
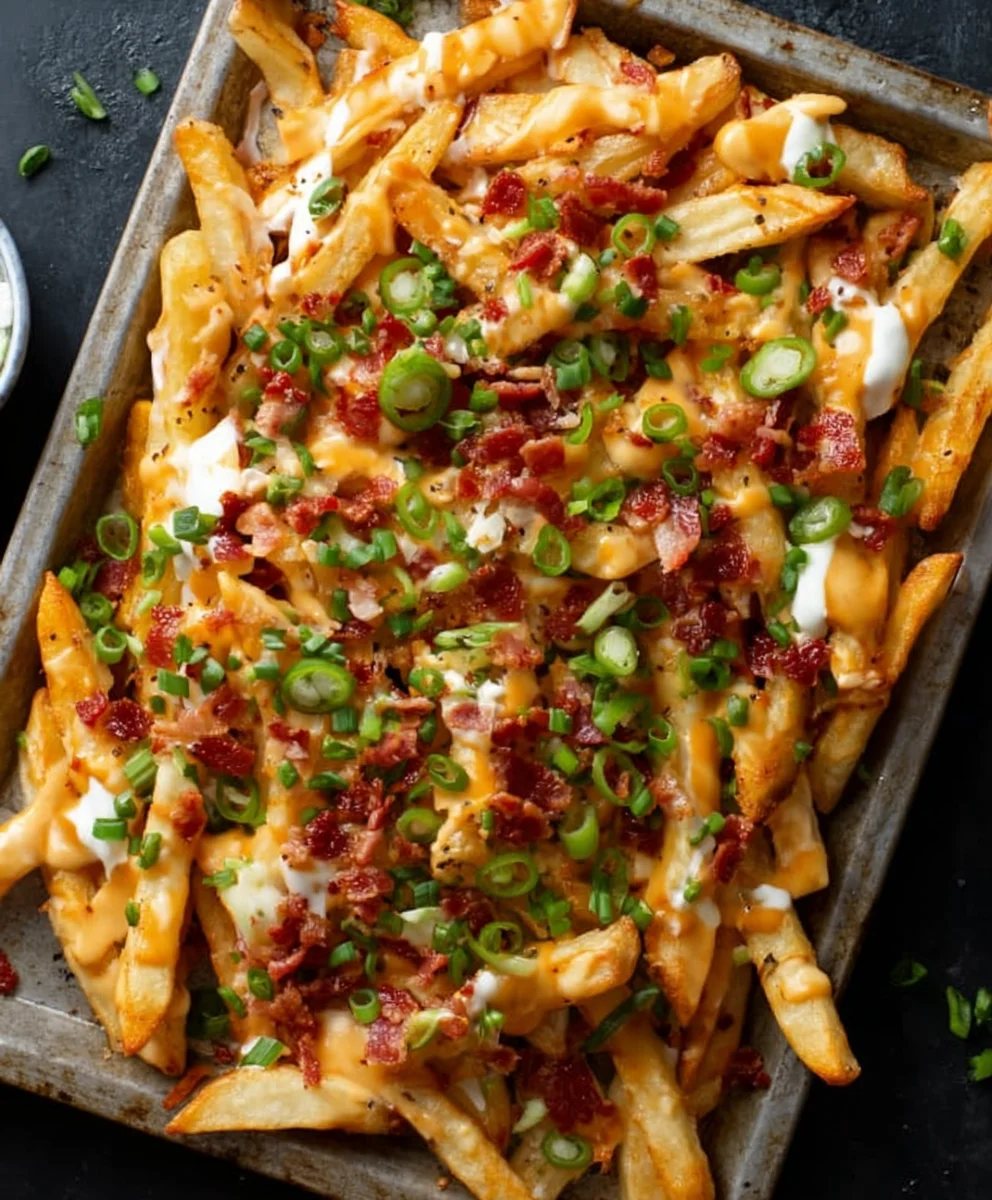
Loaded Fries are more than just a side dish; they’re a culinary experience, a symphony of textures and flavors that can transform any meal into a celebration. Who doesn’t get a thrill when a mountain of perfectly crisp, golden fries arrives, generously crowned with an irresistible medley of toppings? It’s that comforting crunch of the fries, mingling with the creamy, savory, or spicy elements piled high, that has captivated taste buds worldwide. This isn’t your average potato; it’s a canvas for creativity, a blank slate ready to be adorned with everything from melty cheeses and crispy bacon to tangy sour cream and fresh chives. Whether you’re craving a hearty appetizer to share or a satisfying main course that hits all the right notes, these Loaded Fries are guaranteed to bring smiles and second helpings.
What makes them so darn special?
It’s the sheer versatility, for starters. You can customize Loaded Fries to your heart’s content, making them the ultimate crowd-pleaser for any occasion. But beyond the customization, there’s a comforting familiarity that draws us in. It’s the feeling of indulgence, the pure, unadulterated joy that comes from digging into a dish that’s both familiar and excitingly new with every bite. Get ready to elevate your fry game with our ultimate recipe!

Ingredients:
- 1 large bag (approximately 2 pounds) frozen steak-cut fries
- 8 ounces sharp cheddar cheese, shredded
- 4 ounces Monterey Jack cheese, shredded
- 1/2 pound bacon, cooked until crispy and crumbled
- 1/4 cup sour cream
- 2 tablespoons chopped fresh chives
- 1 tablespoon olive oil
- 1/2 teaspoon garlic powder
- Salt and freshly ground black pepper to taste
- Optional toppings: pickled jalapeños, diced red onion, hot sauce
Baking the Fries
- Preheat your oven to 425°F (220°C). This high temperature is crucial for achieving that perfectly crispy exterior on our fries, which forms the foundation for our delicious Loaded Fries. Line a large baking sheet with parchment paper. This prevents sticking and makes for easier cleanup, allowing you to focus on enjoying your creation rather than scrubbing pans.
- Spread the entire bag of frozen steak-cut fries in a single layer on the prepared baking sheet. It’s important that the fries are not piled on top of each other. This ensures that each fry gets direct contact with the hot air circulating in the oven, promoting even browning and crisping. Drizzle the fries evenly with 1 tablespoon of olive oil. The olive oil helps to conduct heat and encourages a golden-brown finish. Sprinkle the garlic powder evenly over the oiled fries. Then, season generously with salt and freshly ground black pepper. Don’t be shy with the seasoning; this is your first opportunity to infuse flavor into the fries themselves.
- Bake for 20-25 minutes, or until the fries are golden brown and crispy. The exact time will depend on your oven and the thickness of the fries. Keep an eye on them during the last 10 minutes, giving the baking sheet a gentle shake halfway through the baking time to ensure even cooking. You’re looking for that satisfying crunch when you bite into a fry. Once they’re cooked to perfection, remove the baking sheet from the oven.
Assembling the Loaded Fries
- While the fries are still hot from the oven, it’s time to build our Loaded Fries masterpiece. Working quickly is key here to ensure the cheese melts beautifully. Scatter the shredded sharp cheddar cheese and shredded Monterey Jack cheese evenly over the crispy fries. Make sure to distribute the cheese so that every fry gets some of that cheesy goodness. The residual heat from the fries will begin to melt the cheese, creating that irresistible gooey layer we all love in Loaded Fries.
- Return the baking sheet to the oven for another 2-3 minutes, or until the cheeses are completely melted and bubbly. Watch closely to prevent the cheese from burning. This short, high-heat blast ensures a perfectly melted, stringy cheese topping without overcooking the fries. The aroma that fills your kitchen at this stage is a true testament to the deliciousness to come!
Finishing Touches and Serving
- Remove the baking sheet from the oven. Now comes the fun part of layering on the toppings that truly make these Loaded Fries spectacular. Sprinkle the crispy crumbled bacon generously over the melted cheese. The salty, smoky crunch of the bacon is a perfect counterpoint to the creamy cheese and crispy fries. Next, dollop small spoonfuls of sour cream evenly over the bacon and cheese. The cool, tangy sour cream adds a refreshing element that cuts through the richness. Finally, sprinkle the chopped fresh chives over everything. The bright, oniony flavor of the chives provides a fresh garnish and a beautiful pop of color.
- If you desire extra layers of flavor and texture, this is the time to add your optional toppings. Arrange pickled jalapeños for a spicy kick, sprinkle diced red onion for a sharp bite, or drizzle your favorite hot sauce for an extra burst of heat. Customize your Loaded Fries to your heart’s content!
- Serve your Loaded Fries immediately. They are best enjoyed piping hot, when the fries are still crispy and the cheese is perfectly melted and gooey. Dig in and savor every delicious bite of these decadent Loaded Fries!

Conclusion:
There you have it – a delicious and satisfying recipe for homemade Loaded Fries that’s sure to impress! This recipe is incredibly versatile, allowing you to customize it to your exact cravings. We’ve walked through creating perfectly crispy fries and then topping them with a mouthwatering combination of cheese, bacon, and a drizzle of creamy sauce. Remember, the key to amazing loaded fries is in the quality of your ingredients and a good base of crispy, fluffy potatoes. Don’t be afraid to experiment with different cheeses, meats, and toppings to make this recipe your own. I truly hope you enjoy making and devouring these loaded fries as much as I do. Happy cooking!
Frequently Asked Questions:
Can I make the fries ahead of time?
While it’s best to assemble and bake your loaded fries immediately after preparing the components for optimal crispiness, you can prep some elements in advance. You can chop your bacon and cook it, grate your cheese, and even par-bake your fries (meaning bake them halfway). However, to prevent sogginess, it’s ideal to finish baking the fries and then add the toppings right before serving.
What are some other topping ideas for loaded fries?
The possibilities are endless! Beyond the classic bacon and cheese, consider adding pulled pork, chili, jalapeños, sour cream, chives, caramelized onions, or even some spicy buffalo chicken. For a vegetarian option, try black beans, corn, salsa, and guacamole.
How can I make my fries extra crispy?
To achieve extra crispy fries, ensure your potatoes are cut uniformly and dried thoroughly after washing and cutting. Frying them twice is a classic technique for achieving that perfect crunch. Alternatively, baking at a high temperature (around 425°F or 220°C) and flipping them halfway through will also yield excellent results.
Best Loaded Fries Recipe – Easy & Delicious Beef Topping
An easy and delicious recipe for loaded fries featuring crispy baked fries, melted cheese, crispy beef topping, and fresh chives.
Ingredients
-
1 large bag (approximately 2 pounds) frozen steak-cut fries
-
8 ounces sharp cheddar cheese, shredded
-
4 ounces Monterey Jack cheese, shredded
-
1/2 pound ground beef, cooked until crispy and crumbled
-
1/4 cup sour cream
-
2 tablespoons chopped fresh chives
-
1 tablespoon olive oil
-
1/2 teaspoon garlic powder
-
Salt and freshly ground black pepper to taste
-
Optional toppings: pickled jalapeños, diced red onion, hot sauce
Instructions
-
Step 1
Preheat oven to 425°F (220°C). Line a large baking sheet with parchment paper. -
Step 2
Spread frozen fries in a single layer on the baking sheet. Drizzle with olive oil, sprinkle with garlic powder, salt, and pepper. -
Step 3
Bake for 20-25 minutes, or until golden brown and crispy. Shake the baking sheet halfway through. -
Step 4
Scatter shredded cheddar and Monterey Jack cheese evenly over the hot fries. -
Step 5
Return to the oven for 2-3 minutes, until cheeses are completely melted and bubbly. -
Step 6
Sprinkle crumbled cooked beef over the melted cheese. Dollop sour cream evenly over the beef and cheese. Sprinkle with chopped chives. -
Step 7
Add optional toppings like pickled jalapeños, diced red onion, or hot sauce, if desired. -
Step 8
Serve immediately while hot and gooey.
Important Information
Nutrition Facts (Per Serving)
It is important to consider this information as approximate and not to use it as definitive health advice.
Allergy Information
Please check ingredients for potential allergens and consult a health professional if in doubt.


Leave a Comment