
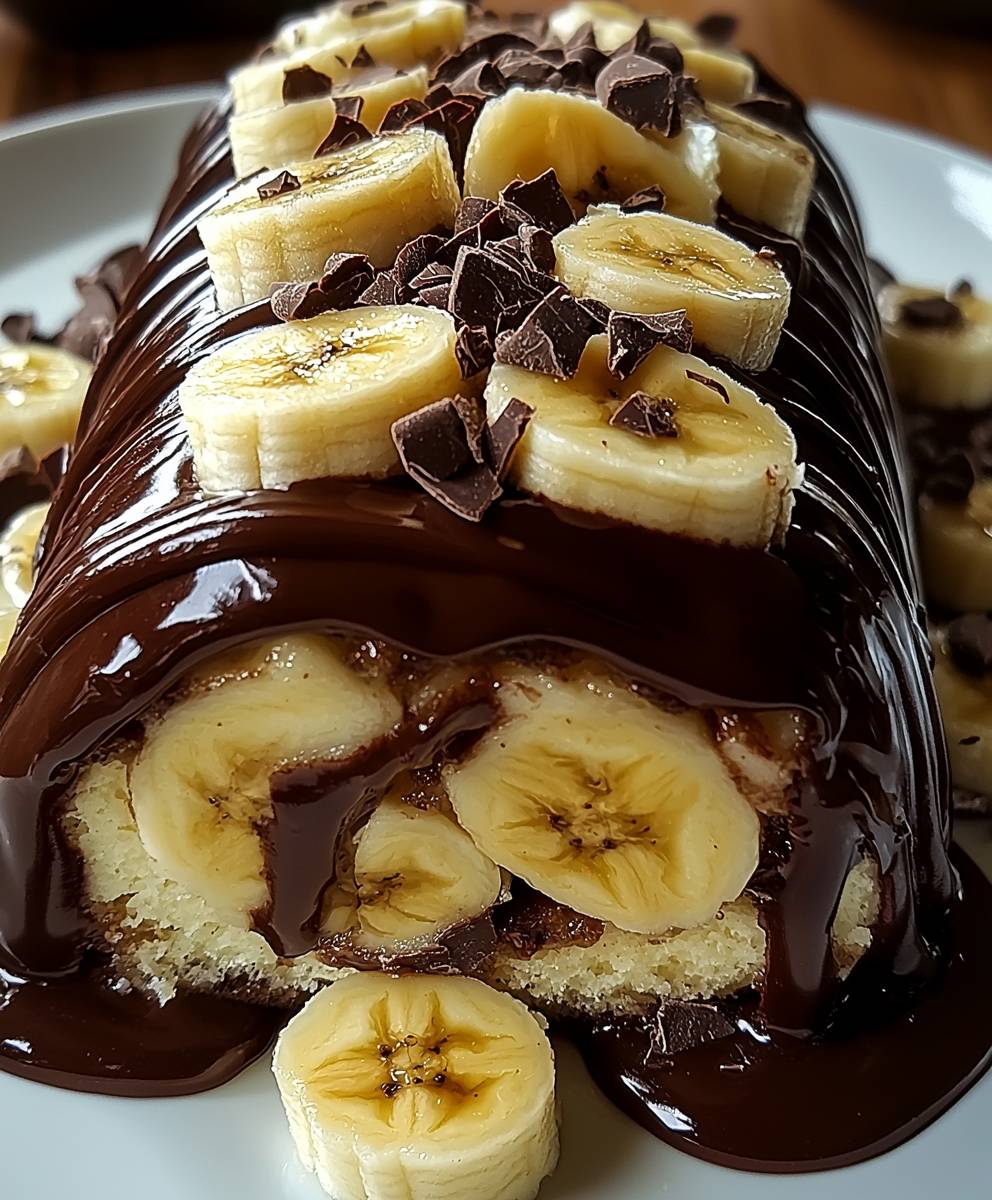
Banana Chocolate Dream Roll: Just the name alone conjures images of pure dessert bliss, doesn’t it? Imagine sinking your fork into a light, airy sponge cake, swirled with a creamy banana filling and decadent chocolate ganache. This isn’t just a dessert; it’s an experience!
While the exact origins of the rolled cake are debated, similar sponge cake creations have been enjoyed for centuries across Europe and Asia. The addition of bananas and chocolate, however, feels distinctly modern, a perfect marriage of classic baking techniques with universally loved flavors. It’s a delightful twist on traditional sponge cakes and a guaranteed crowd-pleaser.
What makes the Banana Chocolate Dream Roll so irresistible? It’s the perfect balance of textures and tastes. The soft, pillowy cake melts in your mouth, while the banana filling provides a creamy sweetness that’s perfectly complemented by the rich, dark chocolate. It’s also surprisingly easy to make, making it ideal for both experienced bakers and those just starting their dessert journey. Whether you’re looking for a show-stopping dessert for a special occasion or a comforting treat to enjoy with a cup of coffee, this recipe is sure to become a new favorite. Get ready to impress your friends and family with this stunning and delicious creation!

Ingredients:
- For the Sponge Cake:
- 1 cup all-purpose flour
- 1 teaspoon baking powder
- 1/4 teaspoon salt
- 5 large eggs, separated
- 3/4 cup granulated sugar, divided
- 1/4 cup milk
- 2 tablespoons vegetable oil
- 1 teaspoon vanilla extract
- For the Chocolate Cream Filling:
- 8 ounces cream cheese, softened
- 1/2 cup unsalted butter, softened
- 3 cups powdered sugar
- 1/2 cup unsweetened cocoa powder
- 1/4 cup milk
- 1 teaspoon vanilla extract
- For the Banana Layer:
- 3 ripe bananas, peeled
- 1 tablespoon lemon juice (to prevent browning)
- For the Chocolate Ganache (Optional):
- 4 ounces semi-sweet chocolate, chopped
- 1/4 cup heavy cream
- For Dusting:
- Powdered sugar (optional)
Preparing the Sponge Cake:
- Preheat and Prepare: Preheat your oven to 350°F (175°C). Grease a 10×15 inch jelly roll pan and line it with parchment paper, leaving an overhang on the sides. This overhang will help you lift the cake out later. Grease the parchment paper as well. Trust me, this step is crucial!
- Dry Ingredients: In a medium bowl, whisk together the flour, baking powder, and salt. Set aside. This ensures everything is evenly distributed.
- Egg Yolks and Sugar: In a large bowl, beat the egg yolks with 1/2 cup of the granulated sugar until pale and thick. This usually takes about 3-5 minutes with an electric mixer. The mixture should ribbon when you lift the beaters.
- Wet Ingredients: Gradually add the milk, vegetable oil, and vanilla extract to the egg yolk mixture, mixing until just combined. Be careful not to overmix at this stage.
- Combine Wet and Dry: Gradually add the dry ingredients to the wet ingredients, mixing until just combined. Again, avoid overmixing. Overmixing can lead to a tough cake.
- Egg Whites: In a separate clean and dry bowl, beat the egg whites with an electric mixer until soft peaks form. Gradually add the remaining 1/4 cup of granulated sugar and continue beating until stiff, glossy peaks form. The peaks should hold their shape but not be dry.
- Folding: Gently fold one-third of the beaten egg whites into the yolk mixture to lighten it. Then, gently fold in the remaining egg whites until just combined. Be careful not to deflate the egg whites; this is what gives the cake its light and airy texture.
- Baking: Pour the batter into the prepared jelly roll pan and spread it evenly. Bake for 12-15 minutes, or until a toothpick inserted into the center comes out clean. The cake should be lightly golden brown.
- Cooling and Rolling: Immediately invert the cake onto a clean kitchen towel dusted with powdered sugar (optional, but it prevents sticking). Carefully peel off the parchment paper. Starting from one of the short ends, roll the cake up tightly in the towel. Let it cool completely in the rolled-up towel. This is important for training the cake to hold its rolled shape.
Preparing the Chocolate Cream Filling:
- Cream Cheese and Butter: In a large bowl, beat the softened cream cheese and butter together until smooth and creamy. Make sure both are at room temperature for the best results.
- Adding Sugar and Cocoa: Gradually add the powdered sugar and cocoa powder to the cream cheese mixture, beating on low speed until combined. Be careful not to create a cloud of powdered sugar!
- Adding Milk and Vanilla: Add the milk and vanilla extract and beat until the filling is smooth and fluffy. If the filling is too thick, add a little more milk, one tablespoon at a time, until you reach the desired consistency.
- Chill (Optional): If the filling seems too soft, you can chill it in the refrigerator for about 30 minutes to firm it up slightly before using.
Assembling the Banana Chocolate Dream Roll:
- Unrolling the Cake: Carefully unroll the cooled sponge cake.
- Lemon Juice on Bananas: In a small bowl, toss the sliced bananas with lemon juice to prevent browning.
- Applying the Filling: Spread the chocolate cream filling evenly over the unrolled cake, leaving a small border at one end to prevent the filling from squeezing out when you roll it up.
- Adding the Bananas: Arrange the banana slices evenly over the chocolate cream filling. You can layer them if you like, but make sure they are not too thick, or it will be difficult to roll the cake.
- Rolling the Cake: Starting from the same short end you rolled it from earlier, carefully roll the cake up tightly, using the towel to help you. Be gentle and try to keep the roll even.
- Sealing the Roll: Wrap the rolled cake tightly in plastic wrap and refrigerate for at least 2 hours, or preferably overnight. This allows the filling to set and the cake to hold its shape.
Preparing the Chocolate Ganache (Optional):
- Heat the Cream: Place the heavy cream in a microwave-safe bowl and heat it in the microwave for about 30-45 seconds, or until it is hot but not boiling.
- Pour over Chocolate: Pour the hot cream over the chopped chocolate in a separate bowl.
- Let it Sit: Let the mixture sit for about 1 minute to allow the heat to melt the chocolate.
- Stir Until Smooth: Gently stir the mixture until the chocolate is completely melted and the ganache is smooth and glossy. If there are still some unmelted chocolate pieces, you can microwave the mixture in 10-second intervals, stirring after each interval, until smooth.
- Cool Slightly: Let the ganache cool slightly before pouring it over the cake. This will help it thicken and adhere better.
Finishing Touches:
- Unwrap and Decorate: Remove the cake from the refrigerator and unwrap it.
- Ganache (Optional): If using, pour the cooled chocolate ganache over the cake, spreading it evenly. You can let the ganache drip down the sides for a more dramatic effect.
- Dust with Powdered Sugar: Dust the cake with powdered sugar for a simple and elegant finish.
- Slice and Serve: Slice the cake with a serrated knife and serve chilled. Enjoy your Banana Chocolate Dream Roll!
Conclusion:
And there you have it! Our Banana Chocolate Dream Roll isn’t just a dessert; it’s an experience. From the moist, tender banana-infused cake to the rich, decadent chocolate filling, every bite is a symphony of flavors and textures that will leave you wanting more. I truly believe this recipe is a must-try for anyone who loves bananas, chocolate, or simply a delicious and impressive treat. It’s surprisingly easy to make, and the results are guaranteed to wow your family and friends. Why is this Banana Chocolate Dream Roll a must-try? Because it’s the perfect balance of comfort and elegance. It’s the kind of dessert that feels both familiar and special, making it ideal for any occasion, from a casual weeknight dinner to a celebratory gathering. The combination of the sweet banana cake and the intense chocolate filling is simply irresistible, and the light, airy texture of the cake makes it surprisingly light and refreshing. Plus, it’s a great way to use up those ripe bananas that are sitting on your counter! But the fun doesn’t stop there! Feel free to get creative with your serving suggestions and variations. For a truly decadent experience, serve each slice with a scoop of vanilla ice cream and a drizzle of chocolate sauce. Or, if you’re feeling adventurous, try adding a sprinkle of chopped nuts, such as walnuts or pecans, for extra crunch and flavor. You could even experiment with different fillings, such as peanut butter, Nutella, or even a homemade cream cheese frosting. Here are a few more ideas to inspire you:Serving Suggestions:
- Serve chilled with a dollop of whipped cream and fresh berries.
- Warm a slice slightly and top with a scoop of your favorite ice cream.
- Dust with powdered sugar for an elegant presentation.
- Pair with a cup of coffee or tea for the perfect afternoon treat.
Variations:
- Add a layer of sliced bananas to the filling for extra banana flavor.
- Substitute the chocolate filling with a peanut butter filling for a Reese’s-inspired treat.
- Incorporate chopped nuts, such as walnuts or pecans, into the cake batter or filling.
- Drizzle the finished roll with caramel sauce for a salted caramel twist.
- Use a different type of chocolate, such as dark chocolate or white chocolate, for a unique flavor profile.

Banana Chocolate Dream Roll: A Decadent Dessert Recipe
- Total Time: 150 minutes
- Yield: 8–10 servings 1x
Description
Light, airy sponge cake with creamy chocolate filling and fresh bananas. Perfect for special occasions!
Ingredients
- 1 cup all-purpose flour
- 1 teaspoon baking powder
- 1/4 teaspoon salt
- 5 large eggs, separated
- 3/4 cup granulated sugar, divided
- 1/4 cup milk
- 2 tablespoons vegetable oil
- 1 teaspoon vanilla extract
- 8 ounces cream cheese, softened
- 1/2 cup unsalted butter, softened
- 3 cups powdered sugar
- 1/2 cup unsweetened cocoa powder
- 1/4 cup milk
- 1 teaspoon vanilla extract
- 3 ripe bananas, peeled
- 1 tablespoon lemon juice (to prevent browning)
- 4 ounces semi-sweet chocolate, chopped
- 1/4 cup heavy cream
- Powdered sugar (optional)
Instructions
- Preheat your oven to 350°F (175°C). Grease a 10×15 inch jelly roll pan and line it with parchment paper, leaving an overhang on the sides. Grease the parchment paper as well.
- In a medium bowl, whisk together the flour, baking powder, and salt. Set aside.
- In a large bowl, beat the egg yolks with 1/2 cup of the granulated sugar until pale and thick (3-5 minutes). The mixture should ribbon when you lift the beaters.
- Gradually add the milk, vegetable oil, and vanilla extract to the egg yolk mixture, mixing until just combined.
- Gradually add the dry ingredients to the wet ingredients, mixing until just combined. Avoid overmixing.
- In a separate clean and dry bowl, beat the egg whites with an electric mixer until soft peaks form. Gradually add the remaining 1/4 cup of granulated sugar and continue beating until stiff, glossy peaks form.
- Gently fold one-third of the beaten egg whites into the yolk mixture to lighten it. Then, gently fold in the remaining egg whites until just combined. Be careful not to deflate the egg whites.
- Pour the batter into the prepared jelly roll pan and spread it evenly. Bake for 12-15 minutes, or until a toothpick inserted into the center comes out clean.
- Immediately invert the cake onto a clean kitchen towel dusted with powdered sugar (optional). Carefully peel off the parchment paper. Starting from one of the short ends, roll the cake up tightly in the towel. Let it cool completely in the rolled-up towel.
- In a large bowl, beat the softened cream cheese and butter together until smooth and creamy.
- Gradually add the powdered sugar and cocoa powder to the cream cheese mixture, beating on low speed until combined.
- Add the milk and vanilla extract and beat until the filling is smooth and fluffy. If the filling is too thick, add a little more milk, one tablespoon at a time, until you reach the desired consistency.
- If the filling seems too soft, you can chill it in the refrigerator for about 30 minutes to firm it up slightly before using.
- Carefully unroll the cooled sponge cake.
- In a small bowl, toss the sliced bananas with lemon juice to prevent browning.
- Spread the chocolate cream filling evenly over the unrolled cake, leaving a small border at one end.
- Arrange the banana slices evenly over the chocolate cream filling.
- Starting from the same short end you rolled it from earlier, carefully roll the cake up tightly, using the towel to help you.
- Wrap the rolled cake tightly in plastic wrap and refrigerate for at least 2 hours, or preferably overnight.
- Place the heavy cream in a microwave-safe bowl and heat it in the microwave for about 30-45 seconds, or until it is hot but not boiling.
- Pour the hot cream over the chopped chocolate in a separate bowl.
- Let the mixture sit for about 1 minute to allow the heat to melt the chocolate.
- Gently stir the mixture until the chocolate is completely melted and the ganache is smooth and glossy. If there are still some unmelted chocolate pieces, you can microwave the mixture in 10-second intervals, stirring after each interval, until smooth.
- Let the ganache cool slightly before pouring it over the cake.
- Remove the cake from the refrigerator and unwrap it.
- If using, pour the cooled chocolate ganache over the cake, spreading it evenly.
- Dust the cake with powdered sugar for a simple and elegant finish.
- Slice the cake with a serrated knife and serve chilled.
Notes
- Greasing and lining the jelly roll pan with parchment paper is crucial for easy cake removal.
- Avoid overmixing the cake batter to prevent a tough cake.
- Be careful not to deflate the egg whites when folding them into the batter.
- Rolling the cake in a towel while cooling helps it maintain its shape.
- Chilling the filled cake is essential for the filling to set and the cake to hold its shape.
- Make sure the cream cheese and butter are softened for the filling.
- Prep Time: 45 minutes
- Cook Time: 15 minutes


Leave a Comment