
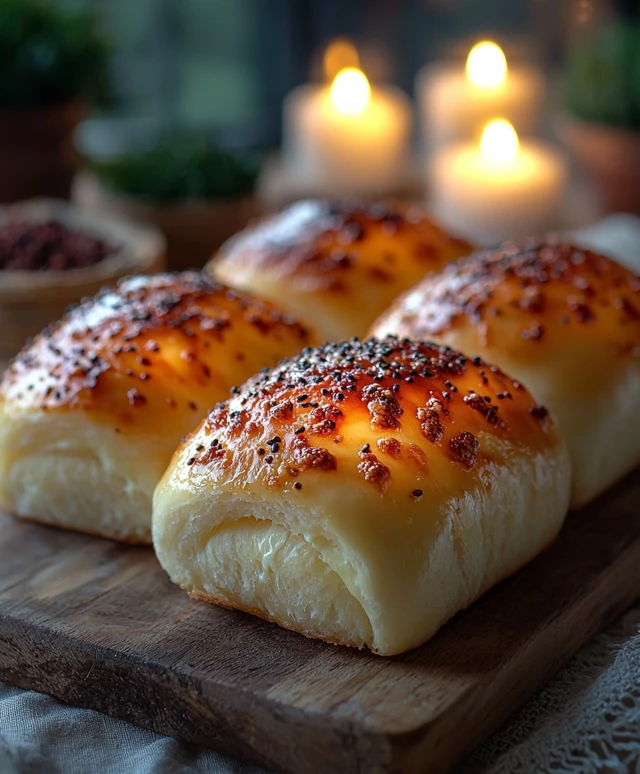
Hawaiian Cream Cheese Rolls are a delightful treat that brings a taste of the islands right to your kitchen. These soft, fluffy rolls are not only a feast for the eyes but also a burst of flavor that will leave your taste buds dancing with joy. Originating from the beautiful Hawaiian islands, these rolls are often enjoyed at luaus and family gatherings, making them a symbol of warmth and hospitality. What I love most about Hawaiian Cream Cheese Rolls is their perfect balance of sweetness and creaminess, creating a texture that is both light and satisfying. Whether served as a side dish or a sweet snack, they are incredibly convenient to make and are sure to impress your family and friends. Join me as we dive into this delicious recipe that captures the essence of Hawaiian cuisine!

Ingredients:
- For the Dough:
- 4 cups all-purpose flour
- 1/4 cup granulated sugar
- 1 packet (2 1/4 teaspoons) active dry yeast
- 1 teaspoon salt
- 1 cup warm milk (about 110°F)
- 1/4 cup unsalted butter, melted
- 2 large eggs
- For the Cream Cheese Filling:
- 8 oz cream cheese, softened
- 1/4 cup powdered sugar
- 1 teaspoon vanilla extract
- For the Topping:
- 1/4 cup unsalted butter, melted
- 1/4 cup shredded coconut (optional)
- 1/4 cup chopped macadamia nuts (optional)
- 1/4 cup granulated sugar
- 1 teaspoon cinnamon
Preparing the Dough
- In a large mixing bowl, combine the warm milk and sugar. Sprinkle the yeast over the top and let it sit for about 5-10 minutes until it becomes frothy. This step is crucial as it activates the yeast.
- Once the yeast is frothy, add the melted butter and eggs to the mixture. Whisk until well combined.
- In a separate bowl, whisk together the flour and salt. Gradually add the flour mixture to the wet ingredients, stirring with a wooden spoon or spatula until a dough begins to form.
- Transfer the dough to a floured surface and knead for about 8-10 minutes until it becomes smooth and elastic. If the dough is too sticky, sprinkle a little more flour as needed.
- Place the kneaded dough in a greased bowl, cover it with a clean kitchen towel, and let it rise in a warm place for about 1 hour or until it has doubled in size.
Preparing the Cream Cheese Filling
- While the dough is rising, prepare the cream cheese filling. In a medium bowl, combine the softened cream cheese, powdered sugar, and vanilla extract.
- Using a hand mixer or a whisk, beat the mixture until it is smooth and creamy. Set aside in the refrigerator to chill slightly while the dough continues to rise.
Shaping the Rolls
- Once the dough has risen, punch it down to release the air. Transfer it back to a floured surface.
- Roll the dough out into a rectangle, approximately 1/4 inch thick. Aim for a size of about 12×18 inches for even rolls.
- Spread the cream cheese filling evenly over the rolled-out dough, leaving a small border around the edges.
- Starting from one long edge, carefully roll the dough tightly into a log. Pinch the seam to seal it.
- Using a sharp knife or a bench scraper, cut the log into 12 equal pieces. You can also use dental floss for a clean cut by sliding it under the roll and crossing the ends over the top to slice through.
- Place the cut rolls into a greased 9×13 inch baking dish, leaving a little space between each roll for expansion.
Second Rise
- Cover the baking dish with a kitchen towel and let the rolls rise again in a warm place for about 30-45 minutes, or until they have puffed up.
- Preheat your oven to 350°F (175°C) during the last 15 minutes of the second rise.
Baking the Rolls
- Once the rolls have risen, brush the tops with melted butter. This will give them a beautiful golden color and add flavor.
- If youre using coconut and macadamia nuts, sprinkle them over the top of the rolls now for added texture and flavor.
- In a small bowl, mix together the granulated sugar and
Conclusion:
In summary, these Hawaiian Cream Cheese Rolls are an absolute must-try for anyone looking to elevate their baking game and impress friends and family alike. The combination of soft, fluffy dough and the rich, creamy filling creates a delightful treat that is perfect for breakfast, brunch, or even as a sweet snack throughout the day. You can serve them warm, straight out of the oven, or let them cool and enjoy them with a drizzle of honey or a sprinkle of powdered sugar for an extra touch of sweetness. If you’re feeling adventurous, consider adding some crushed pineapple or shredded coconut to the cream cheese filling for a tropical twist that will transport your taste buds straight to the islands. Alternatively, you could experiment with different fillings, such as chocolate or fruit preserves, to create your own unique version of these rolls. I encourage you to give this recipe a try and experience the joy of baking these Hawaiian Cream Cheese Rolls in your own kitchen. Once you do, I would love to hear about your experience! Share your thoughts, variations, and any tips you discover along the way. Happy baking, and may your kitchen be filled with the delightful aroma of these irresistible rolls! PrintHawaiian Cream Cheese Rolls: A Delicious Twist on a Classic Recipe
- Total Time: 105 minutes
- Yield: 12 rolls 1x
Description
you like, sprinkle shredded coconut and chopped macadamia nuts on top. Mix granulated sugar and cinnamon, then sprinkle evenly over the rolls. Bake in a preheated oven for 25-30 minutes until golden brown. Let cool slightly before serving. Enjoy these delicious cream cheese rolls fresh or store them for later!
Ingredients
“`html
- 4 cups all-purpose flour
- 1/4 cup granulated sugar
- 1 packet (2 1/4 teaspoons) active dry yeast
- 1 teaspoon salt
- 1 cup warm milk (about 110°F)
- 1/4 cup unsalted butter, melted
- 2 large eggs
- 8 oz cream cheese, softened
- 1/4 cup powdered sugar
- 1 teaspoon vanilla extract
- 1/4 cup unsalted butter, melted
- 1/4 cup shredded coconut (optional)
- 1/4 cup chopped macadamia nuts (optional)
- 1/4 cup granulated sugar
- 1 teaspoon cinnamon
“`
Instructions
“`html
- In einer großen Schüssel die warme Milch und den Zucker vermengen. Die Hefe darüber streuen und etwa 5-10 Minuten stehen lassen, bis sie schaumig wird.
- Wenn die Hefe schaumig ist, die geschmolzene Butter und die Eier zur Mischung hinzufügen. Gut verrühren.
- In einer separaten Schüssel das Mehl und das Salz vermengen. Die Mehlmischung nach und nach zu den feuchten Zutaten geben und mit einem Holzlöffel oder Spatel rühren, bis ein Teig entsteht.
- Den Teig auf eine bemehlte Fläche geben und etwa 8-10 Minuten kneten, bis er glatt und elastisch ist. Falls der Teig zu klebrig ist, etwas mehr Mehl hinzufügen.
- Den gekneteten Teig in eine gefettete Schüssel geben, mit einem sauberen Küchentuch abdecken und an einem warmen Ort etwa 1 Stunde gehen lassen, bis er sich verdoppelt hat.
- Während der Teig aufgeht, die Füllung für die Frischkäsefüllung vorbereiten. In einer mittleren Schüssel den weichen Frischkäse, den Puderzucker und den Vanilleextrakt vermengen.
- Mit einem Handmixer oder einem Schneebesen die Mischung schlagen, bis sie glatt und cremig ist. In den Kühlschrank stellen, während der Teig weiter aufgeht.
- Wenn der Teig aufgegangen ist, ihn niederdrücken, um die Luft zu entlassen. Den Teig zurück auf eine bemehlte Fläche geben.
- Den Teig zu einem Rechteck von etwa 1/4 Zoll Dicke (ca. 12×18 Zoll) ausrollen.
- Die Frischkäsefüllung gleichmäßig über den ausgerollten Teig verteilen, dabei einen kleinen Rand an den Rändern lassen.
- Von einer langen Kante aus den Teig vorsichtig eng zu einer Rolle aufrollen. Die Naht zusammendrücken, um sie zu versiegeln.
- Mit einem scharfen Messer oder einem Teigschneider die Rolle in 12 gleich große Stücke schneiden. Die geschnittenen Brötchen in eine gefettete 9×13 Zoll große Backform legen, dabei etwas Platz zwischen jedem Brötchen lassen.
- Die Backform mit einem Küchentuch abdecken und die Brötchen erneut an einem warmen Ort etwa 30-45 Minuten gehen lassen, bis sie aufgegangen sind.
- Den Ofen auf 350°F (175°C) vorheizen, während die letzten 15 Minuten der zweiten Gehzeit.
- Wenn die Brötchen aufgegangen sind, die Oberseiten mit geschmolzener Butter bestreichen.
- Im vorgeheizten Ofen 25-30 Minuten backen, bis die Brötchen goldbraun und durchgebacken sind.
- Nach dem Backen aus dem Ofen nehmen und leicht abkühlen lassen, bevor sie serviert werden.
“`
Notes
“`html
- For a richer flavor, you can add a pinch of nutmeg to the cinnamon-sugar topping.
- These rolls are best enjoyed fresh but can be stored in an airtight container for up to 2 days.
- Feel free to customize the filling by adding chocolate chips or dried fruits.
“`
- Prep Time: 75 minutes
- Cook Time: 30 minutes


Leave a Comment