
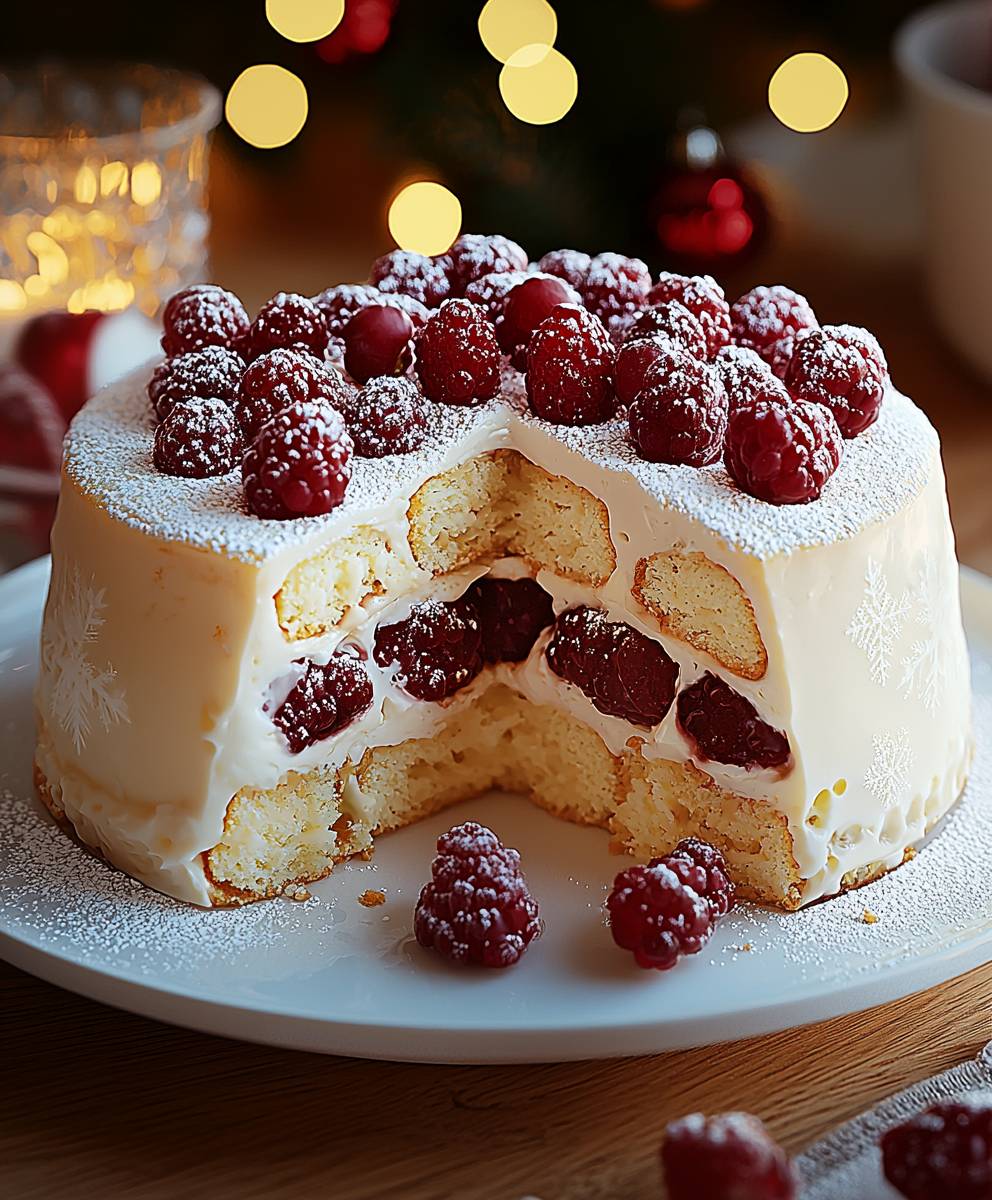
White Christmas Charlotte: Prepare to be transported to a winter wonderland with every delectable bite! This isn’t just a dessert; it’s a showstopper, a conversation starter, and a guaranteed crowd-pleaser for your holiday gatherings. Imagine layers of creamy, dreamy white chocolate mousse nestled between delicate ladyfingers, all dusted with a flurry of powdered sugar, resembling a pristine blanket of snow.
The Charlotte, a dessert with a rich history, is believed to have originated in the late 18th century, possibly named after Queen Charlotte, wife of King George III. While traditional Charlottes often feature fruit fillings, this White Christmas Charlotte takes a festive twist, embracing the flavors of the season. It’s a modern adaptation of a classic, perfect for adding a touch of elegance and whimsy to your Christmas table.
What makes this dessert so irresistible? It’s the perfect balance of textures the soft, yielding ladyfingers, the smooth, melt-in-your-mouth mousse, and the subtle crunch of optional white chocolate shavings. The flavor profile is equally enchanting: the rich, sweet white chocolate is balanced by a hint of vanilla and a touch of almond extract (if you choose to add it), creating a symphony of flavors that will leave your guests wanting more. Plus, while it looks impressive, a White Christmas Charlotte is surprisingly easy to assemble, making it a stress-free addition to your holiday menu. Let’s get baking!

Ingredients:
- For the Ladyfingers:
- 6 large eggs, separated
- ¾ cup granulated sugar, divided
- 1 teaspoon vanilla extract
- 1 cup all-purpose flour
- ½ cup powdered sugar, for dusting
- For the White Chocolate Mousse Filling:
- 12 ounces good quality white chocolate, finely chopped
- 1 ½ cups heavy cream, divided
- 4 large egg yolks
- ¼ cup granulated sugar
- ¼ cup water
- 1 teaspoon vanilla extract
- Pinch of salt
- For the Decoration:
- ½ cup shredded coconut, toasted
- Fresh cranberries, for garnish
- Powdered sugar, for dusting (optional)
- White chocolate shavings (optional)
Making the Ladyfingers:
- Prepare the Egg Yolks: In a large bowl, whisk together the egg yolks and half of the granulated sugar (about 6 tablespoons) until the mixture is pale yellow and thick. This usually takes about 3-5 minutes with an electric mixer. Add the vanilla extract and whisk to combine.
- Whip the Egg Whites: In a separate, clean bowl, beat the egg whites with an electric mixer until soft peaks form. Gradually add the remaining granulated sugar (about 6 tablespoons) and continue beating until stiff, glossy peaks form. Be careful not to overbeat the egg whites, or they will become dry.
- Combine the Mixtures: Gently fold about one-third of the beaten egg whites into the egg yolk mixture to lighten it. Then, gently fold in the remaining egg whites, being careful not to deflate them.
- Add the Flour: Sift the flour over the egg mixture and gently fold it in until just combined. Be careful not to overmix, as this will develop the gluten in the flour and make the ladyfingers tough.
- Pipe the Ladyfingers: Preheat your oven to 375°F (190°C). Line a baking sheet with parchment paper. Transfer the batter to a piping bag fitted with a large round tip. Pipe the batter into ladyfinger shapes, about 3-4 inches long and 1 inch wide, onto the prepared baking sheet, leaving some space between each one.
- Dust with Powdered Sugar: Dust the ladyfingers generously with powdered sugar. Let them sit for about 5 minutes, then dust them again with powdered sugar. This helps create a slightly crisp exterior.
- Bake the Ladyfingers: Bake for 12-15 minutes, or until the ladyfingers are lightly golden brown and spring back when lightly touched.
- Cool the Ladyfingers: Let the ladyfingers cool on the baking sheet for a few minutes before transferring them to a wire rack to cool completely.
Making the White Chocolate Mousse Filling:
- Melt the White Chocolate: Place the finely chopped white chocolate in a heatproof bowl set over a saucepan of simmering water (make sure the bottom of the bowl doesn’t touch the water). Stir occasionally until the white chocolate is completely melted and smooth. Remove from heat and set aside to cool slightly.
- Prepare the Egg Yolk Mixture: In a medium saucepan, whisk together the egg yolks, granulated sugar, and water. Cook over medium-low heat, stirring constantly, until the mixture thickens slightly and reaches a temperature of 160°F (71°C) on a candy thermometer. This is important to pasteurize the egg yolks. The mixture should be thick enough to coat the back of a spoon.
- Temper the White Chocolate: Slowly drizzle the warm egg yolk mixture into the melted white chocolate, whisking constantly to combine. This process is called tempering and prevents the chocolate from seizing. Add the vanilla extract and salt, and whisk until smooth.
- Whip the Heavy Cream: In a separate bowl, whip 1 cup of the heavy cream with an electric mixer until stiff peaks form. Be careful not to overwhip.
- Fold in the Whipped Cream: Gently fold about one-third of the whipped cream into the white chocolate mixture to lighten it. Then, gently fold in the remaining whipped cream until just combined. Be careful not to deflate the whipped cream.
- Chill the Mousse: Cover the bowl with plastic wrap, pressing it directly onto the surface of the mousse to prevent a skin from forming. Refrigerate for at least 2 hours, or preferably overnight, to allow the mousse to set completely.
- Whip Remaining Cream: Before assembling, whip the remaining ½ cup of heavy cream until soft peaks form. This will be used to lighten the mousse before assembly.
- Fold in Lightened Cream: Gently fold the freshly whipped cream into the chilled mousse. This will make the mousse easier to work with and give it a lighter texture.
Assembling the White Christmas Charlotte:
- Prepare the Mold: Choose a 6-inch springform pan or a charlotte mold. Line the bottom of the pan with parchment paper.
- Line the Mold with Ladyfingers: Trim the ladyfingers to fit the height of the mold. Stand the ladyfingers upright around the inside edge of the mold, with the rounded side facing outwards. You may need to trim some of the ladyfingers to ensure they fit snugly and create a solid wall.
- Fill the Base: Cut some of the remaining ladyfingers into smaller pieces and arrange them on the bottom of the mold to create a base.
- Add the Mousse Filling: Pour half of the white chocolate mousse filling into the mold, spreading it evenly over the ladyfinger base.
- Add Another Layer of Ladyfingers: Arrange another layer of ladyfinger pieces over the mousse filling.
- Add the Remaining Mousse Filling: Pour the remaining white chocolate mousse filling into the mold, spreading it evenly over the ladyfinger layer.
- Smooth the Top: Smooth the top of the mousse filling with a spatula.
- Cover and Chill: Cover the mold with plastic wrap and refrigerate for at least 4 hours, or preferably overnight, to allow the mousse to set completely.
Decorating the White Christmas Charlotte:
- Unmold the Charlotte: Carefully remove the charlotte from the mold. If using a springform pan, release the sides. If using a charlotte mold, invert the mold onto a serving plate and gently tap the bottom to release the charlotte.
- Decorate with Coconut: Spread the toasted shredded coconut evenly over the top of the charlotte.
- Garnish with Cranberries: Arrange fresh cranberries around the top edge of the charlotte for a festive touch.
- Dust with Powdered Sugar (Optional): Lightly dust the charlotte with powdered sugar for a snowy effect.
- Add White Chocolate Shavings (Optional): Sprinkle white chocolate shavings over the top for added elegance.
- Serve: Slice the White Christmas Charlotte and serve chilled. Enjoy!
Conclusion:
This White Christmas Charlotte isn’t just a dessert; it’s a festive centerpiece, a conversation starter, and a guaranteed crowd-pleaser. Its ethereal beauty, combined with the delightful blend of creamy white chocolate, crunchy ladyfingers, and the subtle tang of cranberries, makes it an unforgettable experience. I truly believe this recipe is a must-try for anyone looking to elevate their holiday dessert game. It’s surprisingly simple to assemble, yet the impact it makes is truly remarkable.
Think of it: the gasps of admiration as you present this snowy masterpiece, the delighted murmurs as your guests take their first bite. This isn’t just about baking; it’s about creating memories, sharing joy, and adding a touch of magic to your Christmas celebrations. And honestly, who wouldn’t want to be the one responsible for that?
But the best part? This recipe is incredibly versatile! Feel free to experiment with different variations to suit your own taste and preferences. For a richer, more decadent flavor, try using dark chocolate ladyfingers instead of the classic ones. Or, if you’re feeling adventurous, add a layer of raspberry jam between the ladyfingers and the mousse for a burst of fruity sweetness.
Serving suggestions are endless! A simple dusting of powdered sugar is all you need to enhance its snowy appearance. But you could also garnish it with fresh cranberries, sugared rosemary sprigs, or even edible glitter for an extra touch of sparkle. A dollop of whipped cream or a scoop of vanilla ice cream on the side would also be a welcome addition.
For a truly festive presentation, consider serving individual slices of the White Christmas Charlotte on elegant dessert plates, accompanied by a small glass of dessert wine or a cup of hot cocoa. Imagine the warmth and comfort of that combination on a cold winter evening!
And if you’re looking for a way to make this dessert even more special, why not involve your family in the preparation process? It’s a wonderful opportunity to bond over a shared activity and create lasting memories together. Let the kids help with arranging the ladyfingers or decorating the finished cake. It’s all about having fun and enjoying the spirit of the season.
I’m so confident that you’ll love this recipe that I can’t wait to hear about your experience! Please, please, please give it a try and let me know how it turns out. Share your photos, your variations, and your stories in the comments below. I’m eager to see your creations and hear your feedback. Did you add a special ingredient? Did you change the decoration? Did your family love it as much as mine does?
Don’t be intimidated by the elegant appearance of this dessert. It’s much easier to make than you might think. With a little bit of patience and a few simple ingredients, you can create a truly stunning and delicious White Christmas Charlotte that will impress your friends and family. So go ahead, grab your apron, and get baking! You won’t regret it. I promise! Happy baking, and Merry Christmas!
White Christmas Charlotte: Will We See Snow This Year?
A stunning White Christmas Charlotte with homemade ladyfingers, rich white chocolate mousse, and festive coconut and cranberry decorations.
Ingredients
- 6 large eggs, separated
- ¾ cup granulated sugar, divided
- 1 teaspoon vanilla extract
- 1 cup all-purpose flour
- ½ cup powdered sugar, for dusting
- 12 ounces good quality white chocolate, finely chopped
- 1 ½ cups heavy cream, divided
- 4 large egg yolks
- ¼ cup granulated sugar
- ¼ cup water
- 1 teaspoon vanilla extract
- Pinch of salt
- ½ cup shredded coconut, toasted
- Fresh cranberries, for garnish
- Powdered sugar, for dusting (optional)
- White chocolate shavings (optional)
Instructions
- Prepare the Egg Yolks: In a large bowl, whisk together the egg yolks and half of the granulated sugar (about 6 tablespoons) until the mixture is pale yellow and thick. This usually takes about 3-5 minutes with an electric mixer. Add the vanilla extract and whisk to combine.
- Whip the Egg Whites: In a separate, clean bowl, beat the egg whites with an electric mixer until soft peaks form. Gradually add the remaining granulated sugar (about 6 tablespoons) and continue beating until stiff, glossy peaks form. Be careful not to overbeat the egg whites, or they will become dry.
- Combine the Mixtures: Gently fold about one-third of the beaten egg whites into the egg yolk mixture to lighten it. Then, gently fold in the remaining egg whites, being careful not to deflate them.
- Add the Flour: Sift the flour over the egg mixture and gently fold it in until just combined. Be careful not to overmix, as this will develop the gluten in the flour and make the ladyfingers tough.
- Pipe the Ladyfingers: Preheat your oven to 375°F (190°C). Line a baking sheet with parchment paper. Transfer the batter to a piping bag fitted with a large round tip. Pipe the batter into ladyfinger shapes, about 3-4 inches long and 1 inch wide, onto the prepared baking sheet, leaving some space between each one.
- Dust with Powdered Sugar: Dust the ladyfingers generously with powdered sugar. Let them sit for about 5 minutes, then dust them again with powdered sugar. This helps create a slightly crisp exterior.
- Bake the Ladyfingers: Bake for 12-15 minutes, or until the ladyfingers are lightly golden brown and spring back when lightly touched.
- Cool the Ladyfingers: Let the ladyfingers cool on the baking sheet for a few minutes before transferring them to a wire rack to cool completely.
- Melt the White Chocolate: Place the finely chopped white chocolate in a heatproof bowl set over a saucepan of simmering water (make sure the bottom of the bowl doesn’t touch the water). Stir occasionally until the white chocolate is completely melted and smooth. Remove from heat and set aside to cool slightly.
- Prepare the Egg Yolk Mixture: In a medium saucepan, whisk together the egg yolks, granulated sugar, and water. Cook over medium-low heat, stirring constantly, until the mixture thickens slightly and reaches a temperature of 160°F (71°C) on a candy thermometer. This is important to pasteurize the egg yolks. The mixture should be thick enough to coat the back of a spoon.
- Temper the White Chocolate: Slowly drizzle the warm egg yolk mixture into the melted white chocolate, whisking constantly to combine. This process is called tempering and prevents the chocolate from seizing. Add the vanilla extract and salt, and whisk until smooth.
- Whip the Heavy Cream: In a separate bowl, whip 1 cup of the heavy cream with an electric mixer until stiff peaks form. Be careful not to overwhip.
- Fold in the Whipped Cream: Gently fold about one-third of the whipped cream into the white chocolate mixture to lighten it. Then, gently fold in the remaining whipped cream until just combined. Be careful not to deflate the whipped cream.
- Chill the Mousse: Cover the bowl with plastic wrap, pressing it directly onto the surface of the mousse to prevent a skin from forming. Refrigerate for at least 2 hours, or preferably overnight, to allow the mousse to set completely.
- Whip Remaining Cream: Before assembling, whip the remaining ½ cup of heavy cream until soft peaks form. This will be used to lighten the mousse before assembly.
- Fold in Lightened Cream: Gently fold the freshly whipped cream into the chilled mousse. This will make the mousse easier to work with and give it a lighter texture.
- Prepare the Mold: Choose a 6-inch springform pan or a charlotte mold. Line the bottom of the pan with parchment paper.
- Line the Mold with Ladyfingers: Trim the ladyfingers to fit the height of the mold. Stand the ladyfingers upright around the inside edge of the mold, with the rounded side facing outwards. You may need to trim some of the ladyfingers to ensure they fit snugly and create a solid wall.
- Fill the Base: Cut some of the remaining ladyfingers into smaller pieces and arrange them on the bottom of the mold to create a base.
- Add the Mousse Filling: Pour half of the white chocolate mousse filling into the mold, spreading it evenly over the ladyfinger base.
- Add Another Layer of Ladyfingers: Arrange another layer of ladyfinger pieces over the mousse filling.
- Add the Remaining Mousse Filling: Pour the remaining white chocolate mousse filling into the mold, spreading it evenly over the ladyfinger layer.
- Smooth the Top: Smooth the top of the mousse filling with a spatula.
- Cover and Chill: Cover the mold with plastic wrap and refrigerate for at least 4 hours, or preferably overnight, to allow the mousse to set completely.
- Unmold the Charlotte: Carefully remove the charlotte from the mold. If using a springform pan, release the sides. If using a charlotte mold, invert the mold onto a serving plate and gently tap the bottom to release the charlotte.
- Decorate with Coconut: Spread the toasted shredded coconut evenly over the top of the charlotte.
- Garnish with Cranberries: Arrange fresh cranberries around the top edge of the charlotte for a festive touch.
- Dust with Powdered Sugar (Optional): Lightly dust the charlotte with powdered sugar for a snowy effect.
- Add White Chocolate Shavings (Optional): Sprinkle white chocolate shavings over the top for added elegance.
- Serve: Slice the White Christmas Charlotte and serve chilled. Enjoy!
Notes
- Make the ladyfingers and mousse a day ahead for easier assembly.
- Ensure the egg yolks reach 160°F (71°C) to pasteurize them.
- Tempering the white chocolate is crucial to prevent seizing.
- Chilling the mousse thoroughly is essential for a firm set.
- Adjust sweetness to your preference.
- Toasting the coconut enhances its flavor and texture.
Leave a Comment