
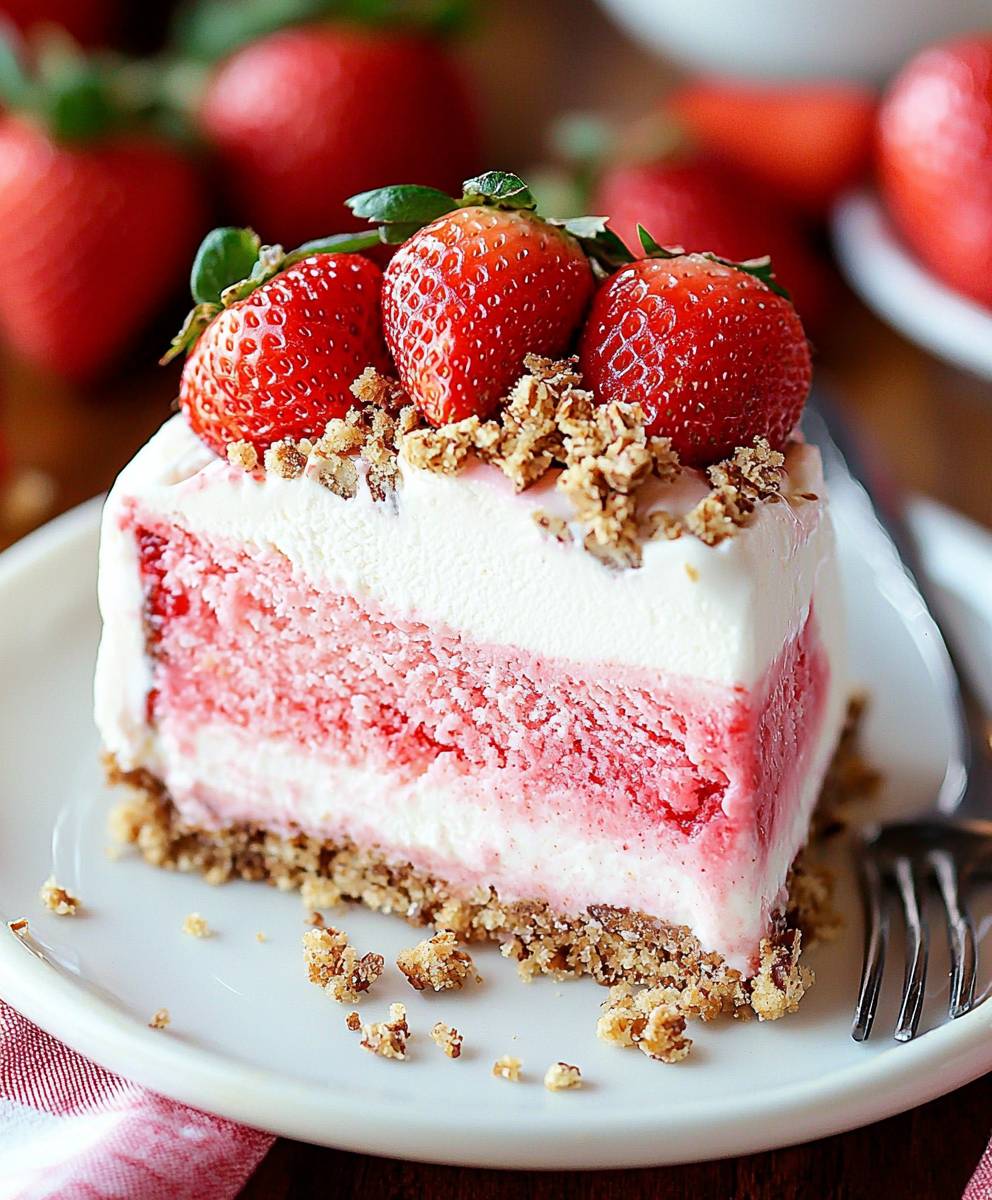
Strawberry Crunch Ice Cream Cake: Prepare to be transported back to your childhood with a dessert that perfectly marries nostalgia and pure deliciousness! Remember those strawberry shortcake ice cream bars from the ice cream truck? This recipe captures that iconic flavor in a show-stopping, crowd-pleasing cake. It’s the ultimate summer treat, perfect for birthdays, barbecues, or simply satisfying your sweet tooth.
While the exact origins of the strawberry shortcake ice cream bar are shrouded in a bit of mystery, its popularity exploded in the 1980s, quickly becoming a beloved summertime staple. The combination of creamy vanilla ice cream, a sweet strawberry coating, and that signature crunchy, cake-like exterior created a textural and flavor sensation that captivated generations. This Strawberry Crunch Ice Cream Cake pays homage to that classic treat, elevating it to a shareable, celebratory dessert.
What makes this cake so irresistible? It’s the symphony of textures and flavors! The creamy, melt-in-your-mouth ice cream contrasts beautifully with the crispy, buttery crunch topping. The sweet and slightly tart strawberry flavor cuts through the richness, creating a perfectly balanced dessert that’s not too heavy. Plus, it’s surprisingly easy to make, requiring minimal baking and assembly. Get ready to impress your friends and family with this unforgettable Strawberry Crunch Ice Cream Cake!

Ingredients:
- For the Strawberry Crunch Coating:
- 1 box (15.25 oz) strawberry cake mix
- 1/2 cup (1 stick) unsalted butter, melted
- 1/4 cup freeze-dried strawberries, crushed into a powder
- For the Ice Cream Layers:
- 1/2 gallon strawberry ice cream, softened
- 1/2 gallon vanilla ice cream, softened
- For the Cake Base:
- 1 box (15.25 oz) yellow cake mix
- Ingredients called for on the box (usually eggs, oil, and water)
- Optional Additions:
- Fresh strawberries, sliced, for garnish
- Whipped cream, for serving
Preparing the Strawberry Crunch Coating:
Okay, let’s get started with the star of the show the strawberry crunch! This is what gives the cake its signature flavor and texture. Trust me, it’s super easy to make.
- Preheat your oven: Preheat your oven to 350°F (175°C). This is crucial for getting the crunch just right.
- Combine the dry ingredients: In a large bowl, combine the strawberry cake mix and the crushed freeze-dried strawberries. Make sure the freeze-dried strawberries are finely crushed; you don’t want any big chunks. I usually put them in a zip-top bag and use a rolling pin to crush them.
- Add the melted butter: Pour the melted butter into the bowl with the dry ingredients.
- Mix well: Use a fork or your hands to mix everything together until it forms a crumbly mixture. It should resemble wet sand. Don’t overmix it!
- Bake the crunch: Spread the crumbly mixture evenly onto a baking sheet lined with parchment paper. This prevents sticking and makes cleanup a breeze.
- Bake until golden brown: Bake for 8-10 minutes, or until the crumbs are golden brown and fragrant. Keep a close eye on it, as it can burn quickly.
- Cool completely: Remove the baking sheet from the oven and let the crunch cool completely on the baking sheet. As it cools, it will harden and become even crunchier. Once cooled, break it up into smaller pieces with your hands or a fork.
Baking the Cake Base:
Now, let’s move on to the cake base. You can use any cake mix you like, but I find that yellow cake complements the strawberry and vanilla ice cream perfectly. Of course, you could use strawberry cake for even more strawberry flavor!
- Prepare the cake batter: Prepare the yellow cake mix according to the instructions on the box. Usually, this involves combining the cake mix with eggs, oil, and water. Make sure to follow the box instructions precisely for the best results.
- Grease and flour your cake pan: Grease and flour a 9-inch springform pan. This is essential for easy removal of the cake later on. I like to use baking spray with flour already in it for extra insurance.
- Pour the batter into the pan: Pour the cake batter into the prepared springform pan.
- Bake the cake: Bake the cake according to the instructions on the box, usually around 30-35 minutes, or until a toothpick inserted into the center comes out clean.
- Cool the cake: Let the cake cool in the pan for 10 minutes before inverting it onto a wire rack to cool completely. Make sure the cake is completely cool before assembling the ice cream cake, or the ice cream will melt.
Assembling the Ice Cream Cake:
This is where the magic happens! We’re going to layer the ice cream and strawberry crunch to create a truly unforgettable dessert. Get ready to get your hands a little messy it’s all part of the fun!
- Prepare the springform pan: Line the same 9-inch springform pan with plastic wrap, leaving enough overhang to easily lift the cake out later. This will prevent the ice cream from sticking to the pan and make serving a breeze.
- Cut the cake: Once the cake is completely cool, use a serrated knife to trim the top of the cake to create a flat surface. This will ensure that the ice cream layers are even.
- Place the cake in the pan: Place the cake layer in the bottom of the prepared springform pan.
- Spread the strawberry ice cream: Spread the softened strawberry ice cream evenly over the cake layer. Make sure the ice cream is soft enough to spread easily, but not so soft that it’s melted. If it’s too hard, it will be difficult to spread evenly.
- Sprinkle with strawberry crunch: Sprinkle half of the strawberry crunch topping evenly over the strawberry ice cream layer.
- Freeze for at least 2 hours: Place the springform pan in the freezer and freeze for at least 2 hours, or until the strawberry ice cream layer is firm. This is important to prevent the layers from mixing together.
- Spread the vanilla ice cream: Remove the springform pan from the freezer and spread the softened vanilla ice cream evenly over the strawberry crunch layer.
- Sprinkle with remaining strawberry crunch: Sprinkle the remaining strawberry crunch topping evenly over the vanilla ice cream layer.
- Freeze again: Cover the springform pan with plastic wrap and freeze for at least 4 hours, or preferably overnight, to allow the ice cream cake to fully set.
Serving the Strawberry Crunch Ice Cream Cake:
Finally, the moment we’ve all been waiting for! It’s time to slice and enjoy this delicious creation. Get ready for some serious compliments!
- Remove from the freezer: Remove the ice cream cake from the freezer about 15-20 minutes before serving to allow it to soften slightly. This will make it easier to slice.
- Release from the springform pan: Lift the ice cream cake out of the springform pan using the plastic wrap overhang. Place it on a serving platter.
- Slice and serve: Use a sharp knife to slice the ice cream cake into wedges. If the knife is sticking, try running it under hot water between slices.
- Garnish (optional): Garnish with fresh strawberries and whipped cream, if desired.
- Enjoy! Serve immediately and enjoy! This ice cream cake is best enjoyed fresh.
Tips and Variations:
- Make it ahead: This ice cream cake can be made several days in advance and stored in the freezer. Just make sure to wrap it tightly in plastic wrap to prevent freezer burn.
- Customize the flavors: Feel free to experiment with different ice cream flavors and cake mixes. Chocolate ice cream and chocolate cake would be a delicious combination!
- Add a layer of fudge: For an extra decadent treat, add a layer of hot fudge sauce between the ice cream layers.
- Use different toppings: Get creative with your toppings! Crushed Oreos, chopped nuts, or sprinkles would all be great additions.
- Individual servings: You can also make individual ice cream cakes using muffin tins or small ramekins.
Troubleshooting:
- Ice cream too hard to spread: Let the ice cream soften at room temperature for a few minutes before spreading. Don’t let it get too soft, though, or it will melt.
- Cake sticking to the pan: Make sure to grease and flour the pan thoroughly before baking the cake. You can also use parchment paper to line the bottom of the pan.
- Strawberry crunch not crunchy: Make sure to bake the strawberry crunch until it’s golden brown. It will harden as it cools.
- Ice cream cake melting too quickly: Make sure to freeze the ice cream cake for at least 4 hours before serving. You can also store it in the freezer until you’re ready to serve it.
Storage Instructions:
Store leftover ice cream cake in the freezer, tightly wrapped in plastic wrap, for up to a week. After that, the texture may start to deteriorate.
Conclusion:
This Strawberry Crunch Ice Cream Cake isn’t just a dessert; it’s a celebration on a plate! From the satisfying crunch of the golden Oreo crust to the creamy, dreamy layers of strawberry ice cream and that iconic strawberry shortcake crumble, every bite is an explosion of textures and flavors that will transport you back to childhood summers. It’s the perfect showstopper for birthdays, holidays, or simply a “just because” treat to brighten up your day. Trust me, once you make this, it will become a requested favorite for years to come. Why is this a must-try? Well, beyond the sheer deliciousness, it’s surprisingly easy to assemble. No baking required! That’s right, you can skip the oven and still impress everyone with a homemade masterpiece. The combination of store-bought ice cream and readily available ingredients makes it a convenient option for busy schedules, while still delivering a wow factor that rivals any fancy bakery creation. It’s also incredibly customizable. Don’t love strawberries? Swap them out for your favorite fruit! Think raspberries, blueberries, or even peaches would be absolutely divine.Serving Suggestions and Variations:
The possibilities are truly endless! For a more elegant presentation, try slicing the cake and serving it with a dollop of whipped cream and a fresh strawberry garnish. A drizzle of chocolate sauce or a sprinkle of chopped nuts would also add a touch of sophistication. Here are a few variations to spark your creativity: * Chocolate Lover’s Dream: Replace the strawberry ice cream with chocolate ice cream and use chocolate Oreos for the crust. Add a layer of fudge sauce for extra indulgence. * Tropical Twist: Use mango or pineapple ice cream and add shredded coconut to the crumble topping. * Peanut Butter Paradise: Swirl peanut butter into the ice cream before layering it into the cake. Use peanut butter cookies in the crust for an extra peanut buttery punch. * Mini Cakes: Make individual portions by layering the ingredients in small ramekins or cups. This is perfect for parties or portion control. * Vegan Option: Use vegan ice cream and vegan-friendly cookies and crumble topping to create a delicious and inclusive dessert. Don’t be afraid to experiment and make this recipe your own! The beauty of this Strawberry Crunch Ice Cream Cake is its versatility. It’s a blank canvas for your culinary creativity. I truly believe that this recipe is a winner. It’s simple, delicious, and guaranteed to bring smiles to everyone who tries it. So, what are you waiting for? Gather your ingredients, put on some music, and get ready to create a dessert that will be the talk of the town. I’m so excited for you to try this recipe! Once you do, please come back and share your experience in the comments below. I’d love to hear about your variations, your serving suggestions, and most importantly, how much you enjoyed it. Did you make it for a special occasion? Did you add any secret ingredients? Let me know! Your feedback is invaluable and helps me create even better recipes for you in the future. Happy baking (or rather, assembling)! I can’t wait to see your creations! Print
Strawberry Crunch Ice Cream Cake: The Ultimate Summer Dessert
- Total Time: 370 minutes
- Yield: 12 servings 1x
Description
Layered Strawberry Crunch Ice Cream Cake with yellow cake, strawberry and vanilla ice cream, and homemade strawberry crunch topping. Perfect make-ahead dessert!
Ingredients
- 1 box (15.25 oz) strawberry cake mix
- 1/2 cup (1 stick) unsalted butter, melted
- 1/4 cup freeze-dried strawberries, crushed into a powder
- 1/2 gallon strawberry ice cream, softened
- 1/2 gallon vanilla ice cream, softened
- 1 box (15.25 oz) yellow cake mix
- Ingredients called for on the box (usually eggs, oil, and water)
- Fresh strawberries, sliced, for garnish
- Whipped cream, for serving
Instructions
- Prepare the Strawberry Crunch Coating:
- Preheat oven to 350°F (175°C).
- In a large bowl, combine strawberry cake mix and crushed freeze-dried strawberries.
- Pour in melted butter and mix until a crumbly mixture forms.
- Spread the mixture evenly onto a baking sheet lined with parchment paper.
- Bake for 8-10 minutes, or until golden brown and fragrant.
- Cool completely on the baking sheet, then break into smaller pieces.
- Bake the Cake Base:
- Prepare the yellow cake mix according to the instructions on the box.
- Grease and flour a 9-inch springform pan.
- Pour the cake batter into the prepared springform pan.
- Bake the cake according to the instructions on the box, usually around 30-35 minutes, or until a toothpick inserted into the center comes out clean.
- Let the cake cool in the pan for 10 minutes before inverting it onto a wire rack to cool completely.
- Assemble the Ice Cream Cake:
- Line a 9-inch springform pan with plastic wrap, leaving enough overhang.
- Trim the top of the cooled cake to create a flat surface.
- Place the cake layer in the bottom of the prepared springform pan.
- Spread the softened strawberry ice cream evenly over the cake layer.
- Sprinkle half of the strawberry crunch topping evenly over the strawberry ice cream layer.
- Freeze for at least 2 hours, or until the strawberry ice cream layer is firm.
- Remove the springform pan from the freezer and spread the softened vanilla ice cream evenly over the strawberry crunch layer.
- Sprinkle the remaining strawberry crunch topping evenly over the vanilla ice cream layer.
- Cover the springform pan with plastic wrap and freeze for at least 4 hours, or preferably overnight, to allow the ice cream cake to fully set.
- Serve the Strawberry Crunch Ice Cream Cake:
- Remove the ice cream cake from the freezer about 15-20 minutes before serving to allow it to soften slightly.
- Lift the ice cream cake out of the springform pan using the plastic wrap overhang. Place it on a serving platter.
- Use a sharp knife to slice the ice cream cake into wedges. If the knife is sticking, try running it under hot water between slices.
- Garnish with fresh strawberries and whipped cream, if desired.
- Serve immediately and enjoy! This ice cream cake is best enjoyed fresh.
Notes
- Make it ahead: This ice cream cake can be made several days in advance and stored in the freezer. Just make sure to wrap it tightly in plastic wrap to prevent freezer burn.
- Customize the flavors: Feel free to experiment with different ice cream flavors and cake mixes. Chocolate ice cream and chocolate cake would be a delicious combination!
- Add a layer of fudge: For an extra decadent treat, add a layer of hot fudge sauce between the ice cream layers.
- Use different toppings: Get creative with your toppings! Crushed Oreos, chopped nuts, or sprinkles would all be great additions.
- Individual servings: You can also make individual ice cream cakes using muffin tins or small ramekins.
- Ice cream too hard to spread: Let the ice cream soften at room temperature for a few minutes before spreading. Don’t let it get too soft, though, or it will melt.
- Cake sticking to the pan: Make sure to grease and flour the pan thoroughly before baking the cake. You can also use parchment paper to line the bottom of the pan.
- Strawberry crunch not crunchy: Make sure to bake the strawberry crunch until it’s golden brown. It will harden as it cools.
- Ice cream cake melting too quickly: Make sure to freeze the ice cream cake for at least 4 hours before serving. You can also store it in the freezer until you’re ready to serve it.
- Storage Instructions: Store leftover ice cream cake in the freezer, tightly wrapped in plastic wrap, for up to a week. After that, the texture may start to deteriorate.
- Prep Time: 30 minutes
- Cook Time: 40 minutes

Leave a Comment