
Strawberry Cheesecake No Bake just the name conjures up images of creamy, dreamy deliciousness, doesn’t it? Imagine sinking your fork into a slice of pure bliss, a symphony of sweet strawberries and tangy cheesecake, all without ever turning on your oven. Yes, you read that right! This no-bake wonder is the perfect dessert for those hot summer days or any time you crave a decadent treat without the fuss.
While the exact origins of cheesecake are debated, its ancestors can be traced back to ancient Greece. However, the modern cheesecake, as we know and love it, truly blossomed in America. Adding strawberries to the mix elevates this classic dessert to a whole new level of refreshing indulgence. The bright, fruity notes perfectly complement the rich, creamy base, creating a harmonious balance that’s simply irresistible.
People adore Strawberry Cheesecake No Bake for so many reasons. First and foremost, it’s incredibly easy to make! No baking skills are required, making it a fantastic option for beginner bakers or anyone short on time. The combination of the smooth, velvety texture of the cheesecake filling with the juicy burst of fresh strawberries is a taste sensation that’s hard to beat. Plus, it’s a crowd-pleaser! Whether you’re hosting a summer barbecue, a birthday party, or simply want to treat yourself, this no-bake cheesecake is guaranteed to be a hit. So, are you ready to dive into this delightful dessert? Let’s get started!

Ingredients:
- For the Crust:
- 1 ½ cups graham cracker crumbs (about 12 full sheets)
- 5 tablespoons (70g) unsalted butter, melted
- ¼ cup (50g) granulated sugar
- Pinch of salt
- For the Cheesecake Filling:
- 24 ounces (680g) cream cheese, softened to room temperature
- 1 ½ cups (300g) granulated sugar
- 1 teaspoon vanilla extract
- ½ teaspoon lemon juice (optional, but brightens the flavor!)
- 1 ½ cups heavy cream, cold
- For the Strawberry Topping:
- 1 pound fresh strawberries, hulled and sliced
- ¼ cup (50g) granulated sugar
- 1 tablespoon lemon juice
- 1 tablespoon cornstarch
- 2 tablespoons water
Preparing the Graham Cracker Crust
- Crush the Graham Crackers: The first step is to get those graham crackers into fine crumbs. You can do this in a food processor, pulsing until they’re finely ground. Alternatively, place the graham crackers in a large zip-top bag, seal it tightly, and use a rolling pin to crush them into crumbs. Make sure there aren’t any large chunks left!
- Combine Crust Ingredients: In a medium bowl, combine the graham cracker crumbs, melted butter, granulated sugar, and a pinch of salt. Mix well until all the crumbs are evenly moistened. The mixture should resemble wet sand.
- Press into Pan: Press the graham cracker mixture firmly into the bottom of a 9-inch springform pan. I like to use the bottom of a measuring cup or a flat-bottomed glass to really pack it down and create a solid base. Make sure the crust is even in thickness.
- Chill the Crust: Place the prepared crust in the refrigerator to chill for at least 30 minutes. This will help it firm up and prevent it from crumbling when you add the filling. You can also freeze it for 15 minutes for a quicker chill.
Making the No-Bake Cheesecake Filling
- Beat the Cream Cheese: In a large bowl, using an electric mixer (either a stand mixer or a hand mixer), beat the softened cream cheese until it’s smooth and creamy. This is a crucial step you don’t want any lumps in your cheesecake! Make sure your cream cheese is truly at room temperature for the best results.
- Add Sugar and Flavorings: Gradually add the granulated sugar to the cream cheese, beating until well combined and smooth. Scrape down the sides of the bowl as needed to ensure everything is evenly mixed. Then, add the vanilla extract and lemon juice (if using) and beat until incorporated. The lemon juice really brightens the flavor, but it’s optional if you prefer a more classic vanilla cheesecake.
- Whip the Heavy Cream: In a separate clean and dry bowl, using the electric mixer, beat the cold heavy cream until stiff peaks form. This is what gives the cheesecake its light and airy texture. Be careful not to overwhip the cream, or it will turn into butter! You want stiff peaks that hold their shape when you lift the beaters.
- Combine Cream Cheese Mixture and Whipped Cream: Gently fold the whipped cream into the cream cheese mixture in two or three additions. Be careful not to deflate the whipped cream you want to maintain that airiness. Use a spatula and fold gently until just combined. Don’t overmix!
- Pour Filling into Crust: Pour the cheesecake filling over the chilled graham cracker crust, spreading it evenly. Smooth the top with a spatula.
- Chill the Cheesecake: Cover the cheesecake with plastic wrap and refrigerate for at least 6 hours, or preferably overnight. This allows the cheesecake to set completely and develop its flavor. Patience is key!
Preparing the Strawberry Topping
- Prepare the Strawberries: Hull and slice the fresh strawberries. I like to slice them about ¼ inch thick.
- Combine Strawberries and Sugar: In a medium saucepan, combine the sliced strawberries and granulated sugar. Stir gently to coat the strawberries with the sugar.
- Cook the Strawberries: Cook the strawberry mixture over medium heat, stirring occasionally, until the strawberries release their juices and the mixture begins to simmer. This usually takes about 5-7 minutes.
- Add Lemon Juice: Stir in the lemon juice. This will add a nice tang and help to preserve the color of the strawberries.
- Thicken the Sauce: In a small bowl, whisk together the cornstarch and water to create a slurry. Pour the cornstarch slurry into the simmering strawberry mixture and stir constantly until the sauce thickens. This should only take a minute or two. Be careful not to overcook it, or the sauce will become too thick.
- Cool the Topping: Remove the saucepan from the heat and let the strawberry topping cool completely. As it cools, it will thicken further. You can speed up the cooling process by transferring the topping to a bowl and placing it in the refrigerator.
Assembling the No-Bake Strawberry Cheesecake
- Remove Cheesecake from Pan: Once the cheesecake is fully set and the strawberry topping is completely cooled, carefully remove the cheesecake from the springform pan. Run a thin knife around the edge of the cheesecake to loosen it from the pan before releasing the spring.
- Top with Strawberry Topping: Spoon the cooled strawberry topping over the top of the cheesecake, spreading it evenly. You can use all of the topping, or save some for serving on the side.
- Slice and Serve: Slice the cheesecake into wedges and serve immediately. You can garnish with extra fresh strawberries or a dollop of whipped cream, if desired.
Tips for Success:
- Room Temperature Cream Cheese: This is absolutely crucial for a smooth and creamy cheesecake filling. Make sure your cream cheese is completely softened to room temperature before you start mixing.
- Cold Heavy Cream: On the other hand, your heavy cream needs to be very cold for it to whip properly. Place the bowl and beaters in the freezer for 15 minutes before whipping for even better results.
- Don’t Overmix: Overmixing the cheesecake filling can result in a dense and rubbery texture. Be gentle when folding in the whipped cream and mix only until just combined.
- Chill Time: The longer you chill the cheesecake, the better it will set and the more flavorful it will become. I recommend chilling it overnight for the best results.
- Strawberry Variation: Feel free to adjust the amount of sugar in the strawberry topping to your liking, depending on the sweetness of the strawberries. You can also add a pinch of cinnamon or a splash of balsamic vinegar for a more complex flavor.
Storage Instructions:
Store leftover no-bake strawberry cheesecake in the refrigerator for up to 3-4 days. Cover it tightly with plastic wrap to prevent it from drying out.

Conclusion:
This Strawberry Cheesecake No Bake recipe is truly a game-changer, and I wholeheartedly believe it deserves a spot in your regular dessert rotation. Why? Because it delivers all the creamy, dreamy goodness of a classic cheesecake without the fuss of baking! Imagine sinking your teeth into a luscious, strawberry-infused filling, perfectly balanced with a buttery graham cracker crust all achieved with minimal effort and maximum flavor. It’s the ideal dessert for those hot summer days when you don’t want to turn on the oven, or for any occasion when you need a show-stopping treat in a hurry. But the best part? It’s incredibly versatile! While I’ve shared my go-to recipe, feel free to get creative and personalize it to your liking. For a richer, more decadent experience, try using a combination of cream cheese and mascarpone. If you’re a fan of a tangier flavor, add a tablespoon or two of sour cream to the filling. And don’t be afraid to experiment with different toppings! Fresh blueberries, raspberries, or even a drizzle of chocolate sauce would be absolutely divine. Serving Suggestions and Variations: * Individual Cheesecakes: For a more elegant presentation, assemble the cheesecake in individual ramekins or small glasses. This is perfect for parties or special occasions. * Strawberry Swirl: Before chilling, swirl a spoonful of strawberry jam or puree into the filling for a beautiful marbled effect. * Chocolate Crust: Elevate the flavor profile by using chocolate graham crackers for the crust. The combination of chocolate and strawberry is simply irresistible. * Lemon Zest: Add a touch of brightness by incorporating a teaspoon of lemon zest into the filling. It complements the strawberry flavor beautifully. * Serving: Serve chilled, and garnish with fresh strawberries, a dollop of whipped cream, or a sprinkle of graham cracker crumbs. A sprig of mint adds a touch of freshness. I truly believe that this Strawberry Cheesecake No Bake recipe is a must-try for anyone who loves delicious desserts but doesn’t want to spend hours in the kitchen. It’s quick, easy, and guaranteed to impress. The creamy texture, the burst of strawberry flavor, and the satisfying crunch of the graham cracker crust it’s a symphony of textures and tastes that will leave you wanting more. So, what are you waiting for? Gather your ingredients, follow the simple steps, and prepare to be amazed by the ease and deliciousness of this no-bake cheesecake. I’m confident that you’ll love it as much as I do! And now, for the most important part: I want to hear about your experience! Did you try this recipe? What variations did you make? What did your family and friends think? Please, share your thoughts, photos, and tips in the comments below. I’m always eager to learn from your culinary adventures and see how you’ve made this recipe your own. Happy baking (or rather, no-baking)! I can’t wait to hear from you! Print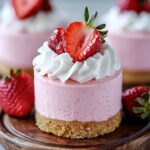
Strawberry Cheesecake No Bake: Easy Recipe & Delicious Dessert
- Total Time: 400 minutes
- Yield: 12 servings 1x
Description
A classic no-bake cheesecake with a buttery graham cracker crust, creamy filling, and a sweet and tangy homemade strawberry topping.
Ingredients
- 1 ½ cups graham cracker crumbs (about 12 full sheets)
- 5 tablespoons (70g) unsalted butter, melted
- ¼ cup (50g) granulated sugar
- Pinch of salt
- 24 ounces (680g) cream cheese, softened to room temperature
- 1 ½ cups (300g) granulated sugar
- 1 teaspoon vanilla extract
- ½ teaspoon lemon juice (optional)
- 1 ½ cups heavy cream, cold
- 1 pound fresh strawberries, hulled and sliced
- ¼ cup (50g) granulated sugar
- 1 tablespoon lemon juice
- 1 tablespoon cornstarch
- 2 tablespoons water
Instructions
- Prepare the Graham Cracker Crust:
- Crush the graham crackers into fine crumbs using a food processor or a zip-top bag and rolling pin.
- In a medium bowl, combine graham cracker crumbs, melted butter, sugar, and salt. Mix until moistened.
- Press the mixture firmly into the bottom of a 9-inch springform pan.
- Chill in the refrigerator for at least 30 minutes (or freeze for 15 minutes).
- Make the No-Bake Cheesecake Filling:
- Beat the softened cream cheese until smooth and creamy.
- Gradually add sugar, beating until combined. Scrape down the sides of the bowl.
- Add vanilla extract and lemon juice (if using), and beat until incorporated.
- In a separate bowl, beat cold heavy cream until stiff peaks form.
- Gently fold the whipped cream into the cream cheese mixture in two or three additions.
- Pour the filling over the chilled crust and spread evenly.
- Cover with plastic wrap and refrigerate for at least 6 hours, or preferably overnight.
- Prepare the Strawberry Topping:
- Hull and slice the strawberries.
- In a saucepan, combine strawberries and sugar.
- Cook over medium heat, stirring occasionally, until the strawberries release their juices and the mixture simmers (5-7 minutes).
- Stir in lemon juice.
- Whisk together cornstarch and water to create a slurry.
- Pour the slurry into the simmering strawberry mixture and stir constantly until the sauce thickens (1-2 minutes).
- Remove from heat and let the topping cool completely.
- Assemble the Cheesecake:
- Carefully remove the cheesecake from the springform pan.
- Spoon the cooled strawberry topping over the top of the cheesecake, spreading evenly.
- Slice and serve. Garnish with extra strawberries or whipped cream, if desired.
Notes
- Room Temperature Cream Cheese: Use completely softened cream cheese for a smooth filling.
- Cold Heavy Cream: Use very cold heavy cream for proper whipping. Chill bowl and beaters for best results.
- Don’t Overmix: Overmixing can result in a dense filling.
- Chill Time: Chill the cheesecake for at least 6 hours, or preferably overnight, for best results.
- Strawberry Variation: Adjust the sugar in the topping to your liking. Add cinnamon or balsamic vinegar for a more complex flavor.
- Prep Time: 30 minutes
- Cook Time: 10 minutes

Leave a Comment