
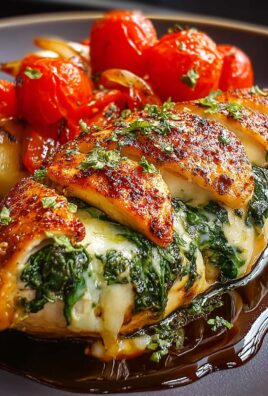
Southwest chicken chimichanga: just the name conjures up images of crispy, golden-brown perfection, doesn’t it? Imagine sinking your teeth into a deep-fried tortilla, bursting with a savory, slightly spicy, and utterly irresistible filling. This isn’t just a meal; it’s an experience!
While the exact origins of the chimichanga are debated (legend has it a chef in Arizona accidentally dropped a burrito into a deep fryer!), its Southwestern roots are undeniable. It’s a beautiful fusion of Mexican and American flavors, a testament to the vibrant culinary landscape of the region. Think of it as a burrito’s adventurous, deep-fried cousin!
What makes the southwest chicken chimichanga so beloved? It’s the symphony of textures and tastes. The satisfying crunch of the tortilla gives way to a tender, flavorful chicken filling, often complemented by beans, cheese, and a medley of Southwestern spices. It’s hearty, comforting, and incredibly satisfying. Plus, it’s surprisingly versatile! You can customize the filling to your liking, making it as mild or as spicy as you dare. Whether you’re looking for a quick weeknight dinner or a crowd-pleasing party snack, this recipe is sure to be a hit. Get ready to embark on a culinary adventure that will tantalize your taste buds and leave you craving more!

Ingredients:
- For the Chicken Filling:
- 2 boneless, skinless chicken breasts (about 1.5 lbs total)
- 1 tablespoon olive oil
- 1 medium yellow onion, chopped
- 1 red bell pepper, chopped
- 1 green bell pepper, chopped
- 1 (15 ounce) can black beans, rinsed and drained
- 1 (15 ounce) can corn, drained
- 1 (10 ounce) can diced tomatoes and green chilies (Rotel), undrained
- 1 packet (1 ounce) taco seasoning
- 1/2 teaspoon cumin
- 1/4 teaspoon chili powder
- 1/4 teaspoon garlic powder
- Salt and pepper to taste
- For the Chimichangas:
- 6 large flour tortillas (burrito size, about 10-12 inches)
- Vegetable oil, for frying (about 2-3 cups)
- For Serving (Optional):
- Sour cream
- Guacamole
- Salsa
- Shredded cheddar cheese
- Chopped cilantro
Preparing the Chicken Filling:
- Cook the Chicken: First, we need to cook our chicken. You can do this in a few ways. My preferred method is to poach it. Place the chicken breasts in a large pot and cover with water. Bring to a boil, then reduce heat and simmer for about 15-20 minutes, or until the chicken is cooked through and no longer pink inside. Alternatively, you can bake the chicken at 375°F (190°C) for about 20-25 minutes, or until cooked through. You can also grill the chicken if you prefer that smoky flavor! Let the chicken cool slightly before shredding it with two forks.
- Sauté the Vegetables: While the chicken is cooking (or after, if you’re baking or grilling), heat the olive oil in a large skillet over medium heat. Add the chopped onion and bell peppers and cook until softened, about 5-7 minutes. You want them to be tender and slightly translucent. Don’t rush this step; properly softened vegetables add so much flavor!
- Combine Ingredients: Add the shredded chicken, black beans, corn, and diced tomatoes and green chilies (Rotel) to the skillet with the vegetables. Stir well to combine.
- Season the Filling: Sprinkle the taco seasoning, cumin, chili powder, and garlic powder over the mixture. Season with salt and pepper to taste. Stir everything together thoroughly to ensure the spices are evenly distributed.
- Simmer the Filling: Reduce the heat to low and let the filling simmer for about 10-15 minutes, stirring occasionally. This allows the flavors to meld together beautifully and the filling to thicken slightly. You want a nice, cohesive mixture that won’t be too watery when you assemble the chimichangas.
- Taste and Adjust: Give the filling a taste and adjust the seasonings as needed. Maybe you want a little more chili powder for extra heat, or a pinch more salt to bring out the flavors. This is your chance to customize it to your liking!
Assembling the Chimichangas:
- Warm the Tortillas: This is a crucial step! Warming the tortillas makes them more pliable and less likely to tear when you’re folding them. You can warm them in a dry skillet over medium heat for about 15-20 seconds per side, or wrap them in a damp paper towel and microwave them for about 30 seconds. Don’t skip this!
- Fill the Tortillas: Lay a warm tortilla on a flat surface. Spoon about 1 cup of the chicken filling into the center of the tortilla. Don’t overfill it, or it will be difficult to fold and seal.
- Fold the Chimichangas: Fold in the sides of the tortilla towards the center, covering part of the filling. Then, fold the bottom edge of the tortilla up and over the filling, tucking it tightly. Roll the chimichanga forward to create a tight, sealed roll. Think of it like rolling a burrito.
- Secure the Chimichangas (Optional): To help keep the chimichangas sealed during frying, you can use toothpicks to secure the seam. Insert the toothpicks at an angle to hold the tortilla in place. Remember to remove the toothpicks before serving!
- Repeat: Repeat steps 2-4 with the remaining tortillas and filling.
Frying the Chimichangas:
- Heat the Oil: Pour the vegetable oil into a large, heavy-bottomed skillet or Dutch oven. Heat the oil over medium-high heat until it reaches a temperature of 350°F (175°C). If you don’t have a thermometer, you can test the oil by dropping a small piece of tortilla into it. If it sizzles and turns golden brown in about 30 seconds, the oil is ready.
- Fry the Chimichangas: Carefully place the chimichangas into the hot oil, seam-side down. Don’t overcrowd the skillet; fry them in batches of 2-3 at a time.
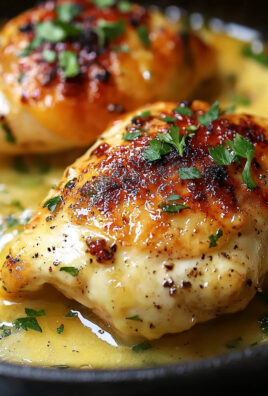
- Cook Until Golden Brown: Fry the chimichangas for about 2-3 minutes per side, or until they are golden brown and crispy. Use tongs to carefully flip them over.
- Remove and Drain: Remove the fried chimichangas from the oil and place them on a wire rack lined with paper towels to drain off any excess oil. This will help them stay crispy.
- Repeat: Repeat steps 2-4 with the remaining chimichangas.
Baking Option (Alternative to Frying):
If you prefer a healthier option, you can bake the chimichangas instead of frying them. This will result in a less crispy texture, but it’s still delicious!
- Preheat Oven: Preheat your oven to 400°F (200°C).
- Prepare Baking Sheet: Lightly grease a baking sheet with cooking spray.
- Place Chimichangas: Place the assembled chimichangas on the prepared baking sheet, seam-side down.
- Brush with Oil: Brush the tops of the chimichangas with a little bit of olive oil or melted butter. This will help them brown nicely.
- Bake: Bake for about 15-20 minutes, or until the chimichangas are golden brown and crispy.
Serving:
Now for the best part serving and enjoying your delicious Southwest Chicken Chimichangas! There are so many ways to customize your serving experience.
- Classic Toppings: Serve the chimichangas with sour cream, guacamole, salsa, and shredded cheddar cheese. These are classic toppings that complement the flavors of the filling perfectly.
- Fresh Garnishes: Sprinkle with chopped cilantro for a fresh, vibrant touch.
- Side Dishes: Consider serving the chimichangas with a side of Mexican rice, refried beans, or a simple salad.
- Plating: Arrange the chimichangas on a plate and garnish with your favorite toppings. A drizzle of sour cream and a sprinkle of cilantro can make them look extra appealing.
- Cutting: You can serve the chimichangas whole, or cut them in half for easier eating.
Tips and Variations:
- Spice Level: Adjust the amount of chili powder and taco seasoning to control the spice level of the filling. If you like it extra spicy, add a pinch of cayenne pepper or some chopped jalapeños.
- Cheese: Add shredded cheese to the filling for an extra cheesy chimichanga. Monterey Jack or pepper jack cheese would be great choices.
- Vegetarian Option: Substitute the chicken with crumbled tofu or extra black beans and corn for a vegetarian version.
- Make Ahead: You can prepare the chicken filling ahead of time and store it in the refrigerator for up to 3 days. Assemble and fry the chimichangas just before serving.
- Freezing: You can freeze the assembled chimichangas before frying or baking. Wrap them individually in plastic wrap and then place them in a freezer bag. They can be stored in the freezer for up to 2 months. When ready to eat, thaw them in the refrigerator overnight and then fry or bake as directed.

Conclusion:
This Southwest Chicken Chimichanga recipe isn’t just another meal; it’s a flavor explosion waiting to happen! From the perfectly seasoned chicken to the creamy, cheesy filling and the satisfying crunch of the golden-brown tortilla, every bite is a fiesta in your mouth. I truly believe this is a must-try recipe for anyone looking to add a little excitement to their dinner routine. It’s relatively simple to make, incredibly satisfying, and easily customizable to suit your personal preferences.
Think of it: tender, juicy chicken mingling with black beans, corn, and melted cheese, all wrapped up in a crispy tortilla. What’s not to love? This recipe takes the classic chimichanga and elevates it with bold Southwestern flavors that will leave you craving more. It’s the perfect dish for a weeknight dinner, a weekend gathering with friends, or even a fun and interactive family meal.
But the best part? You can totally make it your own! Feel free to experiment with different cheeses Monterey Jack, Pepper Jack, or even a blend of your favorites would work beautifully. If you’re feeling adventurous, add a pinch of cayenne pepper or a dash of hot sauce to the chicken mixture for an extra kick.
For serving suggestions, I highly recommend topping your golden-brown chimichangas with a dollop of sour cream or Greek yogurt, a generous spoonful of guacamole, and a sprinkle of fresh cilantro. A side of Spanish rice and refried beans completes the meal perfectly. Alternatively, you could serve them with a vibrant salsa fresca or a creamy cilantro-lime dressing.
And if you’re looking for variations, consider using shredded pork or beef instead of chicken. You could also add some diced bell peppers or onions to the filling for extra texture and flavor. For a vegetarian option, simply replace the chicken with seasoned black beans and corn. The possibilities are endless!
I’ve poured my heart into perfecting this recipe, and I’m confident that you’ll love it as much as I do. It’s a guaranteed crowd-pleaser that’s sure to become a staple in your recipe repertoire. The beauty of this Southwest Chicken Chimichanga lies in its versatility and its ability to bring joy to any occasion.
So, what are you waiting for? Gather your ingredients, fire up your stove, and get ready to create some culinary magic. I promise you won’t be disappointed.
And most importantly, I want to hear about your experience! Once you’ve tried this recipe, please come back and share your thoughts in the comments below. Let me know what variations you tried, what your family thought, and any tips or tricks you discovered along the way. Your feedback is invaluable, and it helps me to continue creating recipes that you’ll love. Happy cooking! I can’t wait to hear all about your chimichanga adventures!
Southwest Chicken Chimichanga: A Delicious & Easy Recipe
Crispy, golden chimichangas filled with a flavorful Southwest chicken, black bean, and corn mixture. Perfect for a satisfying and customizable meal.
Ingredients
- 2 boneless, skinless chicken breasts (about 1.5 lbs total)
- 1 tablespoon olive oil
- 1 medium yellow onion, chopped
- 1 red bell pepper, chopped
- 1 green bell pepper, chopped
- 1 (15 ounce) can black beans, rinsed and drained
- 1 (15 ounce) can corn, drained
- 1 (10 ounce) can diced tomatoes and green chilies (Rotel), undrained
- 1 packet (1 ounce) taco seasoning
- 1/2 teaspoon cumin
- 1/4 teaspoon chili powder
- 1/4 teaspoon garlic powder
- Salt and pepper to taste
- 6 large flour tortillas (burrito size, about 10-12 inches)
- Vegetable oil, for frying (about 2-3 cups)
- Sour cream
- Guacamole
- Salsa
- Shredded cheddar cheese
- Chopped cilantro
Instructions
- Cook the Chicken: Poach, bake (375°F/190°C for 20-25 minutes), or grill chicken breasts until cooked through. Let cool slightly and shred with forks.
- Sauté Vegetables: Heat olive oil in a large skillet over medium heat. Add chopped onion and bell peppers and cook until softened, about 5-7 minutes.
- Combine Ingredients: Add shredded chicken, black beans, corn, and Rotel to the skillet with the vegetables. Stir well.
- Season Filling: Sprinkle taco seasoning, cumin, chili powder, and garlic powder over the mixture. Season with salt and pepper to taste. Stir thoroughly.
- Simmer Filling: Reduce heat to low and simmer for 10-15 minutes, stirring occasionally, until flavors meld and the filling thickens slightly. Taste and adjust seasonings as needed.
- Warm Tortillas: Warm tortillas in a dry skillet (15-20 seconds per side) or microwave wrapped in a damp paper towel (30 seconds).
- Fill Tortillas: Lay a warm tortilla on a flat surface. Spoon about 1 cup of chicken filling into the center.
- Fold Chimichangas: Fold in the sides of the tortilla towards the center. Fold the bottom edge up and over the filling, tucking tightly. Roll forward to create a tight, sealed roll.
- Secure (Optional): Use toothpicks to secure the seam during frying. *Remember to remove before serving!*
- Heat Oil: Pour vegetable oil into a large skillet or Dutch oven. Heat over medium-high heat to 350°F (175°C).
- Fry Chimichangas: Carefully place chimichangas into the hot oil, seam-side down. Fry in batches of 2-3 for 2-3 minutes per side, until golden brown and crispy.
- Remove and Drain: Remove from oil and place on a wire rack lined with paper towels to drain excess oil.
- Baking Option: Preheat oven to 400°F (200°C). Lightly grease a baking sheet. Place assembled chimichangas on the sheet, seam-side down. Brush with olive oil or melted butter. Bake for 15-20 minutes, until golden brown and crispy.
- Serve: Serve with sour cream, guacamole, salsa, shredded cheddar cheese, and chopped cilantro. Consider serving with Mexican rice, refried beans, or a salad.
Notes
- Spice Level: Adjust chili powder and taco seasoning to your preference. Add cayenne pepper or jalapeños for extra heat.
- Cheese: Add shredded Monterey Jack or pepper jack cheese to the filling.
- Vegetarian: Substitute chicken with crumbled tofu or extra black beans and corn.
- Make Ahead: Prepare the filling up to 3 days in advance.
- Freezing: Freeze assembled chimichangas for up to 2 months. Thaw overnight before frying or baking.

Leave a Comment