
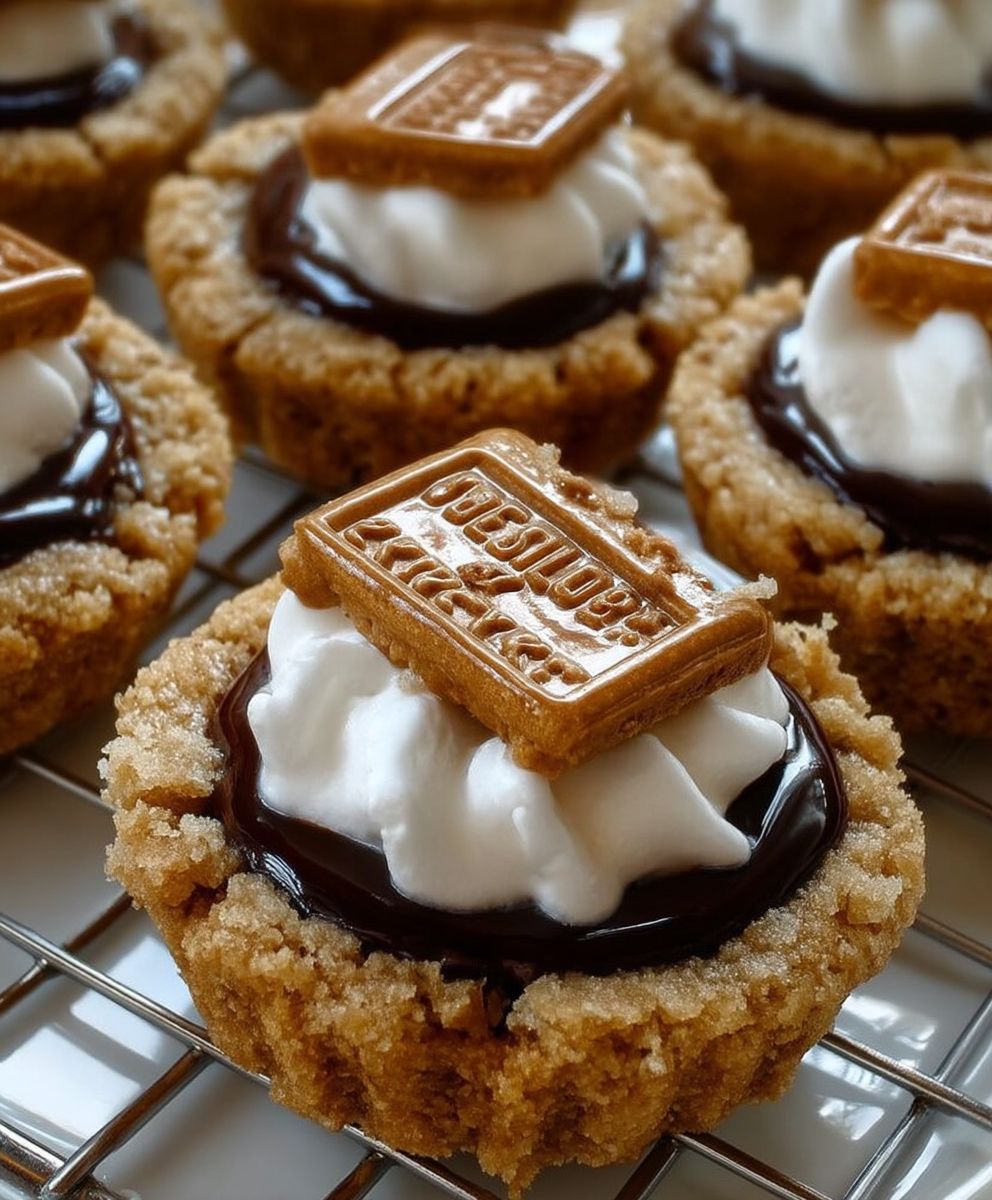
Smores cookie cups: the miniature marvel that perfectly captures the essence of a campfire treat without the campfire! Imagine sinking your teeth into a buttery, soft cookie base, yielding to a gooey chocolate center, all crowned with a perfectly toasted marshmallow. Is your mouth watering yet? Mine certainly is!
The beauty of smores lies in their simplicity. The combination of graham crackers, chocolate, and marshmallows has been a beloved American tradition since the early 1900s, with the first documented recipe appearing in a Girl Scout guidebook. But who says you need a campfire to enjoy this iconic flavor combination? These smores cookie cups bring all the nostalgic goodness of a traditional smore into a convenient, adorable, and utterly irresistible bite-sized package.
What makes these cookie cups so universally loved? It’s the delightful interplay of textures and flavors. The slightly crisp cookie provides a satisfying base, the melted chocolate offers a rich, decadent sweetness, and the toasted marshmallow delivers that signature smoky, caramelized flavor that we all crave. Plus, they’re incredibly easy to make and perfect for parties, potlucks, or simply satisfying your sweet tooth on a cozy night in. Get ready to experience the magic of smores in a whole new way!

Ingredients:
- For the Cookie Cups:
- 1 cup (2 sticks) unsalted butter, softened
- 3/4 cup granulated sugar
- 3/4 cup packed brown sugar
- 2 large eggs
- 1 teaspoon vanilla extract
- 2 1/4 cups all-purpose flour
- 1 teaspoon baking soda
- 1 teaspoon salt
- 1 cup semi-sweet chocolate chips
- 1 cup graham cracker crumbs (about 12 full graham cracker sheets, finely crushed)
- For the Marshmallow Filling:
- 7 ounces marshmallow fluff (about 1 jar)
- 1/4 cup heavy cream
- 1/2 teaspoon vanilla extract
- For the Topping:
- 1 cup semi-sweet chocolate chips
- 1 tablespoon coconut oil (or vegetable oil)
- 1 1/2 cups mini marshmallows
- Optional: Extra graham cracker crumbs for sprinkling
Making the Cookie Dough
- Cream the Butter and Sugars: In a large bowl (or the bowl of a stand mixer), cream together the softened butter, granulated sugar, and brown sugar until light and fluffy. This usually takes about 3-5 minutes. Make sure to scrape down the sides of the bowl occasionally to ensure everything is evenly mixed. The mixture should be pale and airy.
- Add Eggs and Vanilla: Beat in the eggs one at a time, mixing well after each addition. Then, stir in the vanilla extract. Don’t overmix at this stage, just combine until the eggs are fully incorporated.
- Combine Dry Ingredients: In a separate medium bowl, whisk together the all-purpose flour, baking soda, and salt. Whisking ensures that the baking soda and salt are evenly distributed throughout the flour, which is crucial for proper leavening and flavor.
- Gradually Add Dry Ingredients to Wet Ingredients: Gradually add the dry ingredients to the wet ingredients, mixing on low speed until just combined. Be careful not to overmix, as this can result in tough cookies. Overmixing develops the gluten in the flour, leading to a less tender cookie.
- Stir in Chocolate Chips and Graham Cracker Crumbs: Gently fold in the chocolate chips and graham cracker crumbs until they are evenly distributed throughout the dough. I like to use a rubber spatula for this step to avoid overmixing. The graham cracker crumbs add a wonderful texture and flavor that really complements the s’mores theme.
- Chill the Dough: Cover the bowl with plastic wrap and chill the dough in the refrigerator for at least 30 minutes. This chilling time is important because it allows the gluten to relax, which prevents the cookies from spreading too much during baking. It also makes the dough easier to handle. You can chill the dough for longer, even overnight, if needed.
Forming and Baking the Cookie Cups
- Preheat Oven and Prepare Muffin Tin: Preheat your oven to 350°F (175°C). Grease a 24-cup mini muffin tin with cooking spray or line it with paper liners. I prefer using cooking spray for easier removal of the cookie cups.
- Scoop and Shape the Dough: Scoop out rounded tablespoons of cookie dough (about 1.5 tablespoons each) and roll them into balls. Place each ball into a muffin cup.
- Press the Dough into Cups: Use your fingers or the back of a small spoon to press the dough evenly into the bottom and up the sides of each muffin cup, creating a well in the center. You want the dough to be relatively thin and even to ensure that the cookie cups bake properly.
- Bake the Cookie Cups: Bake for 10-12 minutes, or until the edges are golden brown and the centers are set. Keep a close eye on them, as baking times can vary depending on your oven.
- Cool and Remove from Tin: Let the cookie cups cool in the muffin tin for a few minutes before carefully transferring them to a wire rack to cool completely. If they are sticking, you can use a thin knife or offset spatula to gently loosen them from the sides of the muffin tin.
Making the Marshmallow Filling
- Combine Ingredients: In a medium bowl, combine the marshmallow fluff, heavy cream, and vanilla extract.
- Whip Until Smooth: Use an electric mixer to whip the mixture until it is smooth and creamy. Be careful not to overwhip, as this can cause the marshmallow fluff to become stiff.
- Transfer to Piping Bag (Optional): If desired, transfer the marshmallow filling to a piping bag fitted with a large round tip for easier filling of the cookie cups. This is optional, but it can make the process neater and more efficient.
Assembling the S’mores Cookie Cups
- Fill the Cookie Cups: Once the cookie cups are completely cool, fill each cup with the marshmallow filling. You can either pipe the filling in or spoon it in, depending on your preference. Fill them generously, but be careful not to overfill them, as the filling will expand slightly when heated.
Making the Chocolate Ganache Topping
- Melt Chocolate and Coconut Oil: In a microwave-safe bowl, combine the chocolate chips and coconut oil (or vegetable oil). Microwave in 30-second intervals, stirring after each interval, until the chocolate is completely melted and smooth. The coconut oil helps to create a shiny and smooth ganache.
- Drizzle Over Marshmallow Filling: Drizzle the melted chocolate ganache over the marshmallow filling in each cookie cup. You can use a spoon or a piping bag to drizzle the chocolate.
- Add Mini Marshmallows: Immediately sprinkle the mini marshmallows over the chocolate ganache while it is still wet. This will help the marshmallows adhere to the chocolate.
- Optional: Sprinkle with Graham Cracker Crumbs: If desired, sprinkle the tops of the cookie cups with extra graham cracker crumbs for added flavor and texture.
- Broil (Optional): For a toasted marshmallow effect, you can broil the cookie cups for a few seconds. Place the cookie cups on a baking sheet and broil them on low for just a few seconds, watching them very carefully to prevent burning. The marshmallows should be lightly browned and slightly melted. This step is optional, but it adds a nice visual appeal and enhances the s’mores flavor.
- Let Set: Allow the chocolate ganache to set completely before serving. This will take about 15-20 minutes at room temperature, or you can speed up the process by placing the cookie cups in the refrigerator for a few minutes.
Tips and Variations
- Storage: Store the s’mores cookie cups in an airtight container at room temperature for up to 3 days.
- Make Ahead: You can make the cookie dough and marshmallow filling ahead of time and store them separately in the refrigerator. Assemble the cookie cups just before serving.
- Different Chocolate: Feel free to use different types of chocolate chips, such as milk chocolate or dark chocolate, depending on your preference.
- Peanut Butter: Add a layer of peanut butter between the cookie cup and the marshmallow filling for a peanut butter s’mores twist.
- Caramel: Drizzle caramel sauce over the marshmallows for an extra decadent treat.
- Gluten-Free: To make these cookie cups gluten-free, simply substitute the all-purpose flour with a gluten-free all-purpose flour blend.
- Vegan: To make these cookie cups vegan, use vegan butter, vegan chocolate chips, and a vegan marshmallow fluff alternative.
Conclusion:
And there you have it! These S’mores Cookie Cups are truly a must-try recipe, and I’m not just saying that because I created it (though, I am pretty proud!). The combination of the chewy cookie base, the gooey melted chocolate, and the toasted marshmallow top is simply irresistible. It’s like a campfire treat, but without the campfire smell clinging to your clothes for days! Seriously, these little cups of joy are the perfect way to satisfy your sweet tooth and bring a little bit of summer fun into your kitchen, no matter the season.
But why are they a must-try? Well, beyond the incredible flavor profile, they’re surprisingly easy to make. The recipe is straightforward, uses readily available ingredients, and doesn’t require any fancy equipment. Even if you’re a beginner baker, I’m confident you can whip up a batch of these S’mores Cookie Cups with ease. Plus, they’re incredibly versatile!
Looking for serving suggestions? These cookie cups are fantastic served warm, straight from the oven, with a scoop of vanilla ice cream. The contrast between the warm cookie and the cold ice cream is heavenly. You could also drizzle them with a little extra melted chocolate or sprinkle them with crushed graham crackers for an extra touch of decadence. They’re also perfect for parties, potlucks, or even just a cozy night in. Imagine serving these at your next gathering they’re guaranteed to be a crowd-pleaser!
And speaking of versatility, let’s talk variations! Feel free to experiment with different types of chocolate. Dark chocolate would add a richer, more intense flavor, while white chocolate would create a sweeter, creamier experience. You could even use flavored marshmallows, like strawberry or chocolate, to add a unique twist. For a more sophisticated touch, try adding a pinch of sea salt to the cookie dough the saltiness will enhance the sweetness of the chocolate and marshmallow. If you’re feeling adventurous, you could even try adding a layer of peanut butter between the cookie and the chocolate for a Reese’s-inspired treat. The possibilities are endless!
These S’mores Cookie Cups are also a great way to get the kids involved in the kitchen. They’ll love helping to mix the dough, press it into the muffin tins, and, of course, top them with marshmallows. It’s a fun and delicious activity that the whole family can enjoy together. Just be prepared for some sticky fingers!
I truly believe that this recipe is a winner, and I can’t wait for you to try it. So, go ahead, gather your ingredients, preheat your oven, and get ready to bake some magic. I promise you won’t be disappointed.
Once you’ve made these delicious S’mores Cookie Cups, I’d love to hear about your experience! Did you make any variations? Did you serve them with ice cream or something else? What did your family and friends think? Share your photos and stories in the comments below. I’m always looking for new ideas and inspiration, and I love seeing how people put their own spin on my recipes. Happy baking!
Smores Cookie Cups: Easy Recipe for Delicious Treats
Delicious mini s'mores cookie cups with a graham cracker cookie base, marshmallow filling, and chocolate ganache topping. A perfect bite-sized treat!
Ingredients
- 1 cup (2 sticks) unsalted butter, softened
- 3/4 cup granulated sugar
- 3/4 cup packed brown sugar
- 2 large eggs
- 1 teaspoon vanilla extract
- 2 1/4 cups all-purpose flour
- 1 teaspoon baking soda
- 1 teaspoon salt
- 1 cup semi-sweet chocolate chips
- 1 cup graham cracker crumbs (about 12 full graham cracker sheets, finely crushed)
- 7 ounces marshmallow fluff (about 1 jar)
- 1/4 cup heavy cream
- 1/2 teaspoon vanilla extract
- 1 cup semi-sweet chocolate chips
- 1 tablespoon coconut oil (or vegetable oil)
- 1 1/2 cups mini marshmallows
- Optional: Extra graham cracker crumbs for sprinkling
Instructions
- In a large bowl (or the bowl of a stand mixer), cream together the softened butter, granulated sugar, and brown sugar until light and fluffy (3-5 minutes). Scrape down the sides of the bowl occasionally.
- Beat in the eggs one at a time, mixing well after each addition. Stir in the vanilla extract.
- In a separate medium bowl, whisk together the all-purpose flour, baking soda, and salt.
- Gradually add the dry ingredients to the wet ingredients, mixing on low speed until just combined. Do not overmix.
- Gently fold in the chocolate chips and graham cracker crumbs until evenly distributed.
- Cover the bowl with plastic wrap and chill the dough in the refrigerator for at least 30 minutes (or longer, even overnight).
- Preheat your oven to 350°F (175°C). Grease a 24-cup mini muffin tin with cooking spray or line it with paper liners.
- Scoop out rounded tablespoons of cookie dough (about 1.5 tablespoons each) and roll them into balls. Place each ball into a muffin cup.
- Use your fingers or the back of a small spoon to press the dough evenly into the bottom and up the sides of each muffin cup, creating a well in the center.
- Bake for 10-12 minutes, or until the edges are golden brown and the centers are set.
- Let the cookie cups cool in the muffin tin for a few minutes before carefully transferring them to a wire rack to cool completely.
- In a medium bowl, combine the marshmallow fluff, heavy cream, and vanilla extract.
- Use an electric mixer to whip the mixture until it is smooth and creamy. Be careful not to overwhip.
- If desired, transfer the marshmallow filling to a piping bag fitted with a large round tip.
- Once the cookie cups are completely cool, fill each cup with the marshmallow filling.
- In a microwave-safe bowl, combine the chocolate chips and coconut oil (or vegetable oil). Microwave in 30-second intervals, stirring after each interval, until the chocolate is completely melted and smooth.
- Drizzle the melted chocolate ganache over the marshmallow filling in each cookie cup.
- Immediately sprinkle the mini marshmallows over the chocolate ganache while it is still wet.
- If desired, sprinkle the tops of the cookie cups with extra graham cracker crumbs.
- For a toasted marshmallow effect, you can broil the cookie cups for a few seconds. Place the cookie cups on a baking sheet and broil them on low for just a few seconds, watching them very carefully to prevent burning.
- Allow the chocolate ganache to set completely before serving (15-20 minutes at room temperature, or in the refrigerator).
Notes
- Store the s’mores cookie cups in an airtight container at room temperature for up to 3 days.
- You can make the cookie dough and marshmallow filling ahead of time and store them separately in the refrigerator. Assemble the cookie cups just before serving.
- Feel free to use different types of chocolate chips, such as milk chocolate or dark chocolate, depending on your preference.
- Add a layer of peanut butter between the cookie cup and the marshmallow filling for a peanut butter s’mores twist.
- Drizzle caramel sauce over the marshmallows for an extra decadent treat.
- To make these cookie cups gluten-free, simply substitute the all-purpose flour with a gluten-free all-purpose flour blend.
- To make these cookie cups vegan, use vegan butter, vegan chocolate chips, and a vegan marshmallow fluff alternative.


Leave a Comment