
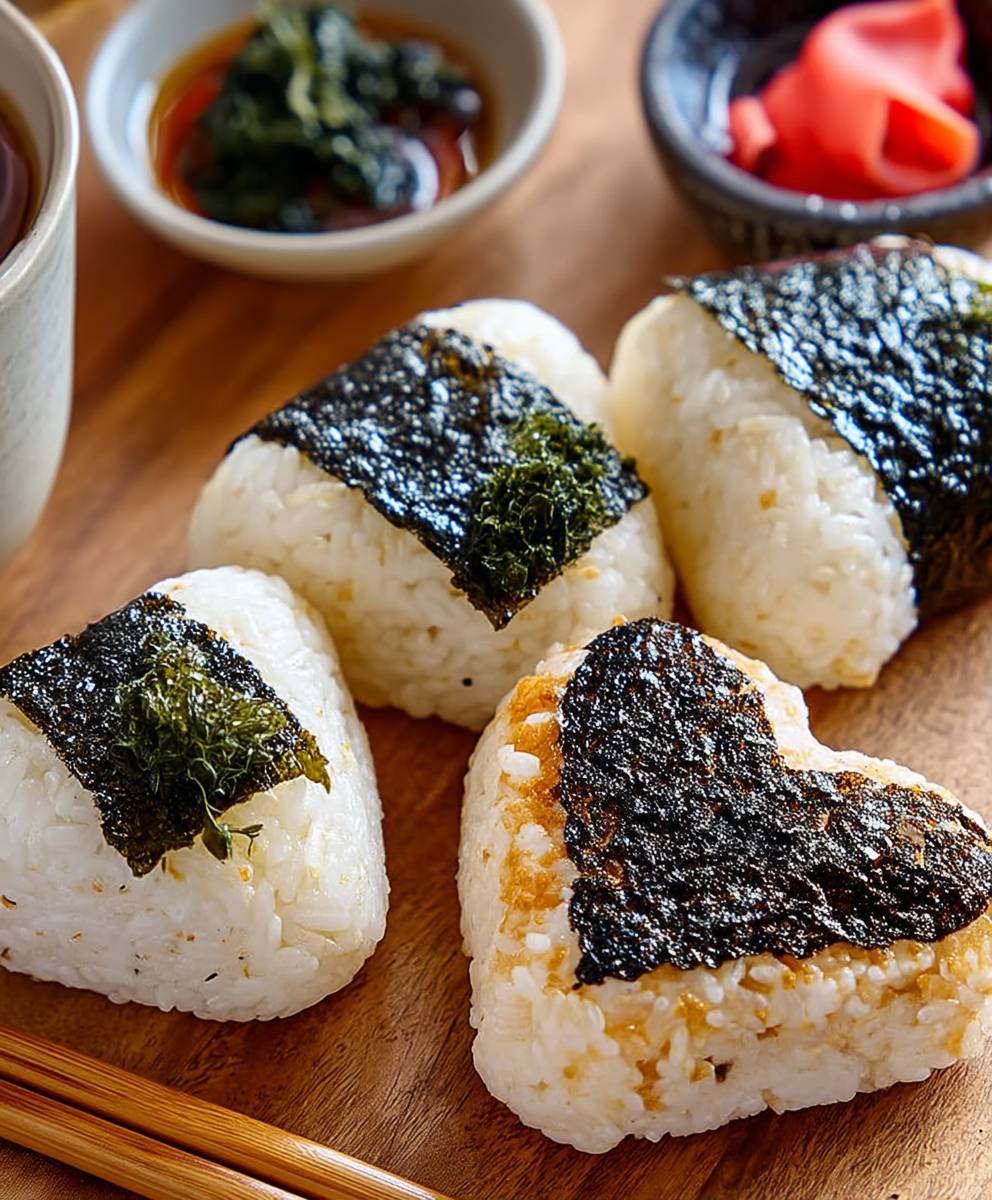
Salmon cheese seaweed rice ball prepare to embark on a culinary adventure that’s as delightful to make as it is to devour! Imagine biting into a perfectly formed sphere of fluffy rice, its subtle sweetness mingling with the rich, savory flavors of flaky salmon and creamy cheese, all embraced by the delicate, salty tang of toasted seaweed. Sounds tempting, doesn’t it?
These aren’t just any ordinary snacks; they’re a playful twist on the traditional Japanese onigiri, a staple in lunchboxes and picnics for centuries. Onigiri, meaning “hand-formed,” has evolved from a simple way to preserve rice to a beloved comfort food enjoyed worldwide. Our version elevates this classic with the addition of salmon and cheese, creating a fusion of flavors that’s both familiar and exciting.
What makes the salmon cheese seaweed rice ball so irresistible? It’s the perfect combination of textures the soft rice, the tender salmon, the smooth cheese, and the crisp seaweed. It’s also incredibly convenient! These little gems are portable, easy to eat, and perfect for lunchboxes, snacks, or even a light meal. Plus, they’re a fantastic way to sneak in some healthy omega-3s from the salmon and calcium from the cheese. Get ready to experience a burst of flavor and fun with every bite!

Ingredients:
- For the Rice:
- 2 cups short-grain sushi rice
- 2 1/4 cups water
- 1/4 cup rice vinegar
- 2 tablespoons sugar
- 1 teaspoon salt
- For the Salmon Filling:
- 8 ounces skinless salmon fillet
- 1 tablespoon soy sauce
- 1 teaspoon mirin (sweet rice wine)
- 1/2 teaspoon grated ginger
- 2 ounces cream cheese, softened
- 1 tablespoon chopped chives
- 1 teaspoon lemon juice
- Pinch of black pepper
- For the Seaweed:
- 5 sheets nori seaweed, cut into strips or squares (depending on desired presentation)
- Optional Garnishes:
- Sesame seeds (black and/or white)
- Furikake seasoning
- Soy sauce (for dipping)
- Pickled ginger
Preparing the Sushi Rice:
- Rinse the Rice: Place the sushi rice in a fine-mesh sieve and rinse under cold running water until the water runs clear. This usually takes about 3-4 minutes. Rinsing removes excess starch, which helps the rice achieve the perfect sticky texture.
- Cook the Rice: Transfer the rinsed rice to a rice cooker or a heavy-bottomed pot. Add 2 1/4 cups of water. If using a rice cooker, follow the manufacturer’s instructions. If using a pot, bring the water to a boil over high heat. Once boiling, reduce the heat to low, cover tightly, and simmer for 18-20 minutes, or until all the water is absorbed. Do not lift the lid during cooking!
- Prepare the Sushi Vinegar: While the rice is cooking, prepare the sushi vinegar. In a small saucepan, combine the rice vinegar, sugar, and salt. Heat over low heat, stirring constantly, until the sugar and salt are completely dissolved. Do not boil. Remove from heat and let cool slightly.
- Season the Rice: Once the rice is cooked, let it stand, covered, for 10 minutes. This allows the steam to redistribute evenly. Gently fluff the rice with a rice paddle or wooden spoon. Transfer the rice to a large, non-metallic bowl (a wooden sushi rice tub, called a hangiri, is ideal if you have one).
- Combine Rice and Vinegar: Gradually drizzle the sushi vinegar over the rice, using the rice paddle to gently cut and fold the vinegar into the rice. Avoid mashing the rice. The goal is to evenly coat the rice with the vinegar without making it mushy. Fan the rice with a fan or piece of cardboard while mixing to help it cool down quickly. This gives the rice a glossy sheen and prevents it from becoming overly sticky. The rice should be cooled to lukewarm before using it to make the rice balls.
Preparing the Salmon Filling:
- Cook the Salmon: There are several ways to cook the salmon. You can bake it, pan-fry it, or poach it. My preferred method is to bake it. Preheat your oven to 375°F (190°C). Place the salmon fillet on a baking sheet lined with parchment paper. In a small bowl, whisk together the soy sauce, mirin, and grated ginger. Brush the mixture over the salmon fillet. Bake for 12-15 minutes, or until the salmon is cooked through and flakes easily with a fork. Alternatively, you can pan-fry the salmon in a lightly oiled skillet over medium heat for about 4-5 minutes per side, or until cooked through. Poaching is also a healthy option; simply simmer the salmon in water or broth until cooked through.
- Flake the Salmon: Once the salmon is cooked, let it cool slightly. Use a fork to flake the salmon into small pieces, removing any bones or skin that may be present.
- Combine Filling Ingredients: In a medium bowl, combine the flaked salmon, softened cream cheese, chopped chives, lemon juice, and black pepper. Mix well until all ingredients are evenly incorporated. Taste and adjust seasonings as needed. You might want to add a pinch of salt if you feel it needs it, but remember that soy sauce already adds saltiness.
Assembling the Salmon Cheese Seaweed Rice Balls:
- Prepare Your Hands: Keep a small bowl of water nearby. Wet your hands lightly before handling the rice. This will prevent the rice from sticking to your hands.
- Shape the Rice Balls: Take a small handful of sushi rice (about 1/4 cup) and gently form it into a ball or triangle shape in the palm of your hand. Be careful not to pack the rice too tightly, as this will make the rice ball hard and less enjoyable to eat.
- Create a Well: Use your thumb to make a small indentation or well in the center of the rice ball.
- Fill the Rice Ball: Spoon about 1-2 teaspoons of the salmon cream cheese filling into the well.
- Close the Rice Ball: Gently bring the rice around the filling to enclose it completely. Reshape the rice ball to your desired shape, ensuring that the filling is completely sealed inside.
- Wrap with Seaweed: Cut the nori seaweed sheets into strips or squares, depending on how you want to decorate your rice balls. You can wrap the entire rice ball with seaweed, or just add a small strip or square to the bottom or side. Moisten the seaweed slightly with water to help it adhere to the rice.
- Repeat: Repeat steps 2-6 with the remaining rice and filling.
- Garnish (Optional): If desired, garnish the rice balls with sesame seeds or furikake seasoning. This adds visual appeal and extra flavor.
Tips and Variations:
- Rice Temperature: Make sure the sushi rice is cooled to lukewarm before assembling the rice balls. Hot rice will melt the cream cheese and make the rice balls difficult to handle.
- Filling Variations: Feel free to experiment with different fillings. Other options include tuna mayonnaise, spicy tuna, avocado, cucumber, or pickled vegetables.
- Seaweed Options: Besides nori, you can also use other types of seaweed, such as kombu or wakame, for added flavor and texture.
- Vegetarian Option: For a vegetarian version, replace the salmon with cooked mushrooms, tofu, or avocado.
- Make Ahead: You can prepare the sushi rice and salmon filling ahead of time and store them separately in the refrigerator. Assemble the rice balls just before serving.
- Storage: Store leftover rice balls in an airtight container in the refrigerator for up to 2 days. The rice may become slightly harder over time, but they will still be safe to eat.
- Serving Suggestions: Serve the salmon cheese seaweed rice balls as a snack, appetizer, or light meal. They are also great for lunchboxes or picnics. Serve with soy sauce for dipping and pickled ginger to cleanse the palate.
- Rice Cooker is Key: While you can cook rice on the stovetop, a rice cooker truly simplifies the process and ensures perfectly cooked rice every time. If you plan on making sushi rice regularly, investing in a good quality rice cooker is highly recommended.
- Don’t Overmix the Filling: When mixing the salmon filling, be gentle. Overmixing can make the cream cheese watery and affect the texture of the filling.
- Presentation Matters: The way you present your rice balls can make a big difference. Arrange them artfully on a plate and garnish with fresh herbs or edible flowers for a more elegant presentation.
Conclusion:
This Salmon Cheese Seaweed Rice Ball recipe is truly a must-try! I know, I know, I might be biased, but trust me on this one. The combination of savory salmon, creamy cheese, and the slightly salty, umami-rich seaweed is simply divine. It’s a flavor explosion in every bite, and the satisfying chewiness of the rice brings it all together. It’s not just a meal; it’s an experience!
But beyond the incredible taste, what makes these rice balls so special is their versatility and ease of preparation. They’re perfect for a quick lunch, a fun snack, or even a delightful addition to a picnic basket. Plus, they’re surprisingly healthy, packed with protein, omega-3 fatty acids, and essential nutrients. What’s not to love?
Why is this recipe a must-try? Because it’s delicious, convenient, healthy, and endlessly adaptable to your own preferences!
Looking for serving suggestions? These rice balls are fantastic on their own, but they also pair beautifully with a variety of sides. Try serving them with a light soy sauce dipping sauce, a dollop of spicy mayo, or a side of pickled ginger for a refreshing contrast. For a more substantial meal, add a side of miso soup or a simple green salad.
And speaking of adaptability, the possibilities for variations are endless! Feel free to experiment with different types of cheese. Cream cheese is a classic, but you could also try brie, goat cheese, or even a sharp cheddar for a bolder flavor. If you’re not a fan of salmon, tuna or cooked shrimp would work just as well. And don’t be afraid to get creative with the seaweed! Nori is the most common choice, but you could also use wakame or kombu for a different texture and flavor profile.
Here are a few more ideas to get your creative juices flowing:
Variations to Try:
* Spicy Salmon Rice Balls: Add a dash of sriracha or chili flakes to the salmon mixture for a fiery kick.
* Vegetarian Rice Balls: Substitute the salmon with avocado, edamame, or tofu for a vegetarian-friendly option.
* Sesame Seed Rice Balls: Roll the finished rice balls in sesame seeds for added flavor and crunch.
* Tempura Rice Balls: Lightly batter and deep-fry the rice balls for a crispy and indulgent treat.
* Brown Rice Option: Use brown rice instead of white rice for a nuttier flavor and added fiber.
I truly believe that once you try this recipe, it will become a staple in your kitchen. It’s the perfect way to satisfy your cravings for something delicious and healthy, and it’s so much fun to make!
So, what are you waiting for? Gather your ingredients, put on your apron, and get ready to create some culinary magic. I’m confident that you’ll love these Salmon Cheese Seaweed Rice Balls as much as I do.
And most importantly, I want to hear about your experience! Did you try the recipe? Did you make any variations? What did you think? Share your photos and comments on social media using #MyRiceBallAdventure. I can’t wait to see what you create! Happy cooking!
Salmon Cheese Seaweed Rice Ball: A Delicious & Easy Recipe
Easy salmon cream cheese rice balls wrapped in seaweed. Great snack, appetizer, or light meal!
Ingredients
- 2 cups short-grain sushi rice
- 2 1/4 cups water
- 1/4 cup rice vinegar
- 2 tablespoons sugar
- 1 teaspoon salt
- 8 ounces skinless salmon fillet
- 1 tablespoon soy sauce
- 1 teaspoon mirin (sweet rice wine)
- 1/2 teaspoon grated ginger
- 2 ounces cream cheese, softened
- 1 tablespoon chopped chives
- 1 teaspoon lemon juice
- Pinch of black pepper
- 5 sheets nori seaweed, cut into strips or squares
- Sesame seeds (black and/or white)
- Furikake seasoning
- Soy sauce (for dipping)
- Pickled ginger
Instructions
- Rinse the Rice: Place the sushi rice in a fine-mesh sieve and rinse under cold running water until the water runs clear (3-4 minutes).
- Cook the Rice: Transfer the rinsed rice to a rice cooker or a heavy-bottomed pot. Add 2 1/4 cups of water. If using a rice cooker, follow the manufacturer’s instructions. If using a pot, bring the water to a boil over high heat. Once boiling, reduce the heat to low, cover tightly, and simmer for 18-20 minutes, or until all the water is absorbed. Do not lift the lid during cooking!
- Prepare the Sushi Vinegar: In a small saucepan, combine the rice vinegar, sugar, and salt. Heat over low heat, stirring constantly, until the sugar and salt are completely dissolved. Do not boil. Remove from heat and let cool slightly.
- Season the Rice: Once the rice is cooked, let it stand, covered, for 10 minutes. Gently fluff the rice with a rice paddle or wooden spoon. Transfer the rice to a large, non-metallic bowl.
- Combine Rice and Vinegar: Gradually drizzle the sushi vinegar over the rice, using the rice paddle to gently cut and fold the vinegar into the rice. Avoid mashing the rice. Fan the rice with a fan or piece of cardboard while mixing to help it cool down quickly. Cool to lukewarm.
- Cook the Salmon: Preheat oven to 375°F (190°C). Place the salmon fillet on a baking sheet lined with parchment paper. In a small bowl, whisk together the soy sauce, mirin, and grated ginger. Brush the mixture over the salmon fillet. Bake for 12-15 minutes, or until the salmon is cooked through and flakes easily with a fork.
- Flake the Salmon: Once the salmon is cooked, let it cool slightly. Use a fork to flake the salmon into small pieces, removing any bones or skin that may be present.
- Combine Filling Ingredients: In a medium bowl, combine the flaked salmon, softened cream cheese, chopped chives, lemon juice, and black pepper. Mix well until all ingredients are evenly incorporated. Taste and adjust seasonings as needed.
- Prepare Your Hands: Keep a small bowl of water nearby. Wet your hands lightly before handling the rice.
- Shape the Rice Balls: Take a small handful of sushi rice (about 1/4 cup) and gently form it into a ball or triangle shape in the palm of your hand. Be careful not to pack the rice too tightly.
- Create a Well: Use your thumb to make a small indentation or well in the center of the rice ball.
- Fill the Rice Ball: Spoon about 1-2 teaspoons of the salmon cream cheese filling into the well.
- Close the Rice Ball: Gently bring the rice around the filling to enclose it completely. Reshape the rice ball to your desired shape, ensuring that the filling is completely sealed inside.
- Wrap with Seaweed: Cut the nori seaweed sheets into strips or squares. You can wrap the entire rice ball with seaweed, or just add a small strip or square to the bottom or side. Moisten the seaweed slightly with water to help it adhere to the rice.
- Repeat: Repeat steps 9-14 with the remaining rice and filling.
- Garnish (Optional): If desired, garnish the rice balls with sesame seeds or furikake seasoning.
Notes
- Rice Temperature: Make sure the sushi rice is cooled to lukewarm before assembling the rice balls. Hot rice will melt the cream cheese and make the rice balls difficult to handle.
- Filling Variations: Feel free to experiment with different fillings. Other options include tuna mayonnaise, spicy tuna, avocado, cucumber, or pickled vegetables.
- Seaweed Options: Besides nori, you can also use other types of seaweed, such as kombu or wakame, for added flavor and texture.
- Vegetarian Option: For a vegetarian version, replace the salmon with cooked mushrooms, tofu, or avocado.
- Make Ahead: You can prepare the sushi rice and salmon filling ahead of time and store them separately in the refrigerator. Assemble the rice balls just before serving.
- Storage: Store leftover rice balls in an airtight container in the refrigerator for up to 2 days. The rice may become slightly harder over time, but they will still be safe to eat.
- Serving Suggestions: Serve the salmon cheese seaweed rice balls as a snack, appetizer, or light meal. They are also great for lunchboxes or picnics. Serve with soy sauce for dipping and pickled ginger to cleanse the palate.
- Rice Cooker is Key: While you can cook rice on the stovetop, a rice cooker truly simplifies the process and ensures perfectly cooked rice every time. If you plan on making sushi rice regularly, investing in a good quality rice cooker is highly recommended.
- Don’t Overmix the Filling: When mixing the salmon filling, be gentle. Overmixing can make the cream cheese watery and affect the texture of the filling.
- Presentation Matters: The way you present your rice balls can make a big difference. Arrange them artfully on a plate and garnish with fresh herbs or edible flowers for a more elegant presentation.


Leave a Comment