
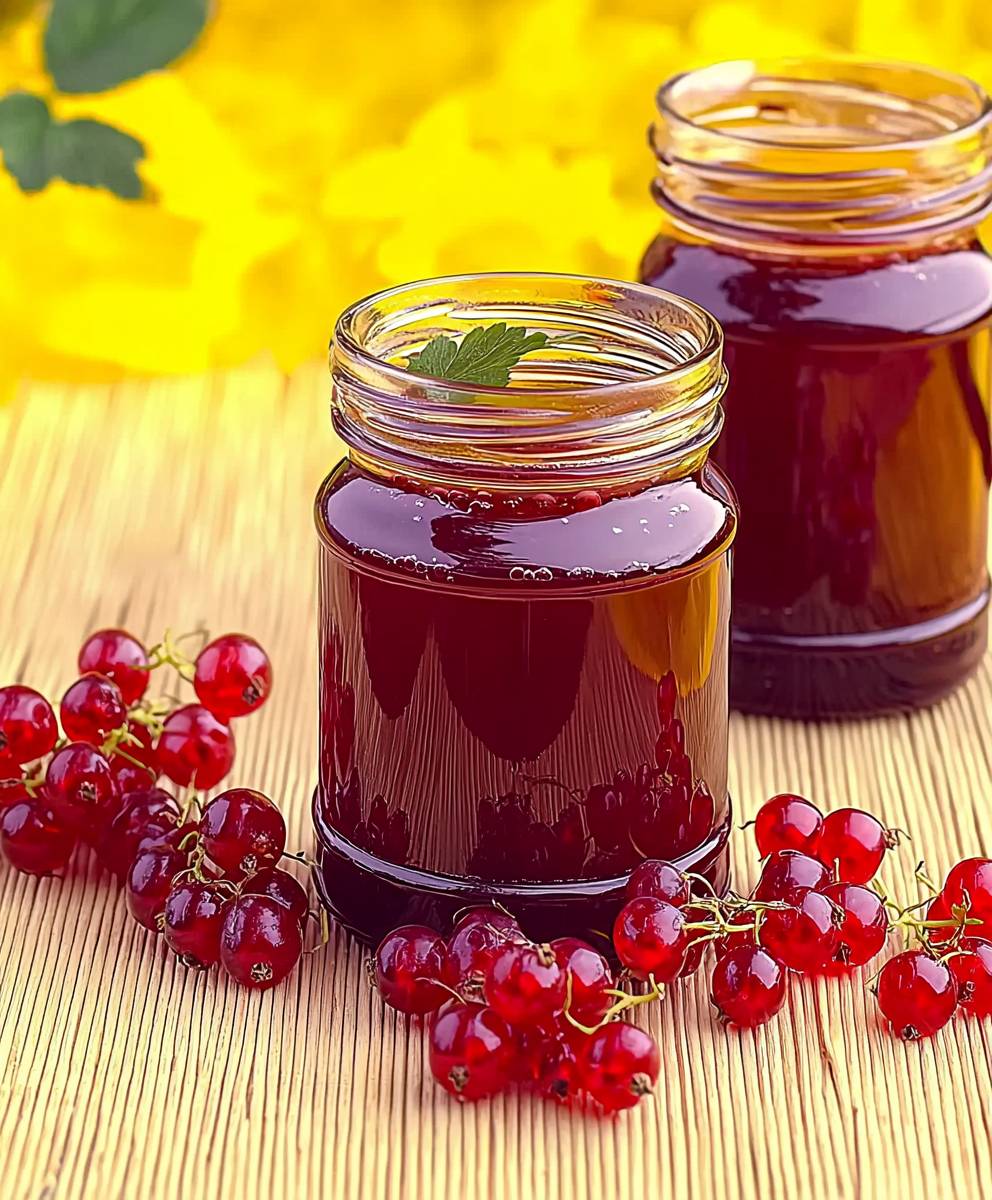
Redcurrant syrup: a taste of summer bottled for year-round enjoyment! Imagine drizzling a vibrant, ruby-red elixir over your morning pancakes, stirring it into sparkling water for a refreshing spritzer, or using it to glaze a succulent roast chicken. This isn’t just a recipe; it’s a portal to sun-drenched gardens and the sweet-tart tang of perfectly ripe redcurrants.
While the exact origins of fruit syrups are difficult to pinpoint, the practice of preserving fruits in sugar has been around for centuries. In many European cultures, redcurrants have long been cherished for their unique flavor profile and their ability to add a touch of elegance to both sweet and savory dishes. Think of it as a sophisticated cousin to simple syrup, boasting a more complex and nuanced flavor.
People adore redcurrant syrup for its versatility and delightful taste. The bright, slightly acidic flavor cuts through richness beautifully, making it a perfect accompaniment to desserts like cheesecake or ice cream. Its vibrant color also adds a visual appeal to any dish or drink. Plus, making your own redcurrant syrup is surprisingly easy, allowing you to capture the essence of summer and enjoy it long after the season has passed. I find it incredibly satisfying to create something so delicious and versatile from scratch, and I know you will too!

Ingredients:
- 1 kg fresh redcurrants, stemmed and washed
- 500g granulated sugar (adjust to taste depending on the tartness of the currants)
- 250ml water
- 1 tablespoon lemon juice (optional, but helps with preservation and adds brightness)
- Sterilized bottles or jars for storage
- Cheesecloth or a fine-mesh sieve
Preparing the Redcurrants:
- Wash and Stem the Redcurrants: Begin by carefully washing the redcurrants under cold running water. Gently remove any stems or leaves. It’s important to remove as much debris as possible to ensure a clean and pure syrup. I like to use a colander for this, making sure to shake off any excess water.
- Crush the Redcurrants: In a large, non-reactive pot (stainless steel or enamel is best), place the washed redcurrants. Using a potato masher or the back of a wooden spoon, gently crush the redcurrants to release their juices. Don’t overdo it; you just want to break them open a bit. This step is crucial for extracting the maximum flavor and color.
- Add Water: Pour the water into the pot with the crushed redcurrants. The water helps to further extract the juice and prevents the currants from scorching during the initial heating process.
Cooking the Redcurrant Mixture:
- Simmer the Mixture: Place the pot over medium heat and bring the mixture to a gentle simmer. Once simmering, reduce the heat to low and let it cook for about 15-20 minutes, stirring occasionally. This allows the redcurrants to soften and release their juices fully. You’ll notice the color deepening and the aroma becoming more pronounced.
- Strain the Mixture: After simmering, remove the pot from the heat. Place a cheesecloth-lined colander or a fine-mesh sieve over a large bowl. Carefully pour the redcurrant mixture into the cheesecloth or sieve. Allow the juice to drip through naturally. Avoid pressing down on the solids, as this can result in a cloudy syrup. I usually let it sit for at least an hour, or even overnight in the refrigerator, to ensure I get every last drop of that precious juice.
- Discard the Solids: Once all the juice has been extracted, discard the solids (the pulp and skins). You can compost them or throw them away.
Making the Syrup:
- Measure the Juice: Measure the amount of redcurrant juice you have. This is important for determining the correct amount of sugar to add. I use a liquid measuring cup for accuracy.
- Combine Juice and Sugar: In a clean, non-reactive pot, combine the redcurrant juice and the granulated sugar. The general rule of thumb is to use a 2:1 ratio of juice to sugar (e.g., for every 2 cups of juice, use 1 cup of sugar). However, you can adjust the amount of sugar to your liking, depending on how sweet you want the syrup to be. If your redcurrants are particularly tart, you might want to add a little more sugar.
- Add Lemon Juice (Optional): If you’re using lemon juice, add it to the pot now. The lemon juice not only enhances the flavor but also acts as a natural preservative.
- Dissolve the Sugar: Place the pot over medium heat and stir constantly until the sugar is completely dissolved. Make sure there are no sugar crystals remaining at the bottom of the pot. This is a crucial step to ensure a smooth and clear syrup.
- Simmer the Syrup: Once the sugar is dissolved, bring the syrup to a gentle simmer. Reduce the heat to low and let it simmer for about 10-15 minutes, or until the syrup has thickened slightly. To test the consistency, place a small spoonful of syrup on a chilled plate. Let it cool for a few seconds, then push it with your finger. If it wrinkles slightly, it’s ready. Be careful not to overcook the syrup, as it will thicken too much as it cools.
- Skim Off Any Foam: As the syrup simmers, you may notice some foam forming on the surface. Use a spoon to skim off any foam to ensure a clear and beautiful syrup.
Bottling and Storing the Redcurrant Syrup:
- Sterilize Bottles or Jars: While the syrup is simmering, sterilize your bottles or jars. You can do this by boiling them in water for 10 minutes, or by running them through a hot cycle in your dishwasher. Make sure the bottles are completely dry before filling them.
- Fill the Bottles: Carefully pour the hot syrup into the sterilized bottles or jars, leaving about 1/4 inch of headspace at the top. A funnel can be helpful for this step to prevent spills.
- Seal the Bottles: If you’re using bottles with screw-top lids, tighten the lids securely. If you’re using jars with two-part lids (flat lid and ring), place the flat lid on the jar and screw on the ring until it’s fingertip tight.
- Process for Longer Storage (Optional): For longer storage, you can process the filled bottles in a boiling water bath for 10 minutes. This will create a vacuum seal and help to preserve the syrup for a longer period. However, if you plan to use the syrup within a few months, this step is not necessary.
- Cool and Store: Let the bottles cool completely at room temperature. As they cool, you may hear a “popping” sound, which indicates that the lids have sealed properly. Once cooled, store the redcurrant syrup in a cool, dark place. Properly sealed bottles can be stored for up to a year. Once opened, store the syrup in the refrigerator.
Tips and Variations:
- Adjust Sweetness: As mentioned earlier, you can adjust the amount of sugar to your liking. Taste the syrup as it simmers and add more sugar if needed.
- Add Spices: For a more complex flavor, you can add spices such as cinnamon sticks, cloves, or star anise to the pot while the syrup is simmering. Remove the spices before bottling the syrup.
- Infuse with Herbs: You can also infuse the syrup with fresh herbs such as mint or rosemary. Add the herbs to the pot during the last few minutes of simmering, then remove them before bottling.
- Use Frozen Redcurrants: If fresh redcurrants are not available, you can use frozen redcurrants. Thaw them slightly before using.
- For a Thicker Syrup: If you prefer a thicker syrup, you can add a small amount of pectin to the pot while the syrup is simmering. Follow the instructions on the pectin package.
Serving Suggestions:
- Pancakes and Waffles: Drizzle the redcurrant syrup over pancakes, waffles, or French toast for a delicious and fruity breakfast.
- Ice Cream: Use the syrup as a topping for ice cream or frozen yogurt.
- Cocktails: Add a splash of redcurrant syrup to cocktails or mocktails for a burst of flavor. It pairs well with gin, vodka, and sparkling wine.
- Yogurt and Oatmeal: Stir the syrup into yogurt or oatmeal for a healthy and flavorful snack or breakfast.
- Meat Glaze: Use the syrup as a glaze for roasted meats, such as chicken or pork.
- Salad Dressing: Whisk the syrup into salad dressings for a sweet and tangy flavor.
- Cake Soak: Use the syrup to soak cake layers for added moisture and flavor.
Enjoy your homemade redcurrant syrup! I hope you find this recipe helpful and that you create a delicious batch of syrup that you can enjoy in many different ways. Remember to always use caution when working with hot liquids and to follow proper sterilization techniques to ensure the safety and longevity of your syrup. Happy cooking!
Conclusion:
This redcurrant syrup recipe isn’t just another recipe; it’s a gateway to a summer garden in a bottle, a burst of sunshine you can enjoy all year round. I truly believe you’ll find it’s a must-try for anyone who appreciates vibrant flavors and the satisfaction of creating something delicious from scratch. The intense, tangy-sweet flavor of homemade redcurrant syrup is simply unmatched by anything you can buy in a store. It’s a testament to the simple beauty of fresh ingredients and a little bit of kitchen magic.
But why is it a must-try? Because it’s incredibly versatile! Think beyond just drizzling it on pancakes (though, trust me, that’s a fantastic start!). Imagine adding a splash to your sparkling water for a refreshing summer cooler, or using it to create a sophisticated cocktail. It elevates simple desserts like vanilla ice cream or yogurt to something truly special. And for the adventurous cooks out there, consider using it as a glaze for grilled chicken or pork the sweet and tart combination is absolutely divine.
Serving Suggestions and Variations:
The possibilities are truly endless! For a simple yet elegant dessert, pour the redcurrant syrup over a warm slice of pound cake and top with fresh berries. Or, whisk it into a vinaigrette for a vibrant salad dressing. If you’re feeling creative, try infusing the syrup with other flavors. A sprig of rosemary or thyme added during the simmering process can add a lovely herbal note. A pinch of chili flakes can provide a subtle kick. And for a truly decadent treat, drizzle it over a creamy cheesecake.
Don’t be afraid to experiment! That’s the beauty of cooking, after all. This recipe is a starting point, a foundation upon which you can build your own culinary creations. Think of it as a blank canvas, ready to be painted with your own unique flavors and preferences.
Ready to give it a try?
I know that making your own syrup might seem a little daunting at first, but I promise you, it’s much easier than you think. The recipe is straightforward, the ingredients are simple, and the results are absolutely worth the effort. Plus, there’s something incredibly satisfying about creating something so delicious from scratch.
I’m so confident that you’ll love this redcurrant syrup recipe that I urge you to give it a go. Don’t let those beautiful redcurrants go to waste! Transform them into a vibrant, flavorful syrup that you can enjoy for months to come.
And once you’ve made it, I’d love to hear about your experience! Share your photos, your variations, and your serving suggestions in the comments below. Let’s create a community of redcurrant syrup enthusiasts! I can’t wait to see what delicious creations you come up with. Happy cooking!
Redcurrant Syrup: The Ultimate Guide to Making and Using It
Vibrant, tangy homemade redcurrant syrup for pancakes, cocktails, desserts, and more! Easy recipe capturing fresh redcurrant flavor.
Ingredients
- 1 kg fresh redcurrants, stemmed and washed
- 500g granulated sugar (adjust to taste depending on the tartness of the currants)
- 250ml water
- 1 tablespoon lemon juice (optional, but helps with preservation and adds brightness)
- Sterilized bottles or jars for storage
- Cheesecloth or a fine-mesh sieve
Instructions
- Wash and Stem the Redcurrants: Begin by carefully washing the redcurrants under cold running water. Gently remove any stems or leaves. It’s important to remove as much debris as possible to ensure a clean and pure syrup. I like to use a colander for this, making sure to shake off any excess water.
- Crush the Redcurrants: In a large, non-reactive pot (stainless steel or enamel is best), place the washed redcurrants. Using a potato masher or the back of a wooden spoon, gently crush the redcurrants to release their juices. Don’t overdo it; you just want to break them open a bit. This step is crucial for extracting the maximum flavor and color.
- Add Water: Pour the water into the pot with the crushed redcurrants. The water helps to further extract the juice and prevents the currants from scorching during the initial heating process.
- Simmer the Mixture: Place the pot over medium heat and bring the mixture to a gentle simmer. Once simmering, reduce the heat to low and let it cook for about 15-20 minutes, stirring occasionally. This allows the redcurrants to soften and release their juices fully. You’ll notice the color deepening and the aroma becoming more pronounced.
- Strain the Mixture: After simmering, remove the pot from the heat. Place a cheesecloth-lined colander or a fine-mesh sieve over a large bowl. Carefully pour the redcurrant mixture into the cheesecloth or sieve. Allow the juice to drip through naturally. Avoid pressing down on the solids, as this can result in a cloudy syrup. I usually let it sit for at least an hour, or even overnight in the refrigerator, to ensure I get every last drop of that precious juice.
- Discard the Solids: Once all the juice has been extracted, discard the solids (the pulp and skins). You can compost them or throw them away.
- Measure the Juice: Measure the amount of redcurrant juice you have. This is important for determining the correct amount of sugar to add. I use a liquid measuring cup for accuracy.
- Combine Juice and Sugar: In a clean, non-reactive pot, combine the redcurrant juice and the granulated sugar. The general rule of thumb is to use a 2:1 ratio of juice to sugar (e.g., for every 2 cups of juice, use 1 cup of sugar). However, you can adjust the amount of sugar to your liking, depending on how sweet you want the syrup to be. If your redcurrants are particularly tart, you might want to add a little more sugar.
- Add Lemon Juice (Optional): If you’re using lemon juice, add it to the pot now. The lemon juice not only enhances the flavor but also acts as a natural preservative.
- Dissolve the Sugar: Place the pot over medium heat and stir constantly until the sugar is completely dissolved. Make sure there are no sugar crystals remaining at the bottom of the pot. This is a crucial step to ensure a smooth and clear syrup.
- Simmer the Syrup: Once the sugar is dissolved, bring the syrup to a gentle simmer. Reduce the heat to low and let it simmer for about 10-15 minutes, or until the syrup has thickened slightly. To test the consistency, place a small spoonful of syrup on a chilled plate. Let it cool for a few seconds, then push it with your finger. If it wrinkles slightly, it’s ready. Be careful not to overcook the syrup, as it will thicken too much as it cools.
- Skim Off Any Foam: As the syrup simmers, you may notice some foam forming on the surface. Use a spoon to skim off any foam to ensure a clear and beautiful syrup.
- Sterilize Bottles or Jars: While the syrup is simmering, sterilize your bottles or jars. You can do this by boiling them in water for 10 minutes, or by running them through a hot cycle in your dishwasher. Make sure the bottles are completely dry before filling them.
- Fill the Bottles: Carefully pour the hot syrup into the sterilized bottles or jars, leaving about 1/4 inch of headspace at the top. A funnel can be helpful for this step to prevent spills.
- Seal the Bottles: If you’re using bottles with screw-top lids, tighten the lids securely. If you’re using jars with two-part lids (flat lid and ring), place the flat lid on the jar and screw on the ring until it’s fingertip tight.
- Process for Longer Storage (Optional): For longer storage, you can process the filled bottles in a boiling water bath for 10 minutes. This will create a vacuum seal and help to preserve the syrup for a longer period. However, if you plan to use the syrup within a few months, this step is not necessary.
- Cool and Store: Let the bottles cool completely at room temperature. As they cool, you may hear a “popping” sound, which indicates that the lids have sealed properly. Once cooled, store the redcurrant syrup in a cool, dark place. Properly sealed bottles can be stored for up to a year. Once opened, store the syrup in the refrigerator.
Notes
- Adjust Sweetness: Adjust the amount of sugar to your liking. Taste the syrup as it simmers and add more sugar if needed.
- Add Spices: For a more complex flavor, you can add spices such as cinnamon sticks, cloves, or star anise to the pot while the syrup is simmering. Remove the spices before bottling the syrup.
- Infuse with Herbs: Infuse the syrup with fresh herbs such as mint or rosemary. Add the herbs to the pot during the last few minutes of simmering, then remove them before bottling.
- Use Frozen Redcurrants: If fresh redcurrants are not available, you can use frozen redcurrants. Thaw them slightly before using.
- For a Thicker Syrup: If you prefer a thicker syrup, you can add a small amount of pectin to the pot while the syrup is simmering. Follow the instructions on the pectin package.
- Straining Time: Allowing the strained juice to sit overnight in the refrigerator will maximize the yield and flavor.
- Sterilization: Ensure proper sterilization techniques are followed to ensure the safety and longevity of your syrup.

Leave a Comment