
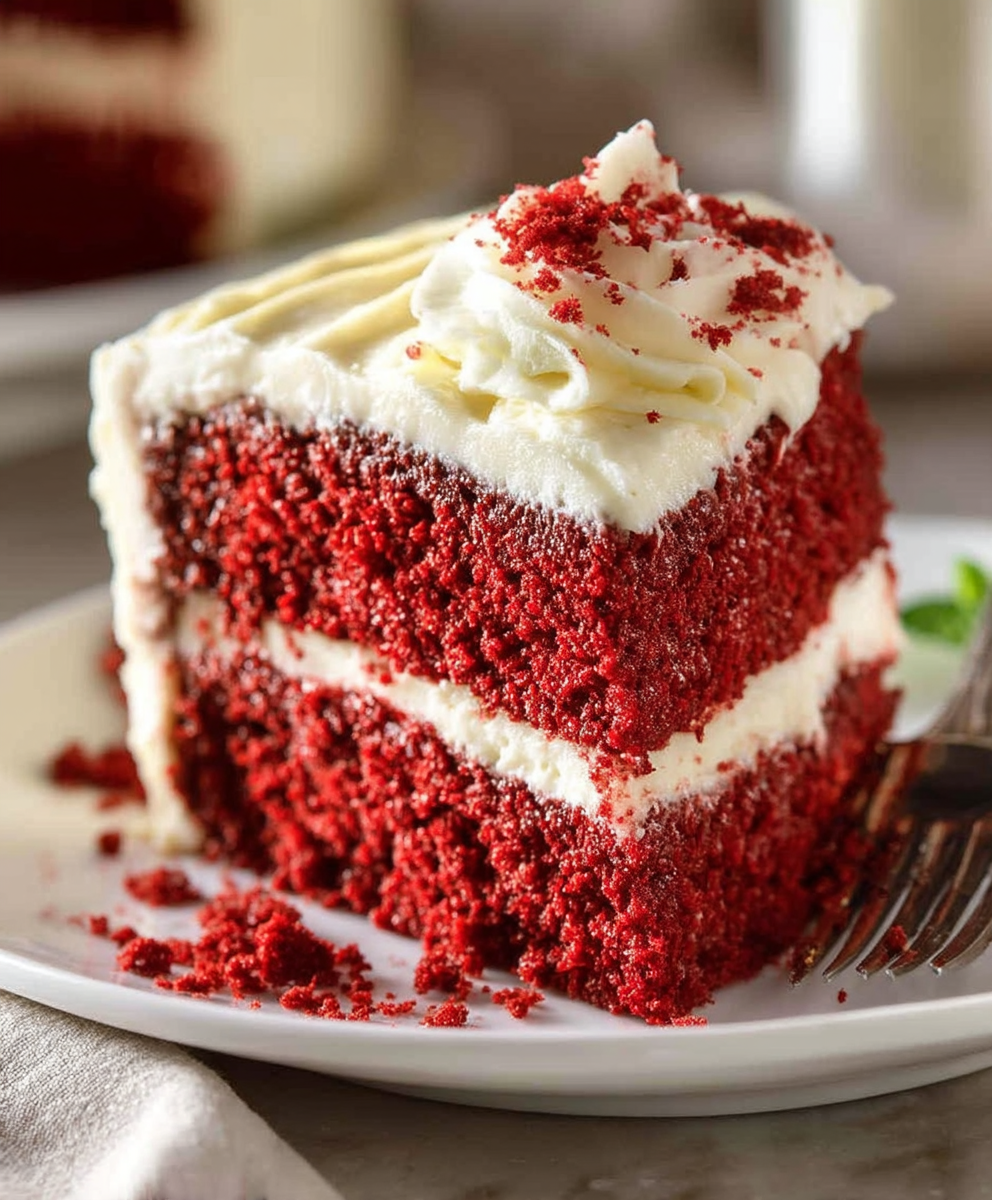
Red Velvet Cake: just the name conjures images of elegance, indulgence, and a certain air of mystery, doesn’t it? This isn’t just any cake; it’s a statement, a celebration, and a guaranteed crowd-pleaser. Have you ever wondered what makes this particular cake so irresistible? I’m here to tell you that it’s more than just the striking color; it’s a symphony of flavors and textures that dance on your palate.
The history of Red Velvet Cake is as rich and intriguing as the cake itself. While its exact origins are debated, many believe it gained popularity during the Great Depression, when bakers used beet juice to enhance the color of their cakes and add moisture. The vibrant red hue, often achieved with food coloring these days, adds to its allure, making it perfect for special occasions like Valentine’s Day, birthdays, or simply a delightful weekend treat.
But what truly makes this cake a beloved classic? It’s the perfect balance of tangy buttermilk, subtle cocoa, and a velvety smooth cream cheese frosting. The crumb is incredibly tender and moist, practically melting in your mouth with each bite. People adore it for its unique flavor profile, which isn’t quite chocolate, but has a hint of cocoa that complements the tangy frosting beautifully. Plus, let’s be honest, who can resist that stunning red color? It’s a visual masterpiece that tastes even better than it looks! So, are you ready to bake your own slice of heaven? Let’s get started!

Ingredients:
- For the Cake:
- 2 ½ cups all-purpose flour
- 2 cups granulated sugar
- 1 teaspoon baking soda
- 1 teaspoon baking powder
- 1 teaspoon salt
- 1 cup (2 sticks) unsalted butter, softened
- 2 large eggs
- 1 cup buttermilk
- 1 ounce (2 tablespoons) red food coloring
- 1 teaspoon white vinegar
- 1 teaspoon vanilla extract
- 2 tablespoons unsweetened cocoa powder
- 1 cup hot brewed coffee
- For the Cream Cheese Frosting:
- 8 ounces cream cheese, softened
- 1 cup (2 sticks) unsalted butter, softened
- 4 cups powdered sugar
- 2 teaspoons vanilla extract
- Pinch of salt
Preparing the Red Velvet Cake
- Preheat and Prep: I always start by preheating my oven to 350°F (175°C). While the oven is heating up, grease and flour two 9-inch round cake pans. You can also line the bottoms with parchment paper rounds for extra insurance against sticking. Trust me, it’s worth the extra step!
- Combine Dry Ingredients: In a large bowl, whisk together the flour, sugar, baking soda, baking powder, salt, and cocoa powder. Make sure everything is evenly distributed. This step is crucial for a consistent texture.
- Cream Butter and Sugar: In a separate large bowl (or the bowl of your stand mixer), cream together the softened butter and sugar until light and fluffy. This usually takes about 3-5 minutes on medium speed. Don’t rush this step; it’s important for incorporating air into the batter.
- Add Eggs: Beat in the eggs one at a time, mixing well after each addition. Then, stir in the vanilla extract.
- Alternate Wet and Dry Ingredients: Gradually add the dry ingredients to the wet ingredients, alternating with the buttermilk. Begin and end with the dry ingredients. So, add about a third of the dry ingredients, then half of the buttermilk, then another third of the dry ingredients, the remaining buttermilk, and finally the last of the dry ingredients. Mix until just combined. Be careful not to overmix! Overmixing can lead to a tough cake.
- Prepare the Red Velvet Magic: In a small bowl, whisk together the red food coloring, vinegar, and vanilla extract. Add this mixture to the batter and mix until well combined. The vinegar helps to activate the baking soda and gives the cake its characteristic tang.
- Add Hot Coffee: Slowly pour in the hot brewed coffee and mix until just combined. The hot coffee helps to bloom the cocoa powder and enhances the flavor of the cake. The batter will be quite thin, but don’t worry, that’s perfectly normal!
- Divide and Bake: Divide the batter evenly between the prepared cake pans. Bake for 30-35 minutes, or until a wooden skewer inserted into the center comes out clean.
- Cool the Cakes: Let the cakes cool in the pans for 10 minutes before inverting them onto a wire rack to cool completely. Make sure the cakes are completely cool before frosting. This is very important to prevent the frosting from melting.
Making the Cream Cheese Frosting
- Cream Cheese and Butter: In a large bowl (or the bowl of your stand mixer), beat together the softened cream cheese and butter until smooth and creamy. Make sure both the cream cheese and butter are at room temperature to avoid lumps in your frosting.
- Add Powdered Sugar: Gradually add the powdered sugar, one cup at a time, beating on low speed until combined. Be careful not to add the powdered sugar too quickly, or you’ll end up with a cloud of sugar in your kitchen!
- Add Vanilla and Salt: Stir in the vanilla extract and a pinch of salt. The salt helps to balance the sweetness of the frosting.
- Whip Until Fluffy: Increase the speed to medium-high and beat for 2-3 minutes, or until the frosting is light and fluffy.
Assembling the Red Velvet Cake
- Level the Cakes: Once the cakes are completely cool, use a serrated knife to level the tops of the cakes. This will ensure that your cake is even and stable.
- First Layer of Frosting: Place one cake layer on a serving plate or cake stand. Spread a generous layer of cream cheese frosting evenly over the top.
- Second Layer: Carefully place the second cake layer on top of the frosting.
- Frost the Cake: Frost the entire cake with the remaining cream cheese frosting. You can create a smooth finish or add swirls and texture with a spatula.
- Optional Decorations: If you want to get fancy, you can decorate the cake with red velvet cake crumbs (simply crumble the cake scraps from leveling the cakes), chopped nuts, or fresh berries.
- Chill and Serve: Refrigerate the cake for at least 30 minutes before serving. This will allow the frosting to set and make the cake easier to slice.
Tips for Success
- Room Temperature Ingredients: Using room temperature ingredients, especially the butter, cream cheese, and eggs, is crucial for a smooth and well-emulsified batter and frosting.
- Don’t Overmix: Overmixing the cake batter can develop the gluten in the flour, resulting in a tough cake. Mix until just combined.
- Properly Measure Flour: Spoon the flour into your measuring cup and level it off with a knife. Avoid scooping the flour directly from the bag, as this can pack the flour and result in too much flour in the recipe.
- Test for Doneness: Use a wooden skewer or toothpick to test for doneness. Insert it into the center of the cake; if it comes out clean or with a few moist crumbs, the cake is done.
- Cool Completely: Make sure the cakes are completely cool before frosting to prevent the frosting from melting.
- Chill the Cake: Chilling the cake before serving allows the frosting to set and makes the cake easier to slice.
Variations and Substitutions
- Chocolate Chips: Add chocolate chips to the cake batter for an extra chocolatey treat.
- Nuts: Add chopped nuts, such as pecans or walnuts, to the cake batter or frosting for added texture and flavor.
- Different Frosting: If you’re not a fan of cream cheese frosting, you can use a classic buttercream frosting or a chocolate ganache.
- Gluten-Free: To make this cake gluten-free, use a gluten-free all-purpose flour blend.
- Vegan: To make this cake vegan, substitute the butter with vegan butter, the eggs with flax eggs (1 tablespoon ground flaxseed mixed with 3 tablespoons water per egg), and the buttermilk with plant-based milk mixed with 1 tablespoon of lemon juice or vinegar. Use vegan cream cheese for the frosting.
Storage Instructions
- Room Temperature: You can store the frosted cake at room temperature for up to 2 days, but it’s best to refrigerate it, especially if the weather is warm.
- Refrigerator: Store the frosted cake in the refrigerator for up to 5 days.
- Freezer: You can freeze the frosted cake for up to 2 months. Wrap it tightly in plastic wrap and then in aluminum foil. Thaw in the refrigerator overnight before serving.
Troubleshooting
- Cake is Dry: Make sure you’re not overbaking the cake. Also, ensure you’re using the correct amount of liquid ingredients.
- Cake is Dense: Avoid overmixing the batter. Also, make sure your baking powder and baking soda are fresh.
- Frosting is Too Soft: Add more powdered sugar, one tablespoon at a time, until the frosting reaches the desired consistency.
- Frosting is Too Stiff: Add a tablespoon of milk or cream at a time until the frosting reaches the desired consistency.
Conclusion:
This isn’t just another cake recipe; it’s an invitation to experience the velvety smooth texture and subtly tangy flavor that makes Red Velvet Cake a timeless classic. From its vibrant hue to its melt-in-your-mouth crumb, every element of this cake is designed to delight. I truly believe this recipe captures the essence of what a Red Velvet Cake should be moist, flavorful, and utterly irresistible.
But why is this recipe a must-try? Beyond the perfect balance of cocoa, buttermilk, and vinegar that creates that signature tang, it’s the simplicity of the instructions that sets it apart. I’ve meticulously crafted this recipe to be accessible to bakers of all skill levels. Whether you’re a seasoned pro or just starting your baking journey, you’ll find this recipe straightforward and rewarding. The result? A show-stopping cake that will impress your friends and family.
And the best part? The possibilities are endless! While the classic cream cheese frosting is a perfect complement to the Red Velvet Cake, don’t be afraid to experiment. For a lighter touch, try a whipped cream frosting or a vanilla bean buttercream. If you’re feeling adventurous, consider adding a layer of raspberry jam between the cake layers for a burst of fruity flavor. Or, for a truly decadent treat, drizzle the finished cake with melted white chocolate.
Serving suggestions? This Red Velvet Cake is perfect for any occasion. It’s a stunning centerpiece for birthday celebrations, a delightful treat for holiday gatherings, or simply a comforting indulgence on a cozy weekend. Serve it with a scoop of vanilla ice cream, a dollop of whipped cream, or a sprinkle of fresh berries. A cup of coffee or tea is the perfect accompaniment. You can even cut the cake into squares and serve them as individual petit fours.
I’ve poured my heart and soul into perfecting this recipe, and I’m confident that you’ll love it as much as I do. But the real magic happens when you make it your own. Don’t be afraid to tweak the recipe to suit your preferences. Add a little more cocoa for a richer flavor, or a little less sugar for a slightly tangier taste. The most important thing is to have fun and enjoy the process.
So, what are you waiting for? Gather your ingredients, preheat your oven, and get ready to bake the most delicious Red Velvet Cake you’ve ever tasted. I can’t wait to hear about your baking adventures! Please, try this recipe and share your experience with me. Let me know what you think, what variations you tried, and how it turned out. Your feedback is invaluable, and it helps me to continue creating recipes that you’ll love. Share your photos on social media and tag me so I can see your beautiful creations! Happy baking! I am sure you will love this Red Velvet Cake recipe.
Red Velvet Cake: The Ultimate Guide to Baking Perfection
Classic Red Velvet Cake: tangy, moist crumb with luscious cream cheese frosting. Perfect for celebrations!
Ingredients
- 2 ½ cups all-purpose flour
- 2 cups granulated sugar
- 1 teaspoon baking soda
- 1 teaspoon baking powder
- 1 teaspoon salt
- 1 cup (2 sticks) unsalted butter, softened
- 2 large eggs
- 1 cup buttermilk
- 1 ounce (2 tablespoons) red food coloring
- 1 teaspoon white vinegar
- 1 teaspoon vanilla extract
- 2 tablespoons unsweetened cocoa powder
- 1 cup hot brewed coffee
- 8 ounces cream cheese, softened
- 1 cup (2 sticks) unsalted butter, softened
- 4 cups powdered sugar
- 2 teaspoons vanilla extract
- Pinch of salt
Instructions
- Preheat oven to 350°F (175°C). Grease and flour two 9-inch round cake pans. Line the bottoms with parchment paper rounds.
- In a large bowl, whisk together the flour, sugar, baking soda, baking powder, salt, and cocoa powder.
- In a separate large bowl (or stand mixer), cream together the softened butter and sugar until light and fluffy (3-5 minutes on medium speed).
- Beat in the eggs one at a time, mixing well after each addition. Stir in the vanilla extract.
- Gradually add the dry ingredients to the wet ingredients, alternating with the buttermilk. Begin and end with the dry ingredients. Mix until just combined. Be careful not to overmix!
- In a small bowl, whisk together the red food coloring, vinegar, and vanilla extract. Add this mixture to the batter and mix until well combined.
- Slowly pour in the hot brewed coffee and mix until just combined. The batter will be quite thin.
- Divide the batter evenly between the prepared cake pans. Bake for 30-35 minutes, or until a wooden skewer inserted into the center comes out clean.
- Let the cakes cool in the pans for 10 minutes before inverting them onto a wire rack to cool completely.
- In a large bowl (or stand mixer), beat together the softened cream cheese and butter until smooth and creamy.
- Gradually add the powdered sugar, one cup at a time, beating on low speed until combined.
- Stir in the vanilla extract and a pinch of salt.
- Increase the speed to medium-high and beat for 2-3 minutes, or until the frosting is light and fluffy.
- Once the cakes are completely cool, use a serrated knife to level the tops of the cakes.
- Place one cake layer on a serving plate or cake stand. Spread a generous layer of cream cheese frosting evenly over the top.
- Carefully place the second cake layer on top of the frosting.
- Frost the entire cake with the remaining cream cheese frosting. You can create a smooth finish or add swirls and texture with a spatula.
- Decorate the cake with red velvet cake crumbs, chopped nuts, or fresh berries.
- Refrigerate the cake for at least 30 minutes before serving.
Notes
- Room Temperature Ingredients: Using room temperature ingredients, especially the butter, cream cheese, and eggs, is crucial for a smooth and well-emulsified batter and frosting.
- Don’t Overmix: Overmixing the cake batter can develop the gluten in the flour, resulting in a tough cake. Mix until just combined.
- Properly Measure Flour: Spoon the flour into your measuring cup and level it off with a knife. Avoid scooping the flour directly from the bag, as this can pack the flour and result in too much flour in the recipe.
- Test for Doneness: Use a wooden skewer or toothpick to test for doneness. Insert it into the center of the cake; if it comes out clean or with a few moist crumbs, the cake is done.
- Cool Completely: Make sure the cakes are completely cool before frosting to prevent the frosting from melting.
- Chill the Cake: Chilling the cake before serving allows the frosting to set and makes the cake easier to slice.
Leave a Comment