
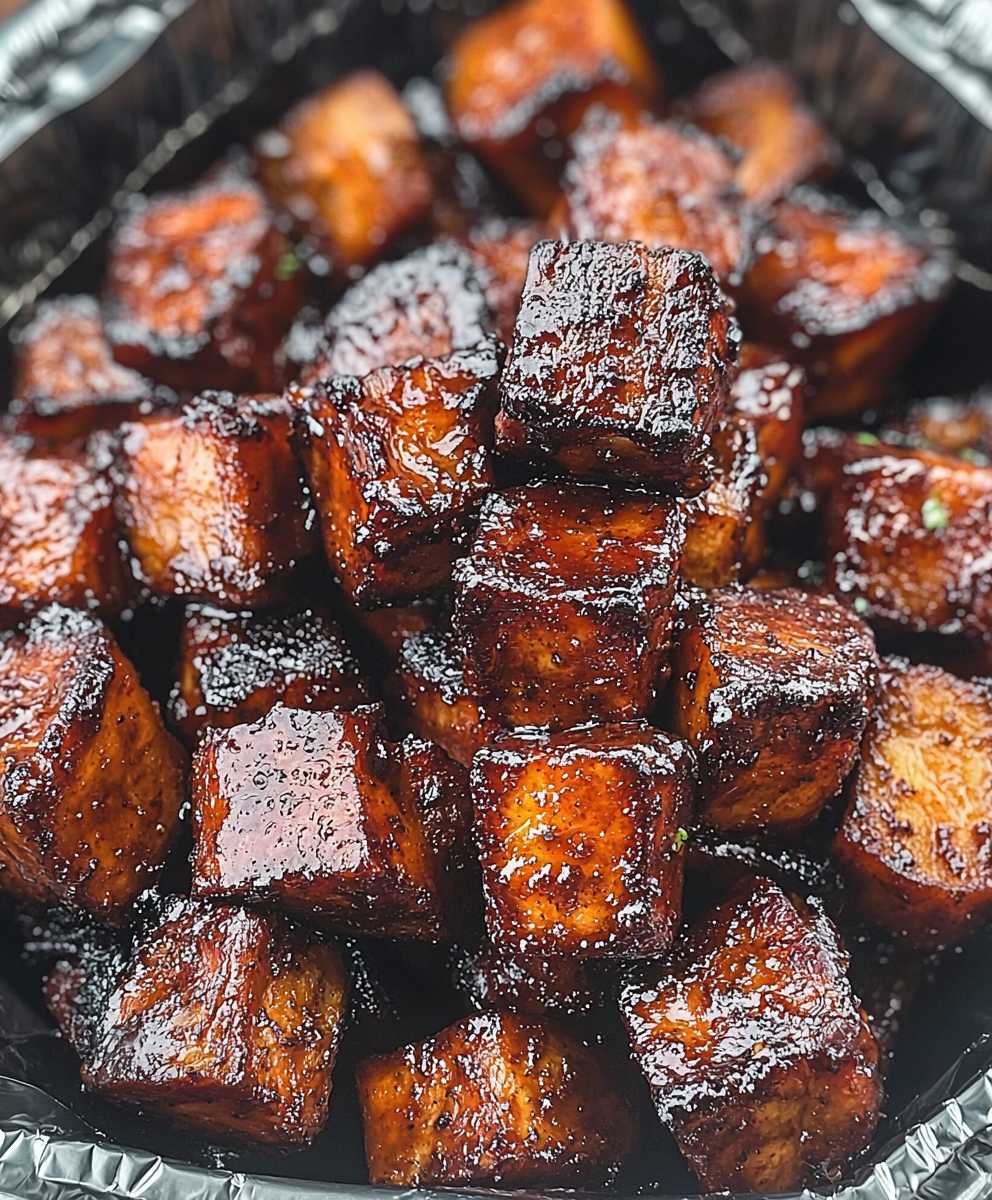
Poor Man Burnt Ends: Prepare to be amazed! Get ready to sink your teeth into a smoky, succulent, and utterly irresistible BBQ experience that won’t break the bank. Forget everything you thought you knew about expensive cuts of meat because we’re about to transform humble chuck roast into melt-in-your-mouth morsels of pure deliciousness.
Burnt ends, traditionally crafted from the point end of a brisket, are a Kansas City barbecue staple, celebrated for their rich, smoky flavor and crispy, caramelized bark. They represent the pinnacle of BBQ artistry, a testament to low-and-slow cooking. However, the cost of brisket can be prohibitive for many home cooks. That’s where our Poor Man Burnt Ends recipe comes in!
This recipe captures the essence of authentic burnt ends that perfect balance of smoky sweetness, tender interior, and satisfyingly crunchy exterior using the more affordable and readily available chuck roast. People adore burnt ends for their intense flavor, the textural contrast, and the sheer joy of eating something so decadently delicious. Plus, this method is surprisingly easy, making it perfect for weekend cookouts or even a weeknight treat. So, fire up your smoker (or oven!), and let’s get started on creating some BBQ magic!

Ingredients:
- 3-4 lbs Chuck Roast (approx. 2-3 inches thick)
- 1/4 cup Yellow Mustard (binder)
- 1/2 cup BBQ Rub (your favorite, or see recipe below)
- 1 cup Beef Broth
- 1/2 cup BBQ Sauce (your favorite, or see recipe below)
- 1/4 cup Brown Sugar, packed
- 2 tablespoons Butter, unsalted
- 1 tablespoon Worcestershire Sauce
- Optional: Pickled Jalapeños, for serving
- Optional: Coleslaw, for serving
- Optional: Buns, for sandwiches
BBQ Rub (Optional, but Recommended):
- 1/4 cup Brown Sugar, packed
- 2 tablespoons Smoked Paprika
- 1 tablespoon Garlic Powder
- 1 tablespoon Onion Powder
- 1 tablespoon Chili Powder
- 1 tablespoon Ground Cumin
- 1 teaspoon Black Pepper
- 1 teaspoon Kosher Salt
- 1/2 teaspoon Cayenne Pepper (optional, for heat)
BBQ Sauce (Optional, but Recommended):
- 1 cup Ketchup
- 1/4 cup Apple Cider Vinegar
- 1/4 cup Brown Sugar, packed
- 2 tablespoons Worcestershire Sauce
- 1 tablespoon Yellow Mustard
- 1 tablespoon Smoked Paprika
- 1 teaspoon Garlic Powder
- 1/2 teaspoon Onion Powder
- 1/4 teaspoon Black Pepper
- 1/4 teaspoon Cayenne Pepper (optional, for heat)
Preparing the Chuck Roast:
- Trim the Chuck Roast: Start by trimming any excess hard fat from the chuck roast. You don’t need to remove all the fat, as some marbling is desirable for flavor and moisture, but remove any large, thick pieces of fat that won’t render down during cooking.
- Apply the Mustard Binder: Generously coat the entire chuck roast with yellow mustard. The mustard acts as a binder, helping the BBQ rub adhere to the meat. Don’t worry, you won’t taste the mustard in the final product.
- Season with BBQ Rub: Liberally apply the BBQ rub to all sides of the mustard-coated chuck roast. Make sure to get an even coating, pressing the rub into the meat to help it stick. If you’re using a pre-made rub, that’s perfectly fine! If you’re making your own (and I highly recommend it!), ensure all the ingredients are well combined before applying.
- Rest (Optional): For best results, wrap the seasoned chuck roast tightly in plastic wrap and refrigerate for at least 2 hours, or preferably overnight. This allows the flavors of the rub to penetrate the meat. If you’re short on time, you can skip this step, but the flavor will be enhanced with resting.
Smoking the Chuck Roast (First Stage):
- Prepare Your Smoker: Preheat your smoker to 250°F (121°C). Use your preferred wood for smoking beef. Oak, hickory, or pecan are all excellent choices. Make sure your smoker is clean and ready to go.
- Place the Chuck Roast in the Smoker: Place the seasoned chuck roast directly on the smoker grate. Ensure there’s enough space around the roast for proper smoke circulation.
- Smoke for 3-4 Hours: Smoke the chuck roast for 3-4 hours, or until the internal temperature reaches around 160-170°F (71-77°C). Use a meat thermometer to monitor the internal temperature. The goal is to develop a good bark (the flavorful crust on the outside of the meat).
- Check for Bark Development: After 3-4 hours, check the bark. It should be a deep, rich color and feel firm to the touch. If the bark isn’t developed enough, continue smoking for another hour, checking periodically.
Braising the Chuck Roast (Second Stage):
- Prepare the Braising Liquid: In a large bowl or measuring cup, combine the beef broth, BBQ sauce, brown sugar, butter, and Worcestershire sauce. Whisk until the brown sugar is dissolved. This mixture will create a flavorful and tenderizing braising liquid.
- Wrap the Chuck Roast: Remove the chuck roast from the smoker and place it in a large aluminum foil pan or a double layer of heavy-duty aluminum foil. Pour the braising liquid over the chuck roast.
- Seal Tightly: Tightly seal the foil pan or wrap the chuck roast securely in the aluminum foil. The goal is to create a tight seal to trap the steam and braise the meat.
- Return to the Smoker: Place the wrapped chuck roast back in the smoker.
- Braise for 2-3 Hours: Braise the chuck roast for 2-3 hours, or until the internal temperature reaches around 203-205°F (95-96°C). The meat should be probe-tender, meaning a thermometer or probe should slide into the meat with little to no resistance.
Cubing and Finishing (Third Stage):
- Rest the Chuck Roast: Remove the wrapped chuck roast from the smoker and let it rest for at least 30 minutes, or up to an hour. This allows the juices to redistribute throughout the meat, resulting in a more tender and flavorful final product. Do not skip this step!
- Unwrap and Cube: Carefully unwrap the chuck roast, reserving the braising liquid. Place the chuck roast on a cutting board and use a sharp knife to cut it into 1-inch cubes.
- Return to the Pan: Place the cubed chuck roast back into the foil pan with the reserved braising liquid.
- Add More BBQ Sauce (Optional): If you want a saucier burnt end, add an additional 1/4 to 1/2 cup of BBQ sauce to the pan and gently toss to coat the cubes.
- Return to the Smoker (Final Stage): Place the uncovered foil pan back in the smoker.
- Cook for 30-60 Minutes: Cook the cubed chuck roast for another 30-60 minutes, or until the sauce has thickened and the burnt ends are sticky and caramelized. This final step is crucial for developing that signature “burnt end” texture.
Serving:
- Remove from Smoker: Remove the pan of Poor Man’s Burnt Ends from the smoker.
- Serve Immediately: Serve the Poor Man’s Burnt Ends immediately. They are delicious on their own, as an appetizer, or as a main course.
- Serving Suggestions:
- Sandwiches: Pile the burnt ends onto toasted buns for a delicious sandwich. Top with coleslaw and pickled jalapeños for extra flavor and texture.
- Appetizer: Serve the burnt ends on a platter with toothpicks for easy snacking.
- Main Course: Serve the burnt ends with your favorite sides, such as coleslaw, potato salad, baked beans, or mac and cheese.
- Toppings: Offer a variety of toppings, such as pickled onions, sliced pickles, and different BBQ sauces, so your guests can customize their burnt ends.
- Enjoy! Enjoy your delicious and tender Poor Man’s Burnt Ends!
Tips and Tricks:
- Choosing the Right Chuck Roast: Look for a chuck roast with good marbling (streaks of fat within the meat). This will ensure a more tender and flavorful final product.
- Don’t Skip the Resting Time: Resting the chuck roast after braising is crucial for allowing the juices to redistribute and prevent the meat from drying out.
- Adjust the BBQ Rub and Sauce to Your Taste: Feel free to adjust the ingredients in the BBQ rub and sauce to suit your personal preferences. If you like it spicier, add more cayenne pepper. If you prefer a sweeter sauce, add more brown sugar.
- Use a Meat Thermometer: A meat thermometer is essential for ensuring that the chuck roast is cooked to the correct internal temperature. This will help you avoid overcooking or undercooking the meat.
- Experiment with Different Wood: Try using different types of wood for smoking to experiment with different flavor profiles.
- Don’t Be Afraid to Experiment: This recipe is just a starting point. Feel free to experiment with different ingredients and techniques to create your own unique version of Poor Man’s Burnt Ends.
- Make it Ahead:
Conclusion:
Okay, friends, let’s recap why this Poor Man Burnt Ends recipe is about to become your new go-to for BBQ deliciousness. We’ve taken the incredible flavor profile of traditional burnt ends that smoky, sweet, and melt-in-your-mouth tenderness and made it accessible to everyone, regardless of budget or equipment. Forget spending a fortune on brisket; this chuck roast transformation is seriously impressive. The beauty of this recipe lies in its simplicity and the sheer depth of flavor you achieve with minimal effort. Its a guaranteed crowd-pleaser, perfect for weekend cookouts, game day gatherings, or even just a satisfying weeknight dinner. Trust me, the aroma alone will have your neighbors peeking over the fence!
But the best part? This recipe is incredibly versatile. While I’ve outlined my favorite method for achieving that perfect bark and tender interior, feel free to experiment with different wood chips for smoking. Hickory and oak are classic choices, but mesquite can add a bolder, more intense flavor. You can also adjust the sweetness level of the sauce to your liking. Prefer a spicier kick? Add a pinch of cayenne pepper or a dash of your favorite hot sauce to the rub or the finishing glaze.
Now, let’s talk serving suggestions. These Poor Man Burnt Ends are fantastic on their own, served with classic BBQ sides like coleslaw, potato salad, and baked beans. But don’t stop there! They’re also incredible in sliders, piled high on toasted buns with a dollop of creamy coleslaw. Or, chop them up and add them to mac and cheese for an unbelievably decadent comfort food experience. Another fantastic option is to use them as a topping for loaded baked potatoes or even in a hearty chili. The possibilities are truly endless!
And if you’re feeling adventurous, consider these variations:
* Spicy Burnt Ends: Add a generous amount of chili powder and cayenne pepper to the rub for a fiery kick.
* Coffee-Rubbed Burnt Ends: Incorporate finely ground coffee into the rub for a rich, earthy flavor.
* Asian-Inspired Burnt Ends: Use a marinade of soy sauce, ginger, garlic, and sesame oil for a unique twist.Ultimately, the goal is to have fun and create a dish that you and your loved ones will enjoy. Don’t be afraid to experiment with different flavors and techniques to make this recipe your own.
So, what are you waiting for? Fire up your smoker or oven, grab a chuck roast, and get ready to experience the magic of Poor Man Burnt Ends. I promise you won’t be disappointed. This recipe is a game-changer, and I can’t wait to hear about your experiences.
Once you’ve tried it, please come back and share your thoughts in the comments below! Let me know what variations you tried, what sides you served them with, and any tips or tricks you discovered along the way. Your feedback is invaluable, and it helps other readers discover new and exciting ways to enjoy this delicious recipe. I’m truly excited to see what culinary creations you come up with! Happy cooking!
Poor Man Burnt Ends: The Ultimate Guide to Budget-Friendly BBQ
Tender, smoky, and caramelized chuck roast burnt ends, also known as "Poor Man's Burnt Ends," are a delicious and budget-friendly alternative to brisket burnt ends. Perfect for sandwiches, appetizers, or a main course!
Ingredients
- 3-4 lbs Chuck Roast (approx. 2-3 inches thick)
- 1/4 cup Yellow Mustard (binder)
- 1/2 cup BBQ Rub (your favorite, or see recipe below)
- 1 cup Beef Broth
- 1/2 cup BBQ Sauce (your favorite, or see recipe below)
- 1/4 cup Brown Sugar, packed
- 2 tablespoons Butter, unsalted
- 1 tablespoon Worcestershire Sauce
- Optional: Pickled Jalapeños, for serving
- Optional: Coleslaw, for serving
- Optional: Buns, for sandwiches
- 1/4 cup Brown Sugar, packed
- 2 tablespoons Smoked Paprika
- 1 tablespoon Garlic Powder
- 1 tablespoon Onion Powder
- 1 tablespoon Chili Powder
- 1 tablespoon Ground Cumin
- 1 teaspoon Black Pepper
- 1 teaspoon Kosher Salt
- 1/2 teaspoon Cayenne Pepper (optional, for heat)
- 1 cup Ketchup
- 1/4 cup Apple Cider Vinegar
- 1/4 cup Brown Sugar, packed
- 2 tablespoons Worcestershire Sauce
- 1 tablespoon Yellow Mustard
- 1 tablespoon Smoked Paprika
- 1 teaspoon Garlic Powder
- 1/2 teaspoon Onion Powder
- 1/4 teaspoon Black Pepper
- 1/4 teaspoon Cayenne Pepper (optional, for heat)
Instructions
- Trim excess fat from the chuck roast. Coat with yellow mustard. Liberally apply BBQ rub to all sides, pressing it into the meat. For best results, wrap in plastic wrap and refrigerate for at least 2 hours, or preferably overnight.
- Preheat smoker to 250°F (121°C). Place chuck roast on smoker grate. Smoke for 3-4 hours, or until internal temperature reaches 160-170°F (71-77°C), developing a good bark.
- Combine beef broth, BBQ sauce, brown sugar, butter, and Worcestershire sauce. Remove chuck roast from smoker and place in a foil pan or wrap tightly in heavy-duty foil. Pour braising liquid over the roast. Seal tightly.
- Return to the smoker and braise for 2-3 hours, or until internal temperature reaches 203-205°F (95-96°C) and the meat is probe-tender.
- Rest the wrapped chuck roast for at least 30 minutes. Unwrap and cube into 1-inch pieces.
- Place cubed chuck roast back into the foil pan with the reserved braising liquid. Add additional BBQ sauce (optional).
- Return the uncovered pan to the smoker. Cook for 30-60 minutes, or until the sauce has thickened and the burnt ends are sticky and caramelized.
- Remove from smoker and serve immediately. Enjoy on buns with coleslaw and pickled jalapeños, as an appetizer, or as a main course with your favorite sides.
Notes
- Choose a chuck roast with good marbling for a more tender result.
- Resting the meat after braising is crucial for tenderness.
- Adjust BBQ rub and sauce ingredients to your taste.
- Use a meat thermometer to ensure proper cooking.
- Experiment with different wood types for smoking.
- Don’t be afraid to experiment with different ingredients and techniques.

Leave a Comment