
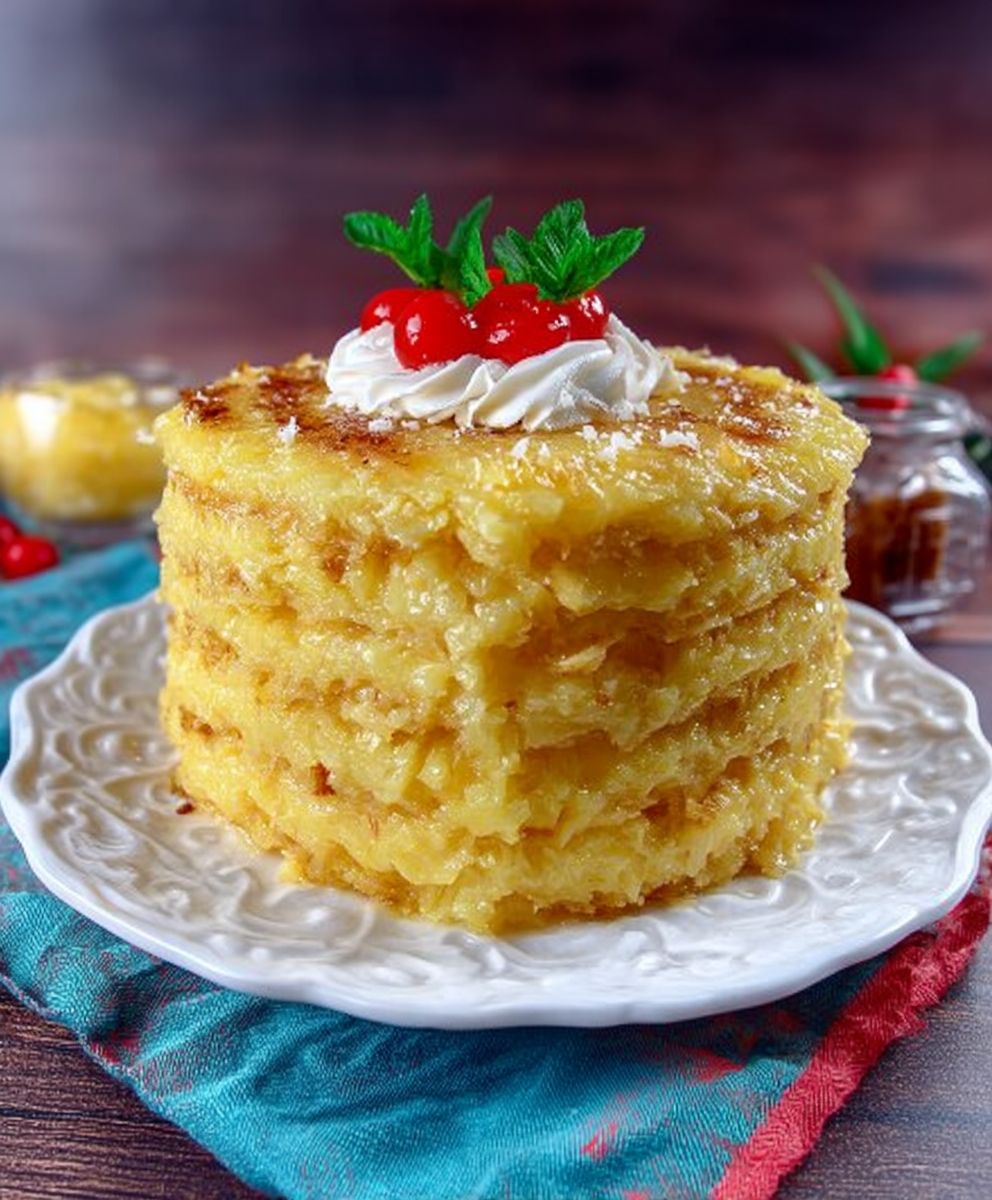
Pineapple layer cake, a dessert that whispers of sunshine and celebration, is more than just a sweet treat; it’s a slice of history. Have you ever wondered why this particular cake evokes such strong feelings of nostalgia and joy? I know I have! From potlucks to birthday parties, this cake has graced tables for generations, and for good reason.
While the exact origins are debated, the rise of pineapple layer cake coincided with the increased availability of canned pineapple in the early 20th century. Suddenly, this exotic fruit, once a symbol of luxury, became accessible to home bakers across the country. This accessibility fueled a wave of culinary creativity, and the pineapple layer cake was born, quickly becoming a beloved staple.
What is it about this cake that makes it so irresistible? Perhaps it’s the delightful combination of moist, tender cake layers, the tangy sweetness of pineapple, and the creamy, often decadent, frosting. Or maybe it’s the sheer simplicity of the recipe, making it a perfect choice for both novice and experienced bakers alike. Whatever the reason, this cake continues to captivate taste buds and create cherished memories. Join me as we explore a recipe that will bring this classic dessert to your kitchen, ensuring a perfect pineapple layer cake every time!

Ingredients:
- For the Cake:
- 2 1/2 cups all-purpose flour
- 2 cups granulated sugar
- 3 1/2 teaspoons baking powder
- 1 teaspoon salt
- 1 cup (2 sticks) unsalted butter, softened
- 1 cup milk
- 2 large eggs
- 1 teaspoon vanilla extract
- 1/2 cup crushed pineapple, well-drained
- For the Pineapple Filling:
- 20 oz can crushed pineapple, undrained
- 1/2 cup granulated sugar
- 3 tablespoons cornstarch
- 1/4 teaspoon salt
- 2 tablespoons unsalted butter
- For the Whipped Cream Frosting:
- 3 cups heavy cream, very cold
- 1/2 cup powdered sugar
- 1 teaspoon vanilla extract
- Optional Garnish:
- Maraschino cherries
- Pineapple wedges
- Toasted coconut flakes
Preparing the Cake Layers:
- Preheat and Prepare Pans: First things first, preheat your oven to 350°F (175°C). While the oven is heating up, grease and flour three 9-inch round cake pans. I like to use baking spray with flour already in it for extra insurance against sticking, but the classic method works just as well. Make sure you get into all the nooks and crannies!
- Combine Dry Ingredients: In a large bowl, whisk together the flour, sugar, baking powder, and salt. Whisking is important here to ensure the baking powder and salt are evenly distributed throughout the flour. This will help your cake rise evenly and have a consistent flavor.
- Cream Butter and Add Milk: Add the softened butter to the dry ingredients and mix on low speed until the mixture resembles coarse crumbs. Gradually add the milk and mix until just combined. Don’t overmix at this stage! Overmixing can lead to a tough cake.
- Add Eggs and Vanilla: Add the eggs one at a time, mixing well after each addition. Then, stir in the vanilla extract. Make sure everything is well incorporated.
- Fold in Pineapple: Gently fold in the well-drained crushed pineapple. Be careful not to overmix; you want to keep the batter light and airy.
- Divide Batter: Divide the batter evenly among the prepared cake pans. I find it helpful to use a kitchen scale to ensure each pan has the same amount of batter. This will help the layers bake evenly.
- Bake: Bake for 25-30 minutes, or until a wooden skewer inserted into the center comes out clean. Keep a close eye on them, as baking times can vary depending on your oven.
- Cool: Let the cakes cool in the pans for 10 minutes before inverting them onto a wire rack to cool completely. Make sure they are completely cool before frosting! This is crucial to prevent the frosting from melting.
Making the Pineapple Filling:
- Combine Ingredients: In a medium saucepan, combine the undrained crushed pineapple, sugar, cornstarch, and salt. Whisk everything together until the cornstarch is fully dissolved. This is important to prevent lumps in your filling.
- Cook and Thicken: Cook over medium heat, stirring constantly, until the mixture comes to a boil and thickens. This usually takes about 5-7 minutes. Keep stirring to prevent scorching!
- Add Butter: Remove from heat and stir in the butter until melted and smooth. The butter adds richness and a lovely sheen to the filling.
- Cool: Let the filling cool completely before using. As it cools, it will thicken even more. You can speed up the cooling process by placing it in the refrigerator.
Preparing the Whipped Cream Frosting:
- Chill Bowl and Whisk: This is a crucial step! Make sure your mixing bowl and whisk (or beaters) are very cold. I like to put them in the freezer for about 15-20 minutes before starting. This helps the heavy cream whip up quickly and hold its shape.
- Whip Cream: Pour the cold heavy cream into the chilled bowl and beat on medium speed until soft peaks form.
- Add Sugar and Vanilla: Gradually add the powdered sugar and vanilla extract, and continue beating until stiff peaks form. Be careful not to overwhip, or the cream will turn grainy. You want it to be firm enough to hold its shape but still light and fluffy.
Assembling the Cake:
- Level the Cake Layers (Optional): If your cake layers are uneven, use a serrated knife to trim the tops so they are flat. This will make your cake look more professional.
- Place First Layer: Place one cake layer on a serving plate or cake stand.
- Add Filling: Spread half of the cooled pineapple filling evenly over the first layer.
- Add Second Layer: Gently place the second cake layer on top of the filling.
- Add Filling: Spread the remaining pineapple filling evenly over the second layer.
- Add Third Layer: Place the final cake layer on top.
- Frost the Cake: Frost the entire cake with the whipped cream frosting. You can use an offset spatula to create a smooth finish, or you can create swirls and peaks for a more rustic look.
- Garnish (Optional): Garnish with maraschino cherries, pineapple wedges, and/or toasted coconut flakes, if desired. Get creative and have fun with it!
- Chill: Refrigerate the cake for at least 30 minutes before serving. This will allow the frosting to set and the flavors to meld together. I often chill it for a couple of hours, or even overnight, for the best results.
Tips for Success:
- Don’t Overmix: Overmixing the cake batter can develop the gluten in the flour, resulting in a tough cake. Mix until just combined.
- Use Room Temperature Ingredients: Using room temperature butter and eggs helps the batter come together smoothly and evenly.
- Drain the Pineapple Well: Make sure to drain the crushed pineapple thoroughly before adding it to the cake batter and using it in the filling. Excess moisture can make the cake soggy.
- Chill the Cake: Chilling the cake before serving allows the flavors to meld together and the frosting to set, making it easier to slice and serve.
- Adjust Sweetness to Taste: If you prefer a less sweet cake, you can reduce the amount of sugar in the cake batter and/or the pineapple filling.
Variations:
- Coconut Cream Frosting: Substitute coconut cream for some of the heavy cream in the frosting for a coconut flavor.
- Pineapple Chunks: Add small chunks of fresh pineapple to the filling for added texture.
- Nuts: Sprinkle chopped pecans or walnuts on top of the frosting for a nutty crunch.
- Cream Cheese Frosting: For a tangier frosting, use a cream cheese frosting instead of whipped cream.
Conclusion:
This Pineapple Layer Cake isn’t just a dessert; it’s a slice of sunshine on a plate, a guaranteed crowd-pleaser, and a recipe I truly believe you need in your baking repertoire. From the moist, tender cake layers infused with the bright, tropical flavor of pineapple to the luscious, creamy frosting, every element works in perfect harmony to create a truly unforgettable experience. It’s the kind of cake that evokes memories of summer days, family gatherings, and pure, unadulterated joy.
I know, I know, I might be gushing a little, but honestly, I’m just so excited for you to try this! It’s surprisingly simple to make, even if you’re not a seasoned baker. The recipe is straightforward, and the results are consistently impressive. Plus, the vibrant yellow hue of the cake and the delicate sweetness of the pineapple make it a visually stunning centerpiece for any occasion.
But what truly sets this cake apart is its versatility. While it’s absolutely divine as is, there are so many ways to customize it to your liking. For a more intense pineapple flavor, try adding a layer of crushed pineapple between the cake layers. Or, if you’re feeling adventurous, consider incorporating a hint of coconut into the frosting for a tropical twist. A sprinkle of toasted coconut flakes on top adds a lovely textural element and enhances the overall presentation.
Serving suggestions? Oh, the possibilities! A simple scoop of vanilla ice cream is a classic pairing that never fails to delight. For a more sophisticated touch, try serving it with a dollop of whipped cream infused with a hint of rum or a side of grilled pineapple. And if you’re looking for a truly decadent experience, drizzle a little caramel sauce over each slice. Trust me, your taste buds will thank you.
Beyond the variations and serving suggestions, the real magic of this Pineapple Layer Cake lies in its ability to bring people together. It’s the kind of dessert that sparks conversation, creates lasting memories, and leaves everyone wanting more. It’s perfect for birthdays, holidays, potlucks, or simply a special treat for yourself. After all, we all deserve a little slice of happiness every now and then, right?
So, what are you waiting for? Gather your ingredients, preheat your oven, and get ready to embark on a baking adventure. I promise you won’t regret it. And once you’ve had a chance to try this recipe, I’d absolutely love to hear about your experience. Did you make any modifications? What did your family and friends think? Share your photos and stories in the comments below! I’m always eager to learn from fellow bakers and see how you’ve made this recipe your own. Happy baking, and may your Pineapple Layer Cake be a resounding success! I can’t wait to hear all about it!
Pineapple Layer Cake: The Ultimate Recipe and Baking Guide
A light and fluffy pineapple cake with a sweet pineapple filling and a creamy whipped cream frosting. Perfect for any occasion!
Ingredients
- 2 1/2 cups all-purpose flour
- 2 cups granulated sugar
- 3 1/2 teaspoons baking powder
- 1 teaspoon salt
- 1 cup (2 sticks) unsalted butter, softened
- 1 cup milk
- 2 large eggs
- 1 teaspoon vanilla extract
- 1/2 cup crushed pineapple, well-drained
- 20 oz can crushed pineapple, undrained
- 1/2 cup granulated sugar
- 3 tablespoons cornstarch
- 1/4 teaspoon salt
- 2 tablespoons unsalted butter
- 3 cups heavy cream, very cold
- 1/2 cup powdered sugar
- 1 teaspoon vanilla extract
- Maraschino cherries
- Pineapple wedges
- Toasted coconut flakes
Instructions
- Preheat oven to 350°F (175°C). Grease and flour three 9-inch round cake pans.
- In a large bowl, whisk together the flour, sugar, baking powder, and salt.
- Add the softened butter to the dry ingredients and mix on low speed until the mixture resembles coarse crumbs. Gradually add the milk and mix until just combined.
- Add the eggs one at a time, mixing well after each addition. Then, stir in the vanilla extract.
- Gently fold in the well-drained crushed pineapple.
- Divide the batter evenly among the prepared cake pans.
- Bake for 25-30 minutes, or until a wooden skewer inserted into the center comes out clean.
- Let the cakes cool in the pans for 10 minutes before inverting them onto a wire rack to cool completely.
- In a medium saucepan, combine the undrained crushed pineapple, sugar, cornstarch, and salt. Whisk until the cornstarch is dissolved.
- Cook over medium heat, stirring constantly, until the mixture comes to a boil and thickens (about 5-7 minutes).
- Remove from heat and stir in the butter until melted and smooth.
- Let the filling cool completely before using.
- Chill your mixing bowl and whisk (or beaters) in the freezer for 15-20 minutes.
- Pour the cold heavy cream into the chilled bowl and beat on medium speed until soft peaks form.
- Gradually add the powdered sugar and vanilla extract, and continue beating until stiff peaks form.
- If your cake layers are uneven, use a serrated knife to trim the tops so they are flat.
- Place one cake layer on a serving plate or cake stand.
- Spread half of the cooled pineapple filling evenly over the first layer.
- Gently place the second cake layer on top of the filling.
- Spread the remaining pineapple filling evenly over the second layer.
- Place the final cake layer on top.
- Frost the entire cake with the whipped cream frosting.
- Garnish with maraschino cherries, pineapple wedges, and/or toasted coconut flakes, if desired.
- Refrigerate the cake for at least 30 minutes before serving.
Notes
- Don’t Overmix: Overmixing the cake batter can develop the gluten in the flour, resulting in a tough cake. Mix until just combined.
- Use Room Temperature Ingredients: Using room temperature butter and eggs helps the batter come together smoothly and evenly.
- Drain the Pineapple Well: Make sure to drain the crushed pineapple thoroughly before adding it to the cake batter and using it in the filling. Excess moisture can make the cake soggy.
- Chill the Cake: Chilling the cake before serving allows the flavors to meld together and the frosting to set, making it easier to slice and serve.
- Adjust Sweetness to Taste: If you prefer a less sweet cake, you can reduce the amount of sugar in the cake batter and/or the pineapple filling.

Leave a Comment