
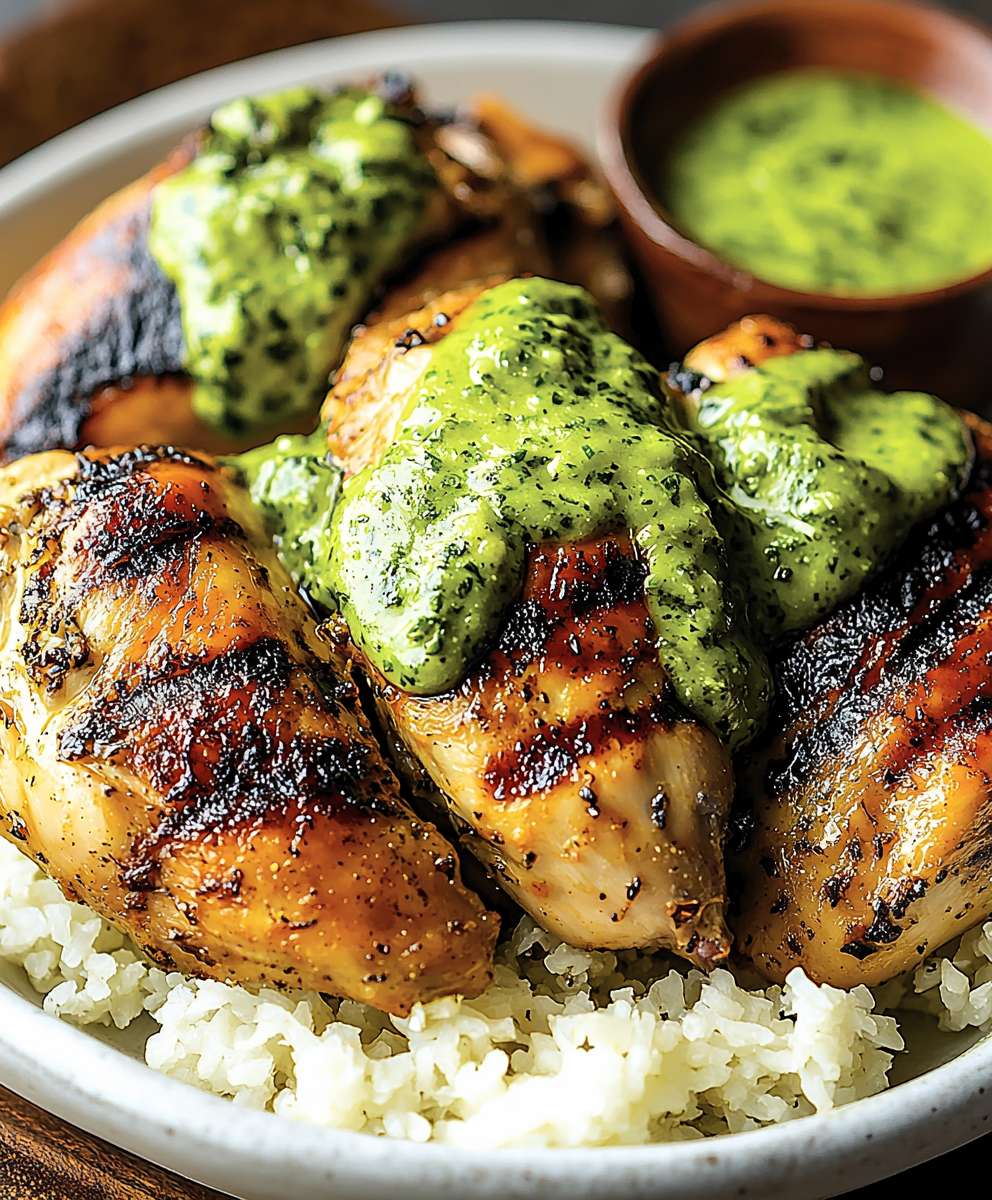
Peruvian Chicken Green Sauce, also known as Aji Verde, is about to become your new obsession. Seriously. Prepare to have your taste buds transported to the vibrant streets of Peru with this creamy, spicy, and utterly addictive condiment. I’m not exaggerating when I say this sauce elevates everything it touches, from grilled chicken (obviously!) to roasted vegetables, tacos, and even scrambled eggs.
Aji Verde is more than just a sauce; it’s a staple of Peruvian cuisine, deeply rooted in the country’s culinary heritage. The word “Aji” refers to chili peppers, which have been cultivated in Peru for thousands of years. This particular green sauce is a modern interpretation, blending the heat of the aji amarillo peppers with fresh herbs, creamy mayonnaise, and a touch of cheese for a truly unforgettable flavor profile.
What makes this Peruvian Chicken Green Sauce so irresistible? It’s the perfect balance of flavors and textures. The heat from the peppers is tempered by the coolness of the herbs and the richness of the mayonnaise, creating a creamy, tangy, and slightly spicy sensation that keeps you coming back for more. Plus, it’s incredibly easy to make! In just a few minutes, you can whip up a batch of this vibrant sauce and transform any meal into a Peruvian-inspired feast. Get ready to experience a flavor explosion!

Ingredients:
- For the Chicken:
- 1 whole chicken (about 3-4 pounds)
- 2 tablespoons olive oil
- 1 tablespoon smoked paprika
- 1 tablespoon garlic powder
- 1 tablespoon onion powder
- 1 teaspoon dried oregano
- 1 teaspoon ground cumin
- 1/2 teaspoon cayenne pepper (optional, for heat)
- Salt and freshly ground black pepper to taste
- For the Green Sauce (Aji Verde):
- 1 cup mayonnaise
- 1/2 cup cilantro, packed
- 1/4 cup aji amarillo paste (or substitute with yellow bell pepper, see notes)
- 2 cloves garlic
- 1 jalapeño, seeded and roughly chopped (adjust to your spice preference)
- 1/4 cup queso fresco (or feta cheese)
- 2 tablespoons lime juice, freshly squeezed
- 1 tablespoon olive oil
- 1/4 cup water (or more, to adjust consistency)
- Salt and freshly ground black pepper to taste
Preparing the Chicken:
- Preheat your oven: I like to start by preheating my oven to 400°F (200°C). This ensures the chicken cooks evenly and the skin gets nice and crispy.
- Prepare the chicken: Remove the chicken from its packaging and pat it dry with paper towels. This is a crucial step! Drying the skin helps it crisp up beautifully in the oven. Trust me, don’t skip this.
- Mix the dry rub: In a small bowl, combine the smoked paprika, garlic powder, onion powder, dried oregano, ground cumin, cayenne pepper (if using), salt, and pepper. Give it a good mix to ensure all the spices are evenly distributed.
- Season the chicken: Drizzle the olive oil all over the chicken. Then, generously rub the spice mixture all over the chicken, making sure to get it under the skin of the breast and thighs as much as possible. This is where the flavor really gets infused into the meat. Don’t be shy!
- Truss the chicken (optional): Trussing the chicken helps it cook more evenly and keeps its shape. If you’re not comfortable trussing, you can skip this step. To truss, tuck the wing tips under the chicken and tie the legs together with kitchen twine.
Roasting the Chicken:
- Place the chicken in a roasting pan: Place the seasoned chicken in a roasting pan. I like to use a roasting rack inside the pan to elevate the chicken, allowing for better air circulation and even cooking. If you don’t have a rack, that’s okay too!
- Roast the chicken: Roast the chicken in the preheated oven for about 1 hour and 15 minutes to 1 hour and 30 minutes, or until the internal temperature reaches 165°F (74°C) in the thickest part of the thigh. Use a meat thermometer to ensure accuracy.
- Basting (optional): For extra crispy skin, you can baste the chicken with its own juices every 20-30 minutes during the roasting process. This helps to keep the skin moist and encourages browning.
- Rest the chicken: Once the chicken is cooked through, remove it from the oven and let it rest for at least 10-15 minutes before carving. This allows the juices to redistribute, resulting in a more tender and flavorful chicken. Tent it loosely with foil to keep it warm.
Making the Green Sauce (Aji Verde):
- Prepare the ingredients: Roughly chop the cilantro, jalapeño (remove seeds for less heat), and garlic. If you’re using a yellow bell pepper instead of aji amarillo paste, roast it until the skin is blackened, then peel and seed it.
- Combine ingredients in a blender: In a blender or food processor, combine the mayonnaise, cilantro, aji amarillo paste (or roasted yellow bell pepper), garlic, jalapeño, queso fresco (or feta cheese), lime juice, and olive oil.
- Blend until smooth: Blend all the ingredients until completely smooth. You may need to scrape down the sides of the blender a few times to ensure everything is incorporated.
- Adjust consistency: Add water, one tablespoon at a time, until the sauce reaches your desired consistency. I like mine to be slightly runny, but you can make it thicker or thinner depending on your preference.
- Season to taste: Season the sauce with salt and pepper to taste. Remember that the queso fresco (or feta) is already salty, so start with a small amount of salt and add more as needed.
- Chill the sauce: For the best flavor, chill the sauce in the refrigerator for at least 30 minutes before serving. This allows the flavors to meld together.
Serving the Peruvian Chicken:
- Carve the chicken: Carve the rested chicken into serving pieces. I like to remove the legs, thighs, wings, and breast meat.
- Serve with the green sauce: Serve the carved chicken with a generous dollop of the green sauce. The sauce is what really makes this dish special!
- Optional sides: Peruvian chicken is delicious served with a variety of sides, such as rice, roasted potatoes, salad, or plantains.
Notes and Tips:
Aji Amarillo Paste Substitute:
If you can’t find aji amarillo paste, you can substitute it with a roasted yellow bell pepper. Roast the bell pepper until the skin is blackened, then peel and seed it before adding it to the sauce. While it won’t have the exact same flavor, it will still provide a nice sweetness and color.
Spice Level:
The amount of jalapeño you use will determine the spice level of the sauce. If you’re sensitive to heat, start with a small amount of jalapeño and add more to taste. Remember to remove the seeds and membranes for less heat.
Cheese Options:
Queso fresco is a traditional ingredient in aji verde, but feta cheese is a good substitute if you can’t find it. Feta has a similar salty and crumbly texture.
Make Ahead:
The green sauce can be made ahead of time and stored in the refrigerator for up to 3 days. The chicken is best served fresh, but leftovers can be stored in the refrigerator for up to 3 days as well.
Crispy Skin Secrets:
Patting the chicken dry before seasoning is key to achieving crispy skin. Also, roasting the chicken at a higher temperature (400°F) helps to render the fat and crisp up the skin.
Don’t Overcook:
Use a meat thermometer to ensure the chicken is cooked to the correct internal temperature (165°F). Overcooked chicken will be dry and tough.
Variations:
Feel free to experiment with different herbs and spices in the dry rub. You can also add other ingredients to the green sauce, such as avocado or spinach.
Serving Suggestions:
This Peruvian chicken is perfect for a weeknight dinner or a weekend gathering. It’s also great for meal prepping. Serve it with your favorite sides and enjoy!
Storage:
Store leftover chicken and green sauce separately in airtight containers in the refrigerator for up to 3 days.
Reheating:
Reheat the chicken in the oven or microwave until heated through. The green sauce is best served cold.
Why I love this recipe:
I absolutely adore this recipe because it’s packed with flavor and relatively easy to make. The combination of the smoky, savory chicken and the creamy, spicy green sauce is simply irresistible. Plus, it’s a crowd-pleaser that everyone will love. The vibrant green sauce adds a fresh and zesty element that perfectly complements the richness of the roasted chicken. It’s a dish that’s both comforting and exciting, and I find myself making it again and again. The aroma that fills the kitchen while the chicken is roasting is heavenly, and the first bite is always a moment of pure bliss. I hope you enjoy making and eating this Peruvian chicken as much as I do!
Conclusion:
This Peruvian Chicken Green Sauce recipe isn’t just another condiment; it’s a vibrant explosion of flavor that will transform your meals from ordinary to extraordinary. I truly believe this is a must-try recipe for anyone looking to add a zesty, herbaceous kick to their culinary repertoire. The creamy texture, the bright cilantro and jalapeño notes, and the subtle tang of lime create a symphony of tastes that perfectly complements grilled chicken, roasted vegetables, or even a simple sandwich.
But the beauty of this sauce lies in its versatility. While it’s traditionally served with Peruvian chicken, don’t limit yourself! Imagine drizzling it over crispy roasted potatoes for a flavor bomb that will have everyone reaching for seconds. Or, try using it as a marinade for shrimp before grilling the lime juice will tenderize the shrimp while the herbs infuse them with incredible flavor. For a vegetarian option, this sauce is phenomenal with grilled halloumi cheese or as a dip for crudités.
Serving Suggestions and Variations:
* Spicy Kick: If you’re a fan of heat, add an extra jalapeño or a pinch of cayenne pepper to the blender. Remember to taste as you go!
* Creamy Dream: For an even richer sauce, substitute some of the water with a tablespoon or two of mayonnaise or sour cream.
* Vegan Delight: Easily make this recipe vegan by using a plant-based mayonnaise alternative. The flavor will remain remarkably similar.
* Serving Ideas: Beyond chicken, this sauce is incredible on tacos, burritos, eggs, fish, steak, or even as a salad dressing. Get creative and experiment!
* Storage: Store leftover sauce in an airtight container in the refrigerator for up to 5 days. The color may fade slightly over time, but the flavor will remain delicious.
I’ve poured my heart into perfecting this recipe, and I’m confident that you’ll love it as much as I do. It’s quick, easy, and requires minimal ingredients, making it the perfect weeknight addition to your dinner table. The fresh, vibrant flavors are guaranteed to brighten up any meal and leave you wanting more.
So, what are you waiting for? Gather your ingredients, fire up your blender, and prepare to be amazed by the incredible taste of this authentic Peruvian Chicken Green Sauce. I’m so excited for you to experience the magic of this recipe!
And now, for the most important part: I want to hear from you! Once you’ve tried this recipe, please share your experience in the comments below. Did you make any variations? What did you serve it with? What did your family and friends think? Your feedback is invaluable and helps me continue to create and share recipes that you’ll love. Don’t be shy let me know what you think! I can’t wait to see your culinary creations and hear about your adventures with this amazing sauce. Happy cooking! I am sure that you will love this Peruvian Chicken Green Sauce as much as I do.
Peruvian Chicken Green Sauce: The Ultimate Recipe Guide
Juicy, flavorful Peruvian Roasted Chicken with a vibrant and spicy Aji Verde (green sauce). A crowd-pleasing dish perfect for weeknights or gatherings.
Ingredients
- 1 whole chicken (about 3-4 pounds)
- 2 tablespoons olive oil
- 1 tablespoon smoked paprika
- 1 tablespoon garlic powder
- 1 tablespoon onion powder
- 1 teaspoon dried oregano
- 1 teaspoon ground cumin
- 1/2 teaspoon cayenne pepper (optional, for heat)
- Salt and freshly ground black pepper to taste
- 1 cup mayonnaise
- 1/2 cup cilantro, packed
- 1/4 cup aji amarillo paste (or substitute with yellow bell pepper, see notes)
- 2 cloves garlic
- 1 jalapeño, seeded and roughly chopped (adjust to your spice preference)
- 1/4 cup queso fresco (or feta cheese)
- 2 tablespoons lime juice, freshly squeezed
- 1 tablespoon olive oil
- 1/4 cup water (or more, to adjust consistency)
- Salt and freshly ground black pepper to taste
Instructions
- Preheat your oven: Preheat your oven to 400°F (200°C).
- Prepare the chicken: Remove the chicken from its packaging and pat it dry with paper towels.
- Mix the dry rub: In a small bowl, combine the smoked paprika, garlic powder, onion powder, dried oregano, ground cumin, cayenne pepper (if using), salt, and pepper.
- Season the chicken: Drizzle the olive oil all over the chicken. Then, generously rub the spice mixture all over the chicken, making sure to get it under the skin of the breast and thighs as much as possible.
- Truss the chicken (optional): Trussing the chicken helps it cook more evenly and keeps its shape. If you’re not comfortable trussing, you can skip this step. To truss, tuck the wing tips under the chicken and tie the legs together with kitchen twine.
- Place the chicken in a roasting pan: Place the seasoned chicken in a roasting pan. Use a roasting rack inside the pan to elevate the chicken, allowing for better air circulation and even cooking.
- Roast the chicken: Roast the chicken in the preheated oven for about 1 hour and 15 minutes to 1 hour and 30 minutes, or until the internal temperature reaches 165°F (74°C) in the thickest part of the thigh. Use a meat thermometer to ensure accuracy.
- Basting (optional): For extra crispy skin, you can baste the chicken with its own juices every 20-30 minutes during the roasting process.
- Rest the chicken: Once the chicken is cooked through, remove it from the oven and let it rest for at least 10-15 minutes before carving. Tent it loosely with foil to keep it warm.
- Prepare the ingredients: Roughly chop the cilantro, jalapeño (remove seeds for less heat), and garlic. If you’re using a yellow bell pepper instead of aji amarillo paste, roast it until the skin is blackened, then peel and seed it.
- Combine ingredients in a blender: In a blender or food processor, combine the mayonnaise, cilantro, aji amarillo paste (or roasted yellow bell pepper), garlic, jalapeño, queso fresco (or feta cheese), lime juice, and olive oil.
- Blend until smooth: Blend all the ingredients until completely smooth. You may need to scrape down the sides of the blender a few times to ensure everything is incorporated.
- Adjust consistency: Add water, one tablespoon at a time, until the sauce reaches your desired consistency.
- Season to taste: Season the sauce with salt and pepper to taste. Remember that the queso fresco (or feta) is already salty, so start with a small amount of salt and add more as needed.
- Chill the sauce: For the best flavor, chill the sauce in the refrigerator for at least 30 minutes before serving.
- Carve the chicken: Carve the rested chicken into serving pieces.
- Serve with the green sauce: Serve the carved chicken with a generous dollop of the green sauce.
- Optional sides: Peruvian chicken is delicious served with a variety of sides, such as rice, roasted potatoes, salad, or plantains.
Notes
- Aji Amarillo Paste Substitute: If you can’t find aji amarillo paste, you can substitute it with a roasted yellow bell pepper. Roast the bell pepper until the skin is blackened, then peel and seed it before adding it to the sauce.
- Spice Level: The amount of jalapeño you use will determine the spice level of the sauce. If you’re sensitive to heat, start with a small amount of jalapeño and add more to taste. Remember to remove the seeds and membranes for less heat.
- Cheese Options: Queso fresco is a traditional ingredient in aji verde, but feta cheese is a good substitute if you can’t find it. Feta has a similar salty and crumbly texture.
- Make Ahead: The green sauce can be made ahead of time and stored in the refrigerator for up to 3 days. The chicken is best served fresh, but leftovers can be stored in the refrigerator for up to 3 days as well.
- Crispy Skin Secrets: Patting the chicken dry before seasoning is key to achieving crispy skin. Also, roasting the chicken at a higher temperature (400°F) helps to render the fat and crisp up the skin.
- Don’t Overcook: Use a meat thermometer to ensure the chicken is cooked to the correct internal temperature (165°F). Overcooked chicken will be dry and tough.
- Variations: Feel free to experiment with different herbs and spices in the dry rub. You can also add other ingredients to the green sauce, such as avocado or spinach.
- Serving Suggestions: This Peruvian chicken is perfect for a weeknight dinner or a weekend gathering. It’s also great for meal prepping. Serve it with your favorite sides and enjoy!
- Storage: Store leftover chicken and green sauce separately in airtight containers in the refrigerator for up to 3 days.
- Reheating: Reheat the chicken in the oven or microwave until heated through. The green sauce is best served cold.


Leave a Comment