
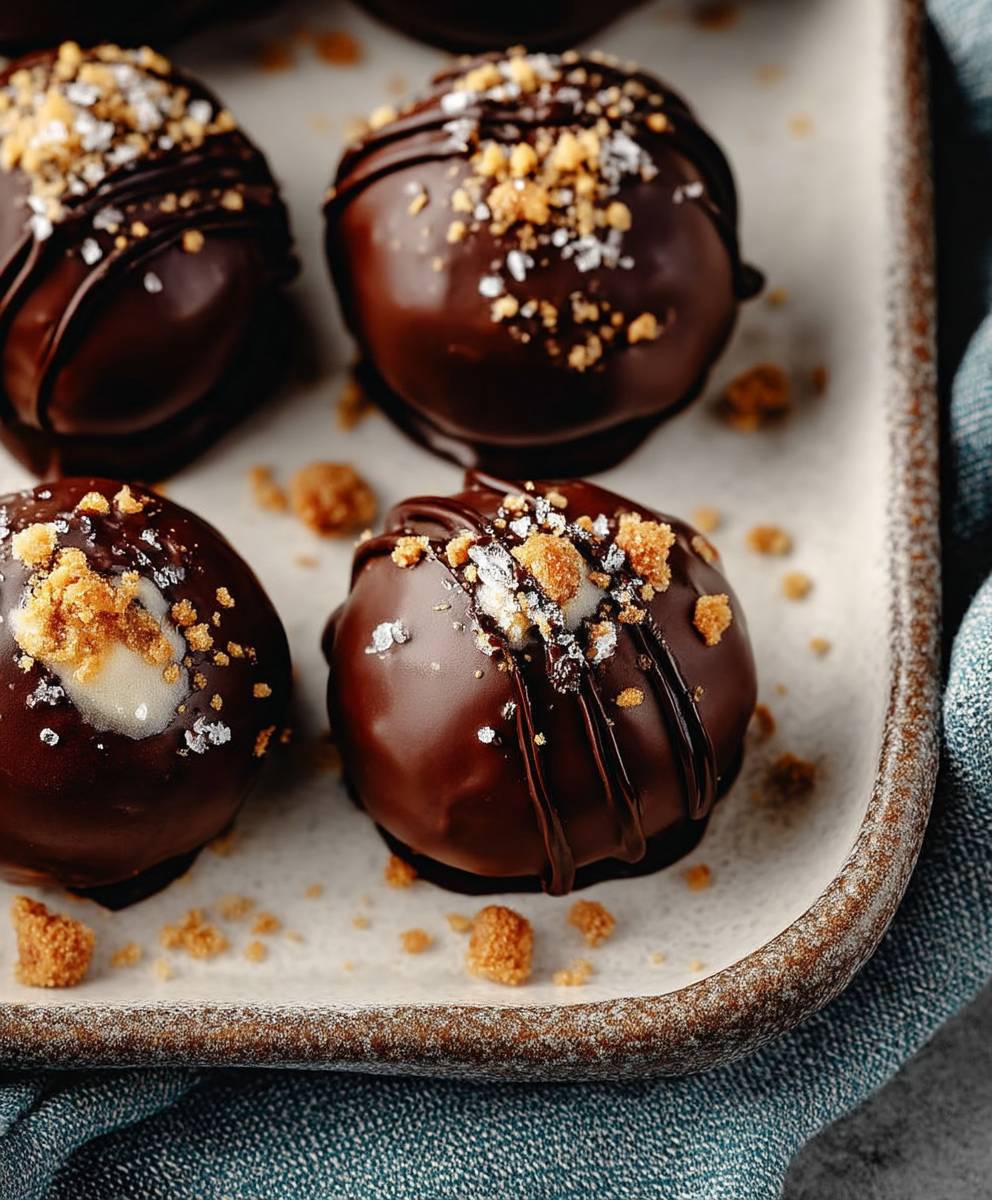
Peanut Butter Oreo Balls: Prepare to be amazed by the easiest, most decadent no-bake dessert you’ll ever make! These little bites of heaven combine the irresistible flavors of peanut butter and Oreo cookies into a treat that’s perfect for parties, holidays, or simply satisfying your sweet tooth. I remember the first time I tried these; a friend brought them to a potluck, and they were gone within minutes! Everyone was clamoring for the recipe, and now I’m thrilled to share it with you.
While the exact origins of this particular combination are a bit of a mystery, the concept of combining cookies and cream cheese into delightful little balls has been around for quite some time. It’s a testament to the enduring appeal of simple, delicious ingredients coming together in perfect harmony. The beauty of Peanut Butter Oreo Balls lies in their simplicity and adaptability. They require minimal effort and ingredients, making them a go-to recipe for busy bakers and anyone looking for a quick and impressive dessert.
People adore these treats for several reasons. The creamy peanut butter filling perfectly complements the crunchy, chocolatey Oreo cookies. The texture is divine a smooth, melt-in-your-mouth center encased in a crisp chocolate shell. Plus, they’re incredibly convenient! No oven required, and they can be made ahead of time, making them ideal for entertaining. So, are you ready to dive into the world of Peanut Butter Oreo Balls? Let’s get started!

Ingredients:
- 1 package (14.3 ounces) Oreo cookies, regular flavor
- 8 ounces cream cheese, softened
- 1 cup creamy peanut butter
- 12 ounces chocolate candy coating, semi-sweet or milk chocolate
- Optional: Sprinkles, chopped nuts, or sea salt for decoration
Crushing the Oreos:
Okay, let’s get started! First things first, we need to crush those Oreos. You have a couple of options here, and I’ll walk you through both. The goal is to get them into a fine crumb, almost like sand. This is crucial for the right texture of our Oreo balls.
- Food Processor Method: This is my preferred method because it’s super quick and efficient. Just toss the entire package of Oreos (yes, the whole cookie, cream filling and all!) into the food processor. Pulse it a few times until you have a fine crumb. Be careful not to over-process it into a paste. We want crumbs, not a sticky mess. It usually takes about 30-60 seconds of pulsing.
- Manual Method (Bag and Rolling Pin): If you don’t have a food processor, no worries! This method works just as well, it just requires a little more elbow grease. Place the Oreos in a large, resealable plastic bag. Seal the bag tightly, removing as much air as possible. Using a rolling pin, crush the Oreos by rolling it back and forth over the bag. Apply even pressure and continue rolling until the Oreos are finely crushed. You can also use a meat mallet or even the bottom of a heavy pan if you don’t have a rolling pin. Just make sure the bag doesn’t break!
Mixing the Oreo Crumbs, Cream Cheese, and Peanut Butter:
Now that we have our beautifully crushed Oreos, it’s time to bring everything together. This is where the magic happens, and the deliciousness really starts to take shape.
- Combine Ingredients: In a large mixing bowl, combine the crushed Oreo crumbs, softened cream cheese, and peanut butter. Make sure your cream cheese is truly softened; otherwise, it will be difficult to mix everything smoothly. If you forgot to take it out of the fridge ahead of time, you can microwave it for a few seconds (start with 15 seconds and check, then add more in 5-second increments until softened, but not melted).
- Mix Thoroughly: Using an electric mixer (handheld or stand mixer), beat the ingredients together until they are completely combined and smooth. Start on low speed to prevent Oreo crumbs from flying everywhere, then gradually increase the speed. If you don’t have an electric mixer, you can use a sturdy spoon, but it will require a bit more effort. Make sure there are no lumps of cream cheese remaining. The mixture should be uniform in color and texture.
Forming the Oreo Balls:
This is the fun part! Getting your hands a little dirty and shaping these little bites of heaven. Consistency is key here, so try to make them as uniform as possible for even coating and a nice presentation.
- Chill the Mixture: Cover the bowl with plastic wrap and refrigerate the mixture for at least 30 minutes. This chilling time is crucial! It allows the mixture to firm up, making it much easier to roll into balls. If you skip this step, the mixture will be too sticky and difficult to handle. You can chill it for longer, even overnight, if you need to.
- Scoop and Roll: Once the mixture is chilled, use a small cookie scoop (about 1 tablespoon size) to scoop out portions of the mixture. Roll each portion between your palms to form a smooth, round ball. If the mixture is still a bit sticky, you can lightly dust your hands with powdered sugar or cocoa powder.
- Place on Baking Sheet: Place the formed Oreo balls on a baking sheet lined with parchment paper or a silicone baking mat. This will prevent them from sticking to the sheet.
- Refrigerate Again: Once all the Oreo balls are formed, place the baking sheet back in the refrigerator for another 15-20 minutes. This will help them firm up even further before we dip them in chocolate.
Melting the Chocolate and Dipping:
Now for the grand finale! The chocolate coating is what really elevates these Oreo balls to the next level. Take your time with this step to ensure a smooth, even coating.
- Melt the Chocolate: There are two main methods for melting chocolate: the microwave and the double boiler. I prefer the double boiler method because it’s less likely to burn the chocolate, but the microwave is faster.
- Microwave Method: Place the chocolate candy coating in a microwave-safe bowl. Microwave in 30-second intervals, stirring well after each interval, until the chocolate is completely melted and smooth. Be very careful not to overheat the chocolate, as it can seize up and become unusable.
- Double Boiler Method: Fill a saucepan with about 1-2 inches of water and bring it to a simmer over medium heat. Place a heat-safe bowl (glass or stainless steel) on top of the saucepan, making sure the bottom of the bowl doesn’t touch the water. Add the chocolate candy coating to the bowl and stir occasionally until it is completely melted and smooth.
- Dipping the Oreo Balls: Once the chocolate is melted, it’s time to dip those Oreo balls! There are a few ways to do this:
- Fork Method: Use a fork to gently lower an Oreo ball into the melted chocolate. Turn it to coat it completely. Lift the Oreo ball out of the chocolate with the fork, tapping the fork gently against the side of the bowl to remove any excess chocolate. Place the dipped Oreo ball back on the prepared baking sheet.
- Dipping Tools: If you have dipping tools (like those used for chocolate-covered strawberries), they can make this process even easier. Use the tool to spear the Oreo ball, dip it in the chocolate, and then place it on the baking sheet.
- Decorate (Optional): While the chocolate is still wet, you can decorate the Oreo balls with sprinkles, chopped nuts, or a sprinkle of sea salt. Get creative and have fun with it!
- Let the Chocolate Set: Place the baking sheet with the dipped Oreo balls in the refrigerator for about 15-20 minutes, or until the chocolate is completely set. This will help them firm up and prevent them from melting at room temperature.
Storage:
Once the chocolate is set, your Peanut Butter Oreo Balls are ready to enjoy! Store them in an airtight container in the refrigerator for up to a week. They can also be frozen for longer storage (up to 2 months). Just let them thaw in the refrigerator before serving.
Tips for Success:
- Softened Cream Cheese is Key: Don’t skip the step of softening the cream cheese! It’s essential for a smooth and creamy mixture.
- Chill Time is Important: The chilling times are crucial for making the Oreo balls easier to handle and dip.
- Don’t Overheat the Chocolate: Be careful not to overheat the chocolate when melting it, as it can seize up and become unusable.
- Get Creative with Decorations: Have fun with the decorations! Use different colors of sprinkles, chopped nuts, or even a drizzle of white chocolate.
Conclusion:
Okay, friends, let’s be honest if you’ve made it this far, you’re already halfway to enjoying these incredible Peanut Butter Oreo Balls. And trust me, you absolutely should! This isn’t just another dessert recipe; it’s a guaranteed crowd-pleaser, a delightful little bite of heaven that combines the best of both worlds: the creamy, salty goodness of peanut butter and the irresistible crunch of Oreos. What’s not to love?
I know what you might be thinking: “Another no-bake recipe? Is it really worth it?” And my answer is a resounding YES! The beauty of this recipe lies in its simplicity. It requires minimal effort, no fancy equipment, and ingredients you probably already have in your pantry. Plus, the results are seriously impressive. These little balls are perfect for parties, potlucks, holiday gatherings, or even just a sweet treat to brighten up your day. They’re also incredibly kid-friendly, making them a fantastic activity to do with your little ones. Get them involved in the rolling and dipping they’ll love it!
But the real reason you need to try these Peanut Butter Oreo Balls is the taste. The combination of the crushed Oreos, the creamy peanut butter, and the rich chocolate coating is simply divine. It’s a symphony of flavors and textures that will leave you wanting more. And the best part? You can customize them to your liking!
Feeling adventurous? Try adding a pinch of sea salt to the peanut butter mixture for an extra layer of flavor. Or, if you’re a fan of white chocolate, swap out the milk chocolate for a creamy white chocolate coating. You could even add a sprinkle of chopped nuts or colorful sprinkles for a festive touch.
Here are a few serving suggestions to elevate your Peanut Butter Oreo Balls experience:
* Serve them chilled for a refreshing treat on a hot day.
* Arrange them on a platter with other desserts for a stunning dessert table display.
* Package them in small gift boxes as a thoughtful homemade gift.
* Pair them with a glass of cold milk or a cup of hot coffee for the ultimate indulgence.
* Crumble them over ice cream for a decadent sundae topping.
Seriously, the possibilities are endless!
I’m so confident that you’ll love this recipe, and I can’t wait to hear about your experience. So, go ahead, gather your ingredients, and get ready to create some magic in your kitchen. Don’t be afraid to experiment with different variations and make them your own.
Once you’ve made your batch of these delectable Peanut Butter Oreo Balls, please come back and share your thoughts in the comments below. I’d love to hear what you think, what variations you tried, and how much everyone enjoyed them. Did you add sprinkles? Did you use white chocolate? Did you hide them from the kids so you could eat them all yourself? (No judgment here!)
Your feedback is invaluable, and it helps other readers discover the joy of this amazing recipe. So, don’t be shy let me know what you think! Happy baking (or rather, no-baking!), and enjoy every single bite of these irresistible treats. I promise, you won’t regret it! Now, go forth and conquer those cravings with these easy and delicious Peanut Butter Oreo Balls! You deserve it!
Peanut Butter Oreo Balls: Easy No-Bake Recipe
Easy no-bake Peanut Butter Oreo Balls! Crushed Oreos, cream cheese, and peanut butter combine into a decadent treat dipped in chocolate.
Ingredients
- 1 package (14.3 ounces) Oreo cookies, regular flavor
- 8 ounces cream cheese, softened
- 1 cup creamy peanut butter
- 12 ounces chocolate candy coating, semi-sweet or milk chocolate
- Optional: Sprinkles, chopped nuts, or sea salt for decoration
Instructions
- Crush the Oreos:
- Food Processor Method: Place Oreos in a food processor and pulse until finely crushed (30-60 seconds).
- Manual Method: Place Oreos in a resealable bag, remove air, and crush with a rolling pin until finely crushed.
- Mix Ingredients: In a large bowl, combine crushed Oreos, softened cream cheese, and peanut butter. Beat with an electric mixer until smooth and well combined.
- Chill the Mixture: Cover the bowl with plastic wrap and refrigerate for at least 30 minutes to firm up.
- Form Oreo Balls: Use a small cookie scoop (about 1 tablespoon) to scoop portions of the mixture. Roll each portion between your palms to form a smooth, round ball. Place on a baking sheet lined with parchment paper.
- Refrigerate Again: Place the baking sheet back in the refrigerator for another 15-20 minutes.
- Melt the Chocolate:
- Microwave Method: Microwave chocolate candy coating in a microwave-safe bowl in 30-second intervals, stirring well after each interval, until melted and smooth.
- Double Boiler Method: Place chocolate candy coating in a heat-safe bowl set over a simmering pot of water (bowl should not touch water). Stir occasionally until melted and smooth.
- Dipping the Oreo Balls: Use a fork or dipping tool to gently lower an Oreo ball into the melted chocolate. Turn to coat completely. Lift out, tapping off excess chocolate, and place back on the prepared baking sheet.
- Decorate (Optional): While the chocolate is still wet, decorate with sprinkles, chopped nuts, or sea salt.
- Let the Chocolate Set: Refrigerate the baking sheet with the dipped Oreo balls for 15-20 minutes, or until the chocolate is completely set.
- Storage: Store in an airtight container in the refrigerator for up to a week, or freeze for up to 2 months. Thaw in the refrigerator before serving.
Notes
- Make sure the cream cheese is fully softened for a smooth mixture.
- Chilling the mixture is crucial for easy rolling and dipping.
- Be careful not to overheat the chocolate when melting.
- Get creative with decorations!
Leave a Comment