
Oreo Balls: Prepare to be amazed by the easiest, most decadent, and utterly irresistible treat you’ll ever make! I’m not exaggerating when I say these little bites of heaven disappear faster than you can say “chocolate.” Seriously, have you ever encountered a dessert that requires only three ingredients and zero baking? If not, get ready to have your mind blown.
While the exact origins of Oreo Balls remain shrouded in mystery (perhaps a delicious secret passed down through generations of cookie lovers?), their popularity is undeniable. They’ve become a staple at holiday gatherings, potlucks, and bake sales, and for good reason. These aren’t just any dessert; they’re a conversation starter, a crowd-pleaser, and a guaranteed smile-inducer.
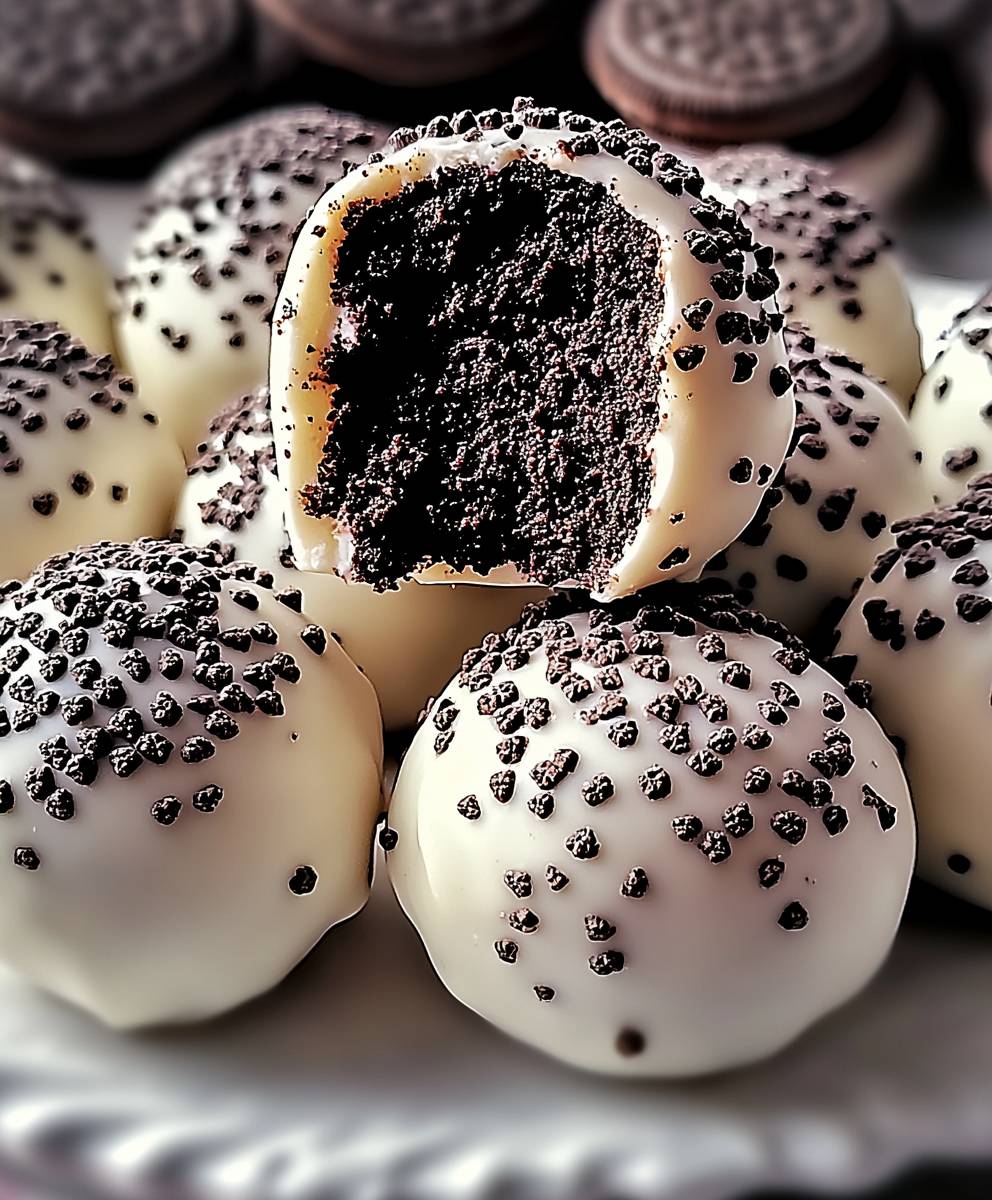
What makes them so beloved? It’s the perfect combination of textures and flavors. The creamy, slightly tangy filling, made with cream cheese, contrasts beautifully with the crunchy, chocolatey Oreo cookie crumbs. Then, that rich chocolate coating seals the deal, creating a symphony of sweetness that’s simply divine. Plus, let’s be honest, the sheer convenience of whipping up a batch of these no-bake wonders in minutes is a major selling point. So, grab your Oreos and cream cheese, and let’s get started on this incredibly simple and satisfying recipe!

Ingredients:
- 1 package (14.3 ounces) Oreo cookies, finely crushed
- 1 package (8 ounces) cream cheese, softened
- 1 package (12 ounces) semi-sweet chocolate chips
- 2 tablespoons shortening (optional, for smoother chocolate)
- Sprinkles or other decorations (optional)
Preparing the Oreo Crumbs:
Okay, let’s get started! The first thing we need to do is crush those Oreos. You have a couple of options here, and I’ll tell you what I usually do. You can use a food processor, which is super quick and easy. Just toss the whole package of Oreos in there yes, the whole cookie, cream filling and all and pulse until you have fine crumbs. Be careful not to over-process them into a paste!
If you don’t have a food processor, no worries! You can use a good old-fashioned zip-top bag and a rolling pin. Place the Oreos in the bag, seal it tightly, and then roll over the bag with the rolling pin until the cookies are crushed into fine crumbs. This might take a little elbow grease, but it’s a great way to relieve some stress! Make sure you get them nice and fine, because big chunks of Oreo can make the balls a little harder to roll later on.
Once you’ve crushed all the Oreos, set the crumbs aside in a large bowl. We’ll need them in the next step.
Mixing the Oreo Crumbs and Cream Cheese:
Now for the fun part mixing the Oreo crumbs with the cream cheese! This is what binds everything together and gives the Oreo balls their signature texture. Make sure your cream cheese is softened. This is really important. If it’s cold and hard, it won’t mix properly with the Oreo crumbs, and you’ll end up with lumpy Oreo balls. Nobody wants that!
To soften the cream cheese, you can either leave it out at room temperature for about an hour or two, or you can microwave it for a few seconds. If you microwave it, be very careful not to overheat it. Start with 15 seconds, then check it. If it’s still firm, microwave it for another 5-10 seconds at a time until it’s nice and soft. You want it to be easily spreadable, but not melted.
Add the softened cream cheese to the bowl of Oreo crumbs. Now, using a spoon or your hands (my preferred method just make sure they’re clean!), mix the cream cheese and Oreo crumbs together until they are completely combined. You want to make sure there are no streaks of cream cheese left. The mixture should be uniform in color and texture. It will be a bit sticky, but that’s okay. That’s what helps the balls hold their shape.
Once everything is mixed together, cover the bowl with plastic wrap and place it in the refrigerator for at least 30 minutes. This will help the mixture firm up, making it easier to roll into balls. You can even leave it in the fridge for a couple of hours, or even overnight, if you want to prepare it ahead of time.
Rolling the Oreo Balls:
Okay, the mixture has chilled, and now it’s time to roll those Oreo balls! This is where things can get a little messy, but it’s also kind of therapeutic. I like to line a baking sheet with parchment paper or wax paper. This will prevent the Oreo balls from sticking to the sheet.
Take the Oreo mixture out of the refrigerator. Using a spoon or a small cookie scoop, scoop out about a tablespoon of the mixture. Roll it between your palms to form a smooth ball. Don’t worry if they’re not perfectly round they’ll still taste delicious! Place the rolled ball on the prepared baking sheet.
Repeat this process until all of the Oreo mixture has been rolled into balls. If the mixture starts to get too soft and sticky, you can pop it back into the refrigerator for a few minutes to firm it up again. This is especially helpful if you’re making these on a warm day.
Once all the Oreo balls are rolled, place the baking sheet in the freezer for at least 15 minutes. This will help them firm up even more, making them easier to dip in the chocolate. You can leave them in the freezer for longer if you want, but 15 minutes is usually enough.
Melting the Chocolate:
While the Oreo balls are chilling in the freezer, it’s time to melt the chocolate. I prefer to use semi-sweet chocolate chips, but you can use any kind of chocolate you like milk chocolate, dark chocolate, white chocolate, or even a combination! Just make sure it’s good quality chocolate, as this will affect the taste of the finished product.
There are two main ways to melt chocolate: in the microwave or in a double boiler. I usually use the microwave because it’s quicker and easier, but a double boiler is a good option if you’re worried about burning the chocolate.
Microwave Method: Place the chocolate chips in a microwave-safe bowl. Microwave in 30-second intervals, stirring after each interval, until the chocolate is completely melted and smooth. Be very careful not to overheat the chocolate, as it can burn easily. If the chocolate is still a little lumpy after a few intervals, continue microwaving in 10-second intervals until it’s completely melted.
Double Boiler Method: Fill a saucepan with about an inch of water and bring it to a simmer. Place a heat-safe bowl on top of the saucepan, making sure the bottom of the bowl doesn’t touch the water. Add the chocolate chips to the bowl and stir occasionally until the chocolate is completely melted and smooth. This method takes a little longer than the microwave method, but it’s less likely to burn the chocolate.
Once the chocolate is melted, stir in the shortening (if using). The shortening will help to thin the chocolate and make it smoother, which will make it easier to dip the Oreo balls. It also gives the chocolate a nice shine. If you don’t have shortening, you can skip this step, but I highly recommend using it if you want the best results.
Dipping the Oreo Balls:
Now for the final step dipping the Oreo balls in the melted chocolate! This is where things can get a little messy again, but it’s also the most rewarding part. Take the Oreo balls out of the freezer. They should be nice and firm.
Using a fork or dipping tools, carefully dip each Oreo ball into the melted chocolate, making sure it’s completely coated. Gently tap the fork or dipping tool against the side of the bowl to remove any excess chocolate. Place the dipped Oreo ball back on the prepared baking sheet.
Repeat this process until all of the Oreo balls have been dipped in chocolate. If the chocolate starts to thicken up, you can microwave it for a few seconds to thin it out again. Just be careful not to overheat it.
While the chocolate is still wet, you can decorate the Oreo balls with sprinkles, chopped nuts, or any other toppings you like. This is a great way to customize them and make them look extra festive. I love using different colors of sprinkles for different holidays.
Once you’ve decorated all the Oreo balls, place the baking sheet back in the refrigerator for at least 30 minutes, or until the chocolate is completely set. This will prevent the chocolate from melting and making a mess.
Serving and Storing:
Once the chocolate is set, the Oreo balls are ready to serve! You can store them in an airtight container in the refrigerator for up to a week. They’re also great for freezing. Just place them in a freezer-safe container and they’ll keep for up to a month.
These Oreo balls are perfect for parties, holidays, or just a sweet treat. They’re always a crowd-pleaser, and they’re so easy to make. I hope you enjoy them!
Conclusion:
Okay, friends, let’s be honest: you’ve scrolled this far because you know, deep down, that you need these Oreo Balls in your life. And trust me, you absolutely do! This isn’t just another dessert recipe; it’s a guaranteed crowd-pleaser, a no-bake wonder, and a ridiculously easy way to satisfy your sweet tooth. The creamy, dreamy filling combined with the crunchy Oreo cookie exterior is a textural and flavor explosion that’s simply irresistible. It’s the perfect balance of sweet and slightly salty, making it a dessert that even those who aren’t huge sweets fans will adore. But why is this recipe a must-try? Because it’s more than just delicious; it’s incredibly versatile. Need a last-minute dessert for a potluck? Oreo Balls to the rescue! Want a fun activity to do with the kids? This recipe is perfect for little hands. Craving something sweet but don’t want to spend hours in the kitchen? These little bites of heaven come together in minutes. Seriously, what’s not to love? And the fun doesn’t stop there! While the classic recipe is amazing on its own, there are so many ways to customize these little treats to your liking. For a festive touch, try dipping them in melted white chocolate and sprinkling them with red and green sprinkles for the holidays. Or, if you’re a peanut butter lover, add a tablespoon or two of peanut butter to the cream cheese filling for an extra layer of flavor. You could even experiment with different Oreo flavors! Golden Oreos dipped in milk chocolate? Yes, please! Mint Oreos with a dark chocolate coating? Absolutely! The possibilities are endless. Serving suggestions? Well, honestly, you can just pop them straight into your mouth (and I won’t judge you one bit!). But if you’re looking to elevate your presentation, try arranging them on a pretty platter for a party. Or, for a more individual serving, place a few Oreo Balls in a small paper cup or mini muffin liner. They also make a fantastic addition to a dessert board or charcuterie platter, adding a touch of sweetness to balance out the savory elements. I truly believe that this Oreo Balls recipe is a winner. It’s simple, satisfying, and endlessly adaptable. It’s the kind of recipe that you’ll find yourself making again and again, whether it’s for a special occasion or just a random Tuesday night craving. So, what are you waiting for? Gather your ingredients, put on some music, and get ready to create some magic in the kitchen. I promise you won’t regret it. And most importantly, I want to hear about your experience! Did you try any variations? Did you make them for a party? What did your friends and family think? Share your photos and stories in the comments below. I can’t wait to see your creations and hear all about your Oreo Ball adventures! Happy baking (or, should I say, happy no-baking!) and enjoy every delicious bite! I am sure you will love this recipe as much as I do. Print
Oreo Balls: Easy No-Bake Recipe for Delicious Treats
- Total Time: 60 minutes
- Yield: 36 Oreo balls 1x
Description
Easy and delicious Oreo balls made with crushed Oreos, cream cheese, and dipped in melted chocolate. Perfect for parties, holidays, or a simple sweet treat!
Ingredients
- 1 package (14.3 ounces) Oreo cookies, finely crushed
- 1 package (8 ounces) cream cheese, softened
- 1 package (12 ounces) semi-sweet chocolate chips
- 2 tablespoons shortening (optional, for smoother chocolate)
- Sprinkles or other decorations (optional)
Instructions
- Crush the Oreos: Use a food processor or place Oreos in a zip-top bag and crush with a rolling pin until finely crushed.
- Mix with Cream Cheese: In a large bowl, combine the crushed Oreos and softened cream cheese. Mix until completely combined and smooth.
- Chill: Cover the bowl with plastic wrap and refrigerate for at least 30 minutes to firm up the mixture.
- Roll into Balls: Line a baking sheet with parchment or wax paper. Scoop out about a tablespoon of the mixture and roll into smooth balls. Place on the prepared baking sheet.
- Freeze: Place the baking sheet in the freezer for at least 15 minutes to firm up the balls.
- Melt Chocolate: Melt the chocolate chips in the microwave (30-second intervals, stirring in between) or in a double boiler until smooth. Stir in shortening (if using).
- Dip: Dip each Oreo ball into the melted chocolate, tapping off excess. Place back on the baking sheet.
- Decorate: While the chocolate is still wet, decorate with sprinkles or other toppings.
- Chill Again: Refrigerate for at least 30 minutes, or until the chocolate is completely set.
- Serve: Enjoy! Store in an airtight container in the refrigerator for up to a week or freeze for up to a month.
Notes
- Make sure the cream cheese is properly softened for easy mixing.
- If the Oreo mixture becomes too soft while rolling, chill it in the refrigerator for a few minutes.
- Be careful not to overheat the chocolate when melting.
- Shortening is optional but recommended for smoother, shinier chocolate.
- Get creative with decorations! Use different sprinkles or toppings to customize your Oreo balls.
- Prep Time: 20 minutes
- Cook Time: 10 minutes


Leave a Comment