
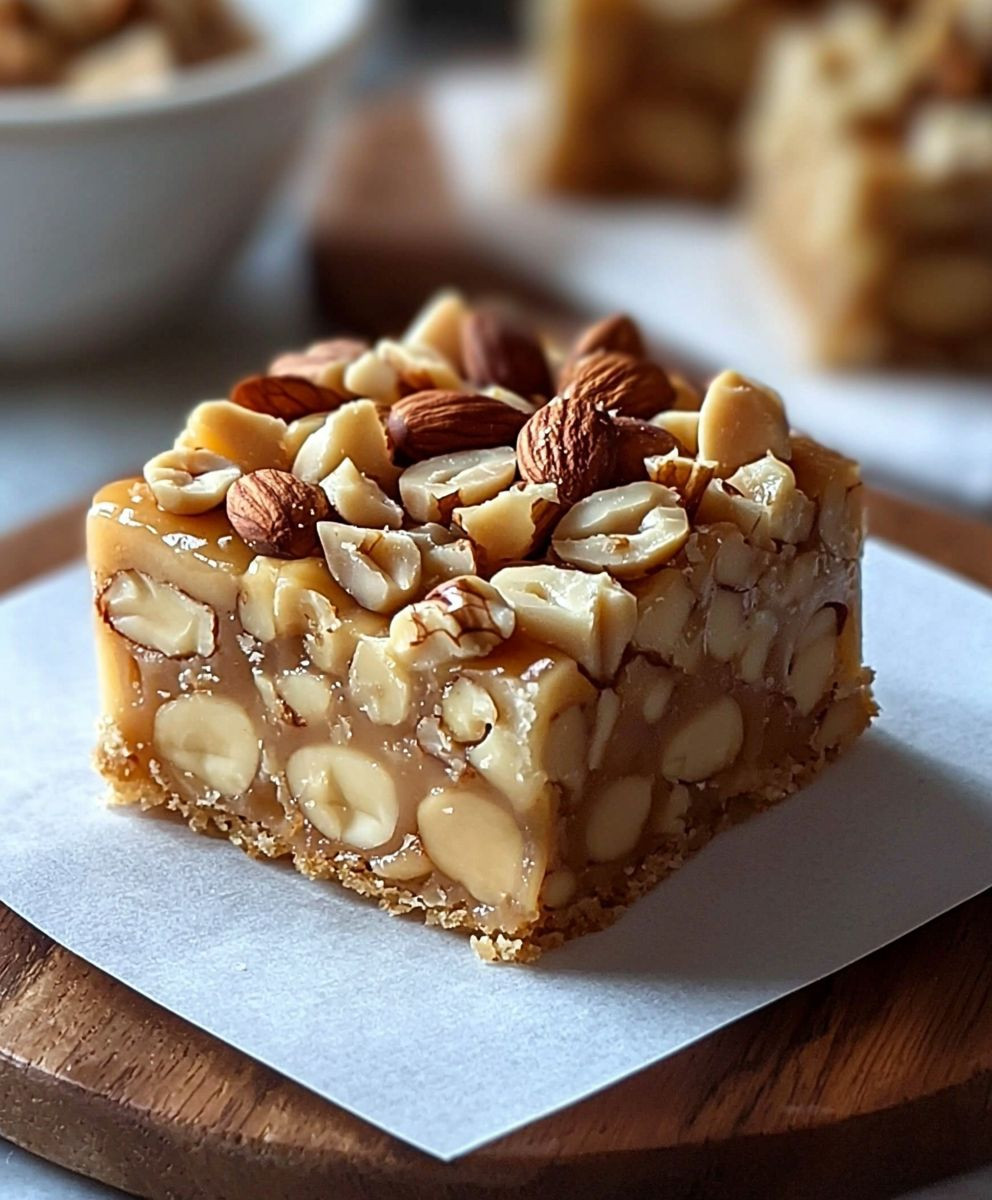
No-Bake Nut Squares are a delightful treat that combines the rich flavors of nuts and sweeteners without the need for an oven. As someone who loves to experiment in the kitchen, I find these squares to be a perfect solution for those moments when you crave something sweet but want to avoid the hassle of baking. Originating from various cultures that celebrate nut-based desserts, these squares have become a beloved snack in many households. The combination of crunchy nuts and a chewy texture creates a satisfying bite that keeps everyone coming back for more.
People adore No-Bake Nut Squares not only for their incredible taste but also for their convenience. With minimal preparation time and no baking required, they are an ideal option for busy days or last-minute gatherings. Plus, they can be easily customized with your favorite nuts and sweeteners, making them a versatile treat for any occasion. Join me as we dive into this simple yet delicious recipe that is sure to become a staple in your dessert repertoire!

Ingredients:
- 2 cups rolled oats
- 1 cup almond butter (or peanut butter)
- 1/2 cup honey or maple syrup
- 1/2 cup unsweetened cocoa powder
- 1/2 cup shredded coconut (unsweetened)
- 1/2 cup chopped nuts (walnuts, almonds, or pecans)
- 1/2 cup mini chocolate chips (optional)
- 1 teaspoon vanilla extract
- 1/4 teaspoon salt
Preparing the Mixture
Lets get started on these delicious no-bake nut squares! First, we need to prepare our mixture. Follow these steps:
- In a large mixing bowl, combine the rolled oats, shredded coconut, and chopped nuts. This will be the base of our nut squares, so make sure everything is evenly distributed.
- In a separate bowl, mix together the almond butter (or peanut butter), honey (or maple syrup), cocoa powder, vanilla extract, and salt. Use a whisk or a spatula to blend these ingredients until they form a smooth and creamy mixture. This will add a rich flavor and sweetness to our squares.
- Once the wet ingredients are well combined, pour this mixture over the dry ingredients in the large mixing bowl. Its time to get our hands a little messy! Use a spatula or your hands to mix everything together until all the oats and nuts are coated with the wet mixture. You want to ensure that every bit of dry ingredient is moistened.
- If youre adding mini chocolate chips, fold them into the mixture now. This step is optional, but I highly recommend it for an extra chocolatey treat!
Pressing the Mixture
Now that we have our mixture ready, its time to press it into a pan.
- Line an 8×8 inch (or 9×9 inch) square baking dish with parchment paper. This will make it easier to remove the squares later. Leave some overhang on the sides for easy lifting.
- Transfer the mixture into the prepared baking dish. Using your hands or a spatula, press the mixture down firmly and evenly into the pan. Make sure to pack it tightly; this will help the squares hold together once they set.
- Once the mixture is evenly pressed into the pan, you can use the back of a measuring cup to smooth out the top. This will give your nut squares a nice, even surface.
Chilling the Squares
Now that our mixture is pressed into the pan, its time to let it chill and set.
- Cover the baking dish with plastic wrap or aluminum foil. This will help keep the moisture in while they chill.
- Place the dish in the refrigerator for at least 2 hours. If you have the time, letting them chill overnight will yield even better results, as they will firm up nicely.
Cutting and Serving
Once the squares have chilled and set, its time to cut and serve them!
- Remove the baking dish from the refrigerator. Using the overhanging parchment paper, lift the entire block of nut squares out of the dish.
- Place the block on a cutting board. Using a sharp knife, cut the block into squares or rectangles, depending on your preference. I usually aim for about 16 squares, but you can make them larger or smaller based on your liking.
- Transfer the cut squares to an airtight container. They can be stored in the refrigerator for up to a week, or you can freeze them for longer storage. Just make sure to separate layers with parchment paper to prevent sticking.
Enjoying Your No-Bake Nut Squares
These no-bake nut squares are perfect for a quick snack, a healthy dessert, or even a breakfast on the go. They are packed with nutrients from the oats, nuts, and nut butter, making them a wholesome choice. Plus, they are incredibly versatile! You can customize them by adding dried fruits, seeds, or even swapping out the nut butter for your favorite flavor.
Whenever I make these, I love to experiment with different add
Conclusion:
In summary, these No-Bake Nut Squares are an absolute must-try for anyone looking to indulge in a deliciously satisfying treat without the hassle of baking. The combination of crunchy nuts, sweet dates, and a hint of chocolate creates a delightful flavor profile that is both wholesome and indulgent. Plus, they are incredibly easy to whip up, making them perfect for busy days or last-minute gatherings. For serving suggestions, I love to pair these squares with a cup of herbal tea or a glass of almond milk for a delightful afternoon snack. You can also get creative with variationstry adding dried fruits like cranberries or apricots for a burst of flavor, or swap out the nuts for your favorites, such as pecans or walnuts. The possibilities are endless! I encourage you to give this No-Bake Nut Squares recipe a try and experience the joy of making a treat that is not only delicious but also packed with nutrients. Once youve made them, Id love to hear about your experience! Share your thoughts, any variations you tried, or even a photo of your creation. Lets spread the love for these delightful squares together! PrintNo-Bake Nut Squares: Easy and Delicious Recipes for a Healthy Snack
- Total Time: 135 minutes
- Yield: 16 squares 1x
Description
These No-Bake Nut Squares are a quick and nutritious snack made with rolled oats, nut butter, and cocoa powder. Easy to prepare and customizable with your favorite mix-ins, they provide a satisfying energy boost without the need for baking. Perfect for on-the-go snacking!
Ingredients
- 2 cups rolled oats
- 1 cup almond butter (or peanut butter)
- 1/2 cup honey or maple syrup
- 1/2 cup unsweetened cocoa powder
- 1/2 cup shredded coconut (unsweetened)
- 1/2 cup chopped nuts (walnuts, almonds, or pecans)
- 1/2 cup mini chocolate chips (optional)
- 1 teaspoon vanilla extract
- 1/4 teaspoon salt
Instructions
- In a large mixing bowl, combine the rolled oats, shredded coconut, and chopped nuts. Mix well to ensure even distribution.
- In a separate bowl, whisk together the almond butter (or peanut butter), honey (or maple syrup), cocoa powder, vanilla extract, and salt until smooth and creamy.
- Pour the wet mixture over the dry ingredients in the large mixing bowl. Use a spatula or your hands to mix until all dry ingredients are coated.
- If using, fold in the mini chocolate chips.
- Line an 8×8 inch (or 9×9 inch) square baking dish with parchment paper, leaving some overhang for easy removal.
- Transfer the mixture into the prepared baking dish. Press down firmly and evenly to pack it tightly.
- Smooth out the top with the back of a measuring cup for an even surface.
- Cover the baking dish with plastic wrap or aluminum foil to retain moisture.
- Refrigerate for at least 2 hours, or overnight for best results.
- Remove the baking dish from the refrigerator and lift the block of nut squares out using the parchment paper.
- Place on a cutting board and cut into squares or rectangles as desired.
- Store in an airtight container in the refrigerator for up to a week, or freeze for longer storage, separating layers with parchment paper.
Notes
- Feel free to customize these squares by adding dried fruits, seeds, or swapping out the nut butter for your favorite flavor.
- For a crunchier texture, consider toasting the nuts before adding them to the mixture.
- Prep Time: 15 minutes
- Cook Time: 0 minutes


Leave a Comment