
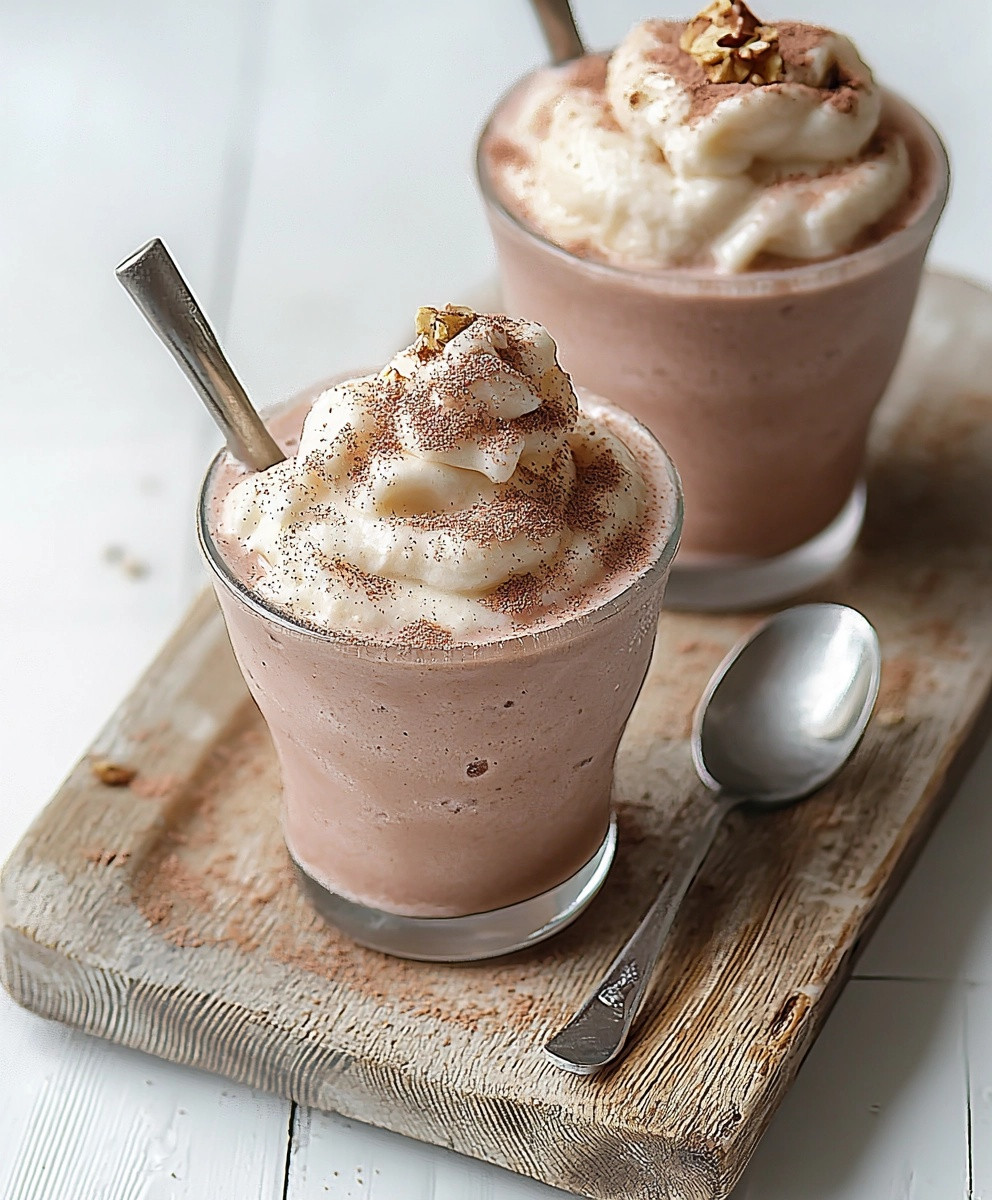
Ninja Creami Frosty Dessert is not just a treat; its a delightful experience that brings joy to every spoonful. As someone who has always had a sweet tooth, I can confidently say that this dessert is a game-changer. The creamy texture and rich flavors make it a perfect indulgence for any occasion, whether you’re hosting a summer barbecue or simply treating yourself after a long day. The Ninja Creami has revolutionized the way we enjoy frozen desserts, allowing us to create our own frosty concoctions right at home.
Historically, frozen desserts have been a staple in many cultures, often associated with celebrations and gatherings. The Ninja Creami Frosty Dessert takes this tradition to a new level, combining convenience with creativity. People love this dish not only for its incredible taste but also for its versatility. You can customize it with your favorite flavors and toppings, making it a hit among family and friends. So, lets dive into this delightful recipe and discover how easy it is to whip up your own Ninja Creami Frosty Dessert!

Ingredients:
- 2 cups heavy cream
- 1 cup whole milk
- 1 cup granulated sugar
- 1 teaspoon vanilla extract
- 1/2 cup cocoa powder (for chocolate flavor)
- 1/2 cup peanut butter (optional, for a nutty flavor)
- 1/2 cup crushed cookies (like Oreos or chocolate wafers)
- 1/2 cup chocolate chips (optional)
- Pinch of salt
Preparing the Base
To start off, I like to prepare the base for my Ninja Creami Frosty Dessert. This is where all the magic begins!
- In a large mixing bowl, combine the heavy cream and whole milk. I usually use a whisk to mix them together until they are well combined.
- Add the granulated sugar to the mixture. Its important to mix this in thoroughly, so I keep whisking until the sugar is completely dissolved. This usually takes about 2-3 minutes.
- Next, I add the vanilla extract for that lovely flavor. If youre going for a chocolate version, this is the time to add the cocoa powder. Make sure to sift it in to avoid any lumps.
- For those who love a nutty twist, I recommend adding the peanut butter at this stage. I find that using a hand mixer helps to incorporate it smoothly into the mixture.
- Finally, I sprinkle in a pinch of salt. This really enhances the flavors and balances the sweetness.
Chilling the Mixture
Once the base is ready, its time to chill it. This step is crucial for achieving that creamy texture.
- Cover the mixing bowl with plastic wrap or a lid. I like to make sure its airtight to prevent any odors from the fridge from seeping in.
- Place the bowl in the refrigerator and let it chill for at least 2 hours. If you have the time, letting it sit overnight is even better!
Preparing the Ninja Creami
While the mixture is chilling, I like to prepare my Ninja Creami. This machine is a game-changer for making frozen desserts!
- Make sure your Ninja Creami is clean and ready to go. I always double-check that the bowl is properly attached to the base.
- Once the mixture is chilled, pour it into the Ninja Creami bowl. I usually fill it up to the max fill line to ensure I get the best results.
- Secure the lid on the bowl and place it into the Ninja Creami machine.
Churning the Dessert
Now comes the fun partchurning the mixture into a frosty dessert!
- Turn on the Ninja Creami and select the Ice Cream setting. I find that this setting works perfectly for achieving that creamy texture.
- Let the machine run its cycle. It usually takes about 5-10 minutes, and youll see the mixture transform into a frosty delight!
- Once the cycle is complete, I like to check the consistency. If its not as creamy as Id like, I run it through the Re-spin cycle for an additional 1-2 minutes.
Adding Mix-Ins
If youre feeling adventurous, this is the perfect time to add some mix-ins to your frosty dessert!
- After the initial churning, I remove the lid and gently fold in any mix-ins like crushed cookies or chocolate chips. I find that using a spatula works best for this.
- Once everything is mixed in, I secure the lid back on and run the Re-spin cycle again for about 1 minute. This helps to evenly distribute the mix-ins throughout the dessert.
Serving the Frosty Dessert
Now that the dessert is ready, its time to serve it up!
- Using an ice cream scoop, I serve generous portions into bowls or cones. The texture should be creamy and frosty, just like a soft-serve
Conclusion:
In conclusion, the Ninja Creami Frosty Dessert is an absolute must-try for anyone looking to indulge in a creamy, dreamy treat thats both delicious and easy to make. This recipe not only satisfies your sweet tooth but also allows for endless creativity with flavors and toppings. Whether you choose to stick with the classic chocolate or vanilla base or venture into exciting variations like strawberry cheesecake or mint chocolate chip, the possibilities are truly limitless. I highly recommend serving your frosty dessert with a drizzle of chocolate sauce, a sprinkle of crushed nuts, or a dollop of whipped cream to elevate the experience even further. You can also experiment with different mix-ins, such as fresh fruits or cookie crumbles, to make it uniquely yours. I encourage you to give this Ninja Creami Frosty Dessert a try and share your experience with friends and family. Id love to hear about your favorite flavor combinations and any creative twists you come up with! So grab your Ninja Creami and get ready to whip up a delightful treat that will impress everyone. Trust me, once you try this recipe, it will become a staple in your dessert rotation! Print
Ninja Creami Frosty Dessert: The Ultimate Guide to Making Delicious Frozen Treats
- Total Time: 145 minutes
- Yield: 4–6 servings 1x
Description
Enjoy a creamy Ninja Creami Frosty Dessert made with heavy cream, whole milk, sugar, and vanilla. Customize it with chocolate, peanut butter, or your favorite mix-ins for a delightful treat perfect for any occasion!
Ingredients
Scale- 2 cups heavy cream
- 1 cup whole milk
- 1 cup granulated sugar
- 1 teaspoon vanilla extract
- 1/2 cup cocoa powder (for chocolate flavor)
- 1/2 cup peanut butter (optional, for a nutty flavor)
- 1/2 cup crushed cookies (like Oreos or chocolate wafers)
- 1/2 cup chocolate chips (optional)
- Pinch of salt
Instructions
- In a large mixing bowl, combine the heavy cream and whole milk. Whisk until well combined.
- Add the granulated sugar and mix thoroughly until dissolved (about 2-3 minutes).
- Add the vanilla extract and sift in the cocoa powder if making a chocolate version.
- If using, add the peanut butter and mix with a hand mixer until smooth.
- Sprinkle in a pinch of salt to enhance flavors.
- Cover the mixing bowl with plastic wrap or a lid to keep it airtight.
- Chill in the refrigerator for at least 2 hours, or overnight for best results.
- Ensure your Ninja Creami is clean and ready to use.
- Pour the chilled mixture into the Ninja Creami bowl up to the max fill line.
- Secure the lid on the bowl and place it into the Ninja Creami machine.
- Turn on the Ninja Creami and select the Ice Cream setting.
- Let the machine run for about 5-10 minutes until the mixture transforms into a frosty texture.
- Check the consistency; if needed, run the Re-spin cycle for an additional 1-2 minutes.
- After the initial churning, remove the lid and gently fold in any mix-ins like crushed cookies or chocolate chips using a spatula.
- Secure the lid and run the Re-spin cycle for about 1 minute to evenly distribute the mix-ins.
- Using an ice cream scoop, serve generous portions into bowls or cones. Enjoy the creamy, frosty texture!
Notes
- For a richer chocolate flavor, increase the cocoa powder to taste.
- Feel free to experiment with different mix-ins like nuts, fruits, or candies.
- This dessert can be stored in the freezer for later enjoyment, but it’s best served fresh.
- Prep Time: 15 minutes
- Cook Time: 10 minutes

Leave a Comment