
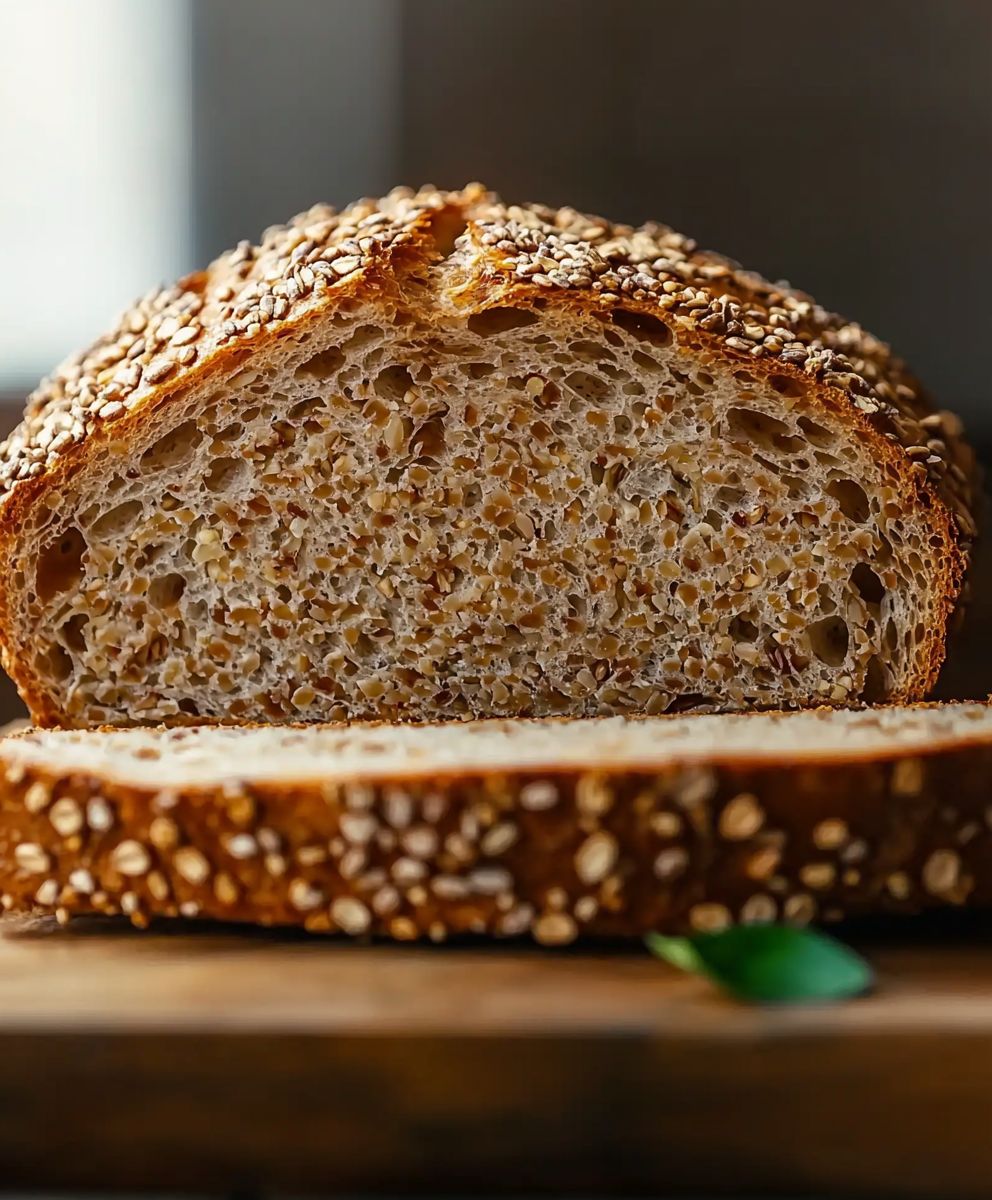
Multigrain bread, a symphony of textures and flavors, is more than just a loaf; it’s a culinary experience. Imagine sinking your teeth into a slice, the hearty crunch of various grains giving way to a soft, satisfying interior. Have you ever wondered why this particular bread holds such a special place in our hearts and on our tables?
The history of multigrain bread is deeply intertwined with the story of human agriculture. For centuries, different cultures have combined various grains to create nutritious and flavorful breads. From ancient civilizations grinding wheat, barley, and rye to modern bakers experimenting with oats, flaxseeds, and sunflower seeds, the spirit of innovation has always been at the heart of multigrain baking.
People adore multigrain bread for a multitude of reasons. Its robust, nutty flavor is a welcome departure from the often bland taste of white bread. The delightful combination of textures, from the chewiness of whole grains to the satisfying pop of seeds, keeps every bite interesting. Beyond its deliciousness, multigrain bread is also celebrated for its nutritional benefits. Packed with fiber, vitamins, and minerals, it’s a wholesome choice that nourishes both body and soul. Whether toasted for breakfast, layered with your favorite sandwich fillings, or served alongside a hearty soup, multigrain bread is a versatile and beloved staple that elevates any meal.

Ingredients:
- For the Dough:
- 3 ½ cups (420g) bread flour, plus more for dusting
- 1 ½ cups (180g) whole wheat flour
- ½ cup (60g) rolled oats
- ¼ cup (30g) flax seeds
- ¼ cup (30g) sunflower seeds
- 2 ¼ teaspoons (7g) active dry yeast
- 1 ½ teaspoons (9g) salt
- 2 tablespoons (30ml) honey or maple syrup
- 2 tablespoons (30ml) olive oil, plus more for greasing
- 1 ¾ cups (420ml) warm water (105-115°F / 40-46°C)
- For the Seed Topping (Optional):
- 1 tablespoon rolled oats
- 1 tablespoon flax seeds
- 1 tablespoon sunflower seeds
- 1 tablespoon sesame seeds
- 1 tablespoon poppy seeds
- 1 large egg, beaten (for egg wash)
Preparing the Dough:
- Combine Dry Ingredients: In a large bowl, whisk together the bread flour, whole wheat flour, rolled oats, flax seeds, sunflower seeds, yeast, and salt. Make sure everything is evenly distributed. This ensures the yeast will activate properly and the salt won’t inhibit its growth.
- Add Wet Ingredients: In a separate bowl, combine the warm water, honey (or maple syrup), and olive oil. The water temperature is crucial; too hot, and you’ll kill the yeast; too cold, and it won’t activate.
- Combine Wet and Dry: Pour the wet ingredients into the dry ingredients and stir with a wooden spoon or spatula until a shaggy dough forms. It will be sticky, and that’s perfectly fine. Don’t worry about making it perfectly smooth at this stage.
- Knead the Dough: Turn the dough out onto a lightly floured surface. Knead for 8-10 minutes, or until the dough becomes smooth and elastic. You can also use a stand mixer with a dough hook attachment for this step. If using a mixer, knead on medium speed for about 6-8 minutes. The dough should be slightly tacky but not overly sticky. If it’s too sticky, add a tablespoon of flour at a time until it reaches the right consistency.
- First Rise: Lightly grease a large bowl with olive oil. Place the dough in the bowl, turning to coat all sides. Cover the bowl with plastic wrap or a clean kitchen towel. Let the dough rise in a warm place for 1-1.5 hours, or until doubled in size. The rising time will depend on the temperature of your environment. A warmer environment will result in a faster rise. I usually place mine in a slightly warmed oven (turned off, of course!).
Shaping and Second Rise:
- Punch Down the Dough: Gently punch down the risen dough to release the air. This helps to redistribute the yeast and create a more even texture in the final bread.
- Shape the Loaf: Turn the dough out onto a lightly floured surface. Gently shape it into a loaf. You can do this by patting it into a rectangle and then rolling it up tightly. Pinch the seam closed and tuck the ends underneath.
- Prepare the Loaf Pan: Grease a 9×5 inch loaf pan with olive oil or cooking spray. You can also line the pan with parchment paper, leaving an overhang for easy removal.
- Place Dough in Pan: Carefully place the shaped loaf into the prepared loaf pan.
- Second Rise: Cover the loaf pan with plastic wrap or a clean kitchen towel. Let the dough rise again in a warm place for 45-60 minutes, or until it has almost doubled in size and reaches about an inch above the rim of the pan. This second rise is crucial for a light and airy texture.
Baking the Bread:
- Preheat the Oven: Preheat your oven to 375°F (190°C). Make sure your oven rack is in the center position.
- Prepare the Seed Topping (Optional): In a small bowl, combine the rolled oats, flax seeds, sunflower seeds, sesame seeds, and poppy seeds.
- Egg Wash and Seed Topping (Optional): Gently brush the top of the risen loaf with the beaten egg. This will give the bread a beautiful golden-brown color. Sprinkle the seed mixture evenly over the egg-washed surface.
- Bake the Bread: Bake for 45-55 minutes, or until the bread is golden brown and sounds hollow when tapped on the bottom. To prevent the top from browning too quickly, you can tent it with aluminum foil during the last 15-20 minutes of baking.
- Check for Doneness: The internal temperature of the bread should reach 200-210°F (93-99°C). You can use a digital thermometer to check this. Insert the thermometer into the center of the loaf.
- Cool the Bread: Remove the bread from the oven and let it cool in the loaf pan for 10 minutes. Then, transfer it to a wire rack to cool completely before slicing. This is important because slicing the bread while it’s still warm can result in a gummy texture.
Tips and Variations:
- Adjusting Sweetness: Feel free to adjust the amount of honey or maple syrup to your liking. You can also use other sweeteners like molasses or brown sugar.
- Adding Nuts: For extra flavor and texture, you can add chopped nuts like walnuts, pecans, or almonds to the dough. Add about ½ cup of chopped nuts during the kneading process.
- Using Different Seeds: Experiment with different types of seeds, such as pumpkin seeds (pepitas) or hemp seeds.
- Making a Sourdough Version: If you have a sourdough starter, you can incorporate it into this recipe. Reduce the amount of yeast to ¼ teaspoon and add about 1 cup (240g) of active sourdough starter. You may need to adjust the hydration slightly depending on the consistency of your starter.
- Storing the Bread: Store the cooled bread in an airtight container at room temperature for up to 3 days, or in the refrigerator for up to a week. You can also freeze the bread for longer storage. Slice the bread before freezing for easier thawing.
- Kneading by Hand vs. Mixer: While a stand mixer makes kneading easier, kneading by hand is perfectly acceptable and can be quite therapeutic! Just be patient and persistent, and you’ll achieve a beautiful loaf.
- Warm Environment for Rising: Creating a warm environment for the dough to rise is key. If your kitchen is cold, try placing the bowl in a slightly warmed oven (turned off!), on top of the refrigerator, or in a sunny spot.
- Don’t Over-Knead: Over-kneading can result in a tough bread. The dough should be smooth and elastic, but not overly tight.
- Don’t Over-Proof: Over-proofing can cause the bread to collapse during baking. The dough should have almost doubled in size, but not be overly puffy.
- Scoring the Bread: If you want to create a decorative slash on the top of the bread, you can score it with a sharp knife or lame just before baking. This also helps to control the expansion of the bread during baking.
- Adding a Steam Bath: For a crustier crust, you can create a steam bath in the oven during the first 15 minutes of baking. Place a pan of hot water on the bottom rack of the oven. The steam will help to create a crispier crust.
- Troubleshooting: If your bread is not rising properly, make sure your yeast is fresh and that the water is at the correct temperature. If your bread is too dense, you may have over-kneaded it or not allowed it to rise long enough.
Enjoy your homemade multigrain bread! It’s perfect for sandwiches, toast, or simply enjoying with a pat of butter.
Conclusion:
This isn’t just another bread recipe; it’s an invitation to experience the wholesome goodness of homemade multigrain bread. From the satisfying chew to the nutty aroma that fills your kitchen, this loaf is a testament to the simple pleasures of baking from scratch. I truly believe that once you’ve tasted this, you’ll understand why I consider it a must-try.
But why is it so special? It’s the combination of textures and flavors, the hearty grains working together to create a bread that’s both delicious and nutritious. It’s the feeling of accomplishment you get from pulling a perfectly baked loaf from the oven, knowing you created something truly special with your own two hands. It’s the sheer versatility of this bread, ready to be enjoyed in countless ways.
And speaking of enjoying it, let’s talk serving suggestions! My personal favorite is a simple slice, toasted and slathered with creamy avocado and a sprinkle of sea salt. The richness of the avocado perfectly complements the nutty flavor of the grains. But don’t stop there! This bread makes incredible sandwiches think turkey and swiss with a smear of Dijon mustard, or a classic BLT with crispy bacon and juicy tomatoes. It’s also fantastic for grilled cheese, adding a depth of flavor that you just can’t get with regular white bread.
For a heartier meal, try using it for French toast. The multigrain adds a wonderful texture and a subtle sweetness that pairs beautifully with maple syrup and fresh berries. Or, cube it up and use it to make homemade croutons for your favorite salads. The possibilities are truly endless!
Feeling adventurous? Let’s explore some variations! If you’re a fan of seeds, try adding a tablespoon or two of sunflower seeds, pumpkin seeds, or flax seeds to the dough. This will add even more texture and nutritional value. For a touch of sweetness, you could incorporate a handful of dried cranberries or raisins. And if you’re looking for a savory twist, consider adding some chopped herbs like rosemary or thyme. These additions can really elevate the flavor profile of your multigrain bread.
Another variation I love is adding a touch of molasses or honey to the dough. This not only adds a subtle sweetness but also helps to create a beautiful, dark crust. Experiment with different types of flour as well! Try substituting some of the all-purpose flour with whole wheat flour for an even heartier loaf. Or, add a small amount of rye flour for a unique flavor.
I’ve poured my heart and soul into perfecting this recipe, and I’m so excited for you to try it. I know that baking bread can seem intimidating at first, but trust me, it’s easier than you think. Just follow the instructions carefully, and don’t be afraid to experiment and make it your own.
So, what are you waiting for? Preheat your oven, gather your ingredients, and get ready to bake the best multigrain bread you’ve ever tasted. I’m confident that you’ll love it as much as I do.
And most importantly, I want to hear about your experience! Share your photos and stories with me. Let me know what variations you tried, what you served it with, and how much you enjoyed it. Your feedback is invaluable, and it helps me to continue creating and sharing recipes that you’ll love. Happy baking! I can’t wait to see what you create!
Multigrain Bread: The Ultimate Guide to Health Benefits and Recipes
Wholesome multigrain bread with a delicious blend of flours, oats, and seeds. Perfect for sandwiches, toast, or enjoying on its own!
Ingredients
- 3 ½ cups (420g) bread flour, plus more for dusting
- 1 ½ cups (180g) whole wheat flour
- ½ cup (60g) rolled oats
- ¼ cup (30g) flax seeds
- ¼ cup (30g) sunflower seeds
- 2 ¼ teaspoons (7g) active dry yeast
- 1 ½ teaspoons (9g) salt
- 2 tablespoons (30ml) honey or maple syrup
- 2 tablespoons (30ml) olive oil, plus more for greasing
- 1 ¾ cups (420ml) warm water (105-115°F / 40-46°C)
- 1 tablespoon rolled oats
- 1 tablespoon flax seeds
- 1 tablespoon sunflower seeds
- 1 tablespoon sesame seeds
- 1 tablespoon poppy seeds
- 1 large egg, beaten (for egg wash)
Instructions
- Combine Dry Ingredients: In a large bowl, whisk together the bread flour, whole wheat flour, rolled oats, flax seeds, sunflower seeds, yeast, and salt. Make sure everything is evenly distributed.
- Add Wet Ingredients: In a separate bowl, combine the warm water, honey (or maple syrup), and olive oil. The water temperature is crucial.
- Combine Wet and Dry: Pour the wet ingredients into the dry ingredients and stir with a wooden spoon or spatula until a shaggy dough forms. It will be sticky.
- Knead the Dough: Turn the dough out onto a lightly floured surface. Knead for 8-10 minutes, or until the dough becomes smooth and elastic. Alternatively, use a stand mixer with a dough hook on medium speed for 6-8 minutes. Add flour a tablespoon at a time if too sticky.
- First Rise: Lightly grease a large bowl with olive oil. Place the dough in the bowl, turning to coat all sides. Cover the bowl with plastic wrap or a clean kitchen towel. Let the dough rise in a warm place for 1-1.5 hours, or until doubled in size.
- Punch Down the Dough: Gently punch down the risen dough to release the air.
- Shape the Loaf: Turn the dough out onto a lightly floured surface. Gently shape it into a loaf. Pinch the seam closed and tuck the ends underneath.
- Prepare the Loaf Pan: Grease a 9×5 inch loaf pan with olive oil or cooking spray. You can also line the pan with parchment paper.
- Place Dough in Pan: Carefully place the shaped loaf into the prepared loaf pan.
- Second Rise: Cover the loaf pan with plastic wrap or a clean kitchen towel. Let the dough rise again in a warm place for 45-60 minutes, or until it has almost doubled in size and reaches about an inch above the rim of the pan.
- Preheat the Oven: Preheat your oven to 375°F (190°C).
- Prepare the Seed Topping (Optional): In a small bowl, combine the rolled oats, flax seeds, sunflower seeds, sesame seeds, and poppy seeds.
- Egg Wash and Seed Topping (Optional): Gently brush the top of the risen loaf with the beaten egg. Sprinkle the seed mixture evenly over the egg-washed surface.
- Bake the Bread: Bake for 45-55 minutes, or until the bread is golden brown and sounds hollow when tapped on the bottom. Tent with foil if browning too quickly.
- Check for Doneness: The internal temperature of the bread should reach 200-210°F (93-99°C).
- Cool the Bread: Remove the bread from the oven and let it cool in the loaf pan for 10 minutes. Then, transfer it to a wire rack to cool completely before slicing.
Notes
- Adjust the amount of honey or maple syrup to your liking.
- Add ½ cup of chopped nuts like walnuts, pecans, or almonds to the dough during kneading.
- Experiment with different types of seeds, such as pumpkin seeds (pepitas) or hemp seeds.
- For a sourdough version, reduce the amount of yeast to ¼ teaspoon and add about 1 cup (240g) of active sourdough starter. You may need to adjust the hydration slightly depending on the consistency of your starter.
- Store the cooled bread in an airtight container at room temperature for up to 3 days, or in the refrigerator for up to a week. You can also freeze the bread for longer storage. Slice the bread before freezing for easier thawing.
- Creating a warm environment for the dough to rise is key. If your kitchen is cold, try placing the bowl in a slightly warmed oven (turned off!), on top of the refrigerator, or in a sunny spot.
- Over-kneading can result in a tough bread. The dough should be smooth and elastic, but not overly tight.
- Over-proofing can cause the bread to collapse during baking. The dough should have almost doubled in size, but not be overly puffy.
- If you want to create a decorative slash on the top of the bread, you can score it with a sharp knife or lame just before baking. This also helps to control the expansion of the bread during baking.
- For a crustier crust, you can create a steam bath in the oven during the first 15 minutes of baking. Place a pan of hot water on the bottom rack of the oven. The steam will help to create a crispier crust.
- If your bread is not rising properly, make sure your yeast is fresh and that the water is at the correct temperature. If your bread is too dense, you may have over-kneaded it or not allowed it to rise long enough.


Leave a Comment