
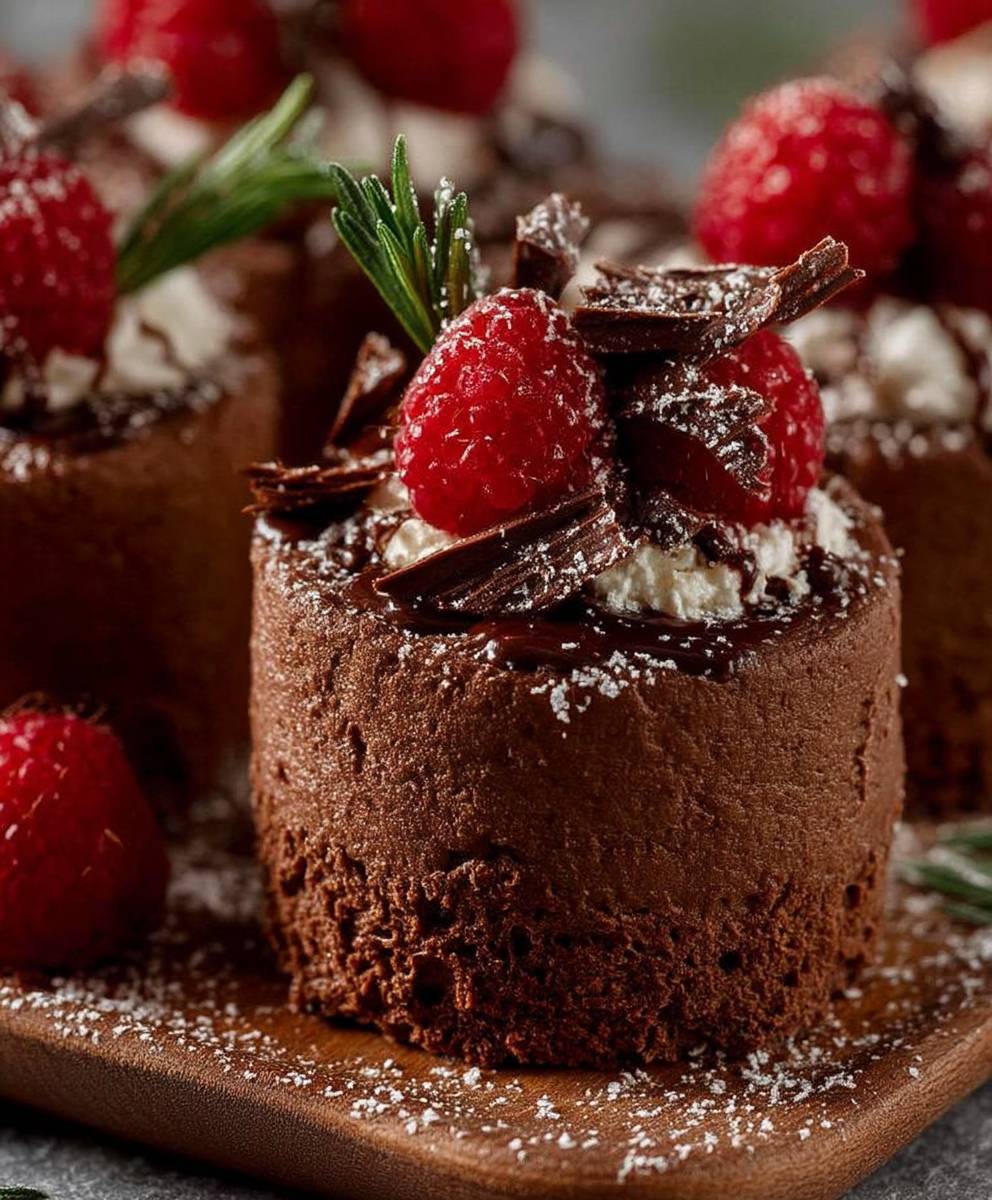
Mini chocolate cakes: prepare to be utterly captivated by these delightful, bite-sized morsels of pure chocolate bliss! Imagine sinking your teeth into a perfectly formed, intensely chocolatey cake, its moist crumb practically melting in your mouth. These aren’t just desserts; they’re tiny celebrations of all things delicious, and I’m thrilled to share my foolproof recipe with you.
While the exact origins of individual chocolate cakes are somewhat shrouded in delicious mystery, the concept of small, portable cakes has been around for centuries. Think of the individual fruitcakes of Victorian England or the madeleines of France these were all precursors to the modern mini chocolate cakes we adore today. They represent a shift towards individual indulgence and portion control, allowing us to savor a treat without the guilt of a larger slice.
But what is it about these little cakes that makes them so irresistible? It’s a combination of factors, really. The intense chocolate flavor, of course, is paramount. But it’s also the perfect portion size just enough to satisfy a craving without feeling overly heavy. Plus, they’re incredibly versatile! Serve them warm with a scoop of vanilla ice cream, dust them with powdered sugar for an elegant touch, or pack them in lunchboxes for a delightful midday treat. Whatever your preference, these mini chocolate cakes are guaranteed to bring a smile to your face.

Ingredients:
- 1 ½ cups all-purpose flour
- ¾ cup unsweetened cocoa powder
- 1 ½ cups granulated sugar
- 1 ½ teaspoons baking soda
- ¾ teaspoon baking powder
- ¾ teaspoon salt
- ¾ cup buttermilk
- ¾ cup vegetable oil
- 2 large eggs
- 1 ½ teaspoons vanilla extract
- ¾ cup boiling water
Preparing the Batter:
- First, let’s get all our dry ingredients together. In a large bowl, whisk together the flour, cocoa powder, granulated sugar, baking soda, baking powder, and salt. Make sure everything is evenly distributed this will help your cakes rise beautifully and have a consistent flavor.
- Now, in a separate bowl, whisk together the buttermilk, vegetable oil, eggs, and vanilla extract. Whisk until everything is well combined and the mixture looks smooth. Don’t worry if it seems a little thin; that’s perfectly normal.
- Time to combine the wet and dry ingredients! Gradually add the wet ingredients to the dry ingredients, mixing on low speed with an electric mixer (or by hand with a whisk) until just combined. Be careful not to overmix; a few lumps are okay. Overmixing can lead to tough cakes, and we want them to be light and fluffy.
- This is where the magic happens! Slowly pour in the boiling water while mixing on low speed. The batter will become very thin and liquidy don’t panic! This is exactly what we want. The hot water helps to bloom the cocoa powder, intensifying the chocolate flavor and creating a moist, tender crumb. Mix until the batter is smooth and glossy.
Preparing the Mini Cake Pans:
- Preheat your oven to 350°F (175°C). This is crucial for even baking. Make sure your oven is properly calibrated for the best results.
- Grease and flour your mini cake pans (or muffin tins). You can use cooking spray with flour in it, or grease them with butter or shortening and then dust them with flour. Make sure to get into all the nooks and crannies to prevent the cakes from sticking. Alternatively, you can use cupcake liners for easy removal.
- Evenly distribute the batter among the prepared mini cake pans, filling each about two-thirds full. This will allow the cakes to rise without overflowing. Using a cookie scoop or a measuring cup can help you achieve consistent filling.
Baking the Mini Cakes:
- Carefully place the filled mini cake pans in the preheated oven.
- Bake for 18-22 minutes, or until a toothpick inserted into the center comes out clean or with a few moist crumbs attached. The baking time may vary depending on your oven, so keep a close eye on them. Start checking for doneness around 18 minutes.
- Remove the mini cake pans from the oven and let them cool in the pans for about 5-10 minutes. This allows the cakes to set slightly and makes them easier to remove.
- After 5-10 minutes, carefully invert the cakes onto a wire rack to cool completely. If you used cupcake liners, simply lift them out of the pan.
Preparing the Chocolate Ganache (Optional):
While the cakes are cooling, you can prepare a simple chocolate ganache to drizzle over them. This is optional, but it adds a touch of elegance and extra chocolatey goodness.
Ingredients for Ganache:
- 4 ounces semi-sweet chocolate, chopped
- ½ cup heavy cream
Instructions for Ganache:
- Place the chopped chocolate in a heatproof bowl.
- In a small saucepan, heat the heavy cream over medium heat until it just begins to simmer. Do not boil.
- Pour the hot cream over the chocolate and let it sit for about a minute to allow the chocolate to melt.
- Gently whisk the mixture until smooth and glossy. If the ganache is too thick, add a tablespoon of warm milk or cream at a time until you reach the desired consistency.
Frosting Option:
If you prefer a buttercream frosting, here’s a simple recipe:
Ingredients for Buttercream Frosting:
- ½ cup (1 stick) unsalted butter, softened
- 3 cups powdered sugar
- ¼ cup milk
- 1 teaspoon vanilla extract
Instructions for Buttercream Frosting:
- In a large bowl, beat the softened butter with an electric mixer until light and fluffy.
- Gradually add the powdered sugar, one cup at a time, beating well after each addition.
- Add the milk and vanilla extract and beat until smooth and creamy. If the frosting is too thick, add a little more milk. If it’s too thin, add a little more powdered sugar.
Assembling and Decorating:
- Once the mini cakes are completely cool, you can decorate them as desired.
- If using the chocolate ganache, drizzle it over the cakes. You can also dip the tops of the cakes into the ganache for a more decadent look.
- If using buttercream frosting, pipe or spread it onto the cakes. Get creative with your decorating!
- Sprinkle with sprinkles, chocolate shavings, chopped nuts, or fresh berries for an extra touch of elegance.
- Serve immediately or store in an airtight container at room temperature for up to 3 days.
Tips and Variations:
- For a richer chocolate flavor: Use dark chocolate cocoa powder instead of unsweetened cocoa powder.
- Add coffee: Substitute ½ cup of strong brewed coffee for ½ cup of the boiling water to enhance the chocolate flavor.
- Spice it up: Add a pinch of cinnamon or cayenne pepper to the batter for a subtle kick.
- Nutty delight: Stir in ½ cup of chopped nuts (such as walnuts, pecans, or almonds) to the batter.
- Chocolate chips: Fold in ½ cup of chocolate chips to the batter for extra chocolatey goodness.
- Peanut butter swirl: Swirl a spoonful of peanut butter into the batter before baking for a delicious peanut butter chocolate combination.
- Cream cheese frosting: For a tangy twist, use a cream cheese frosting instead of buttercream.
- Mini Bundt cakes: Bake the batter in mini Bundt pans for a more elegant presentation.
- Gluten-free option: Substitute the all-purpose flour with a gluten-free all-purpose flour blend. Be sure to use a blend that contains xanthan gum for best results.
- Vegan option: Substitute the buttermilk with a plant-based milk (such as almond milk or soy milk) mixed with 1 teaspoon of apple cider vinegar. Use an egg replacer or flax egg instead of the eggs.
- Storage: Store the unfrosted cakes in an airtight container at room temperature for up to 3 days or in the freezer for up to 2 months. Frosted cakes should be stored in the refrigerator.
Troubleshooting:
- Cakes are dry: Make sure you are not overbaking the cakes. Check for doneness a few minutes before the recommended baking time. Also, ensure you are using the correct amount of liquid ingredients.
- Cakes are sinking in the middle: This could be due to underbaking or using too much leavening agent (baking soda or baking powder). Make sure to measure the ingredients accurately and bake the cakes until a toothpick inserted into the center comes out clean.
- Cakes are sticking to the pan: Make sure you are greasing and flouring the pans thoroughly. You can also use parchment paper liners for easy removal.
- Ganache is too thick: Add a tablespoon of warm milk or cream at a time until you reach the desired consistency.
- Ganache is too thin: Let the ganache sit at room temperature for a few minutes to thicken up. You can also refrigerate it for a short period of time, but be careful not to let it get too hard.
Enjoy!
These mini chocolate cakes are perfect for parties, potlucks, or simply as a sweet treat for yourself. They are easy to make, incredibly delicious, and sure to impress everyone who tries them. Happy baking!
Conclusion:
And there you have it! These mini chocolate cakes are truly a must-try for anyone craving a decadent, yet surprisingly simple, treat. From the rich, fudgy texture to the intense chocolate flavor, every bite is pure bliss. I know I’ve made these countless times, and they’re always a hit, whether it’s a casual weeknight dessert or a special occasion celebration.
But what makes these little cakes so irresistible? It’s the perfect balance of ease and indulgence. You don’t need to be a master baker to whip these up, and the ingredients are likely already in your pantry. Plus, the individual portions make them ideal for portion control (if you can resist having more than one!), and they’re incredibly versatile.
Speaking of versatility, let’s talk serving suggestions and variations! For a classic presentation, dust them with powdered sugar or cocoa powder. A dollop of whipped cream or a scoop of vanilla ice cream elevates them to a truly decadent dessert. Feeling adventurous? Try adding a swirl of raspberry jam or a sprinkle of chopped nuts before baking. You could even incorporate a hint of espresso powder into the batter for an extra kick of coffee flavor.
For a truly special occasion, consider frosting them with a rich chocolate ganache or a creamy buttercream frosting. Get creative with your decorations! Sprinkles, chocolate shavings, fresh berries the possibilities are endless. You can even use different sized muffin tins to create mini cupcakes or larger individual cakes, depending on your preference.
Another fun variation is to add chocolate chips to the batter. Milk chocolate, dark chocolate, white chocolate any kind will work! Or, for a more sophisticated flavor profile, try adding a pinch of sea salt to the batter. The salt enhances the sweetness of the chocolate and creates a delightful contrast.
If you’re looking for a gluten-free option, simply substitute the all-purpose flour with a gluten-free flour blend. Just be sure to check the label to ensure it’s a 1:1 replacement. You might also need to add a little extra moisture to the batter, as gluten-free flours tend to be drier.
These mini chocolate cakes are also perfect for gifting! Package them in a pretty box or tin, and they’re sure to be a welcome treat for friends, family, or neighbors. You could even include a handwritten recipe card for an extra personal touch.
I truly believe that everyone should have a go-to chocolate cake recipe, and this one is mine. It’s reliable, delicious, and always a crowd-pleaser. So, what are you waiting for? Gather your ingredients, preheat your oven, and get ready to bake some magic!
I’m so confident that you’ll love these mini chocolate cakes that I can’t wait to hear about your experience. Did you try any of the variations I suggested? Did you add your own special twist? Share your photos and comments below! I’m always looking for new ideas and inspiration. Happy baking! Let me know what you think of these mini chocolate cakes!
Mini Chocolate Cakes: The Ultimate Guide to Baking Perfection
Decadent and moist mini chocolate cakes, perfect for any occasion! Easy to make and customizable with ganache or buttercream frosting.
Ingredients
- 1 ½ cups all-purpose flour
- ¾ cup unsweetened cocoa powder
- 1 ½ cups granulated sugar
- 1 ½ teaspoons baking soda
- ¾ teaspoon baking powder
- ¾ teaspoon salt
- ¾ cup buttermilk
- ¾ cup vegetable oil
- 2 large eggs
- 1 ½ teaspoons vanilla extract
- ¾ cup boiling water
- 4 ounces semi-sweet chocolate, chopped
- ½ cup heavy cream
- ½ cup (1 stick) unsalted butter, softened
- 3 cups powdered sugar
- ¼ cup milk
- 1 teaspoon vanilla extract
Instructions
- Preheat oven to 350°F (175°C).
- In a large bowl, whisk together flour, cocoa powder, granulated sugar, baking soda, baking powder, and salt.
- In a separate bowl, whisk together buttermilk, vegetable oil, eggs, and vanilla extract.
- Gradually add the wet ingredients to the dry ingredients, mixing on low speed until just combined.
- Slowly pour in the boiling water while mixing on low speed until smooth and glossy.
- Grease and flour mini cake pans (or muffin tins).
- Evenly distribute the batter among the prepared mini cake pans, filling each about two-thirds full.
- Carefully place the filled mini cake pans in the preheated oven.
- Bake for 18-22 minutes, or until a toothpick inserted into the center comes out clean or with a few moist crumbs attached.
- Remove the mini cake pans from the oven and let them cool in the pans for about 5-10 minutes.
- Carefully invert the cakes onto a wire rack to cool completely.
- Place the chopped chocolate in a heatproof bowl.
- In a small saucepan, heat the heavy cream over medium heat until it just begins to simmer. Do not boil.
- Pour the hot cream over the chocolate and let it sit for about a minute to allow the chocolate to melt.
- Gently whisk the mixture until smooth and glossy. If the ganache is too thick, add a tablespoon of warm milk or cream at a time until you reach the desired consistency.
- In a large bowl, beat the softened butter with an electric mixer until light and fluffy.
- Gradually add the powdered sugar, one cup at a time, beating well after each addition.
- Add the milk and vanilla extract and beat until smooth and creamy. If the frosting is too thick, add a little more milk. If it’s too thin, add a little more powdered sugar.
- Once the mini cakes are completely cool, you can decorate them as desired.
- If using the chocolate ganache, drizzle it over the cakes. You can also dip the tops of the cakes into the ganache for a more decadent look.
- If using buttercream frosting, pipe or spread it onto the cakes. Get creative with your decorating!
- Sprinkle with sprinkles, chocolate shavings, chopped nuts, or fresh berries for an extra touch of elegance.
- Serve immediately or store in an airtight container at room temperature for up to 3 days.
Notes
- For a richer chocolate flavor: Use dark chocolate cocoa powder instead of unsweetened cocoa powder.
- Add coffee: Substitute ½ cup of strong brewed coffee for ½ cup of the boiling water to enhance the chocolate flavor.
- Spice it up: Add a pinch of cinnamon or cayenne pepper to the batter for a subtle kick.
- Nutty delight: Stir in ½ cup of chopped nuts (such as walnuts, pecans, or almonds) to the batter.
- Chocolate chips: Fold in ½ cup of chocolate chips to the batter for extra chocolatey goodness.
- Peanut butter swirl: Swirl a spoonful of peanut butter into the batter before baking for a delicious peanut butter chocolate combination.
- Cream cheese frosting: For a tangy twist, use a cream cheese frosting instead of buttercream.
- Mini Bundt cakes: Bake the batter in mini Bundt pans for a more elegant presentation.
- Gluten-free option: Substitute the all-purpose flour with a gluten-free all-purpose flour blend. Be sure to use a blend that contains xanthan gum for best results.
- Vegan option: Substitute the buttermilk with a plant-based milk (such as almond milk or soy milk) mixed with 1 teaspoon of apple cider vinegar. Use an egg replacer or flax egg instead of the eggs.
- Storage: Store the unfrosted cakes in an airtight container at room temperature for up to 3 days or in the freezer for up to 2 months. Frosted cakes should be stored in the refrigerator.
Leave a Comment