
Kung pao chicken, a symphony of spicy, savory, and sweet, is about to become your new weeknight obsession. Forget takeout! I’m going to show you how to create this restaurant-quality dish in your very own kitchen, and trust me, it’s easier than you think. Are you ready to embark on a culinary adventure that will tantalize your taste buds and leave you craving more?
This iconic stir-fry boasts a rich history, originating in the Sichuan province of China. Legend has it that the dish was named after Ding Baozhen, a late Qing Dynasty official who held the title of “Gong Bao,” meaning palace guardian. While the exact origins are debated, the dish’s popularity is undeniable, spreading far beyond Sichuan and becoming a beloved staple in Chinese restaurants worldwide.
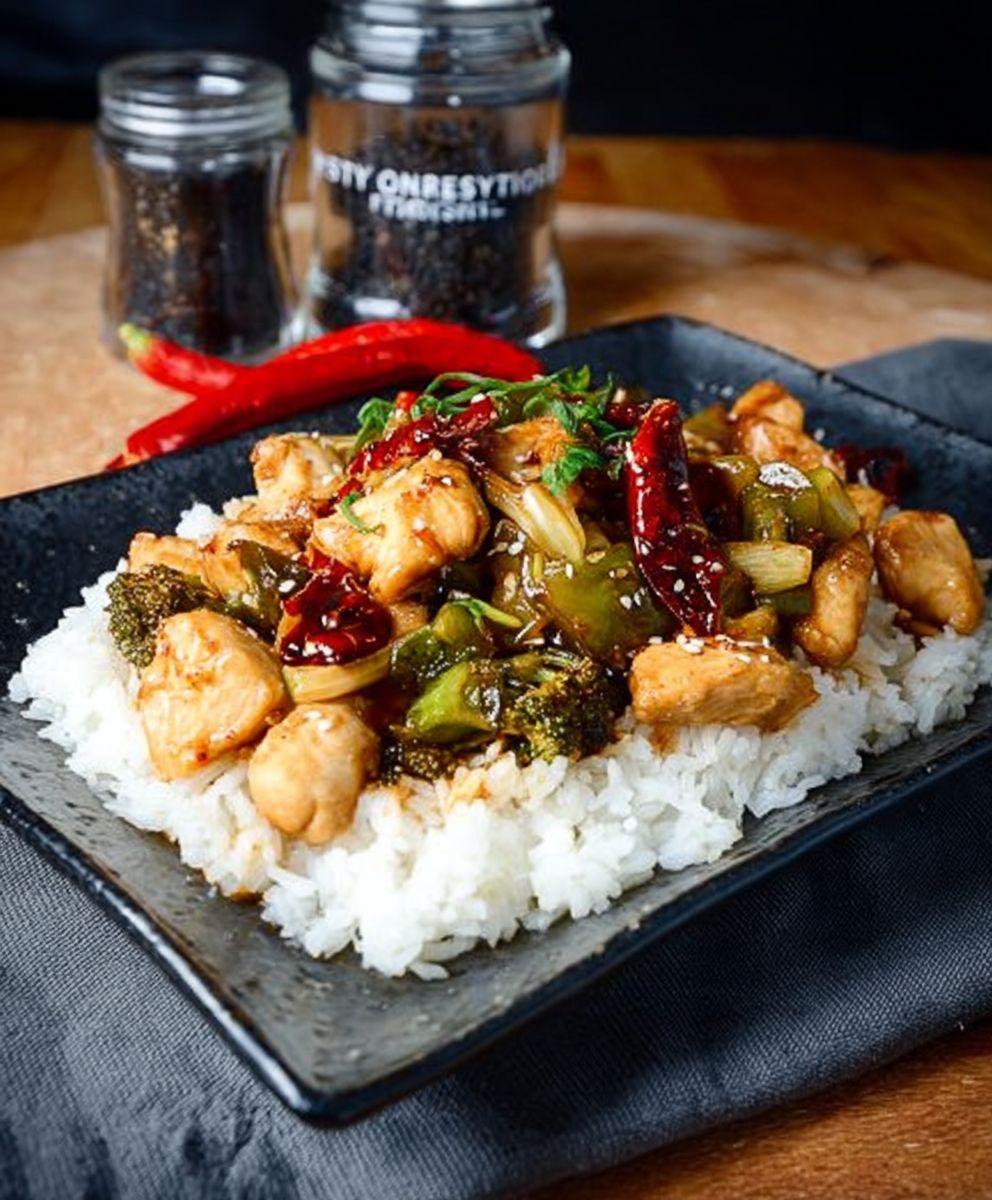
What makes kung pao chicken so irresistible? It’s the perfect balance of flavors and textures. The tender chicken, the crunchy peanuts, the fiery chili peppers, and the tangy sauce all come together in a harmonious explosion of deliciousness. People love it because it’s quick to prepare, incredibly flavorful, and satisfying. Plus, it’s a fantastic way to add some excitement to your dinner routine. So, let’s get cooking and discover the secrets to making the perfect kung pao chicken!

Ingredients:
- For the Chicken Marinade:
- 1.5 lbs boneless, skinless chicken thighs, cut into 1-inch cubes
- 1 tablespoon soy sauce
- 1 tablespoon Shaoxing rice wine (or dry sherry)
- 1 tablespoon cornstarch
- 1 teaspoon sugar
- 1/2 teaspoon salt
- 1/4 teaspoon white pepper
- 1 tablespoon vegetable oil
- For the Kung Pao Sauce:
- 2 tablespoons soy sauce
- 2 tablespoons Chinkiang vinegar (or balsamic vinegar)
- 1 tablespoon Shaoxing rice wine (or dry sherry)
- 1 tablespoon sugar
- 1 tablespoon cornstarch
- 1 teaspoon sesame oil
- 1/2 teaspoon ground Sichuan peppercorns, toasted and ground (optional, but highly recommended!)
- 1/4 teaspoon red pepper flakes (or more, to taste)
- 1/4 cup chicken broth or water
- For the Stir-Fry:
- 2 tablespoons vegetable oil
- 1/2 cup roasted peanuts (unsalted or lightly salted)
- 1 cup dried red chilies, cut in half or thirds (remove seeds for less heat)
- 4 cloves garlic, minced
- 1 inch ginger, minced
- 1 cup scallions, white and light green parts, chopped into 1-inch pieces
- 1/2 cup diced bell pepper (any color, or a mix)
Marinating the Chicken:
- In a medium bowl, combine the cubed chicken thighs with soy sauce, Shaoxing rice wine (or dry sherry), cornstarch, sugar, salt, and white pepper.
- Mix well with your hands, ensuring the chicken is evenly coated.
- Add the vegetable oil to the chicken mixture and mix again. This helps to seal in the moisture and prevent the chicken from sticking together during cooking.
- Cover the bowl and refrigerate for at least 30 minutes, or up to a few hours. The longer it marinates, the more flavorful and tender the chicken will be. I usually aim for at least an hour if I have the time.
Preparing the Kung Pao Sauce:
- In a small bowl, whisk together the soy sauce, Chinkiang vinegar (or balsamic vinegar), Shaoxing rice wine (or dry sherry), sugar, cornstarch, sesame oil, ground Sichuan peppercorns (if using), red pepper flakes, and chicken broth or water.
- Stir until the cornstarch is completely dissolved and the sauce is smooth. Set aside. It’s important to have this ready before you start stir-frying, as the cooking process moves quickly.
Stir-Frying the Kung Pao Chicken:
- Heat a wok or large skillet over high heat until it’s smoking hot. This is crucial for achieving that characteristic wok hei flavor.
- Add 1 tablespoon of vegetable oil to the wok and swirl to coat the surface.
- Add the marinated chicken to the wok in a single layer (you may need to do this in batches to avoid overcrowding).
- Stir-fry the chicken until it’s browned on all sides and cooked through, about 3-5 minutes per batch. Remove the cooked chicken from the wok and set aside.
- Add the remaining 1 tablespoon of vegetable oil to the wok.
- Add the dried red chilies and stir-fry for about 30 seconds, or until they are fragrant and slightly darkened. Be careful not to burn them, as they can become bitter.
- Add the minced garlic and ginger to the wok and stir-fry for another 15-20 seconds, or until fragrant.
- Add the chopped scallions and diced bell pepper to the wok and stir-fry for 1-2 minutes, or until the bell pepper is slightly softened.
- Pour the Kung Pao sauce into the wok and bring it to a simmer, stirring constantly. The sauce will thicken quickly.
- Return the cooked chicken to the wok and toss to coat it evenly with the sauce.
- Add the roasted peanuts to the wok and toss to combine.
- Stir-fry for another minute or two, until the sauce is glossy and the chicken is heated through.
Serving:
- Transfer the Kung Pao chicken to a serving dish.
- Garnish with extra chopped scallions and roasted peanuts, if desired.
- Serve immediately with steamed rice. This dish is best enjoyed fresh!
Tips for the Best Kung Pao Chicken:
- High Heat is Key: Make sure your wok or skillet is screaming hot before you start stir-frying. This will help to create that smoky, charred flavor that’s characteristic of authentic Kung Pao chicken.
- Don’t Overcrowd the Wok: Cook the chicken in batches to avoid overcrowding the wok. Overcrowding will lower the temperature and result in steamed, rather than stir-fried, chicken.
- Toast the Sichuan Peppercorns: If you’re using Sichuan peppercorns, toasting them before grinding will enhance their flavor and aroma. Simply dry-toast them in a skillet over medium heat for a few minutes, until fragrant.
- Adjust the Spice Level: The amount of red pepper flakes can be adjusted to your preference. If you like it really spicy, add more! You can also use fresh chilies instead of dried ones.
- Use Fresh Ingredients: Fresh garlic, ginger, and scallions will make a big difference in the flavor of the dish.
- Prepare Everything in Advance: Stir-frying is a fast process, so it’s important to have all of your ingredients prepped and ready to go before you start cooking. This includes chopping the vegetables, measuring out the sauce ingredients, and marinating the chicken.
- Don’t Overcook the Chicken: Overcooked chicken will be dry and tough. Cook it just until it’s cooked through and still slightly tender.
- Use Quality Ingredients: Using high-quality soy sauce, vinegar, and sesame oil will elevate the flavor of the dish.
Variations:
- Vegetarian Kung Pao: Substitute the chicken with tofu, tempeh, or vegetables like mushrooms, zucchini, and broccoli.
- Kung Pao Shrimp: Replace the chicken with shrimp. Marinate the shrimp in the same marinade as the chicken, but reduce the cooking time.
- Kung Pao Beef: Use thinly sliced beef instead of chicken. Marinate the beef in the same marinade as the chicken.
- Add More Vegetables: Feel free to add other vegetables to the stir-fry, such as carrots, celery, or water chestnuts.
- Use Different Nuts: If you don’t have peanuts, you can use cashews or almonds instead.
Storing Leftovers:
Leftover Kung Pao chicken can be stored in an airtight container in the refrigerator for up to 3 days. Reheat it in a skillet or microwave until heated through. The sauce may thicken upon refrigeration, so you may need to add a splash of water or chicken broth when reheating.
Serving Suggestions:
- Serve with steamed rice or brown rice.
- Serve with noodles, such as lo mein or chow mein.
- Serve with a side of stir-fried vegetables.
- Garnish with chopped cilantro or sesame seeds.
Conclusion:
This isn’t just another recipe; it’s your ticket to restaurant-quality Kung Pao Chicken right in your own kitchen! From the satisfying sizzle of the wok to the explosion of flavors the spicy chilies, the savory sauce, the crunchy peanuts this dish is a complete sensory experience. I know, I know, there are a million Kung Pao Chicken recipes out there, but trust me, this one is different. It’s the perfect balance of sweet, sour, spicy, and savory, and it’s surprisingly easy to make once you have all your ingredients prepped.
Why is this a must-try? Because it delivers authentic flavor without the fuss. We’ve streamlined the process to make it accessible for even beginner cooks. Plus, you get to control the spice level! Want it mild? Reduce the number of dried chilies. Craving some serious heat? Add a few more! The beauty of homemade is that you can customize it to your exact preferences. And let’s be honest, who can resist that addictive combination of tender chicken, crunchy peanuts, and a glossy, flavorful sauce? It’s comfort food elevated.
But the deliciousness doesn’t stop there! This Kung Pao Chicken is incredibly versatile. Serve it over fluffy white rice for a classic presentation, or try it with brown rice or quinoa for a healthier twist. For a low-carb option, serve it over cauliflower rice or zucchini noodles. You can also add extra vegetables like bell peppers, zucchini, or water chestnuts to bulk it up and add more nutrients. Feeling adventurous? Try adding pineapple chunks for a sweet and tangy twist. Or, for a vegetarian version, substitute the chicken with tofu or tempeh. Just be sure to press the tofu well to remove excess moisture before stir-frying.
Looking for some serving suggestions? A side of steamed broccoli or bok choy complements the dish perfectly. You could also serve it with spring rolls or egg rolls for a complete Asian-inspired meal. And don’t forget the garnish! A sprinkle of chopped green onions and a few extra peanuts add a touch of freshness and visual appeal.
I’m absolutely confident that you’re going to love this recipe. It’s a crowd-pleaser, a weeknight winner, and a guaranteed way to impress your friends and family. So, what are you waiting for? Gather your ingredients, fire up your wok (or skillet!), and get ready to experience the magic of homemade Kung Pao Chicken.
I truly believe that cooking should be fun and rewarding, and this recipe is both! It’s a chance to unleash your inner chef and create something truly delicious. And the best part? You get to enjoy the fruits (or rather, the chicken!) of your labor.
Now, I want to hear from you! Once you’ve tried this recipe, please come back and share your experience in the comments below. Did you make any modifications? What did you serve it with? What did your family think? I’m always eager to learn from your experiences and see how you’ve made this recipe your own. Don’t be shy your feedback is invaluable! Happy cooking, and enjoy your amazing homemade Kung Pao Chicken! I can’t wait to hear all about it!
Kung Pao Chicken: The Ultimate Recipe and Guide
Classic Kung Pao Chicken with tender chicken, peanuts, and dried chilies in a savory and slightly spicy sauce.
Ingredients
- 1.5 lbs boneless, skinless chicken thighs, cut into 1-inch cubes
- 1 tablespoon soy sauce
- 1 tablespoon Shaoxing rice wine (or dry sherry)
- 1 tablespoon cornstarch
- 1 teaspoon sugar
- 1/2 teaspoon salt
- 1/4 teaspoon white pepper
- 1 tablespoon vegetable oil
- 2 tablespoons soy sauce
- 2 tablespoons Chinkiang vinegar (or balsamic vinegar)
- 1 tablespoon Shaoxing rice wine (or dry sherry)
- 1 tablespoon sugar
- 1 tablespoon cornstarch
- 1 teaspoon sesame oil
- 1/2 teaspoon ground Sichuan peppercorns, toasted and ground (optional, but highly recommended!)
- 1/4 teaspoon red pepper flakes (or more, to taste)
- 1/4 cup chicken broth or water
- 2 tablespoons vegetable oil
- 1/2 cup roasted peanuts (unsalted or lightly salted)
- 1 cup dried red chilies, cut in half or thirds (remove seeds for less heat)
- 4 cloves garlic, minced
- 1 inch ginger, minced
- 1 cup scallions, white and light green parts, chopped into 1-inch pieces
- 1/2 cup diced bell pepper (any color, or a mix)
Instructions
- In a medium bowl, combine the cubed chicken thighs with soy sauce, Shaoxing rice wine (or dry sherry), cornstarch, sugar, salt, and white pepper. Mix well with your hands, ensuring the chicken is evenly coated. Add the vegetable oil to the chicken mixture and mix again. Cover the bowl and refrigerate for at least 30 minutes, or up to a few hours.
- In a small bowl, whisk together the soy sauce, Chinkiang vinegar (or balsamic vinegar), Shaoxing rice wine (or dry sherry), sugar, cornstarch, sesame oil, ground Sichuan peppercorns (if using), red pepper flakes, and chicken broth or water. Stir until the cornstarch is completely dissolved and the sauce is smooth. Set aside.
- Heat a wok or large skillet over high heat until it’s smoking hot. Add 1 tablespoon of vegetable oil to the wok and swirl to coat the surface. Add the marinated chicken to the wok in a single layer (you may need to do this in batches to avoid overcrowding). Stir-fry the chicken until it’s browned on all sides and cooked through, about 3-5 minutes per batch. Remove the cooked chicken from the wok and set aside.
- Add the remaining 1 tablespoon of vegetable oil to the wok. Add the dried red chilies and stir-fry for about 30 seconds, or until they are fragrant and slightly darkened. Be careful not to burn them, as they can become bitter.
- Add the minced garlic and ginger to the wok and stir-fry for another 15-20 seconds, or until fragrant.
- Add the chopped scallions and diced bell pepper to the wok and stir-fry for 1-2 minutes, or until the bell pepper is slightly softened.
- Pour the Kung Pao sauce into the wok and bring it to a simmer, stirring constantly. The sauce will thicken quickly.
- Return the cooked chicken to the wok and toss to coat it evenly with the sauce.
- Add the roasted peanuts to the wok and toss to combine.
- Stir-fry for another minute or two, until the sauce is glossy and the chicken is heated through.
- Transfer the Kung Pao chicken to a serving dish. Garnish with extra chopped scallions and roasted peanuts, if desired. Serve immediately with steamed rice.
Notes
- High heat is key for achieving wok hei flavor.
- Don’t overcrowd the wok; cook chicken in batches.
- Toast Sichuan peppercorns before grinding for enhanced flavor.
- Adjust the spice level to your preference.
- Prepare all ingredients in advance for a smooth cooking process.
- Don’t overcook the chicken.
- Use quality ingredients for the best flavor.
- See recipe for variations (vegetarian, shrimp, beef, etc.) and serving suggestions.
- Leftovers can be stored in the refrigerator for up to 3 days.
Leave a Comment