
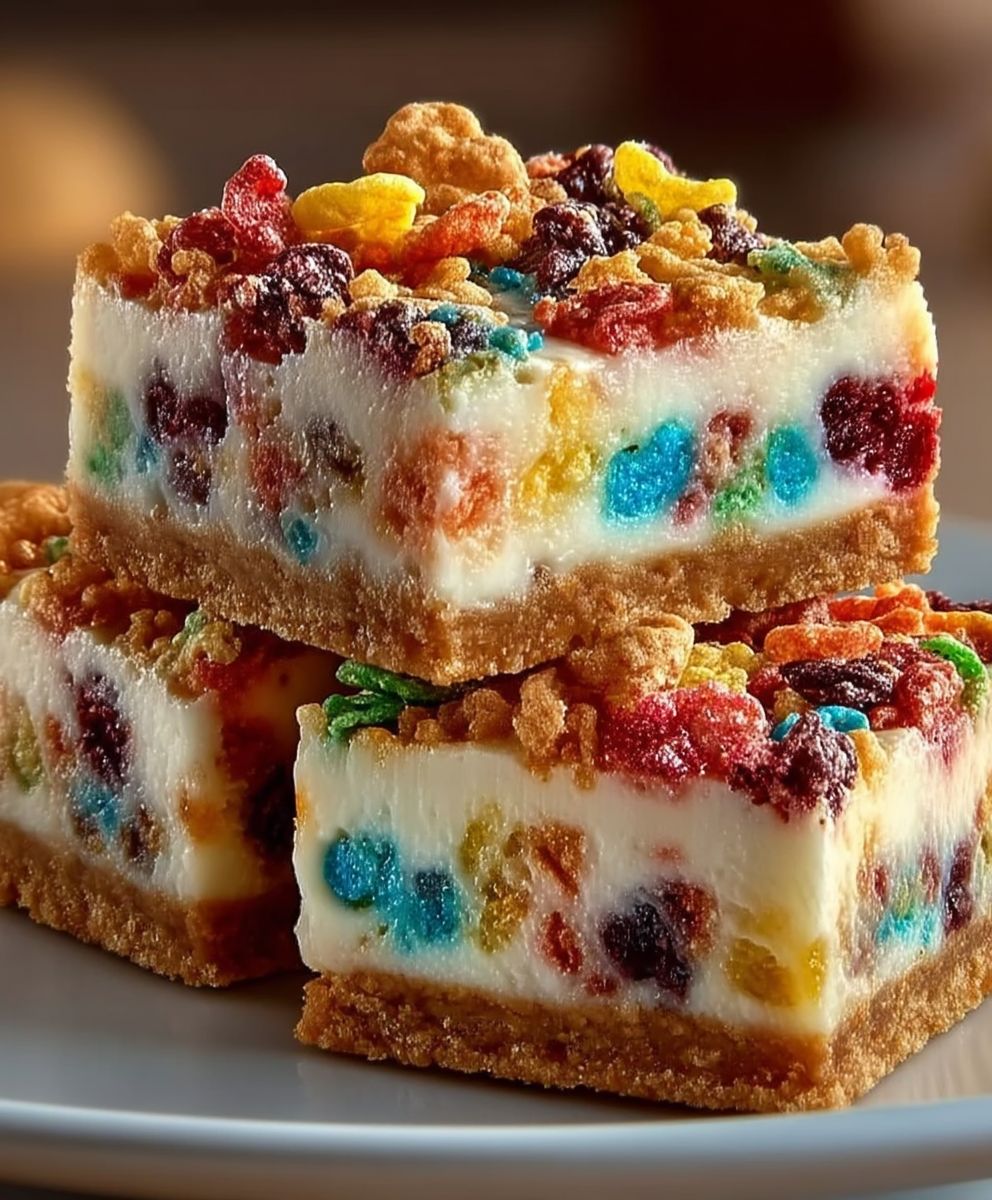
Fruity Pebbles Cheesecake Bars: Prepare to be transported back to Saturday mornings with a grown-up twist! Remember the joy of pouring a bowl of brightly colored, sugary cereal? Now, imagine that same nostalgic flavor baked into a creamy, decadent cheesecake bar. These aren’t your average dessert; they’re a vibrant explosion of fun and flavor that will have everyone begging for more.
While cheesecake itself boasts a rich history dating back to ancient Greece, the addition of Fruity Pebbles is a decidedly modern and playful innovation. It’s a celebration of American pop culture, taking a beloved childhood breakfast staple and elevating it to dessert status. Think of it as a culinary remix, blending classic indulgence with a touch of whimsical charm.
What makes these Fruity Pebbles Cheesecake Bars so irresistible? It’s the perfect combination of textures: the smooth, creamy cheesecake filling, the slightly crunchy cereal topping, and the buttery graham cracker crust. The taste is a delightful dance of sweet and tangy, with the fruity cereal adding a burst of vibrant flavor that complements the richness of the cheesecake. Plus, they’re incredibly easy to make and perfect for parties, potlucks, or simply satisfying your sweet tooth. Trust me, one bite and you’ll be hooked!

Ingredients:
- For the Fruity Pebbles Crust:
- 3 cups Fruity Pebbles cereal
- 6 tablespoons (3 ounces) unsalted butter, melted
- 2 tablespoons granulated sugar
- For the Cheesecake Filling:
- 32 ounces (4 packages) cream cheese, softened to room temperature
- 1 1/2 cups granulated sugar
- 1 teaspoon vanilla extract
- 1/2 teaspoon almond extract (optional, but highly recommended!)
- 4 large eggs
- 1/2 cup heavy cream
- For the Fruity Pebbles Topping:
- 1 cup Fruity Pebbles cereal
- 2 tablespoons melted white chocolate chips (optional, for extra hold)
Preparing the Fruity Pebbles Crust:
- Preheat your oven and prepare your pan: First things first, preheat your oven to 350°F (175°C). While the oven is heating up, grease and line a 9×13 inch baking pan with parchment paper. Make sure the parchment paper overhangs the sides of the pan this will make it super easy to lift the cheesecake bars out later! I like to use binder clips to hold the parchment paper in place while I’m working.
- Crush the Fruity Pebbles: Now, let’s get those Fruity Pebbles ready for the crust. You can use a food processor to pulse the cereal into fine crumbs. If you don’t have a food processor, no worries! Just place the Fruity Pebbles in a large zip-top bag and use a rolling pin or the bottom of a heavy glass to crush them. You want them to be pretty fine, but a few larger pieces are okay for texture.
- Combine the crust ingredients: In a medium bowl, combine the crushed Fruity Pebbles, melted butter, and granulated sugar. Mix everything together until the crumbs are evenly moistened. The mixture should resemble wet sand.
- Press the crust into the pan: Pour the Fruity Pebbles mixture into the prepared baking pan. Use the bottom of a measuring cup or your fingers to firmly press the crumbs into an even layer across the bottom of the pan. Make sure to press it down really well so it holds together.
- Bake the crust: Bake the crust in the preheated oven for 8-10 minutes, or until it’s lightly golden brown and fragrant. Keep a close eye on it to prevent burning! Once it’s done, remove the pan from the oven and let the crust cool completely while you prepare the cheesecake filling.
Making the Cheesecake Filling:
- Beat the cream cheese and sugar: In a large bowl (or the bowl of your stand mixer), beat the softened cream cheese and granulated sugar together until smooth and creamy. This is a crucial step, so make sure there are no lumps of cream cheese remaining. Scrape down the sides of the bowl as needed to ensure everything is evenly mixed.
- Add the vanilla and almond extracts: Stir in the vanilla extract and almond extract (if using). The almond extract really enhances the flavor and complements the Fruity Pebbles, but it’s totally optional if you’re not a fan.
- Incorporate the eggs: Add the eggs one at a time, beating well after each addition. Be careful not to overmix at this stage, as overmixing can incorporate too much air into the batter, which can cause the cheesecake to crack during baking.
- Stir in the heavy cream: Gently stir in the heavy cream until the batter is smooth and well combined. The heavy cream adds richness and helps to create a creamy, decadent cheesecake.
Baking the Cheesecake Bars:
- Pour the filling over the crust: Once the crust has cooled completely, pour the cheesecake filling evenly over the top. Use a spatula to spread the filling to the edges of the pan.
- Bake the cheesecake: Bake the cheesecake in the preheated oven for 30-35 minutes, or until the edges are set but the center still has a slight jiggle. The jiggle is important it means the cheesecake will be perfectly creamy once it’s cooled.
- Cool the cheesecake: Turn off the oven and crack the oven door slightly. Let the cheesecake cool in the oven for 1 hour. This gradual cooling process helps to prevent cracking.
- Refrigerate the cheesecake: After 1 hour, remove the cheesecake from the oven and let it cool completely at room temperature. Once it’s cooled, cover the pan with plastic wrap and refrigerate for at least 4 hours, or preferably overnight. This allows the cheesecake to set completely and develop its full flavor.
Adding the Fruity Pebbles Topping:
- Prepare the topping: In a small bowl, gently toss the remaining 1 cup of Fruity Pebbles cereal with the melted white chocolate chips (if using). The white chocolate helps the cereal stick to the cheesecake, but it’s optional.
- Top the cheesecake: Once the cheesecake has chilled completely, lift it out of the pan using the parchment paper overhang. Cut the cheesecake into bars using a sharp knife.
- Add the Fruity Pebbles: Sprinkle the Fruity Pebbles topping evenly over the cheesecake bars. Gently press the cereal into the cheesecake to help it adhere.
- Serve and enjoy! Serve the Fruity Pebbles Cheesecake Bars chilled and enjoy! These bars are best stored in the refrigerator in an airtight container. They’ll stay fresh for up to 5 days (if they last that long!).
Tips for Success:
- Use room temperature ingredients: Make sure your cream cheese and eggs are at room temperature before you start. This will help them blend together smoothly and prevent lumps in your cheesecake filling.
- Don’t overmix the batter: Overmixing can incorporate too much air into the batter, which can cause the cheesecake to crack during baking. Mix until just combined.
- Bake in a water bath (optional): For an even creamier cheesecake, you can bake it in a water bath. To do this, wrap the bottom of your baking pan tightly in aluminum foil. Place the wrapped pan in a larger baking pan and fill the larger pan with hot water until it reaches about halfway up the sides of the cheesecake pan. Bake as directed.
- Cool the cheesecake slowly: Cooling the cheesecake slowly in the oven and then in the refrigerator helps to prevent cracking.
- Get creative with the toppings: Feel free to experiment with different toppings! You could add a drizzle of chocolate sauce, a sprinkle of sprinkles, or even some fresh fruit.
Variations:
- Fruity Pebbles Swirl: Before baking, reserve about 1/2 cup of the cheesecake filling. Mix in a few tablespoons of crushed Fruity Pebbles. Drop spoonfuls of the Fruity Pebbles mixture over the top of the cheesecake filling and swirl with a knife or toothpick.
- Individual Cheesecake Cups: Instead of baking in a 9×13 inch pan, you can bake the cheesecake in individual cupcake liners. Reduce the baking time accordingly.
- Different Cereal Crust: If you’re not a fan of Fruity Pebbles, you can use a different cereal for the crust. Cocoa Pebbles, Rice Krispies, or even graham crackers would all work well.
Conclusion:
And there you have it! These Fruity Pebbles Cheesecake Bars are truly a must-try for anyone looking for a fun, vibrant, and utterly delicious dessert. The creamy cheesecake filling, perfectly balanced with the sweet and crunchy Fruity Pebbles, creates a textural and flavor explosion that will have everyone begging for more. I know I’ve already made them three times this month!
But why are these bars so special? It’s more than just the nostalgia factor of Fruity Pebbles. It’s the way the cereal infuses the cheesecake with a subtle fruity flavor, complementing the richness of the cream cheese and the buttery graham cracker crust. It’s the sheer joy of biting into something so colorful and playful. It’s the perfect balance of sweet, creamy, and crunchy. Trust me, these aren’t your average cheesecake bars. They’re a party in your mouth!
These Fruity Pebbles Cheesecake Bars are incredibly versatile too!
Looking for serving suggestions? These bars are fantastic on their own, chilled straight from the fridge. But you can also elevate them with a few simple additions. A dollop of whipped cream and a sprinkle of extra Fruity Pebbles on top adds a touch of elegance. For a more decadent treat, drizzle them with melted white chocolate or a homemade berry sauce. They’re also amazing served alongside a scoop of vanilla ice cream.
Want to experiment with variations? The possibilities are endless! Try using a different type of cereal for a completely new flavor profile. Cocoa Pebbles would create a chocolatey cheesecake bar, while Cinnamon Toast Crunch would add a warm, spicy twist. You could also incorporate other mix-ins, such as chopped strawberries, blueberries, or even mini chocolate chips. For a truly indulgent experience, try adding a layer of Nutella between the crust and the cheesecake filling.
Another fun variation is to make mini cheesecake bites instead of bars. Simply use a mini muffin tin and adjust the baking time accordingly. These bite-sized treats are perfect for parties or potlucks. You can also get creative with the crust. Instead of graham crackers, try using crushed Oreos or even shortbread cookies.
Don’t be intimidated by the recipe! It’s surprisingly easy to make, even for beginner bakers. The most important thing is to follow the instructions carefully and allow the cheesecake to cool completely before cutting into bars. This will ensure that the bars are firm and hold their shape.
I’m confident that you’ll love these Fruity Pebbles Cheesecake Bars as much as I do. They’re the perfect dessert for any occasion, from birthday parties to casual get-togethers. They’re also a great way to brighten up a gloomy day. So, what are you waiting for? Gather your ingredients, preheat your oven, and get ready to bake some magic!
I truly believe that this recipe for Fruity Pebbles Cheesecake Bars is a winner. It’s a guaranteed crowd-pleaser that will leave everyone smiling.
Now, it’s your turn! I’m so excited for you to try this recipe and experience the joy of these Fruity Pebbles Cheesecake Bars for yourself. Once you’ve made them, please come back and share your experience in the comments below. I’d love to hear what you think, what variations you tried, and any tips or tricks you discovered along the way. Happy baking!
Fruity Pebbles Cheesecake Bars: A Delicious No-Bake Recipe
Fun, colorful dessert bars with a crunchy Fruity Pebbles crust, creamy cheesecake filling, and a sprinkle of Fruity Pebbles on top!
Ingredients
- 3 cups Fruity Pebbles cereal
- 6 tablespoons (3 ounces) unsalted butter, melted
- 2 tablespoons granulated sugar
- 32 ounces (4 packages) cream cheese, softened to room temperature
- 1 1/2 cups granulated sugar
- 1 teaspoon vanilla extract
- 1/2 teaspoon almond extract (optional, but highly recommended!)
- 4 large eggs
- 1/2 cup heavy cream
- 1 cup Fruity Pebbles cereal
- 2 tablespoons melted white chocolate chips (optional, for extra hold)
Instructions
- Preheat your oven to 350°F (175°C). Grease and line a 9×13 inch baking pan with parchment paper, ensuring the paper overhangs the sides.
- Crush the Fruity Pebbles using a food processor or by placing them in a zip-top bag and crushing with a rolling pin. Aim for fine crumbs with some larger pieces for texture.
- In a medium bowl, combine the crushed Fruity Pebbles, melted butter, and granulated sugar. Mix until evenly moistened.
- Pour the mixture into the prepared pan and firmly press into an even layer using the bottom of a measuring cup or your fingers.
- Bake for 8-10 minutes, or until lightly golden brown and fragrant. Let cool completely.
- In a large bowl, beat the softened cream cheese and granulated sugar until smooth and creamy. Scrape down the sides of the bowl as needed.
- Stir in the vanilla extract and almond extract (if using).
- Add the eggs one at a time, beating well after each addition. Be careful not to overmix.
- Gently stir in the heavy cream until smooth and well combined.
- Pour the cheesecake filling evenly over the cooled crust.
- Bake for 30-35 minutes, or until the edges are set but the center still has a slight jiggle.
- Turn off the oven, crack the door slightly, and let the cheesecake cool in the oven for 1 hour.
- Remove from the oven and let cool completely at room temperature. Cover with plastic wrap and refrigerate for at least 4 hours, or preferably overnight.
- In a small bowl, gently toss the remaining 1 cup of Fruity Pebbles cereal with the melted white chocolate chips (if using).
- Lift the chilled cheesecake out of the pan using the parchment paper overhang. Cut into bars.
- Sprinkle the Fruity Pebbles topping evenly over the cheesecake bars, gently pressing to adhere.
- Serve chilled and enjoy! Store in the refrigerator in an airtight container for up to 5 days.
Notes
- Use room temperature ingredients for a smooth filling.
- Don’t overmix the batter to prevent cracking.
- For an even creamier cheesecake, bake in a water bath (wrap the bottom of the pan in foil, place in a larger pan, and fill the larger pan with hot water halfway up the sides).
- Cool the cheesecake slowly to prevent cracking.
- Get creative with toppings!
Leave a Comment