
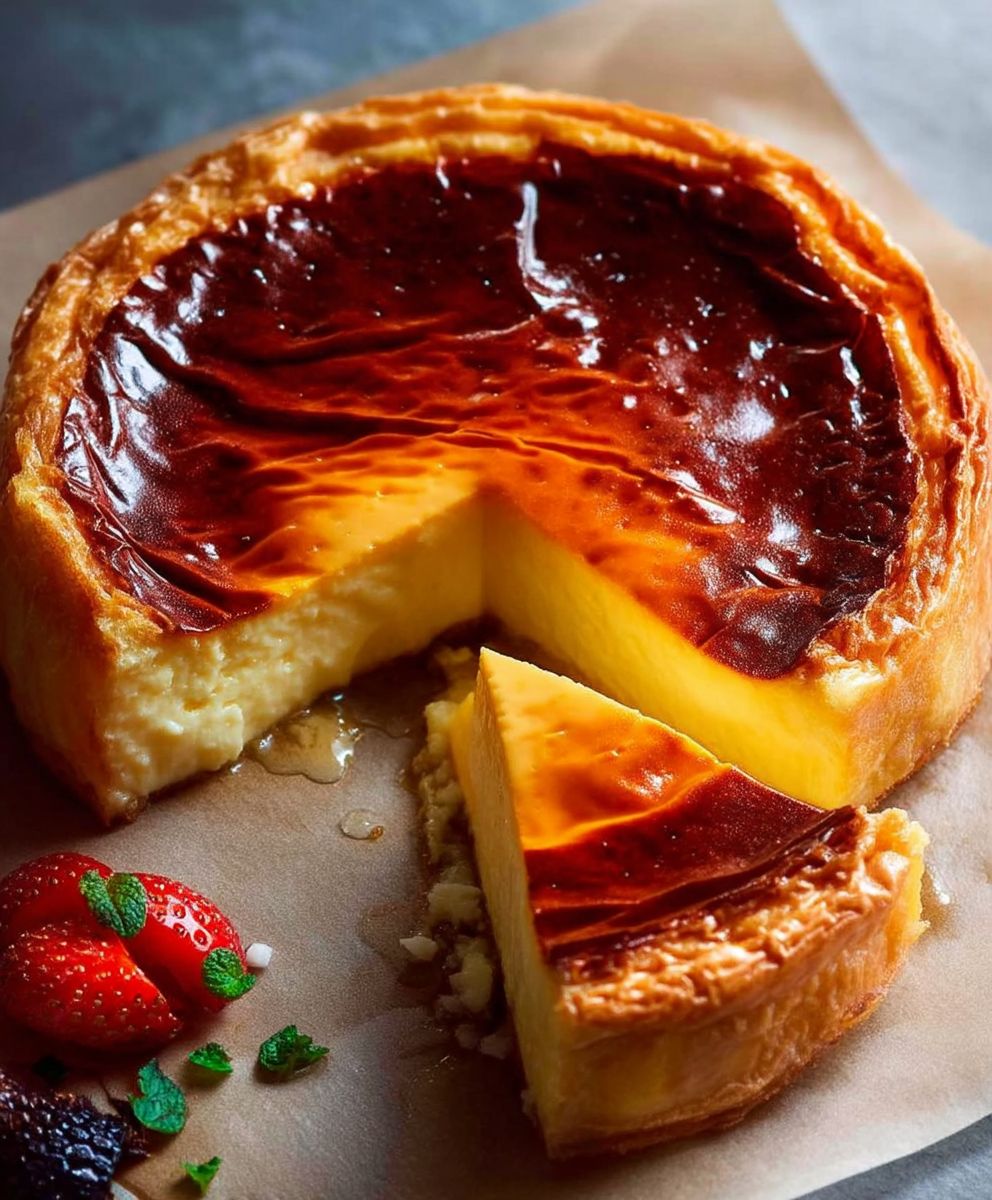
Flan Patissier, oh, where do I even begin? This isn’t just a dessert; it’s a creamy, dreamy slice of French history, a testament to simple ingredients transformed into something truly extraordinary. Imagine sinking your fork into a velvety smooth custard, its delicate sweetness perfectly balanced by a buttery, crisp pastry crust. That, my friends, is the magic of a perfectly executed Flan Patissier.
While its exact origins are debated, similar custard tarts have graced European tables for centuries. The French, however, have truly perfected the art, elevating it to a beloved classic found in patisseries across the country. It’s a dessert that speaks of tradition, of Sunday family lunches, and of the simple pleasures in life.
But what is it about this seemingly simple tart that has captured hearts (and stomachs) for generations? It’s the texture, undoubtedly. The contrast between the wobbly, yielding custard and the satisfying crunch of the pastry is simply divine. It’s also the subtle sweetness, never cloying, always elegant. And let’s be honest, the fact that it can be made ahead of time makes it a winner in my book! Whether you’re a seasoned baker or just starting out, this recipe will guide you through creating your own slice of French paradise.

Ingredients:
- For the Pastry:
- 250g plain flour, plus extra for dusting
- 125g cold unsalted butter, cut into small cubes
- Pinch of salt
- 50ml ice water
- For the Custard Filling:
- 1 litre whole milk
- 200ml double cream
- 200g caster sugar
- 1 vanilla pod, split lengthways and seeds scraped
- 6 large eggs
- 2 large egg yolks
- 60g cornflour
Preparing the Sweet Shortcrust Pastry:
- First, let’s tackle the pastry. In a large bowl, sift the flour and add a pinch of salt. This helps to distribute the salt evenly and gives the pastry a better flavor.
- Now, add the cold, cubed butter to the flour. Using your fingertips, rub the butter into the flour until the mixture resembles breadcrumbs. The key here is to work quickly and keep the butter cold. If the butter gets too warm, the pastry will be tough. You can also use a food processor for this step, pulsing until you get the breadcrumb consistency.
- Gradually add the ice water, a tablespoon at a time, mixing gently with a knife or your hands. Be careful not to overwork the dough. You want just enough water to bring the dough together into a ball.
- Once the dough comes together, flatten it into a disc, wrap it in cling film, and refrigerate for at least 30 minutes. This chilling time is crucial as it allows the gluten to relax, resulting in a tender pastry. You can even chill it for longer, up to a couple of days, if you’re preparing in advance.
- After chilling, lightly flour a clean work surface. Roll out the pastry to a thickness of about 3mm. It should be large enough to line a 23cm (9-inch) tart tin with a removable base.
- Carefully lift the pastry and drape it over the tart tin. Gently press the pastry into the base and sides of the tin, ensuring there are no air pockets.
- Use a rolling pin to trim the excess pastry from the top of the tin. Roll the pin over the top edge to create a clean finish.
- Now, it’s time to blind bake the pastry. Prick the base of the pastry all over with a fork. This prevents the pastry from puffing up during baking.
- Line the pastry case with baking parchment and fill it with baking beans or dried rice. This will weigh down the pastry and help it to keep its shape.
- Bake in a preheated oven at 200°C (180°C fan/Gas Mark 6) for 15 minutes.
- Remove the baking beans and parchment and bake for a further 5-10 minutes, or until the pastry is lightly golden brown. Keep a close eye on it to prevent it from burning.
- Remove the pastry case from the oven and set aside to cool slightly.
Preparing the Custard Filling:
- While the pastry is cooling, let’s make the custard filling. In a large saucepan, combine the milk, double cream, and caster sugar.
- Split the vanilla pod lengthways and scrape out the seeds. Add both the seeds and the pod to the saucepan. The vanilla pod infuses the milk with a beautiful aroma and flavor.
- Heat the milk mixture over medium heat, stirring occasionally, until it just comes to a simmer. Be careful not to let it boil.
- In a separate bowl, whisk together the eggs, egg yolks, and cornflour until smooth and pale. The cornflour helps to thicken the custard.
- Once the milk mixture is simmering, remove it from the heat and carefully pour a little of the hot milk into the egg mixture, whisking constantly. This is called tempering the eggs and prevents them from scrambling when added to the hot milk.
- Gradually pour the tempered egg mixture back into the saucepan with the remaining hot milk, whisking continuously.
- Return the saucepan to medium heat and cook, stirring constantly with a wooden spoon, until the custard thickens and coats the back of the spoon. This usually takes about 5-10 minutes. Be patient and keep stirring to prevent the custard from sticking to the bottom of the pan and burning.
- Once the custard has thickened, remove it from the heat and strain it through a fine-mesh sieve into a clean bowl. This will remove any lumps and ensure a smooth, creamy custard.
- Discard the vanilla pod.
Assembling and Baking the Flan:
- Pour the warm custard filling into the pre-baked pastry case.
- Smooth the surface of the custard with a spatula.
- Bake in a preheated oven at 160°C (140°C fan/Gas Mark 3) for 30-40 minutes, or until the custard is set but still has a slight wobble in the center. The baking time may vary depending on your oven, so keep a close eye on it.
- Remove the flan from the oven and let it cool completely in the tin. As it cools, the custard will set further.
- Once the flan is completely cool, carefully remove it from the tin. You can run a thin knife around the edge of the tin to help release it.
- Place the flan on a serving plate.
- For an extra touch, you can dust the top of the flan with icing sugar before serving.
- Serve the flan chilled or at room temperature. It’s delicious on its own or with a dollop of whipped cream or a scoop of vanilla ice cream.
Tips for Success:
- Cold Ingredients are Key: Make sure your butter and water are ice cold when making the pastry. This will prevent the gluten from developing too much and result in a tender crust.
- Don’t Overwork the Pastry: Overworking the pastry will make it tough. Mix the ingredients just until they come together.
- Blind Baking is Essential: Blind baking the pastry prevents it from becoming soggy when you add the custard filling.
- Tempering the Eggs: Tempering the eggs is crucial to prevent them from scrambling when added to the hot milk.
- Constant Stirring: Stir the custard constantly while it’s cooking to prevent it from sticking to the bottom of the pan and burning.
- Cooling Time: Allow the flan to cool completely before removing it from the tin. This will give the custard time to set properly.
Variations:
- Chocolate Flan: Add 50g of melted dark chocolate to the custard filling for a rich chocolate flavor.
- Lemon Flan: Add the zest of one lemon to the custard filling for a refreshing citrus twist.
- Salted Caramel Flan: Drizzle salted caramel sauce over the top of the flan before serving for a decadent treat.
This Flan Patissier recipe is a classic for a reason. It’s a simple yet elegant dessert that’s sure to impress your friends and family. With a little practice, you’ll be able to create a perfect flan every time. Enjoy!
Conclusion:
So, there you have it! This Flan Patissier recipe is more than just a dessert; it’s an experience, a journey back to comforting flavors and simple pleasures. I truly believe that once you’ve tasted the creamy custard nestled in that perfectly crisp pastry, you’ll understand why I’m so passionate about sharing it with you. It’s a must-try for anyone who appreciates classic French baking, and I promise, it’s easier to master than you might think!
Why is this Flan Patissier a must-try? Well, beyond the incredible taste and texture, it’s the sheer versatility. It’s elegant enough to serve at a dinner party, yet comforting enough to enjoy on a cozy afternoon with a cup of tea. It’s a crowd-pleaser, a conversation starter, and a guaranteed way to impress your friends and family. Plus, the satisfaction of creating something so beautiful and delicious from scratch is simply unmatched.
Now, let’s talk serving suggestions and variations! While this Flan Patissier is absolutely divine on its own, there are plenty of ways to customize it to your liking. For a simple touch, dust the top with a light coating of powdered sugar just before serving. Or, if you’re feeling a bit more adventurous, try adding a sprinkle of cinnamon or nutmeg to the custard filling for a warm, spiced flavor. A dollop of whipped cream or a scoop of vanilla ice cream also makes a delightful accompaniment.
For variations, consider infusing the milk with different flavors. A vanilla bean is the classic choice, but you could also try lemon zest, orange zest, or even a few cardamom pods for a more exotic twist. If you’re a chocolate lover, you could add a tablespoon or two of cocoa powder to the custard filling for a decadent chocolate Flan Patissier. Another fun idea is to add a layer of fruit to the bottom of the pastry crust before pouring in the custard. Sliced apples, pears, or berries would all work beautifully.
Don’t be intimidated by the seemingly long list of instructions. I’ve broken it down into manageable steps, and I’m confident that you can achieve amazing results. Remember to take your time, read through the recipe carefully, and don’t be afraid to experiment. Baking is all about learning and having fun, so embrace the process and enjoy the journey!
I’m so excited for you to try this recipe and experience the magic of Flan Patissier for yourself. Once you do, please, please, please come back and share your experience! I’d love to hear how it turned out, what variations you tried, and any tips or tricks you discovered along the way. Your feedback is invaluable, and it helps me to continue creating and sharing recipes that you’ll love.
So, go ahead, preheat your oven, gather your ingredients, and get ready to bake a truly unforgettable dessert. I can’t wait to hear all about your Flan Patissier adventures! Happy baking!
Flan Patissier: The Ultimate Guide to Making This Classic Dessert
Classic French Flan Patissier: buttery shortcrust and smooth vanilla custard. Perfect for any occasion.
Ingredients
- 250g plain flour, plus extra for dusting
- 125g cold unsalted butter, cut into small cubes
- Pinch of salt
- 50ml ice water
- 1 litre whole milk
- 200ml double cream
- 200g caster sugar
- 1 vanilla pod, split lengthways and seeds scraped
- 6 large eggs
- 2 large egg yolks
- 60g cornflour
Instructions
- In a large bowl, sift the flour and add a pinch of salt.
- Add the cold, cubed butter to the flour. Using your fingertips, rub the butter into the flour until the mixture resembles breadcrumbs. Work quickly and keep the butter cold. Alternatively, use a food processor, pulsing until you get the breadcrumb consistency.
- Gradually add the ice water, a tablespoon at a time, mixing gently with a knife or your hands. Be careful not to overwork the dough. You want just enough water to bring the dough together into a ball.
- Once the dough comes together, flatten it into a disc, wrap it in cling film, and refrigerate for at least 30 minutes (or up to a couple of days).
- After chilling, lightly flour a clean work surface. Roll out the pastry to a thickness of about 3mm. It should be large enough to line a 23cm (9-inch) tart tin with a removable base.
- Carefully lift the pastry and drape it over the tart tin. Gently press the pastry into the base and sides of the tin, ensuring there are no air pockets.
- Use a rolling pin to trim the excess pastry from the top of the tin. Roll the pin over the top edge to create a clean finish.
- Prick the base of the pastry all over with a fork.
- Line the pastry case with baking parchment and fill it with baking beans or dried rice.
- Bake in a preheated oven at 200°C (180°C fan/Gas Mark 6) for 15 minutes.
- Remove the baking beans and parchment and bake for a further 5-10 minutes, or until the pastry is lightly golden brown.
- Remove the pastry case from the oven and set aside to cool slightly.
- In a large saucepan, combine the milk, double cream, and caster sugar.
- Split the vanilla pod lengthways and scrape out the seeds. Add both the seeds and the pod to the saucepan.
- Heat the milk mixture over medium heat, stirring occasionally, until it just comes to a simmer. Be careful not to let it boil.
- In a separate bowl, whisk together the eggs, egg yolks, and cornflour until smooth and pale.
- Once the milk mixture is simmering, remove it from the heat and carefully pour a little of the hot milk into the egg mixture, whisking constantly.
- Gradually pour the tempered egg mixture back into the saucepan with the remaining hot milk, whisking continuously.
- Return the saucepan to medium heat and cook, stirring constantly with a wooden spoon, until the custard thickens and coats the back of the spoon. This usually takes about 5-10 minutes.
- Once the custard has thickened, remove it from the heat and strain it through a fine-mesh sieve into a clean bowl.
- Discard the vanilla pod.
- Pour the warm custard filling into the pre-baked pastry case.
- Smooth the surface of the custard with a spatula.
- Bake in a preheated oven at 160°C (140°C fan/Gas Mark 3) for 30-40 minutes, or until the custard is set but still has a slight wobble in the center.
- Remove the flan from the oven and let it cool completely in the tin.
- Once the flan is completely cool, carefully remove it from the tin.
- Place the flan on a serving plate.
- For an extra touch, you can dust the top of the flan with icing sugar before serving.
- Serve the flan chilled or at room temperature.
Notes
- Cold Ingredients are Key: Make sure your butter and water are ice cold when making the pastry.
- Don’t Overwork the Pastry: Overworking the pastry will make it tough. Mix the ingredients just until they come together.
- Blind Baking is Essential: Blind baking the pastry prevents it from becoming soggy when you add the custard filling.
- Tempering the Eggs: Tempering the eggs is crucial to prevent them from scrambling when added to the hot milk.
- Constant Stirring: Stir the custard constantly while it’s cooking to prevent it from sticking to the bottom of the pan and burning.
- Cooling Time: Allow the flan to cool completely before removing it from the tin.
- Variations:
- Chocolate Flan: Add 50g of melted dark chocolate to the custard filling.
- Lemon Flan: Add the zest of one lemon to the custard filling.
- Salted Caramel Flan: Drizzle salted caramel sauce over the top of the flan before serving.

Leave a Comment