
Easter Dip: Prepare to hop into spring with the most delightful and crowd-pleasing appetizer you’ll make all season! Forget the same old deviled eggs; this creamy, dreamy dip is about to become the star of your Easter celebration. Imagine a vibrant, flavorful concoction that perfectly complements crisp vegetables, crunchy crackers, or even toasted baguette slices. It’s so good, you might just find yourself sneaking spoonfuls straight from the bowl!
While dips, in general, have a long and varied history across cultures, this particular Easter Dip is a modern creation, designed to capture the essence of the holiday. Think of it as a celebration of fresh, spring flavors, bringing together the best of the season in one irresistible dish. It’s a fun and festive way to add a touch of whimsy to your Easter gathering.
What makes this dip so universally loved? It’s the perfect balance of creamy texture, tangy flavor, and fresh ingredients. The combination is simply irresistible! Plus, it’s incredibly easy to make, requiring minimal effort and readily available ingredients. Whether you’re hosting a large family gathering or a small get-together with friends, this Easter Dip is guaranteed to be a hit. Get ready for rave reviews and requests for the recipe it’s that good!

Ingredients:
- 16 ounces cream cheese, softened
- 1 cup powdered sugar
- 1 teaspoon vanilla extract
- 1/2 teaspoon almond extract (optional, but adds a lovely flavor!)
- 8 ounces whipped topping, thawed (like Cool Whip)
- 1/4 cup milk or heavy cream (for adjusting consistency)
- Assorted Easter candies for topping (jelly beans, chocolate eggs, Cadbury Mini Eggs, sprinkles, etc.)
- Graham crackers, vanilla wafers, pretzels, fruit slices (strawberries, apple slices, banana slices) for serving
Preparing the Easter Dip Base
Okay, let’s get started! This Easter dip is so easy, it practically makes itself. The most important thing is to make sure your cream cheese is nice and soft. This will prevent any lumps and give you that smooth, creamy texture we’re after.
- Soften the Cream Cheese: Take your cream cheese out of the refrigerator at least an hour before you plan to start. If you’re short on time, you can carefully microwave it in 15-second intervals, checking after each interval, until it’s softened but not melted. We want it pliable, not liquid!
- Combine Cream Cheese and Sugar: In a large bowl, add the softened cream cheese and powdered sugar. Now, you can use a hand mixer or a stand mixer for this. I prefer a hand mixer because it’s easy to control, but either will work. Start on low speed to prevent a cloud of powdered sugar from erupting. Gradually increase the speed to medium and beat until the cream cheese and sugar are completely combined and smooth. Scrape down the sides of the bowl as needed to ensure everything is incorporated. We’re aiming for a velvety texture here.
- Add Extracts: Once the cream cheese and sugar are perfectly blended, add the vanilla extract and almond extract (if using). The almond extract is optional, but I find it adds a really nice, subtle depth of flavor that complements the other ingredients. Mix on low speed until the extracts are evenly distributed. Don’t overmix at this stage, just enough to incorporate the extracts.
- Incorporate the Whipped Topping: Now for the whipped topping! Gently fold in the thawed whipped topping using a spatula. Be careful not to deflate the whipped topping; we want to keep it light and airy. Fold until just combined, leaving a few streaks of whipped topping is perfectly fine. Overmixing will result in a thinner dip.
- Adjust the Consistency (if needed): If your dip is too thick, you can add a tablespoon or two of milk or heavy cream to thin it out. Add it gradually, mixing after each addition, until you reach your desired consistency. I like my dip to be thick enough to hold its shape but still easy to scoop. Remember, you can always add more liquid, but you can’t take it away, so go slowly!
Chilling and Preparing the Toppings
Chilling the dip is crucial for allowing the flavors to meld and for the dip to firm up slightly. This also gives you time to prepare all those fun Easter toppings!
- Chill the Dip: Cover the bowl with plastic wrap and refrigerate for at least 30 minutes, or up to several hours. This will allow the flavors to meld together and the dip to thicken. If you’re short on time, 30 minutes will do, but I find that an hour or two is even better.
- Prepare the Toppings: While the dip is chilling, prepare your Easter candies and dippers. Sort your candies and decide how you want to arrange them on top of the dip. If you’re using larger candies like chocolate eggs, you might want to chop them into smaller pieces. Wash and slice any fruit you’re using for dipping. Arrange your graham crackers, vanilla wafers, and pretzels in serving bowls.
Assembling the Easter Dip
This is the fun part! Time to get creative and decorate your Easter dip. Think of it as an edible canvas!
- Transfer to Serving Dish: Remove the dip from the refrigerator and transfer it to your serving dish. You can use a pretty bowl, a pie plate, or even a platter. Spread the dip evenly in the dish.
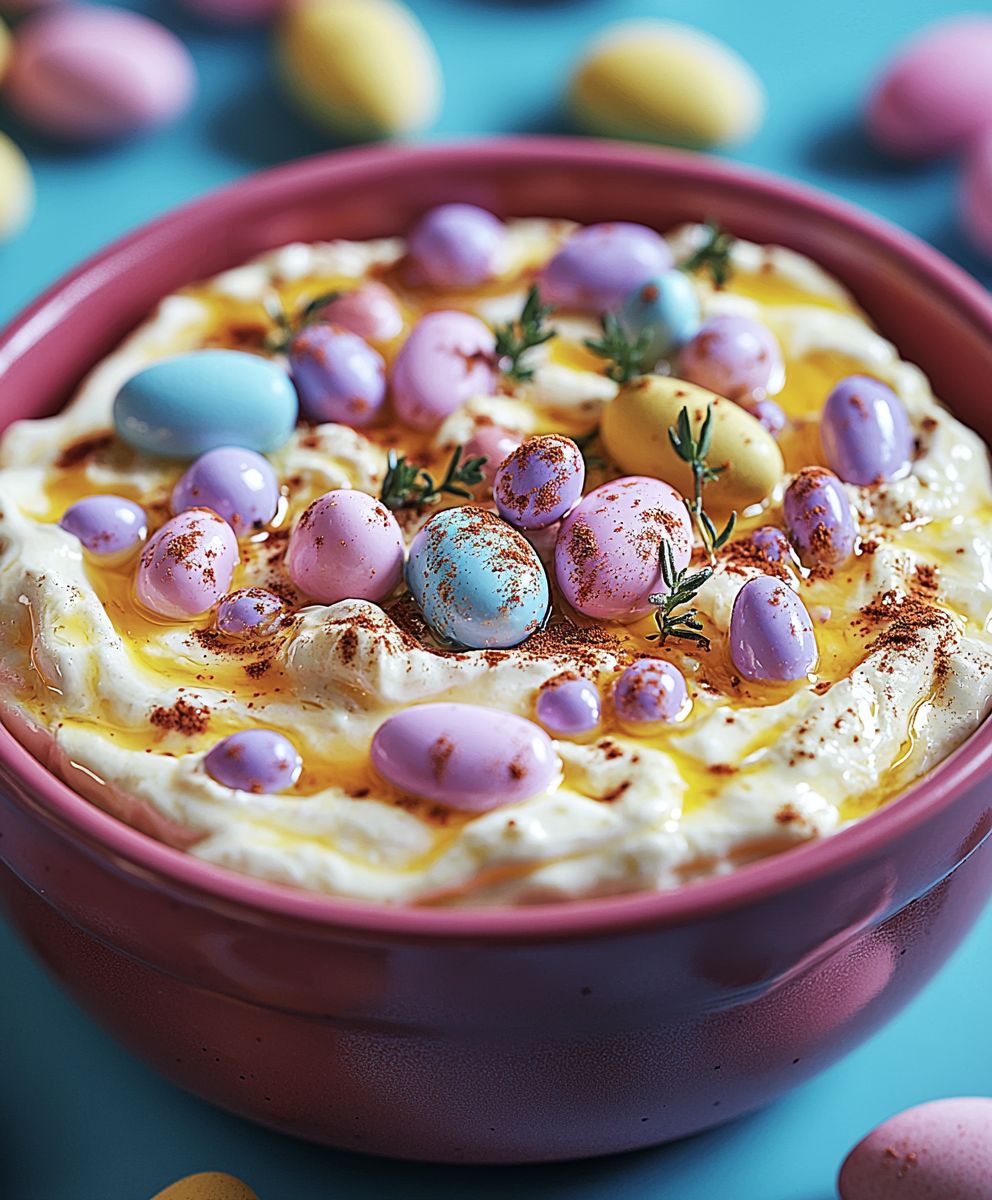
- Decorate with Easter Candies: Now, get creative with your Easter candies! You can create a simple design by sprinkling the candies evenly over the top of the dip, or you can create a more elaborate design using different colors and shapes. I like to create a “nest” in the center of the dip using shredded coconut (optional) and then fill it with chocolate eggs. You can also arrange jelly beans in a circular pattern around the edge of the dip. The possibilities are endless!
- Add Sprinkles (Optional): If you want to add a little extra sparkle, sprinkle some Easter-themed sprinkles over the top of the dip. This is especially fun if you have kids helping you decorate.
- Serve with Dippers: Arrange your graham crackers, vanilla wafers, pretzels, and fruit slices around the dip. Make sure there’s plenty of room for everyone to grab a dipper.
Tips and Variations
This recipe is super versatile, so feel free to experiment and make it your own!
- Different Extracts: Instead of vanilla and almond extract, you could try lemon extract, orange extract, or even peppermint extract. Just be sure to use them sparingly, as they can be quite strong.
- Chocolate Chips: Add 1/2 cup of mini chocolate chips to the dip for a chocolatey twist. White chocolate chips would also be delicious.
- Peanut Butter: Stir in 1/4 cup of peanut butter for a peanut butter and chocolate flavor combination.
- Food Coloring: Add a few drops of food coloring to tint the dip a pastel color. This is especially fun for Easter!
- Healthier Option: Use Greek yogurt instead of cream cheese for a healthier option. You may need to add a little more powdered sugar to sweeten it.
- Make it Ahead: You can make the dip up to 24 hours in advance. Just store it in the refrigerator until you’re ready to serve it. Wait to add the toppings until just before serving, as they may become soggy if they sit in the dip for too long.
- Storage: Store leftover dip in an airtight container in the refrigerator for up to 3 days.
Serving Suggestions:
This Easter dip is perfect for parties, potlucks, or just a fun afternoon snack. It’s always a crowd-pleaser!
- Serve it with a variety of dippers to appeal to different tastes.
- Make it a part of an Easter dessert buffet.
- Bring it to a potluck or party.
- Enjoy it as a fun and festive snack with your family.
Enjoy!
I hope you enjoy this Easter dip as much as I do! It’s a fun, festive, and delicious treat that’s perfect for celebrating the holiday. Happy Easter!
Conclusion:
This Easter Dip isn’t just a recipe; it’s a celebration in a bowl! From the vibrant colors to the creamy, dreamy texture and the delightful blend of sweet and savory, it’s guaranteed to be the star of your Easter gathering. I know, I know, I might be biased, but trust me on this one you absolutely *have* to try it. It’s quick, it’s easy, and it’s a guaranteed crowd-pleaser. Think of it: the kids will adore the pastel hues and the fun dippers, while the adults will appreciate the sophisticated flavor profile. It’s a win-win! And the best part? It’s so versatile.Serving Suggestions & Variations:
Beyond the classic graham crackers and vanilla wafers, get creative with your dippers! Fresh fruit like strawberries, apple slices, and pineapple chunks add a refreshing twist. For a savory option, try pretzel sticks, bagel chips, or even mini croissants. Seriously, the possibilities are endless! Want to kick things up a notch? Consider these variations: * Chocolate Lover’s Dream: Add a tablespoon or two of cocoa powder to the cream cheese mixture for a chocolatey indulgence. Garnish with chocolate shavings or mini chocolate chips. * Citrus Burst: Zest a lemon or orange into the dip for a bright, zesty flavor. A squeeze of fresh juice will enhance the citrus notes even further. * Nutty Delight: Fold in chopped pecans, walnuts, or almonds for added texture and flavor. A sprinkle of toasted nuts on top makes it extra special. * Spiced Up: A pinch of cinnamon or nutmeg adds a warm, comforting touch. Perfect for those who enjoy a hint of spice. * Vegan Easter Dip: Substitute the cream cheese with a plant-based alternative and use vegan marshmallows. The taste is surprisingly similar! But honestly, the beauty of this recipe lies in its simplicity. You don’t *need* to add anything extra to make it amazing. The original recipe is perfect as is. I truly believe this Easter Dip will become a new family favorite. It’s more than just a dip; it’s a memory in the making. Imagine the smiles, the laughter, and the shared moments as everyone gathers around the table to enjoy this delicious treat. So, what are you waiting for? Head to the kitchen, gather your ingredients, and get ready to create some Easter magic! I’m confident you’ll love it as much as I do. And now for the most important part: I want to hear from you! Once you’ve tried this recipe, please, please, PLEASE share your experience. Did you make any variations? What were your favorite dippers? Did your family and friends love it? Let me know in the comments below! Your feedback is invaluable, and I can’t wait to see your creations. Happy dipping, and Happy Easter! I hope this Easter Dip brings joy to your celebration. Print
Easter Dip: Delicious Recipes & Easy Ideas for Your Holiday
- Total Time: 45 minutes
- Yield: 6–8 servings 1x
Description
Creamy, sweet Easter dip loaded with your favorite candies and served with graham crackers, fruit, and more! A festive and easy dessert for Easter celebrations.
Ingredients
- 16 ounces cream cheese, softened
- 1 cup powdered sugar
- 1 teaspoon vanilla extract
- 1/2 teaspoon almond extract (optional)
- 8 ounces whipped topping, thawed (like Cool Whip)
- 1/4 cup milk or heavy cream (for adjusting consistency)
- Assorted Easter candies for topping (jelly beans, chocolate eggs, Cadbury Mini Eggs, sprinkles, etc.)
- Graham crackers, vanilla wafers, pretzels, fruit slices (strawberries, apple slices, banana slices) for serving
Instructions
- Soften the Cream Cheese: Take your cream cheese out of the refrigerator at least an hour before you plan to start. If you’re short on time, you can carefully microwave it in 15-second intervals, checking after each interval, until it’s softened but not melted.
- Combine Cream Cheese and Sugar: In a large bowl, add the softened cream cheese and powdered sugar. Use a hand mixer or a stand mixer. Start on low speed to prevent a cloud of powdered sugar from erupting. Gradually increase the speed to medium and beat until the cream cheese and sugar are completely combined and smooth. Scrape down the sides of the bowl as needed.
- Add Extracts: Once the cream cheese and sugar are perfectly blended, add the vanilla extract and almond extract (if using). Mix on low speed until the extracts are evenly distributed.
- Incorporate the Whipped Topping: Gently fold in the thawed whipped topping using a spatula. Be careful not to deflate the whipped topping. Fold until just combined, leaving a few streaks of whipped topping is perfectly fine.
- Adjust the Consistency (if needed): If your dip is too thick, you can add a tablespoon or two of milk or heavy cream to thin it out. Add it gradually, mixing after each addition, until you reach your desired consistency.
- Chill the Dip: Cover the bowl with plastic wrap and refrigerate for at least 30 minutes, or up to several hours.
- Prepare the Toppings: While the dip is chilling, prepare your Easter candies and dippers. Sort your candies and decide how you want to arrange them on top of the dip. Wash and slice any fruit you’re using for dipping. Arrange your graham crackers, vanilla wafers, and pretzels in serving bowls.
- Transfer to Serving Dish: Remove the dip from the refrigerator and transfer it to your serving dish. Spread the dip evenly in the dish.
- Decorate with Easter Candies: Get creative with your Easter candies! You can create a simple design by sprinkling the candies evenly over the top of the dip, or you can create a more elaborate design using different colors and shapes.
- Add Sprinkles (Optional): If you want to add a little extra sparkle, sprinkle some Easter-themed sprinkles over the top of the dip.
- Serve with Dippers: Arrange your graham crackers, vanilla wafers, pretzels, and fruit slices around the dip.
Notes
- Experiment with different extracts like lemon, orange, or peppermint.
- Add 1/2 cup of mini chocolate chips.
- Stir in 1/4 cup of peanut butter.
- Add a few drops of food coloring to tint the dip a pastel color.
- Use Greek yogurt instead of cream cheese.
- You can make the dip up to 24 hours in advance. Wait to add the toppings until just before serving.
- Store leftover dip in an airtight container in the refrigerator for up to 3 days.
- Prep Time: 15 minutes
- Cook Time: 0 minutes


Leave a Comment