
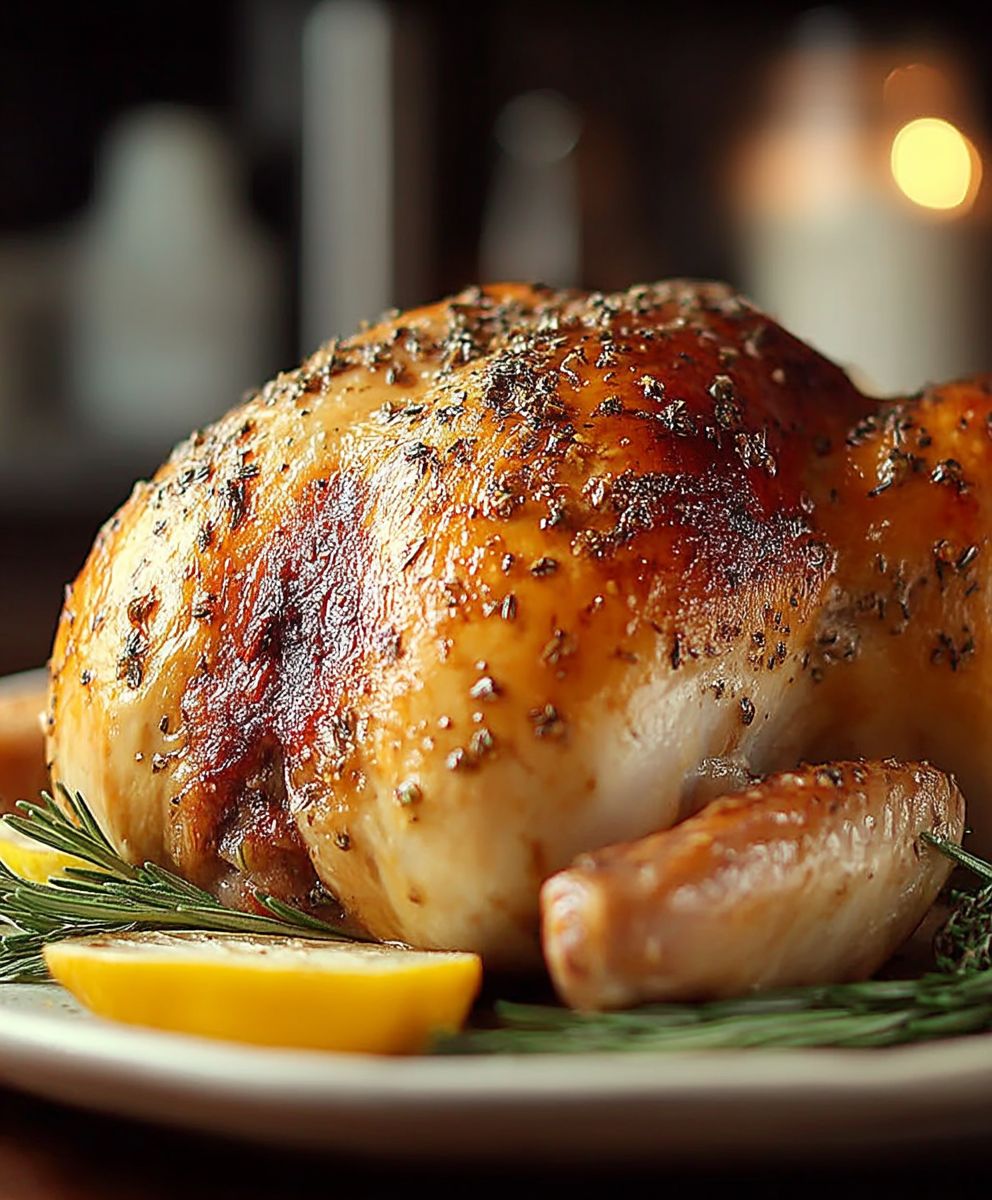
Dry Brine Turkey: Prepare to revolutionize your Thanksgiving (or any special occasion!) with the juiciest, most flavorful turkey you’ve ever tasted. Forget everything you thought you knew about brining this method is simpler, cleaner, and delivers unparalleled results. Have you ever dreamt of a perfectly browned, crispy skin that practically begs to be devoured, giving way to succulent, tender meat that melts in your mouth? That dream is about to become a delicious reality.
While brining turkeys has been around for a while, the dry brine method is a modern twist on a classic technique. It offers all the benefits of traditional wet brining without the hassle of dealing with large containers of salty water. Think of it as a concentrated flavor infusion, drawing moisture into the bird while simultaneously seasoning it from the inside out.
People adore a dry brine turkey because it’s incredibly effective and surprisingly easy. The salt draws out moisture, which then dissolves the salt and other seasonings. This creates a concentrated brine that is reabsorbed into the meat, resulting in a bird that is deeply seasoned and incredibly moist. Plus, the dry environment in the refrigerator encourages the skin to dry out, leading to that coveted crispy texture. It’s a win-win situation for flavor and texture, and it frees up valuable refrigerator space a precious commodity during the holidays!

Ingredients:
- 1 (12-14 pound) whole turkey, thawed
- 1/2 cup kosher salt
- 1/4 cup granulated sugar
- 2 tablespoons black peppercorns, coarsely ground
- 1 tablespoon dried thyme
- 1 tablespoon dried rosemary
- 1 tablespoon garlic powder
- 1 tablespoon onion powder
- 1 teaspoon smoked paprika
- 1/2 teaspoon red pepper flakes (optional, for a little heat)
- 1 lemon, quartered
- 1 onion, quartered
- 4 sprigs fresh rosemary
- 4 sprigs fresh thyme
- 4 tablespoons unsalted butter, melted
- 1 cup chicken broth
Dry Brining the Turkey
Okay, let’s get started with the most important part: the dry brine! This is where the magic happens, infusing your turkey with flavor and ensuring a juicy, perfectly seasoned bird. Don’t skip this step it’s a game-changer!
- Prepare the Brine Mixture: In a medium bowl, combine the kosher salt, granulated sugar, ground black peppercorns, dried thyme, dried rosemary, garlic powder, onion powder, smoked paprika, and red pepper flakes (if using). Mix everything together thoroughly until well combined. This is your flavor powerhouse!
- Prepare the Turkey: Remove the turkey from its packaging. Pat it completely dry, inside and out, with paper towels. This is crucial! A dry surface allows the brine to penetrate the skin more effectively, leading to that crispy, golden-brown skin we all crave. Remove the giblets and neck from the turkey cavity. You can save these for making gravy later!
- Apply the Dry Brine: Now comes the fun part! Using your hands, generously rub the dry brine mixture all over the turkey, including under the skin of the breast. This is where you need to be a little patient and work carefully. Gently loosen the skin over the breast meat by sliding your fingers underneath. Then, sprinkle about half of the brine mixture directly onto the breast meat. This ensures the breast stays incredibly moist. Rub the remaining brine mixture all over the outside of the turkey, paying special attention to the legs and thighs.
- Refrigerate: Place the turkey in a large brining bag or on a rimmed baking sheet lined with plastic wrap. This will prevent any cross-contamination and keep your refrigerator clean. Refrigerate the turkey for at least 24 hours, and up to 72 hours. The longer it brines, the more flavorful and juicy it will become. I usually aim for 48 hours for the best results.
- Rinse (Optional): After the brining period, some people prefer to rinse the turkey under cold water to remove excess salt. This is a matter of personal preference. If you’re concerned about the turkey being too salty, go ahead and rinse it. However, I usually skip this step, as the sugar in the brine helps to balance the saltiness. Just make sure you pat the turkey completely dry again after rinsing.
Preparing for Roasting
Alright, the turkey has been brining and is ready for its star turn in the oven! Let’s get it prepped for roasting to ensure even cooking and maximum flavor.
- Preheat the Oven: Preheat your oven to 450°F (232°C). This high initial temperature helps to crisp up the skin.
- Prepare the Turkey Cavity: Stuff the turkey cavity with the quartered lemon, quartered onion, fresh rosemary sprigs, and fresh thyme sprigs. These aromatics will infuse the turkey with a subtle, delicious flavor from the inside out.
- Truss the Turkey (Optional): Trussing the turkey helps it cook more evenly and gives it a more appealing shape. To truss, use kitchen twine to tie the legs together and tuck the wing tips under the body of the turkey. If you don’t have kitchen twine, don’t worry you can skip this step.
- Prepare the Roasting Pan: Place a roasting rack inside a large roasting pan. This allows air to circulate around the turkey, promoting even cooking and crispy skin. Pour the chicken broth into the bottom of the roasting pan. This will help to keep the turkey moist and prevent it from drying out.
- Brush with Butter: Brush the entire turkey with the melted butter. This will help the skin to brown beautifully and become extra crispy.
Roasting the Turkey
Now for the main event! Roasting the turkey requires a little patience and attention, but the results are well worth the effort. Follow these steps carefully to ensure a perfectly cooked turkey.
- Initial Roasting: Place the turkey in the preheated oven and roast for 30 minutes at 450°F (232°C). This high heat will help to brown the skin quickly.
- Reduce Heat and Continue Roasting: After 30 minutes, reduce the oven temperature to 325°F (163°C). Continue roasting the turkey for approximately 3-4 hours, or until a meat thermometer inserted into the thickest part of the thigh registers 165°F (74°C). The exact cooking time will depend on the size of your turkey.
- Basting (Optional): Basting the turkey with pan juices every 30-45 minutes can help to keep it moist and promote even browning. However, opening the oven door frequently can lower the oven temperature and increase the cooking time. If you choose to baste, do it quickly and efficiently.
- Tent with Foil (If Needed): If the turkey skin starts to brown too quickly, tent it loosely with aluminum foil. This will prevent it from burning while the inside continues to cook.
- Check for Doneness: The most accurate way to determine if the turkey is done is to use a meat thermometer. Insert the thermometer into the thickest part of the thigh, being careful not to touch the bone. The turkey is done when the thermometer registers 165°F (74°C). You can also check the turkey by piercing the thigh with a fork. If the juices run clear, the turkey is done.
Resting and Carving
Don’t skip this crucial step! Resting the turkey allows the juices to redistribute throughout the meat, resulting in a more tender and flavorful bird. Carving it properly will also ensure that you get the most out of your hard work.
- Rest the Turkey: Remove the turkey from the oven and let it rest for at least 30 minutes, and up to an hour, before carving. Tent it loosely with aluminum foil to keep it warm. This resting period is essential for allowing the juices to redistribute throughout the meat, resulting in a more tender and flavorful turkey.
- Prepare for Carving: Transfer the turkey to a large cutting board. Remove the stuffing from the cavity and set it aside.
- Carve the Turkey: Using a sharp carving knife, start by removing the legs and thighs. Separate the thigh from the leg at the joint. Slice the thigh meat against the grain.
- Remove the Wings: Remove the wings by cutting through the joint where they attach to the body.
- Carve the Breast: Carve the breast meat by slicing it thinly, starting from the top and working your way down. Angle the knife slightly towards the bone to get the most meat.
- Arrange and Serve: Arrange the carved turkey on a platter and serve immediately. Don’t forget to serve it with your favorite side dishes and gravy!
Enjoy your perfectly dry-brined turkey! I hope this recipe helps you create a memorable Thanksgiving or holiday meal. Happy cooking!
Conclusion:
So, there you have it! This Dry Brine Turkey recipe is truly a game-changer, and I wholeheartedly believe it will revolutionize your Thanksgiving (or any special occasion!) feast. Forget the soggy, bland turkey of years past. This method guarantees a bird that’s not only incredibly flavorful from skin to bone but also boasts a perfectly crisp, golden-brown skin that will have everyone reaching for seconds (and thirds!).
Why is this a must-try? Because it’s simple, effective, and delivers unparalleled results. The dry brine does all the work for you, drawing out moisture and then allowing the salt and spices to penetrate deep into the meat. This process not only seasons the turkey beautifully but also helps it retain moisture during cooking, preventing that dreaded dryness. Trust me, once you try this, you’ll never go back to wet brining again!
But the best part? The versatility! While the recipe I’ve shared is my go-to, feel free to experiment with different herbs and spices to create your own signature flavor profile. Consider adding a touch of smoked paprika for a smoky depth, or a pinch of cayenne pepper for a subtle kick. You could even incorporate citrus zest, like lemon or orange, for a bright and zesty twist. The possibilities are endless!
As for serving suggestions, this Dry Brine Turkey pairs perfectly with all the classic Thanksgiving sides. Think creamy mashed potatoes, savory stuffing, tangy cranberry sauce, and roasted vegetables. But don’t be afraid to get creative! Try serving it with a wild rice pilaf, a butternut squash risotto, or a Brussels sprouts salad with bacon and pecans. And of course, no Thanksgiving meal is complete without a generous helping of gravy!
Here are a few variations to consider:
* Herb Butter Boost: Before roasting, gently loosen the skin of the turkey breast and rub a generous amount of herb butter (made with softened butter, chopped herbs like rosemary, thyme, and sage, and minced garlic) underneath. This will add even more flavor and moisture.
* Citrus Infusion: Stuff the cavity of the turkey with quartered oranges, lemons, and limes, along with sprigs of fresh herbs. The citrus will infuse the turkey with a bright and refreshing flavor.
* Maple Glaze: During the last 30 minutes of roasting, brush the turkey with a maple glaze (made with maple syrup, Dijon mustard, and a touch of apple cider vinegar). This will create a beautiful, glossy finish and add a touch of sweetness.
* Spicy Kick: Add a pinch of cayenne pepper or red pepper flakes to the dry brine mixture for a subtle kick of heat.
* Smoked Turkey: Use this dry brine method before smoking your turkey for an even more flavorful and juicy result.
I’m so excited for you to try this recipe and experience the magic of a perfectly cooked, incredibly flavorful turkey. I truly believe that this Dry Brine Turkey will become a staple in your holiday traditions.
So, go ahead, grab that turkey, gather your ingredients, and get ready to impress your family and friends with the most delicious turkey they’ve ever tasted! And please, don’t forget to share your experience with me! I’d love to hear about your variations, your serving suggestions, and most importantly, how much everyone loved it. You can leave a comment below, tag me on social media, or send me an email. I can’t wait to hear from you! Happy cooking!
Dry Brine Turkey: The Ultimate Guide to a Juicy Bird
A foolproof guide to dry-brining and roasting a turkey for a juicy, flavorful, and perfectly browned centerpiece.
Ingredients
- 1 (12-14 pound) whole turkey, thawed
- 1/2 cup kosher salt
- 1/4 cup granulated sugar
- 2 tablespoons black peppercorns, coarsely ground
- 1 tablespoon dried thyme
- 1 tablespoon dried rosemary
- 1 tablespoon garlic powder
- 1 tablespoon onion powder
- 1 teaspoon smoked paprika
- 1/2 teaspoon red pepper flakes (optional, for a little heat)
- 1 lemon, quartered
- 1 onion, quartered
- 4 sprigs fresh rosemary
- 4 sprigs fresh thyme
- 4 tablespoons unsalted butter, melted
- 1 cup chicken broth
Instructions
- In a medium bowl, combine the kosher salt, granulated sugar, ground black peppercorns, dried thyme, dried rosemary, garlic powder, onion powder, smoked paprika, and red pepper flakes (if using). Mix everything together thoroughly until well combined.
- Remove the turkey from its packaging. Pat it completely dry, inside and out, with paper towels. Remove the giblets and neck from the turkey cavity.
- Using your hands, generously rub the dry brine mixture all over the turkey, including under the skin of the breast. Gently loosen the skin over the breast meat by sliding your fingers underneath. Then, sprinkle about half of the brine mixture directly onto the breast meat. Rub the remaining brine mixture all over the outside of the turkey, paying special attention to the legs and thighs.
- Place the turkey in a large brining bag or on a rimmed baking sheet lined with plastic wrap. Refrigerate the turkey for at least 24 hours, and up to 72 hours.
- After the brining period, rinse the turkey under cold water to remove excess salt (optional). Pat the turkey completely dry again after rinsing.
- Preheat your oven to 450°F (232°C).
- Stuff the turkey cavity with the quartered lemon, quartered onion, fresh rosemary sprigs, and fresh thyme sprigs.
- Truss the turkey using kitchen twine to tie the legs together and tuck the wing tips under the body of the turkey.
- Place a roasting rack inside a large roasting pan. Pour the chicken broth into the bottom of the roasting pan.
- Brush the entire turkey with the melted butter.
- Place the turkey in the preheated oven and roast for 30 minutes at 450°F (232°C).
- After 30 minutes, reduce the oven temperature to 325°F (163°C). Continue roasting the turkey for approximately 3-4 hours, or until a meat thermometer inserted into the thickest part of the thigh registers 165°F (74°C).
- Baste the turkey with pan juices every 30-45 minutes (optional).
- If the turkey skin starts to brown too quickly, tent it loosely with aluminum foil.
- Insert a meat thermometer into the thickest part of the thigh, being careful not to touch the bone. The turkey is done when the thermometer registers 165°F (74°C).
- Remove the turkey from the oven and let it rest for at least 30 minutes, and up to an hour, before carving. Tent it loosely with aluminum foil to keep it warm.
- Transfer the turkey to a large cutting board. Remove the stuffing from the cavity and set it aside.
- Using a sharp carving knife, start by removing the legs and thighs. Separate the thigh from the leg at the joint. Slice the thigh meat against the grain.
- Remove the wings by cutting through the joint where they attach to the body.
- Carve the breast meat by slicing it thinly, starting from the top and working your way down. Angle the knife slightly towards the bone to get the most meat.
- Arrange the carved turkey on a platter and serve immediately.
Notes
- Dry brining the turkey for at least 24 hours, and up to 72 hours, will result in a more flavorful and juicy bird.
- Patting the turkey completely dry before applying the dry brine is crucial for achieving crispy skin.
- The exact roasting time will depend on the size of your turkey. Use a meat thermometer to ensure the turkey is cooked to a safe internal temperature of 165°F (74°C).
- Resting the turkey for at least 30 minutes before carving allows the juices to redistribute throughout the meat, resulting in a more tender and flavorful bird.

Leave a Comment