
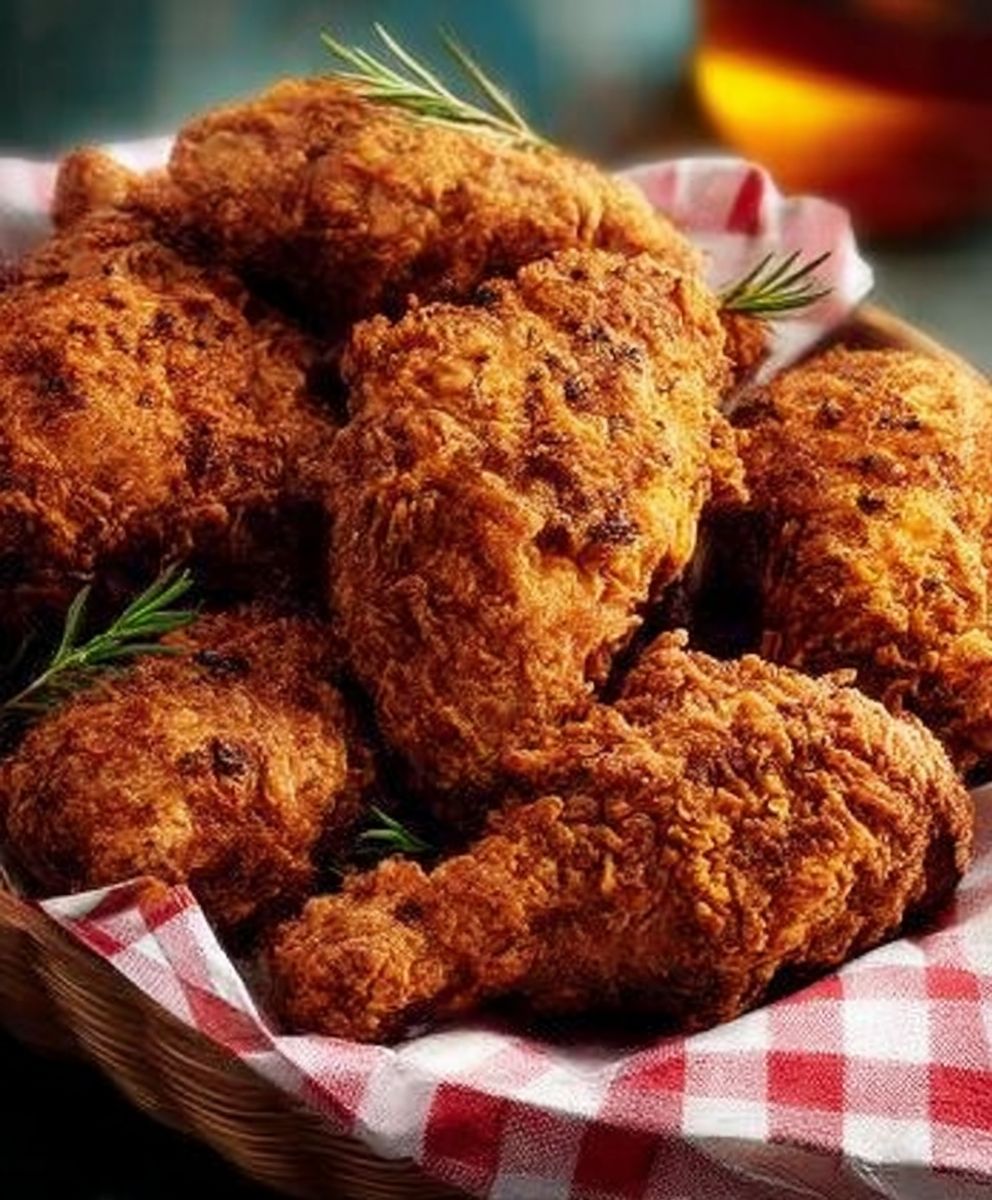
Crispy fried chicken. Just the words alone conjure up images of golden-brown perfection, a symphony of textures, and an aroma that makes your mouth water instantly, doesn’t it? I know it does for me! But forget those bland, greasy versions you might find elsewhere. We’re talking about truly exceptional, restaurant-quality crispy fried chicken, made right in your own kitchen.
Fried chicken boasts a rich and fascinating history, particularly in the American South, where it evolved from a resourceful way to prepare chicken into a beloved culinary tradition. Enslaved Africans, who often cooked for plantation owners, brought their own unique techniques and spices to the process, transforming a simple dish into something truly special. Over time, it became a symbol of Southern hospitality and comfort food, deeply ingrained in the region’s culture.
What is it about this dish that makes it so irresistible? It’s the satisfying crunch that gives way to juicy, tender meat. It’s the perfect balance of savory spices and seasonings. And let’s be honest, it’s the sheer indulgence of it all! Whether you’re enjoying it at a picnic, a family gathering, or simply as a weeknight treat, crispy fried chicken is a guaranteed crowd-pleaser. So, are you ready to learn the secrets to achieving that perfect crispy coating and unbelievably juicy interior? Let’s get started!

Ingredients:
- Chicken: 3 lbs bone-in, skin-on chicken pieces (thighs, drumsticks, wings, and breasts)
- Brine:
- 8 cups cold water
- 1/2 cup kosher salt
- 1/4 cup granulated sugar
- 2 tablespoons black peppercorns, crushed
- 4 cloves garlic, smashed
- 1 tablespoon hot sauce (optional, for a little kick)
- Dry Dredge:
- 3 cups all-purpose flour
- 1/2 cup cornstarch
- 2 tablespoons paprika
- 2 tablespoons garlic powder
- 2 tablespoons onion powder
- 1 tablespoon dried thyme
- 1 tablespoon dried oregano
- 1 tablespoon ground black pepper
- 1 tablespoon salt
- 1 teaspoon cayenne pepper (optional, for heat)
- Egg Wash:
- 3 large eggs
- 1/2 cup buttermilk
- 1 tablespoon hot sauce (optional)
- Frying Oil:
- Vegetable oil or peanut oil, for frying (about 6-8 cups)
Brining the Chicken
Brining is absolutely crucial for juicy, flavorful fried chicken. Don’t skip this step!
- In a large bowl or container (that will fit in your refrigerator), combine the cold water, kosher salt, granulated sugar, crushed black peppercorns, smashed garlic cloves, and hot sauce (if using). Stir until the salt and sugar are completely dissolved.
- Add the chicken pieces to the brine, making sure they are fully submerged. You might need to weigh them down with a plate or a resealable bag filled with water to keep them submerged.
- Cover the container and refrigerate for at least 4 hours, or preferably overnight (up to 12 hours). Longer brining times will result in even more flavorful and tender chicken. Don’t brine for longer than 12 hours, as the chicken can become too salty.
- After brining, remove the chicken from the brine and rinse it thoroughly under cold running water. Pat the chicken completely dry with paper towels. This is important for crispy skin!
Preparing the Dredge and Egg Wash
While the chicken is brining (or after, if you’ve already brined it), you can prepare the dry dredge and egg wash. This will streamline the frying process later.
- In a large, shallow dish or baking pan, whisk together the all-purpose flour, cornstarch, paprika, garlic powder, onion powder, dried thyme, dried oregano, ground black pepper, salt, and cayenne pepper (if using). Make sure everything is evenly distributed. The cornstarch helps create a lighter, crispier coating.
- In a separate shallow dish or bowl, whisk together the large eggs, buttermilk, and hot sauce (if using) until well combined. The buttermilk adds a tangy flavor and helps the dredge adhere to the chicken.
Dredging the Chicken
This is where the magic happens! The double-dredging technique is key to achieving that extra-crispy, restaurant-quality fried chicken.
- Take a piece of chicken and dredge it thoroughly in the dry flour mixture, making sure it’s completely coated on all sides. Press the flour into the chicken to help it adhere.
- Shake off any excess flour.
- Dip the floured chicken into the egg wash, ensuring it’s fully coated.
- Lift the chicken from the egg wash and let any excess drip off.
- Dredge the chicken again in the dry flour mixture, pressing the flour into the chicken to create a thick, even coating. This second coating is what gives you that extra crunch.
- Shake off any excess flour.
- Place the dredged chicken on a wire rack lined with parchment paper. This allows air to circulate around the chicken, helping it to dry out slightly and further promote crispiness.
- Repeat the dredging process with the remaining chicken pieces.
- Let the dredged chicken rest on the wire rack for at least 15-20 minutes before frying. This allows the coating to set and adhere better to the chicken, preventing it from falling off during frying.
Frying the Chicken
Now for the fun part! Maintaining the correct oil temperature is crucial for perfectly cooked, crispy fried chicken. Too low, and the chicken will be greasy; too high, and the outside will burn before the inside is cooked through.
- Pour vegetable oil or peanut oil into a large, heavy-bottomed pot or Dutch oven until it’s about 2-3 inches deep.
- Heat the oil over medium-high heat to 325-350°F (160-175°C). Use a deep-fry thermometer to monitor the oil temperature. It’s important to maintain this temperature throughout the frying process.
- Carefully place a few pieces of chicken into the hot oil, being careful not to overcrowd the pot. Overcrowding will lower the oil temperature and result in greasy chicken. Fry in batches.
- Fry the chicken for about 6-8 minutes per side, or until it’s golden brown and the internal temperature reaches 165°F (74°C). Use a meat thermometer to check the internal temperature of the thickest part of the chicken (avoiding the bone).
- If the chicken is browning too quickly, reduce the heat slightly to maintain the oil temperature.
- Once the chicken is cooked through, remove it from the oil with a slotted spoon or tongs and place it on a wire rack lined with paper towels to drain excess oil.
- Repeat the frying process with the remaining chicken pieces, making sure to maintain the oil temperature.
- If the oil temperature drops significantly between batches, allow it to heat back up to 325-350°F (160-175°C) before adding more chicken.
Serving and Enjoying
Your crispy fried chicken is ready! Serve it hot and enjoy!
- Let the chicken cool slightly on the wire rack before serving. This will allow the juices to redistribute and prevent it from being too hot to handle.
- Serve the fried chicken with your favorite sides, such as mashed potatoes, coleslaw, biscuits, corn on the cob, or mac and cheese.
- Store any leftover fried chicken in an airtight container in the refrigerator for up to 3 days.
- To reheat, bake the chicken in a preheated oven at 350°F (175°C) for about 15-20 minutes, or until heated through. You can also reheat it in an air fryer for a crispier result.
Conclusion:
And there you have it! This isn’t just another fried chicken recipe; it’s a gateway to crispy, juicy, and utterly satisfying comfort food. I truly believe this recipe is a must-try because it delivers that perfect balance of crispy exterior and tender, flavorful interior that we all crave. Forget those soggy, bland imitations this is the real deal. The secret lies in the double dredge and the carefully controlled oil temperature, ensuring that every bite is an explosion of texture and taste.
But the best part? It’s surprisingly easy to make! I know frying can seem intimidating, but I’ve broken down each step to make it foolproof, even for beginner cooks. Trust me, once you master this technique, you’ll be making crispy fried chicken for every potluck, picnic, and family gathering. It’s a guaranteed crowd-pleaser!
Serving Suggestions and Variations:
Now, let’s talk about how to enjoy your masterpiece. Of course, classic sides like creamy mashed potatoes, buttery corn on the cob, and tangy coleslaw are always a winning combination. But don’t be afraid to get creative!
* Spicy Kick: Add a pinch of cayenne pepper or a dash of hot sauce to the flour mixture for a fiery twist.
* Herb Infusion: Experiment with different herbs like thyme, rosemary, or oregano in the breading for a more complex flavor profile.
* Honey Glaze: Brush the fried chicken with a honey glaze for a sweet and savory treat.
* Chicken Sandwiches: Use the fried chicken to make incredible sandwiches with your favorite toppings, like lettuce, tomato, pickles, and a generous dollop of mayonnaise or spicy aioli.
* Waffles and Chicken: Elevate your brunch game by serving the fried chicken with fluffy waffles and a drizzle of maple syrup. It’s a match made in culinary heaven!
* Global Flavors: Try marinating the chicken in buttermilk with a touch of soy sauce, ginger, and garlic for an Asian-inspired twist. Serve with rice and stir-fried vegetables.
The possibilities are endless! Feel free to experiment and adapt the recipe to your own taste preferences. That’s the beauty of cooking it’s all about creating something that you love.
I’m so excited for you to try this recipe and experience the joy of homemade crispy fried chicken. It’s a labor of love, but the results are well worth the effort. The satisfaction of biting into that perfectly crispy, juicy chicken is simply unmatched.
So, what are you waiting for? Gather your ingredients, put on some music, and get ready to fry! I promise you won’t be disappointed.
And most importantly, I’d love to hear about your experience! Did you try any of the variations? What sides did you serve with your fried chicken? Share your photos and stories in the comments below. I can’t wait to see your culinary creations! Happy frying! Let me know if you have any questions, I’m here to help you achieve fried chicken perfection. I’m confident that this recipe will become a staple in your kitchen, just like it has in mine. Enjoy!
Crispy Fried Chicken: The Ultimate Guide to Perfect Crispy Chicken
Crispy, juicy, and flavorful fried chicken made from scratch! This recipe uses a brine and double-dredge technique for ultimate crunch and tenderness.
Ingredients
- 3 lbs bone-in, skin-on chicken pieces (thighs, drumsticks, wings, and breasts)
- 8 cups cold water
- 1/2 cup kosher salt
- 1/4 cup granulated sugar
- 2 tablespoons black peppercorns, crushed
- 4 cloves garlic, smashed
- 1 tablespoon hot sauce (optional, for a little kick)
- 3 cups all-purpose flour
- 1/2 cup cornstarch
- 2 tablespoons paprika
- 2 tablespoons garlic powder
- 2 tablespoons onion powder
- 1 tablespoon dried thyme
- 1 tablespoon dried oregano
- 1 tablespoon ground black pepper
- 1 tablespoon salt
- 1 teaspoon cayenne pepper (optional, for heat)
- 3 large eggs
- 1/2 cup buttermilk
- 1 tablespoon hot sauce (optional)
- Vegetable oil or peanut oil, for frying (about 6-8 cups)
Instructions
- In a large bowl or container, combine cold water, kosher salt, granulated sugar, crushed black peppercorns, smashed garlic cloves, and hot sauce (if using). Stir until salt and sugar are dissolved.
- Add chicken pieces to the brine, ensuring they are fully submerged. Weigh down with a plate if needed.
- Cover and refrigerate for at least 4 hours, preferably overnight (up to 12 hours).
- Remove chicken from brine, rinse thoroughly under cold water, and pat completely dry with paper towels.
- In a large, shallow dish, whisk together flour, cornstarch, paprika, garlic powder, onion powder, thyme, oregano, black pepper, salt, and cayenne pepper (if using).
- In a separate shallow dish, whisk together eggs, buttermilk, and hot sauce (if using).
- Dredge each piece of chicken in the dry flour mixture, pressing to adhere. Shake off excess.
- Dip in the egg wash, ensuring it’s fully coated. Let excess drip off.
- Dredge again in the dry flour mixture, pressing to create a thick coating. Shake off excess.
- Place dredged chicken on a wire rack lined with parchment paper.
- Repeat with remaining chicken. Let rest for 15-20 minutes.
- Pour oil into a large, heavy-bottomed pot to a depth of 2-3 inches.
- Heat oil over medium-high heat to 325-350°F (160-175°C). Use a deep-fry thermometer.
- Carefully place a few pieces of chicken into the hot oil, being careful not to overcrowd the pot. Fry in batches.
- Fry for 6-8 minutes per side, or until golden brown and internal temperature reaches 165°F (74°C).
- Remove chicken from oil with a slotted spoon and place on a wire rack lined with paper towels to drain.
- Repeat with remaining chicken, maintaining oil temperature.
- Let chicken cool slightly before serving. Serve with your favorite sides.
Notes
- Brining is crucial for juicy, flavorful fried chicken. Don’t skip this step!
- Don’t brine for longer than 12 hours, as the chicken can become too salty.
- Patting the chicken dry after brining is important for crispy skin!
- The cornstarch in the dredge helps create a lighter, crispier coating.
- The buttermilk adds a tangy flavor and helps the dredge adhere to the chicken.
- The double-dredging technique is key to achieving that extra-crispy, restaurant-quality fried chicken.
- Maintaining the correct oil temperature is crucial for perfectly cooked, crispy fried chicken. Too low, and the chicken will be greasy; too high, and the outside will burn before the inside is cooked through.
- Overcrowding the pot will lower the oil temperature and result in greasy chicken. Fry in batches.
- If the chicken is browning too quickly, reduce the heat slightly to maintain the oil temperature.
- If the oil temperature drops significantly between batches, allow it to heat back up to 325-350°F (160-175°C) before adding more chicken.
- Store any leftover fried chicken in an airtight container in the refrigerator for up to 3 days.
- To reheat, bake the chicken in a preheated oven at 350°F (175°C) for about 15-20 minutes, or until heated through. You can also reheat it in an air fryer for a crispier result.

Leave a Comment