
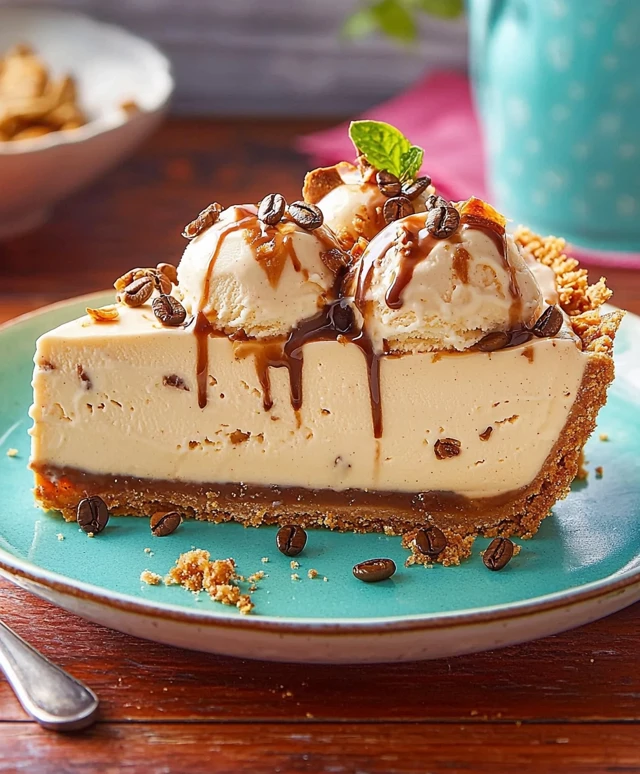
Coffee Ice Cream Dessert is a delightful treat that combines the rich, bold flavors of coffee with the creamy indulgence of ice cream, creating a dessert that is both refreshing and satisfying. As a coffee lover myself, I cant resist the allure of this sweet concoction, especially on a warm day. The origins of coffee ice cream can be traced back to the early 20th century, when ice cream makers began experimenting with coffee flavors, and it quickly became a favorite among dessert enthusiasts.
People adore this coffee ice cream dessert not only for its unique taste but also for its velvety texture that melts in your mouth. The combination of the robust coffee flavor and the smooth creaminess makes it a perfect ending to any meal or a delightful afternoon pick-me-up. Plus, its incredibly convenient to whip up at home, allowing you to enjoy a gourmet dessert without the fuss. Join me as we dive into this delicious recipe that is sure to impress your family and friends!

Ingredients:
- 2 cups heavy cream
- 1 cup whole milk
- 1 cup granulated sugar
- 1 tablespoon pure vanilla extract
- 1 cup freshly brewed strong coffee (cooled to room temperature)
- 1/2 cup coffee liqueur (optional)
- 1/2 cup chocolate chips (optional)
- 1/4 cup crushed espresso beans (optional, for garnish)
- Whipped cream (for serving)
- Chocolate syrup (for drizzling, optional)
Preparing the Ice Cream Base
Lets start by making the ice cream base. This is the foundation of our delicious coffee ice cream dessert.
- In a large mixing bowl, combine the heavy cream and whole milk. I like to use a whisk for this step to ensure everything is well blended.
- Add the granulated sugar to the cream and milk mixture. Whisk until the sugar is completely dissolved. This usually takes about 2-3 minutes.
- Next, stir in the pure vanilla extract. The vanilla adds a lovely depth of flavor that complements the coffee beautifully.
- Now, its time to add the star of the show: the coffee! Pour in the cooled strong coffee and, if youre using it, the coffee liqueur. Mix everything together until well combined.
- For an extra touch of indulgence, you can fold in the chocolate chips at this stage. Theyll add a delightful surprise in every bite!
Chilling the Mixture
Once your ice cream base is ready, its important to chill it before churning. This helps to develop the flavors and ensures a smoother texture.
- Cover the mixing bowl with plastic wrap or a lid and place it in the refrigerator. Let it chill for at least 2 hours, or overnight if you have the time. The longer it chills, the better the flavors will meld together.
Churning the Ice Cream
Now that our mixture is chilled, its time to churn it into ice cream!
- Take your chilled ice cream base out of the refrigerator. Give it a quick stir to ensure everything is well mixed again.
- Pour the mixture into your ice cream maker. Follow the manufacturers instructions for churning. Typically, this process takes about 20-25 minutes.
- As the ice cream churns, it will start to thicken and take on a creamy texture. Keep an eye on it, and when it reaches a soft-serve consistency, its ready for the next step.
Freezing the Ice Cream
After churning, we need to freeze the ice cream to achieve that perfect scoopable texture.
- Transfer the churned ice cream into an airtight container. I like to use a loaf pan or a plastic container with a lid.
- Press a piece of parchment paper directly onto the surface of the ice cream to prevent ice crystals from forming.
- Seal the container with a lid and place it in the freezer. Let it freeze for at least 4 hours, or until firm. If you can wait overnight, thats even better!
Assembling the Dessert
Now that our coffee ice cream is ready, its time to assemble the dessert. This is where you can get creative!
- Take the ice cream out of the freezer and let it sit at room temperature for about 5-10 minutes to soften slightly. This will make scooping easier.
- While the ice cream is softening, prepare your serving dishes. I love using tall glasses or dessert bowls for a beautiful presentation.
- Scoop a generous amount of coffee ice cream into each serving dish. You can layer it with whipped cream for added richness.
- If youre feeling fancy, drizzle some chocolate syrup over the top. It adds a nice touch and enhances the flavor.
- For a finishing touch, sprinkle some crushed espresso beans on top for a bit of crunch and an extra coffee kick.
Serving
Conclusion:
In summary, this Coffee Ice Cream Dessert is an absolute must-try for anyone who loves the rich, bold flavors of coffee combined with the creamy sweetness of ice cream. Its the perfect treat to cool down on a hot day or to indulge in after a hearty meal. The delightful combination of textures and flavors will leave your taste buds dancing with joy! For serving suggestions, consider pairing this dessert with a drizzle of chocolate sauce or a sprinkle of crushed nuts for added crunch. You can also experiment with variations by adding a splash of your favorite liqueur, like Kahlúa or Baileys, to elevate the flavor profile even further. If youre feeling adventurous, try incorporating different ice cream flavors, such as vanilla or mocha, to create your own unique twist on this classic dessert. I wholeheartedly encourage you to give this Coffee Ice Cream Dessert a try! Its not only simple to make but also a guaranteed crowd-pleaser. Once youve whipped up this delightful treat, Id love to hear about your experience. Share your thoughts, any variations you tried, or even a photo of your creation! Lets celebrate the joy of cooking and indulging together. Enjoy every scoop! PrintCoffee Ice Cream Dessert: A Deliciously Indulgent Treat for Coffee Lovers
- Total Time: 280 minutes
- Yield: 1 quart 1x
Description
Enjoy a delightful homemade coffee ice cream that’s creamy and rich, featuring strong coffee and vanilla flavors. Optional chocolate chips and coffee liqueur add an extra indulgent touch, making it a perfect treat for any occasion!
Ingredients
- 2 cups heavy cream
- 1 cup whole milk
- 1 cup granulated sugar
- 1 tablespoon pure vanilla extract
- 1 cup freshly brewed strong coffee (cooled to room temperature)
- 1/2 cup coffee liqueur (optional)
- 1/2 cup chocolate chips (optional)
- 1/4 cup crushed espresso beans (optional, for garnish)
- Whipped cream (for serving)
- Chocolate syrup (for drizzling, optional)
Instructions
- In a large mixing bowl, combine the heavy cream and whole milk. Whisk until well blended.
- Add the granulated sugar and whisk until completely dissolved (about 2-3 minutes).
- Stir in the pure vanilla extract.
- Pour in the cooled strong coffee and, if using, the coffee liqueur. Mix until well combined.
- Optionally, fold in the chocolate chips for added indulgence.
- Cover the mixing bowl with plastic wrap or a lid and refrigerate for at least 2 hours, or overnight for best flavor melding.
- Remove the chilled mixture from the refrigerator and stir.
- Pour into your ice cream maker and churn according to the manufacturers instructions (typically 20-25 minutes).
- When it reaches a soft-serve consistency, its ready for freezing.
- Transfer the churned ice cream into an airtight container.
- Press parchment paper onto the surface to prevent ice crystals.
- Seal and freeze for at least 4 hours, or until firm (overnight is ideal).
- Let the ice cream sit at room temperature for 5-10 minutes to soften.
- Prepare serving dishes (tall glasses or dessert bowls work well).
- Scoop the coffee ice cream into each dish, layering with whipped cream if desired.
- Drizzle with chocolate syrup for an extra touch.
- Sprinkle crushed espresso beans on top for garnish and added crunch.
Notes
- For a richer flavor, consider using high-quality coffee and liqueur.
- Feel free to customize toppings based on your preferences.
- This ice cream can be stored in the freezer for up to 2 weeks, but it’s best enjoyed fresh!
- Prep Time: 15 minutes
- Cook Time: 25 minutes


Leave a Comment