
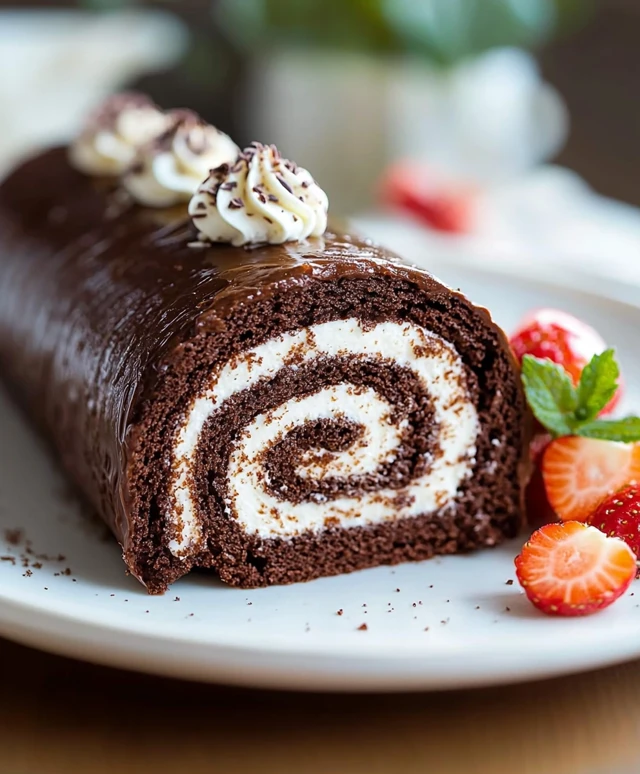
Chocolate Swiss Roll is a delightful dessert that never fails to impress. With its rich chocolate flavor and light, airy texture, this classic treat has been a favorite in many households for generations. Originating in Switzerland, the Swiss roll has a fascinating history that dates back to the 19th century, where it was often served at festive occasions and celebrations. Today, it continues to hold a special place in our hearts and on our dessert tables.
What I love most about the Chocolate Swiss Roll is its perfect balance of sweetness and decadence. The combination of a soft sponge cake rolled around a luscious chocolate filling creates a delightful experience with every bite. Not only is it visually stunning, but its also surprisingly easy to make, making it a go-to recipe for both novice and experienced bakers alike. Whether youre hosting a dinner party or simply indulging in a sweet treat at home, the Chocolate Swiss Roll is sure to bring joy and satisfaction to everyone who tries it.

Ingredients:
- For the Chocolate Sponge Cake:
- 4 large eggs
- 100g (1/2 cup) granulated sugar
- 75g (1/2 cup) all-purpose flour
- 25g (1/4 cup) unsweetened cocoa powder
- 1/2 teaspoon baking powder
- 1/4 teaspoon salt
- 30g (2 tablespoons) unsalted butter, melted
- 1 teaspoon vanilla extract
- For the Chocolate Filling:
- 200ml (3/4 cup) heavy cream
- 100g (3.5 oz) dark chocolate, chopped
- 2 tablespoons powdered sugar
- 1 teaspoon vanilla extract
- For Dusting:
- Powdered sugar, for dusting
Preparing the Chocolate Sponge Cake
- Preheat your oven to 180°C (350°F). Line a 10×15 inch (25×38 cm) baking tray with parchment paper, making sure to leave some overhang on the sides for easy removal later.
- In a large mixing bowl, crack the 4 large eggs and add the 100g of granulated sugar. Using an electric mixer, beat the eggs and sugar together on high speed for about 5-7 minutes, or until the mixture is thick, pale, and has doubled in volume. This step is crucial as it incorporates air into the batter, giving the sponge its light texture.
- In a separate bowl, sift together the 75g of all-purpose flour, 25g of cocoa powder, 1/2 teaspoon of baking powder, and 1/4 teaspoon of salt. This helps to combine the dry ingredients and remove any lumps.
- Gently fold the dry ingredients into the egg mixture using a spatula. Be careful not to deflate the batter; use a gentle folding motion until just combined.
- Drizzle the 30g of melted butter and 1 teaspoon of vanilla extract into the batter. Again, fold gently until fully incorporated.
- Pour the batter into the prepared baking tray, spreading it evenly with a spatula. Tap the tray lightly on the counter to remove any air bubbles.
- Bake in the preheated oven for 10-12 minutes, or until the sponge springs back when lightly pressed in the center. Keep an eye on it to avoid overbaking, as this can make the sponge dry.
- Once baked, remove the sponge from the oven and let it cool in the tray for about 5 minutes. Then, carefully lift the sponge out using the parchment paper and transfer it to a wire rack to cool completely.
Preparing the Chocolate Filling
- While the sponge is cooling, lets prepare the chocolate filling. Start by heating the 200ml of heavy cream in a small saucepan over medium heat. You want it to be hot but not boiling.
- Once the cream is hot, remove it from the heat and add the 100g of chopped dark chocolate. Let it sit for a minute to melt the chocolate, then stir until smooth and fully combined.
- Add the 2 tablespoons of powdered sugar and 1 teaspoon of vanilla extract to the chocolate mixture. Stir until everything is well combined and the filling is glossy. Set aside to cool slightly; it will thicken as it cools.
Assembling the Chocolate Swiss Roll
- Once the sponge cake is completely cool, place it on a clean kitchen towel, with the parchment paper facing up. This will help you roll it without sticking.
- Carefully peel off the parchment paper from the sponge. If the sponge has stuck a little, use a spatula to gently loosen it.
- Spread the chocolate filling evenly over the sponge, leaving a small border around the edges. This will prevent the filling from spilling out when you roll it.
- Starting from one end, use the towel to help you roll the sponge tightly into a log shape. Be gentle
Conclusion:
In summary, this Chocolate Swiss Roll is an absolute must-try for anyone who loves a delightful dessert that combines rich chocolate flavor with a light, airy texture. The beauty of this recipe lies not only in its taste but also in its versatility. You can serve it plain, dusted with powdered sugar, or dressed up with a dollop of whipped cream and fresh berries for an elegant touch. For a fun twist, consider adding a layer of fruit preserves or a hint of espresso to the filling for an extra flavor boost. I encourage you to give this Chocolate Swiss Roll a go in your own kitchen. Its a fantastic way to impress your family and friends, and I promise theyll be asking for seconds! Plus, its a great opportunity to get creativefeel free to experiment with different fillings or toppings to make it your own. Once youve made it, Id love to hear about your experience. Share your thoughts, any variations you tried, or even a picture of your creation! Lets spread the joy of baking together. Happy rolling! PrintChocolate Swiss Roll: A Decadent Dessert Recipe You Must Try
- Total Time: 32 minutes
- Yield: 8–10 slices 1x
Description
Enjoy a light and airy Chocolate Swiss Roll filled with rich chocolate cream, perfect for impressing guests at any occasion. This elegant dessert combines a moist chocolate sponge with a luscious filling, making it a delightful treat for chocolate lovers.
Ingredients
- 4 large eggs
- 100g (1/2 cup) granulated sugar
- 75g (1/2 cup) all-purpose flour
- 25g (1/4 cup) unsweetened cocoa powder
- 1/2 teaspoon baking powder
- 1/4 teaspoon salt
- 30g (2 tablespoons) unsalted butter, melted
- 1 teaspoon vanilla extract
- 200ml (3/4 cup) heavy cream
- 100g (3.5 oz) dark chocolate, chopped
- 2 tablespoons powdered sugar
- 1 teaspoon vanilla extract
- Powdered sugar, for dusting
Instructions
- Preheat your oven to 180°C (350°F). Line a 10×15 inch (25×38 cm) baking tray with parchment paper, leaving some overhang for easy removal.
- In a large mixing bowl, crack the 4 large eggs and add the 100g of granulated sugar. Beat on high speed for 5-7 minutes until thick, pale, and doubled in volume.
- In a separate bowl, sift together the 75g of all-purpose flour, 25g of cocoa powder, 1/2 teaspoon of baking powder, and 1/4 teaspoon of salt.
- Gently fold the dry ingredients into the egg mixture using a spatula until just combined.
- Drizzle in the 30g of melted butter and 1 teaspoon of vanilla extract, folding gently until fully incorporated.
- Pour the batter into the prepared baking tray, spreading it evenly. Tap the tray lightly to remove air bubbles.
- Bake for 10-12 minutes, or until the sponge springs back when lightly pressed. Avoid overbaking to keep it moist.
- Remove from the oven and let cool in the tray for 5 minutes. Lift out using the parchment paper and transfer to a wire rack to cool completely.
- While the sponge cools, heat the 200ml of heavy cream in a small saucepan over medium heat until hot but not boiling.
- Remove from heat and add the 100g of chopped dark chocolate. Let sit for a minute, then stir until smooth.
- Stir in the 2 tablespoons of powdered sugar and 1 teaspoon of vanilla extract until glossy. Set aside to cool slightly.
- Once the sponge cake is completely cool, place it on a clean kitchen towel, parchment paper side up.
- Carefully peel off the parchment paper. If it sticks, use a spatula to loosen it.
- Spread the chocolate filling evenly over the sponge, leaving a small border around the edges.
- Starting from one end, use the towel to help roll the sponge tightly into a log shape. Be gentle to avoid cracking.
Notes
- Ensure the sponge cake is completely cool before spreading the filling to prevent melting.
- You can dust the finished roll with powdered sugar for an elegant touch.
- Store any leftovers in an airtight container in the refrigerator for up to 3 days.
- Prep Time: 20 minutes
- Cook Time: 12 minutes
Leave a Comment