
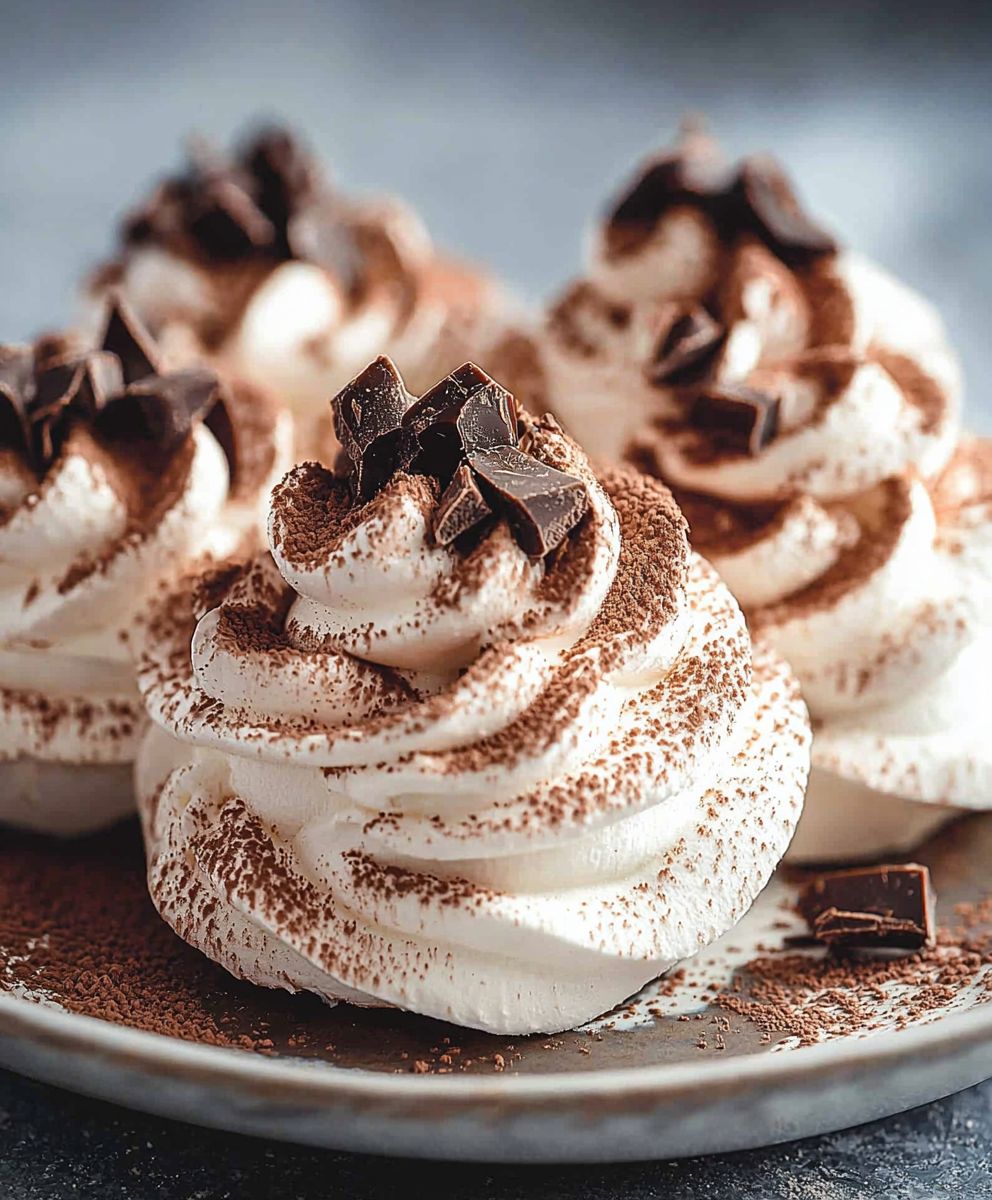
Chocolate Meringues: Prepare to be enchanted by these delicate, airy clouds of chocolatey goodness! Imagine biting into a crisp, melt-in-your-mouth shell that gives way to a subtly chewy, intensely chocolate-flavored center. These aren’t your average meringues; they’re a sophisticated treat that’s surprisingly simple to make.
Meringues, in general, have a fascinating history, with roots tracing back to the Swiss pastry chef, Gasparini, in the 17th century. While the classic meringue is a delightful confection on its own, the addition of chocolate elevates it to a whole new level of indulgence. These chocolate meringues offer a delightful twist on a timeless classic.
What makes these little treats so irresistible? It’s the delightful contrast of textures the initial crispness followed by the soft, almost marshmallow-like interior. The rich, dark chocolate flavor perfectly complements the sweetness of the meringue, creating a balanced and satisfying dessert. Plus, they’re naturally gluten-free and relatively low in fat, making them a guilt-free pleasure. Whether you’re looking for an elegant dessert to impress your guests or a simple treat to satisfy your sweet tooth, these chocolate meringues are sure to be a hit. Let’s get baking!

Ingredients:
- For the Meringues:
- 4 large egg whites, at room temperature
- 1/4 teaspoon cream of tartar
- 1 cup granulated sugar
- 1/4 cup unsweetened cocoa powder, Dutch-processed preferred
- 1/2 teaspoon vanilla extract
- Pinch of salt
- For the Chocolate Ganache Filling (Optional):
- 4 ounces bittersweet chocolate, finely chopped
- 1/2 cup heavy cream
- 1 tablespoon unsalted butter, softened
Preparing the Meringue Base
Okay, let’s get started with the meringue base. This is the foundation of our delicious chocolate meringues, so it’s important to get it right. Don’t worry, I’ll guide you through each step!
- Prepare Your Equipment: Make sure your mixing bowl and whisk attachment are impeccably clean and dry. Any trace of grease can prevent the egg whites from whipping properly. I like to wipe them down with a little lemon juice or vinegar just to be extra sure.
- Whip the Egg Whites: In your clean mixing bowl, add the egg whites and cream of tartar. Start whipping on medium speed until soft peaks form. Soft peaks will hold their shape briefly but will droop at the tip when you lift the whisk.
- Gradually Add the Sugar: This is crucial! Slowly add the granulated sugar, about a tablespoon at a time, while continuing to whip on medium speed. Make sure each addition of sugar is fully incorporated before adding the next. This process can take a few minutes, but it’s essential for creating a stable meringue.
- Whip to Stiff, Glossy Peaks: Continue whipping until the meringue forms stiff, glossy peaks. Stiff peaks will stand straight up when you lift the whisk. The meringue should also look smooth and shiny. This is a sign that the sugar has fully dissolved and the meringue is properly whipped.
- Incorporate the Cocoa Powder and Vanilla: Gently sift the cocoa powder over the meringue. This helps prevent lumps. Add the vanilla extract and salt. Using a rubber spatula, gently fold the cocoa powder and vanilla into the meringue until just combined. Be careful not to overmix, as this can deflate the meringue. You want to see streaks of chocolate throughout the meringue.
Shaping and Baking the Meringues
Now comes the fun part shaping and baking! This is where your meringues start to look like, well, meringues! We’ll use a piping bag for a professional look, but you can also use a spoon if you prefer.
- Preheat the Oven and Prepare Baking Sheets: Preheat your oven to 225°F (107°C). This low temperature is key to drying out the meringues without browning them too much. Line two baking sheets with parchment paper or silicone baking mats.
- Fill the Piping Bag: Fit a large piping bag with a large star tip (or any tip you like). If you don’t have a piping bag, you can use a large zip-top bag and snip off a corner. Fill the piping bag with the chocolate meringue mixture.
- Pipe the Meringues: Pipe the meringues onto the prepared baking sheets. You can make them any size and shape you like. I usually pipe them into 2-inch rounds, leaving about an inch between each meringue. You can also pipe them into swirls or kisses. Get creative!
- Bake the Meringues: Place the baking sheets in the preheated oven and bake for 60-90 minutes, or until the meringues are dry and crisp. The baking time will depend on the size of your meringues. To test for doneness, gently try to lift a meringue from the parchment paper. If it comes off easily and feels dry, it’s done. If it sticks, it needs more time.
- Cool Completely: Turn off the oven and leave the meringues in the oven with the door slightly ajar for at least an hour, or until they are completely cool. This helps prevent them from cracking. Don’t be tempted to open the oven door completely, as the sudden temperature change can cause the meringues to collapse.
Making the Chocolate Ganache Filling (Optional)
While the meringues are cooling, let’s make the chocolate ganache filling. This is totally optional, but it adds a rich, decadent touch that takes these meringues to the next level. If you prefer, you can skip this step and enjoy the meringues plain.
- Heat the Heavy Cream: Place the heavy cream in a small saucepan and heat over medium heat until it just comes to a simmer. Do not boil.
- Pour Over the Chocolate: Place the finely chopped bittersweet chocolate in a heatproof bowl. Pour the hot heavy cream over the chocolate and let it sit for a minute or two to soften the chocolate.
- Stir Until Smooth: Gently stir the chocolate and cream together until the chocolate is completely melted and the ganache is smooth and glossy.
- Add the Butter: Stir in the softened butter until it is fully incorporated. This will add richness and shine to the ganache.
- Cool Slightly: Let the ganache cool slightly until it thickens to a spreadable consistency. This will take about 15-20 minutes. You can speed up the process by placing the ganache in the refrigerator for a few minutes, but be careful not to let it get too cold, or it will become too hard to spread.
Assembling the Meringues (Optional)
Now for the final step assembling the meringues! This is where you get to put everything together and create those beautiful, irresistible chocolate meringue sandwiches.
- Pair the Meringues: Find meringues that are similar in size and shape.
- Spread with Ganache: Spread a generous amount of chocolate ganache on the flat side of one meringue.
- Sandwich Together: Top with another meringue, flat side down, to create a sandwich.
- Repeat: Repeat with the remaining meringues and ganache.
- Chill (Optional): If you like, you can chill the assembled meringues in the refrigerator for a few minutes to help the ganache set.
Tips and Tricks for Perfect Meringues
Here are a few extra tips and tricks to help you achieve meringue perfection:
- Use Room Temperature Egg Whites: Room temperature egg whites whip up to a greater volume than cold egg whites.
- Avoid Overmixing: Overmixing the meringue can deflate it, resulting in flat, dense meringues.
- Bake at a Low Temperature: Baking at a low temperature allows the meringues to dry out slowly without browning too much.
- Cool Completely in the Oven: Cooling the meringues in the oven helps prevent them from cracking.
- Store Properly: Store the meringues in an airtight container at room temperature. They will keep for several days. If you live in a humid climate, you may want to store them in the refrigerator.
- Experiment with Flavors: Feel free to experiment with different flavors. You can add a pinch of espresso powder to the meringue for a mocha flavor, or a few drops of peppermint extract for a mint chocolate flavor.
- Troubleshooting: If your meringues crack, it could be due to a number of factors, such as baking them at too high a temperature, opening the oven door too frequently, or cooling them too quickly. If your meringues are sticky, it could be due to high humidity. Try baking them for a longer time at a lower temperature.
Enjoy Your Chocolate Meringues!
And there you have it! Delicious, homemade chocolate meringues that are sure to impress. These are perfect for parties, holidays, or just a special treat for yourself. I hope you enjoy making and eating them as much as I do!
Conclusion:
And there you have it! These Chocolate Meringues are more than just a dessert; they’re an experience. The delicate, airy texture that melts in your mouth, combined with the rich, intense chocolate flavor, is simply irresistible. I truly believe this recipe is a must-try for anyone who loves a touch of elegance and a whole lot of deliciousness.
Why is it a must-try? Because it’s surprisingly simple to make, yet delivers a sophisticated and impressive result. Forget complicated baking projects that take hours; these meringues come together relatively quickly, and the active baking time is minimal. Plus, they’re naturally gluten-free, making them a perfect treat for those with dietary restrictions. But most importantly, they taste absolutely divine! The contrast between the crisp exterior and the slightly chewy interior is a textural delight, and the deep chocolate flavor is perfectly balanced by the sweetness of the meringue.
Now, let’s talk serving suggestions and variations. These Chocolate Meringues are wonderful on their own, enjoyed with a cup of coffee or tea. But you can also get creative! Imagine serving them alongside a scoop of vanilla ice cream and a drizzle of chocolate sauce for an extra decadent dessert. Or, crumble them over a bowl of fresh berries and whipped cream for a lighter, more refreshing treat.
For a festive touch, you could dip the meringues in melted chocolate and sprinkle them with chopped nuts or sprinkles. Another fun variation is to add a hint of espresso powder to the meringue mixture for a mocha-flavored treat. If you’re feeling adventurous, try swirling in a spoonful of raspberry jam before baking for a fruity twist. You could even sandwich two meringues together with a dollop of chocolate ganache or buttercream frosting for a truly indulgent experience. The possibilities are endless!
I’ve personally made these Chocolate Meringues countless times, and they’re always a hit. Whether I’m serving them at a dinner party, bringing them to a potluck, or simply enjoying them as a sweet treat at home, they never fail to impress. I’ve experimented with different variations, and I’ve found that the key is to use high-quality chocolate and to be patient with the baking process. Don’t rush it! Low and slow is the way to go for perfectly crisp and airy meringues.
So, what are you waiting for? Gather your ingredients, preheat your oven, and get ready to create some magic in the kitchen. I promise you won’t regret it. This recipe is a keeper, and I’m confident that it will become a favorite in your household too.
I’m so excited for you to try this recipe and experience the joy of making (and eating!) these delightful Chocolate Meringues. Once you’ve given it a go, I’d love to hear about your experience. Did you try any of the variations I suggested? Did you add your own special touch? Share your photos and stories in the comments below! I can’t wait to see what you create. Happy baking! Let me know if you have any questions, and I’ll do my best to help. Enjoy!
Chocolate Meringues: A Decadent & Easy Recipe
Light, airy chocolate meringues, optionally filled with rich chocolate ganache. A surprisingly easy and delightful treat!
Ingredients
- 4 large egg whites, at room temperature
- 1/4 teaspoon cream of tartar
- 1 cup granulated sugar
- 1/4 cup unsweetened cocoa powder, Dutch-processed preferred
- 1/2 teaspoon vanilla extract
- Pinch of salt
- 4 ounces bittersweet chocolate, finely chopped
- 1/2 cup heavy cream
- 1 tablespoon unsalted butter, softened
Instructions
- Make sure your mixing bowl and whisk attachment are impeccably clean and dry. Wipe them down with lemon juice or vinegar for extra assurance.
- In your clean mixing bowl, add the egg whites and cream of tartar. Start whipping on medium speed until soft peaks form.
- Slowly add the granulated sugar, about a tablespoon at a time, while continuing to whip on medium speed. Ensure each addition is fully incorporated before adding the next.
- Continue whipping until the meringue forms stiff, glossy peaks that stand straight up when you lift the whisk.
- Gently sift the cocoa powder over the meringue. Add the vanilla extract and salt. Gently fold the cocoa powder and vanilla into the meringue until just combined. Be careful not to overmix.
- Preheat your oven to 225°F (107°C). Line two baking sheets with parchment paper or silicone baking mats.
- Fit a large piping bag with a large star tip (or use a zip-top bag with a corner snipped). Fill the piping bag with the chocolate meringue mixture.
- Pipe the meringues onto the prepared baking sheets into 2-inch rounds, leaving about an inch between each meringue.
- Place the baking sheets in the preheated oven and bake for 60-90 minutes, or until the meringues are dry and crisp.
- Turn off the oven and leave the meringues in the oven with the door slightly ajar for at least an hour, or until they are completely cool.
- Place the heavy cream in a small saucepan and heat over medium heat until it just comes to a simmer. Do not boil.
- Place the finely chopped bittersweet chocolate in a heatproof bowl. Pour the hot heavy cream over the chocolate and let it sit for a minute or two to soften the chocolate.
- Gently stir the chocolate and cream together until the chocolate is completely melted and the ganache is smooth and glossy.
- Stir in the softened butter until it is fully incorporated.
- Let the ganache cool slightly until it thickens to a spreadable consistency. This will take about 15-20 minutes.
- Find meringues that are similar in size and shape.
- Spread a generous amount of chocolate ganache on the flat side of one meringue.
- Top with another meringue, flat side down, to create a sandwich.
- Repeat with the remaining meringues and ganache.
- If you like, you can chill the assembled meringues in the refrigerator for a few minutes to help the ganache set.
Notes
- Use room temperature egg whites for best volume.
- Avoid overmixing the meringue.
- Bake at a low temperature to prevent browning.
- Cool completely in the oven to prevent cracking.
- Store in an airtight container at room temperature (or in the refrigerator in humid climates).
- Experiment with flavors like espresso or peppermint extract.
- If meringues crack, it could be due to temperature fluctuations or baking at too high a temperature.
- If meringues are sticky, it could be due to high humidity; try baking longer at a lower temperature.

Leave a Comment