
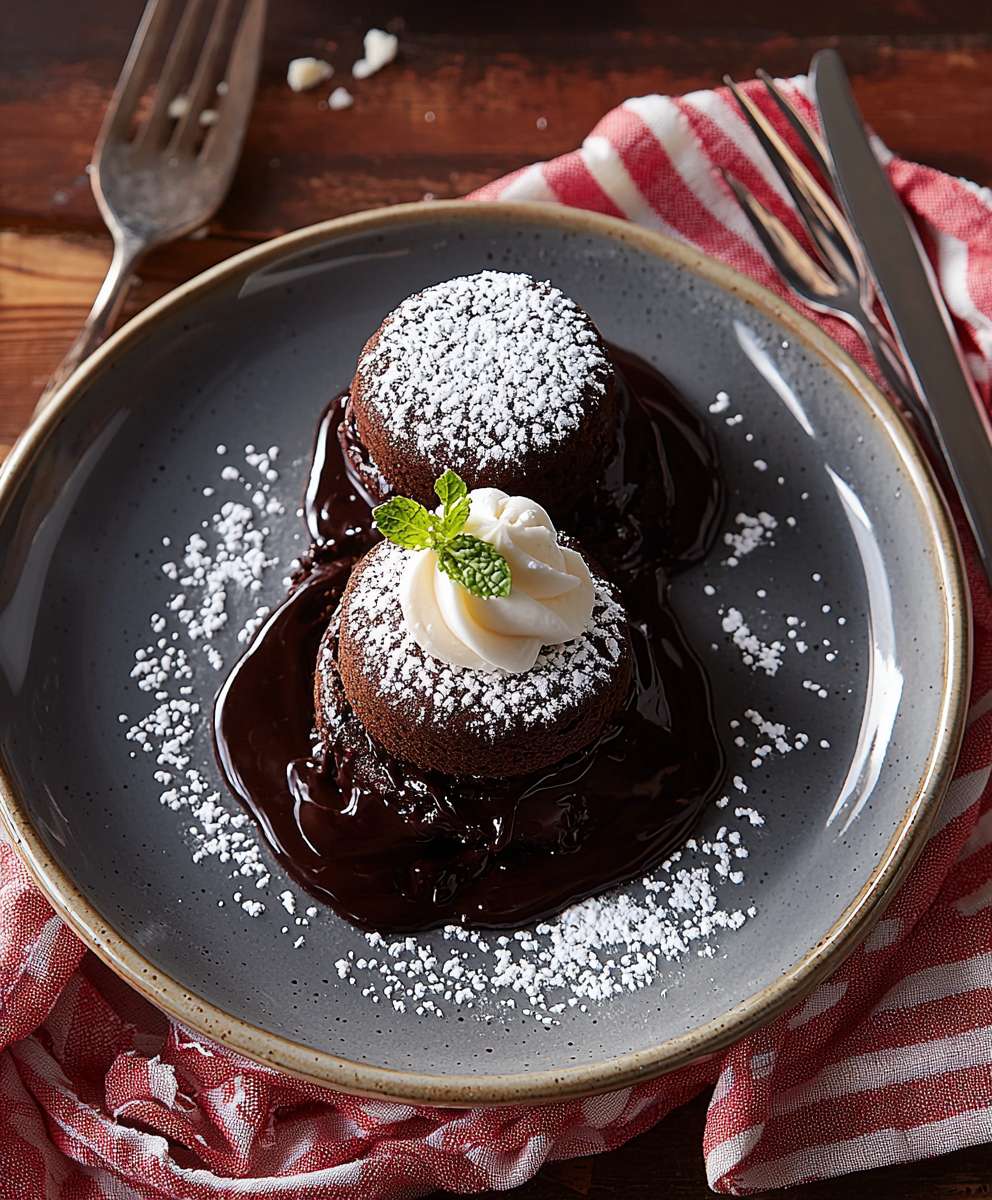
Chocolate Lava Cakes, those molten masterpieces, are the ultimate indulgence, and I’m thrilled to share my foolproof recipe with you! Imagine sinking your spoon into a warm, decadent chocolate cake, only to be greeted by a river of rich, flowing chocolate. It’s a dessert experience that’s both comforting and utterly irresistible.
While the exact origins are debated, many believe the chocolate lava cake emerged in the late 20th century, quickly becoming a restaurant staple and a beloved dessert worldwide. Its appeal lies in the delightful contrast between the slightly firm, cake-like exterior and the gooey, molten center. It’s a textural symphony that dances on your palate!
What makes chocolate lava cakes so universally adored? Beyond the obvious chocolatey goodness, they offer a sense of instant gratification. They’re relatively quick to make, perfect for satisfying a sudden craving or impressing guests with a seemingly sophisticated dessert. The intense chocolate flavor, combined with the warm, melty texture, creates a truly unforgettable experience. Get ready to experience pure chocolate bliss!

Ingredients:
- 1/2 cup (1 stick) unsalted butter, plus more for greasing ramekins
- 1/2 cup granulated sugar, plus more for coating ramekins
- 4 ounces bittersweet chocolate, finely chopped
- 2 large eggs
- 2 large egg yolks
- 1/4 teaspoon salt
- 2 tablespoons all-purpose flour
- Powdered sugar, for dusting (optional)
- Fresh raspberries or strawberries, for serving (optional)
Preparing the Ramekins:
Before we even think about melting chocolate, let’s get our ramekins ready. This is a crucial step because it ensures our lava cakes release cleanly and beautifully. Trust me, you don’t want to skip this!
- Grease generously: Take a small piece of butter and thoroughly grease the inside of each ramekin. Make sure you get into all the nooks and crannies. Don’t be shy a generous coating is key.
- Coat with sugar: Add a tablespoon or two of granulated sugar to one of the greased ramekins. Tilt and rotate the ramekin, tapping gently, so the sugar coats the entire inside surface. Repeat with the remaining ramekins. This sugar coating not only helps with release but also adds a delightful texture to the edges of the cake.
- Tap out excess: Once the ramekins are coated, tap out any excess sugar. You want a nice, even layer, not clumps of sugar.
- Chill (optional but recommended): For best results, place the prepared ramekins in the refrigerator while you prepare the batter. This helps the butter and sugar solidify, further preventing sticking.
Making the Chocolate Batter:
Now for the fun part creating that rich, decadent chocolate batter that will transform into molten lava goodness! This step requires a little attention to detail, but don’t worry, I’ll guide you through it.
- Melt the butter and chocolate: In a heatproof bowl set over a saucepan of simmering water (make sure the bottom of the bowl doesn’t touch the water), combine the butter and chopped chocolate. Stir occasionally until completely melted and smooth. Alternatively, you can melt the butter and chocolate in the microwave in 30-second intervals, stirring in between, until melted and smooth. Be careful not to overheat the chocolate, as it can seize up.
- Cool slightly: Remove the bowl from the heat and let the chocolate mixture cool slightly for a few minutes. This is important because you don’t want to cook the eggs when you add them.
- Whisk in the sugar: Add the granulated sugar to the slightly cooled chocolate mixture and whisk until well combined. The mixture should be smooth and glossy.
- Add the eggs and yolks: Add the eggs and egg yolks, one at a time, whisking well after each addition. Make sure each egg is fully incorporated before adding the next. This ensures a smooth and even batter.
- Incorporate the salt: Add the salt and whisk until combined. The salt enhances the chocolate flavor and balances the sweetness.
- Fold in the flour: Gently fold in the all-purpose flour until just combined. Be careful not to overmix, as this can develop the gluten in the flour and result in a tougher cake. You want a light and airy batter. A few streaks of flour are okay.
Baking the Lava Cakes:
The baking time is critical for achieving that perfect molten center. It’s a delicate balance between a cooked exterior and a gooey interior. Keep a close eye on your cakes!
- Preheat the oven: Preheat your oven to 425°F (220°C). Make sure your oven is properly preheated before you put the ramekins in.
- Fill the ramekins: Divide the batter evenly among the prepared ramekins. Each ramekin should be about three-quarters full.
- Bake: Place the ramekins on a baking sheet and bake for 12-15 minutes, or until the edges of the cakes are set but the centers are still soft and slightly jiggly. The baking time will vary depending on your oven, so start checking at 12 minutes. You want the edges to be firm and the center to look slightly underbaked.
- Check for doneness: To check for doneness, gently shake the baking sheet. The edges of the cakes should be set, but the centers should wobble slightly. If the centers are completely firm, the cakes are overbaked and won’t have a molten center.
Serving and Enjoying:
This is the best part! Carefully inverting the lava cakes and serving them with your favorite toppings is the perfect way to end a meal (or any time, really!).
- Loosen the edges: Carefully run a thin knife or spatula around the edges of each cake to loosen it from the ramekin.
- Invert onto plates: Place a serving plate over each ramekin and carefully invert the plate and ramekin together. Gently tap the bottom of the ramekin to release the cake. If the cake doesn’t release easily, try running the knife around the edges again.
- Dust with powdered sugar (optional): Dust the lava cakes with powdered sugar for a beautiful presentation.
- Garnish (optional): Serve immediately with fresh raspberries or strawberries, a scoop of vanilla ice cream, or a dollop of whipped cream. The contrast of the warm, molten chocolate with the cold ice cream or fresh berries is heavenly.
- Enjoy immediately: Lava cakes are best enjoyed warm, right out of the oven. The molten center will solidify as they cool, so don’t wait too long!
Tips for Success:
- Use high-quality chocolate: The quality of the chocolate will greatly impact the flavor of the lava cakes. Use a good-quality bittersweet chocolate for the best results.
- Don’t overbake: Overbaking is the biggest mistake people make when making lava cakes. Keep a close eye on the cakes and remove them from the oven when the edges are set but the centers are still soft.
- Prepare the ramekins properly: Greasing and sugaring the ramekins is essential for preventing the cakes from sticking.
- Serve immediately: Lava cakes are best served warm, right out of the oven.
- Experiment with flavors: Try adding a pinch of espresso powder to the batter for a mocha flavor, or a few drops of peppermint extract for a chocolate peppermint lava cake.
Troubleshooting:
- Cakes didn’t release: Make sure you greased and sugared the ramekins thoroughly. If the cakes still stick, try running a knife around the edges again and gently tapping the bottom of the ramekin.
- No molten center: The cakes were likely overbaked. Reduce the baking time by a minute or two next time.
- Cakes are too runny: The cakes were likely underbaked. Increase the baking time by a minute or two next time.
- Batter is grainy: The chocolate may have seized up. Make sure you don’t overheat the chocolate when melting it.
I hope you enjoy making these delicious chocolate lava cakes! They’re the perfect dessert for any occasion.
Conclusion:
And there you have it! These individual Chocolate Lava Cakes are truly a dessert experience you won’t soon forget. From the rich, decadent chocolate flavor to the molten, flowing center, every bite is pure bliss. I genuinely believe this recipe is a must-try for any chocolate lover, whether you’re a seasoned baker or just starting out. The simplicity of the steps combined with the impressive results makes it a winner in my book. But why is this recipe so special? It’s more than just a cake; it’s a moment. It’s the perfect ending to a romantic dinner, a delightful treat for a special occasion, or simply a way to indulge in a little self-care. The warm, gooey center is like a hug from the inside out, and the intense chocolate flavor is guaranteed to satisfy even the most intense cravings. Plus, the individual portions make them ideal for portion control (if you can resist having more than one!). Now, let’s talk about serving suggestions and variations because the possibilities are endless! My personal favorite is to serve these warm with a scoop of vanilla bean ice cream. The contrast between the warm cake and the cold ice cream is simply divine. A dusting of powdered sugar adds a touch of elegance, and a few fresh raspberries or strawberries provide a burst of freshness that complements the chocolate perfectly. But don’t stop there! Feel free to get creative and experiment with different toppings and flavors. A dollop of whipped cream is always a classic choice. You could also try adding a sprinkle of chopped nuts, such as pecans or walnuts, for a bit of crunch. For a more sophisticated touch, consider drizzling a raspberry sauce or a salted caramel sauce over the top. If you’re feeling adventurous, you can even try incorporating different flavors into the cake batter itself. A teaspoon of espresso powder will enhance the chocolate flavor, while a pinch of cinnamon adds a warm, spicy note. You could also try adding a tablespoon of your favorite liqueur, such as Frangelico or Kahlua, for an extra kick. For a mint chocolate version, add a few drops of peppermint extract to the batter. Another fun variation is to use different types of chocolate. While I’ve used semi-sweet chocolate in this recipe, you could easily substitute dark chocolate for a more intense flavor or milk chocolate for a sweeter, milder taste. You could even use a combination of different chocolates to create a unique flavor profile. Ultimately, the best way to enjoy these Chocolate Lava Cakes is to make them your own. Don’t be afraid to experiment and find what works best for you. The most important thing is to have fun and enjoy the process. I truly hope you’ll give this recipe a try. I’m confident that you’ll love it as much as I do. And when you do, please, please, please share your experience with me! I’d love to hear what you think, what variations you tried, and how you served them. You can leave a comment below, tag me on social media, or even send me an email. I’m always eager to hear from fellow food lovers and see your culinary creations. So go ahead, bake up a batch of these decadent treats and let me know what you think! Happy baking! Print
Chocolate Lava Cakes: The Ultimate Guide to Baking Perfection
- Total Time: 30
- Yield: 4 servings 1x
Description
Decadent chocolate lava cakes with a molten center, perfect for special occasions or cozy nights in. Easy to make with simple ingredients.
Ingredients
- 1/2 cup (1 stick) unsalted butter, plus more for greasing ramekins
- 1/2 cup granulated sugar, plus more for coating ramekins
- 4 ounces bittersweet chocolate, finely chopped
- 2 large eggs
- 2 large egg yolks
- 1/4 teaspoon salt
- 2 tablespoons all-purpose flour
- Powdered sugar, for dusting (optional)
- Fresh raspberries or strawberries, for serving (optional)
Instructions
- Prepare the Ramekins: Grease ramekins generously with butter, then coat with granulated sugar, tapping out any excess. Chill in the refrigerator while preparing the batter (optional).
- Melt Butter and Chocolate: In a heatproof bowl over simmering water (or in the microwave in 30-second intervals), melt butter and chocolate until smooth. Let cool slightly.
- Make the Batter: Whisk in granulated sugar until combined. Add eggs and egg yolks one at a time, whisking well after each addition. Incorporate salt. Gently fold in flour until just combined; do not overmix.
- Bake: Preheat oven to 425°F (220°C). Divide batter evenly among ramekins, filling each about three-quarters full. Place on a baking sheet and bake for 12-15 minutes, or until edges are set but centers are still soft and slightly jiggly.
- Serve: Loosen edges with a knife. Invert onto plates. Dust with powdered sugar (optional). Garnish with fresh raspberries or strawberries (optional). Serve immediately.
Notes
- Use high-quality bittersweet chocolate for the best flavor.
- Don’t overbake the cakes; the centers should still be soft.
- Greasing and sugaring the ramekins thoroughly is essential for easy release.
- Lava cakes are best served warm, right out of the oven.
- Experiment with flavors by adding espresso powder or peppermint extract.
- Prep Time: 15 minutes
- Cook Time: 15 minutes

Leave a Comment