
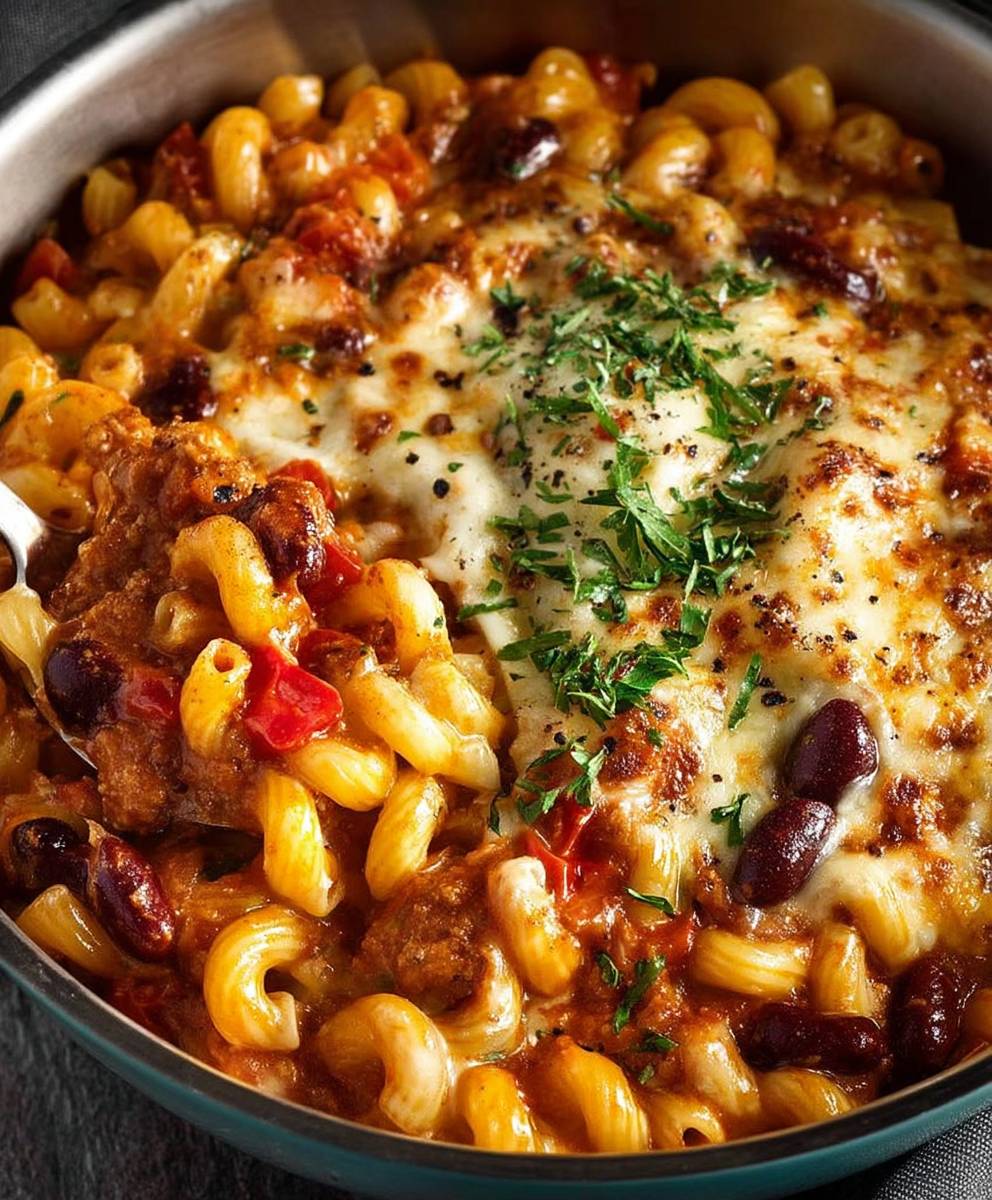
Chili Mac and Cheese: the ultimate comfort food mashup you didn’t know you needed! Imagine the creamy, cheesy goodness of classic macaroni and cheese, swirled together with the hearty, savory flavors of a robust chili. It’s a culinary collision that will leave you craving more, and trust me, this recipe is about to become a staple in your household.
While the exact origins of combining chili and mac and cheese are somewhat murky, its popularity likely stems from the American tradition of enjoying both dishes as standalone comfort foods. Think of it as a natural evolution, a brilliant fusion born from the desire for maximum flavor and minimal effort. It’s a dish that speaks to our love of simple pleasures and satisfying meals.
What’s not to love? The rich, cheesy sauce coats every noodle, while the chili adds a layer of warmth, spice, and meaty texture. It’s the perfect balance of creamy and chunky, mild and bold. Plus, this Chili Mac and Cheese recipe is incredibly versatile. You can customize it with your favorite chili ingredients, from different types of beans to varying levels of spice. Whether you’re looking for a quick weeknight dinner or a crowd-pleasing dish for a potluck, this recipe delivers every time. Get ready to experience a flavor explosion that will redefine your definition of comfort food!

Ingredients:
- 1 pound ground beef
- 1 large onion, chopped
- 2 cloves garlic, minced
- 1 green bell pepper, chopped
- 1 (15 ounce) can kidney beans, rinsed and drained
- 1 (15 ounce) can pinto beans, rinsed and drained
- 1 (14.5 ounce) can diced tomatoes, undrained
- 1 (8 ounce) can tomato sauce
- 1 (4 ounce) can diced green chilies, undrained
- 2 tablespoons chili powder
- 1 tablespoon cumin
- 1 teaspoon smoked paprika
- 1/2 teaspoon oregano
- 1/4 teaspoon cayenne pepper (optional, for extra heat)
- Salt and pepper to taste
- 1 pound elbow macaroni
- 4 tablespoons butter
- 1/4 cup all-purpose flour
- 3 cups milk
- 4 cups shredded cheddar cheese, divided
- 1 cup shredded Monterey Jack cheese
- Optional toppings: sour cream, chopped green onions, shredded cheese
Preparing the Chili Base
Okay, let’s get started with the heart of our Chili Mac and Cheese the chili! This is where all the flavor comes from, so we’re going to take our time and build it up layer by layer. Trust me, it’s worth the effort!
- Brown the Ground Beef: In a large pot or Dutch oven, brown the ground beef over medium-high heat. Break it up with a spoon as it cooks. You want it to be nice and crumbly. Once it’s browned, drain off any excess grease. Nobody wants greasy chili!
- Sauté the Aromatics: Add the chopped onion and minced garlic to the pot with the browned beef. Cook until the onion is softened and translucent, about 5-7 minutes. The aroma should be amazing at this point!
- Add the Bell Pepper: Throw in the chopped green bell pepper and cook for another 3-5 minutes, until it starts to soften. The bell pepper adds a nice sweetness and texture to the chili.
- Incorporate the Beans and Tomatoes: Now it’s time for the beans and tomatoes! Add the rinsed and drained kidney beans and pinto beans to the pot. Then, pour in the undrained diced tomatoes and tomato sauce. Don’t drain the tomatoes that juice is full of flavor!
- Spice it Up!: Add the diced green chilies (undrained), chili powder, cumin, smoked paprika, oregano, and cayenne pepper (if using). Stir everything together well to combine.
- Simmer for Flavor: Bring the chili to a simmer, then reduce the heat to low, cover, and let it simmer for at least 30 minutes, or even longer if you have the time. The longer it simmers, the more the flavors will meld together. Stir occasionally to prevent sticking. I usually let mine simmer for an hour or more for maximum flavor!
- Season to Perfection: After simmering, taste the chili and season with salt and pepper to your liking. Remember, you can always add more seasoning, but you can’t take it away!
Cooking the Macaroni
While the chili is simmering away, let’s get the macaroni cooked. This is a pretty straightforward process, but there are a few tips to make sure it turns out perfectly al dente.
- Boil the Macaroni: Bring a large pot of salted water to a rolling boil. Add the elbow macaroni and cook according to the package directions, usually around 8-10 minutes, or until al dente. Al dente means the pasta is cooked through but still has a slight bite to it.
- Drain and Set Aside: Once the macaroni is cooked, drain it well and set it aside. Don’t rinse it, as the starch on the pasta will help the cheese sauce cling to it.
Making the Cheese Sauce
Now for the star of the show the creamy, cheesy sauce! This is a classic cheese sauce made with a roux, which is a mixture of butter and flour that thickens the sauce. Don’t be intimidated, it’s easier than you think!
- Melt the Butter: In a large saucepan or pot (the same one you used for the chili, after cleaning it, works great!), melt the butter over medium heat.
- Make the Roux: Whisk in the flour and cook for 1-2 minutes, stirring constantly, until the mixture is smooth and bubbly. This is the roux, and it’s important to cook it for a minute or two to get rid of the raw flour taste.
- Whisk in the Milk: Gradually whisk in the milk, a little at a time, making sure to whisk out any lumps as you go. Continue whisking until the mixture is smooth.
- Thicken the Sauce: Bring the sauce to a simmer, stirring constantly, until it thickens slightly, about 5-7 minutes. It should be thick enough to coat the back of a spoon.
- Add the Cheese: Remove the saucepan from the heat and stir in 3 cups of the shredded cheddar cheese and the Monterey Jack cheese until the cheese is melted and the sauce is smooth and creamy. Reserve the remaining 1 cup of cheddar cheese for topping.
- Season the Cheese Sauce: Taste the cheese sauce and season with salt and pepper to your liking. Remember, the chili is already seasoned, so you might not need much salt.
Assembling the Chili Mac and Cheese
Alright, we’re in the home stretch! Now it’s time to bring everything together and create the ultimate Chili Mac and Cheese masterpiece.
- Combine the Macaroni and Cheese Sauce: Add the cooked macaroni to the cheese sauce and stir to coat evenly. Make sure every noodle is covered in that delicious cheesy goodness!
- Add the Chili: Pour the chili into the macaroni and cheese and stir to combine. You can add all of the chili, or reserve some for topping, depending on your preference. I like to add most of it and then dollop a little extra on top for presentation.
- Transfer to a Baking Dish (Optional): If you want to bake the Chili Mac and Cheese, transfer it to a greased 9×13 inch baking dish. This step is optional, but it’s a great way to keep it warm and melty.
- Top with Cheese: Sprinkle the remaining 1 cup of shredded cheddar cheese over the top of the Chili Mac and Cheese.
- Bake (Optional): If baking, bake in a preheated oven at 350°F (175°C) for 15-20 minutes, or until the cheese is melted and bubbly.
- Serve and Enjoy!: Let the Chili Mac and Cheese cool slightly before serving. Top with your favorite toppings, such as sour cream, chopped green onions, or extra shredded cheese. Enjoy!
Conclusion:
This isn’t just another weeknight dinner; it’s a flavor explosion waiting to happen! I truly believe this Chili Mac and Cheese recipe is a must-try for anyone who loves comfort food with a kick. The creamy, cheesy goodness combined with the hearty, savory chili creates a symphony of textures and tastes that will leave you wanting more. It’s the perfect dish to warm you up on a chilly evening, impress your friends at a casual gathering, or simply satisfy a craving for something truly delicious.
But what makes this recipe so special? It’s the perfect balance of simplicity and depth of flavor. We’re not talking about a complicated, all-day affair. This is a recipe designed for real life, for busy weeknights, and for those moments when you need a comforting meal without spending hours in the kitchen. Yet, the combination of spices, the richness of the cheese sauce, and the heartiness of the chili elevate it far beyond your average mac and cheese.
And the best part? It’s incredibly versatile! Feel free to get creative with your toppings. A dollop of sour cream or Greek yogurt adds a tangy coolness that complements the richness of the dish. Chopped green onions or fresh cilantro provide a burst of freshness. For those who like a little extra heat, a sprinkle of red pepper flakes or a drizzle of hot sauce will do the trick.
Looking for serving suggestions? This Chili Mac and Cheese is fantastic on its own as a complete meal. However, it also pairs beautifully with a simple side salad for a lighter option. Alternatively, you could serve it as a side dish alongside grilled chicken or steak for a heartier feast.
Want to take it to the next level? Consider these variations:
* Meat Lover’s Delight: Add cooked and crumbled bacon or sausage to the chili for an extra layer of savory goodness.
* Veggie Power: Stir in some chopped bell peppers, corn, or black beans to the chili for added nutrients and texture.
* Spicy Fiesta: Use a spicier chili powder or add a chopped jalapeño to the chili for a fiery kick.
* Creamy Dreamy: Substitute some of the milk in the cheese sauce with heavy cream for an even richer and more decadent experience.
* Baked Perfection: Transfer the finished Chili Mac and Cheese to a baking dish, top with breadcrumbs and extra cheese, and bake until golden brown and bubbly.
I’m so excited for you to try this recipe! I poured my heart into creating a dish that is both delicious and easy to make, and I truly believe you’ll love it as much as I do.
So, what are you waiting for? Gather your ingredients, preheat your oven (if you’re going the baked route!), and get ready to experience the ultimate comfort food. Don’t be afraid to experiment with different variations and toppings to create your own signature Chili Mac and Cheese masterpiece.
Once you’ve made it, I’d absolutely love to hear about your experience! Share your photos and comments on social media using [Insert your social media hashtag here]. Let me know what you thought of the recipe, what variations you tried, and what toppings you loved. I can’t wait to see your creations and hear your feedback! Happy cooking!
Chili Mac and Cheese: The Ultimate Comfort Food Recipe
Comforting Chili Mac and Cheese with flavorful homemade chili, tender macaroni, and a creamy, cheesy sauce. Perfect for a cozy night!
Ingredients
- 1 pound ground beef
- 1 large onion, chopped
- 2 cloves garlic, minced
- 1 green bell pepper, chopped
- 1 (15 ounce) can kidney beans, rinsed and drained
- 1 (15 ounce) can pinto beans, rinsed and drained
- 1 (14.5 ounce) can diced tomatoes, undrained
- 1 (8 ounce) can tomato sauce
- 1 (4 ounce) can diced green chilies, undrained
- 2 tablespoons chili powder
- 1 tablespoon cumin
- 1 teaspoon smoked paprika
- 1/2 teaspoon oregano
- 1/4 teaspoon cayenne pepper (optional, for extra heat)
- Salt and pepper to taste
- 1 pound elbow macaroni
- 4 tablespoons butter
- 1/4 cup all-purpose flour
- 3 cups milk
- 4 cups shredded cheddar cheese, divided
- 1 cup shredded Monterey Jack cheese
- Optional toppings: sour cream, chopped green onions, shredded cheese
Instructions
- In a large pot or Dutch oven, brown the ground beef over medium-high heat. Break it up with a spoon as it cooks. Drain off any excess grease.
- Add the chopped onion and minced garlic to the pot with the browned beef. Cook until the onion is softened and translucent, about 5-7 minutes.
- Add the chopped green bell pepper and cook for another 3-5 minutes, until it starts to soften.
- Add the rinsed and drained kidney beans and pinto beans to the pot. Then, pour in the undrained diced tomatoes and tomato sauce.
- Add the diced green chilies (undrained), chili powder, cumin, smoked paprika, oregano, and cayenne pepper (if using). Stir everything together well to combine.
- Bring the chili to a simmer, then reduce the heat to low, cover, and let it simmer for at least 30 minutes, or even longer for maximum flavor. Stir occasionally to prevent sticking.
- After simmering, taste the chili and season with salt and pepper to your liking.
- Bring a large pot of salted water to a rolling boil. Add the elbow macaroni and cook according to the package directions, usually around 8-10 minutes, or until al dente.
- Once the macaroni is cooked, drain it well and set it aside. Don’t rinse it.
- In a large saucepan or pot, melt the butter over medium heat.
- Whisk in the flour and cook for 1-2 minutes, stirring constantly, until the mixture is smooth and bubbly.
- Gradually whisk in the milk, a little at a time, making sure to whisk out any lumps as you go. Continue whisking until the mixture is smooth.
- Bring the sauce to a simmer, stirring constantly, until it thickens slightly, about 5-7 minutes. It should be thick enough to coat the back of a spoon.
- Remove the saucepan from the heat and stir in 3 cups of the shredded cheddar cheese and the Monterey Jack cheese until the cheese is melted and the sauce is smooth and creamy. Reserve the remaining 1 cup of cheddar cheese for topping.
- Taste the cheese sauce and season with salt and pepper to your liking.
- Add the cooked macaroni to the cheese sauce and stir to coat evenly.
- Pour the chili into the macaroni and cheese and stir to combine. You can add all of the chili, or reserve some for topping, depending on your preference.
- If you want to bake the Chili Mac and Cheese, transfer it to a greased 9×13 inch baking dish. This step is optional, but it’s a great way to keep it warm and melty.
- Sprinkle the remaining 1 cup of shredded cheddar cheese over the top of the Chili Mac and Cheese.
- If baking, bake in a preheated oven at 350°F (175°C) for 15-20 minutes, or until the cheese is melted and bubbly.
- Let the Chili Mac and Cheese cool slightly before serving. Top with your favorite toppings, such as sour cream, chopped green onions, or extra shredded cheese. Enjoy!
Notes
- For a spicier chili, increase the amount of cayenne pepper or add a pinch of red pepper flakes.
- Simmering the chili for a longer time (1 hour or more) will deepen the flavors.
- Don’t rinse the macaroni after cooking, as the starch helps the cheese sauce cling to it.
- The baking step is optional but adds a nice melty, bubbly top.
- Feel free to customize the toppings to your liking!


Leave a Comment