
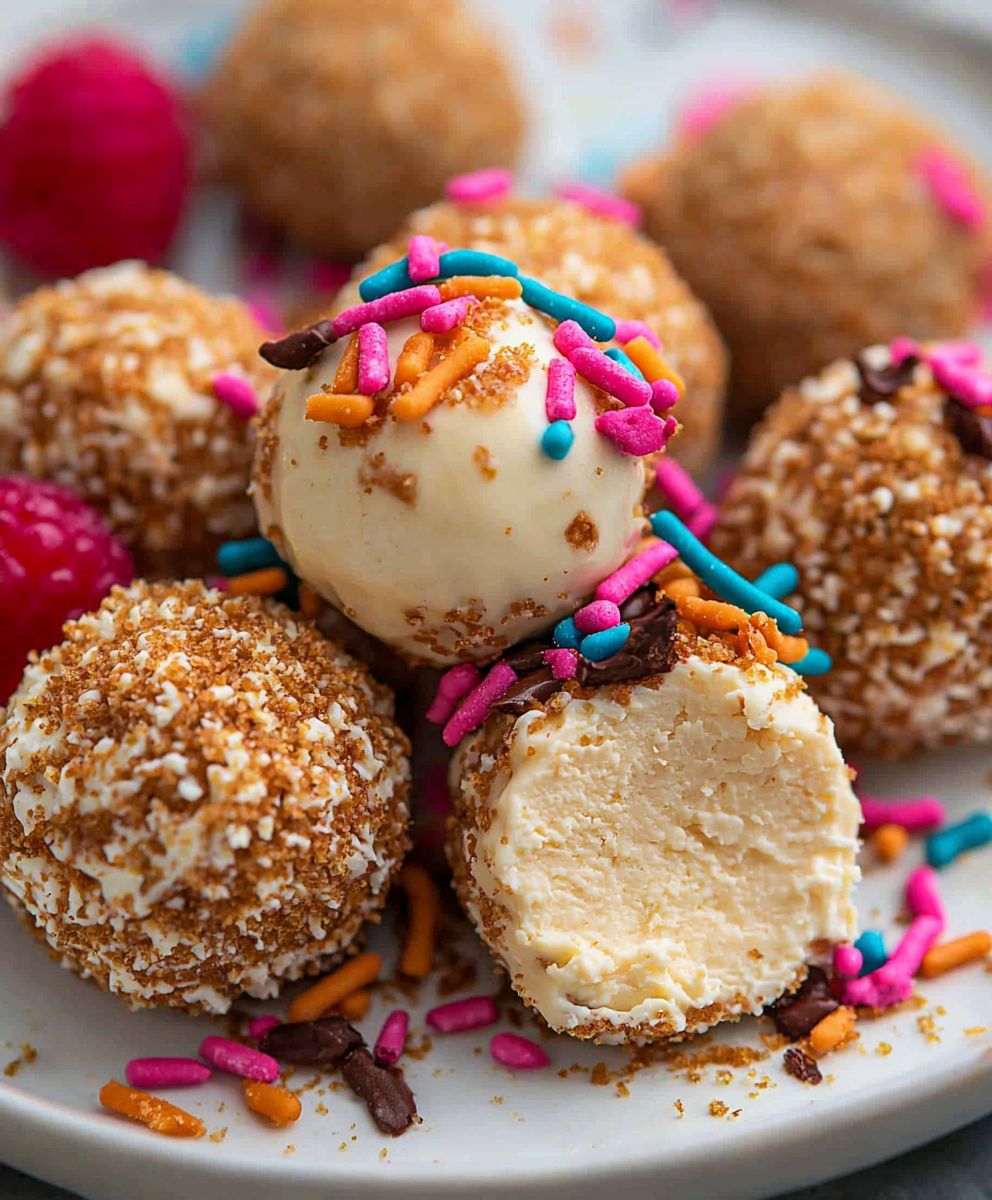
Cheesecake Balls No Bake: Prepare to be amazed by the easiest, most decadent dessert you’ll ever make! Imagine biting into a creamy, dreamy ball of cheesecake goodness, all without ever turning on your oven. These little bites of heaven are perfect for parties, potlucks, or simply satisfying your sweet tooth on a cozy night in.
While the exact origins of cheesecake balls are a bit hazy, they draw inspiration from the classic cheesecake, a dessert with roots stretching back to ancient Greece. The Greeks were known to enjoy a simple cake made with fresh cheese, flour, and honey. Over time, this evolved into the rich and creamy cheesecake we know and love today. These no-bake cheesecake balls take that beloved flavor profile and transform it into a fun, bite-sized treat.
What makes these cheesecake balls no bake so irresistible? It’s the perfect combination of creamy texture, tangy flavor, and incredible convenience. The no-bake aspect means you can whip them up in minutes, making them ideal for busy weeknights or last-minute gatherings. Plus, their small size makes them incredibly poppable and shareable (if you’re willing to share, that is!). The rich, sweet filling combined with a crunchy coating creates a symphony of textures and flavors that will leave you wanting more. Get ready to experience cheesecake bliss in every bite!

Ingredients:
- For the Cheesecake Filling:
- 8 ounces cream cheese, softened to room temperature
- 1/2 cup (1 stick) unsalted butter, softened to room temperature
- 1 1/2 cups powdered sugar, sifted
- 1 teaspoon vanilla extract
- 1/4 teaspoon salt
- For the Coating:
- 12 ounces chocolate chips (milk, dark, or white your choice!)
- 1 tablespoon coconut oil (or vegetable shortening)
- Optional: Sprinkles, chopped nuts, crushed cookies, or other toppings for decoration
- For the Cookie Crumbs (Base):
- 1 1/2 cups graham cracker crumbs (about 12 graham crackers)
- 1/4 cup granulated sugar
- 6 tablespoons unsalted butter, melted
Preparing the Cookie Crumb Base:
- First, let’s get that cookie crumb base ready. This adds a nice textural contrast to the creamy cheesecake filling. If you haven’t already, crush your graham crackers into fine crumbs. You can use a food processor for this, or simply place them in a zip-top bag and crush them with a rolling pin. I personally prefer the rolling pin method it’s a bit more therapeutic!
- In a medium bowl, combine the graham cracker crumbs and granulated sugar. Mix them well to ensure the sugar is evenly distributed. This will help bind the crumbs together and add a touch of sweetness.
- Now, pour the melted butter over the crumb mixture. Use a fork to gently toss everything together until the crumbs are evenly moistened. The mixture should resemble wet sand. If it seems too dry, you can add a teaspoon or two more of melted butter.
- Press the crumb mixture firmly into the bottom of a 9-inch pie plate or a similar-sized dish. You can use the bottom of a measuring cup or your fingers to create a smooth, even layer. Make sure to press it down firmly so it holds its shape.
- Place the pie plate in the refrigerator to chill while you prepare the cheesecake filling. This will help the crust set and prevent it from crumbling when you scoop out the cheesecake balls.
Making the Cheesecake Filling:
- This is where the magic happens! In a large bowl, beat the softened cream cheese and butter together with an electric mixer until smooth and creamy. It’s crucial that both the cream cheese and butter are at room temperature; otherwise, you’ll end up with lumps in your filling. Trust me, I’ve been there!
- Gradually add the sifted powdered sugar to the cream cheese mixture, beating on low speed until fully incorporated. Sifting the powdered sugar is important to prevent any clumps from forming in your filling. Nobody wants lumpy cheesecake balls!
- Stir in the vanilla extract and salt. The vanilla extract enhances the flavor of the cheesecake, while the salt balances the sweetness.
- Once the filling is smooth and creamy, remove the chilled cookie crumb base from the refrigerator.
- Using a small ice cream scoop or a spoon, scoop out small balls of the cheesecake filling and place them on top of the prepared cookie crumb base. Try to make them as uniform in size as possible for a more professional look.
- Once you’ve used up all the cheesecake filling, gently press the balls into the cookie crumb base. This will help them adhere to the crust and prevent them from rolling around.
- Cover the pie plate with plastic wrap and place it in the freezer for at least 2 hours, or until the cheesecake balls are firm enough to handle. This is essential for easy dipping!
Coating the Cheesecake Balls:
- While the cheesecake balls are freezing, prepare your chocolate coating. In a heat-safe bowl, combine the chocolate chips and coconut oil (or vegetable shortening). The coconut oil helps to thin the chocolate and gives it a glossy finish.
- Melt the chocolate in the microwave in 30-second intervals, stirring in between each interval, until smooth and completely melted. Be careful not to overheat the chocolate, as it can burn easily. Alternatively, you can melt the chocolate in a double boiler over simmering water.
- Once the chocolate is melted and smooth, remove the cheesecake balls from the freezer.
- Using a fork or dipping tools, carefully dip each cheesecake ball into the melted chocolate, ensuring it’s fully coated. Gently tap off any excess chocolate.
- Place the dipped cheesecake balls on a parchment-lined baking sheet.
- While the chocolate is still wet, sprinkle the cheesecake balls with your desired toppings, such as sprinkles, chopped nuts, or crushed cookies. Get creative and have fun with it!
- Return the baking sheet to the refrigerator for at least 30 minutes, or until the chocolate has set completely.
Serving and Storage:
- Once the chocolate has set, the cheesecake balls are ready to be served! You can arrange them on a platter for a party or simply enjoy them straight from the refrigerator.
- Store any leftover cheesecake balls in an airtight container in the refrigerator for up to 3 days. They can also be frozen for longer storage. Just be sure to thaw them in the refrigerator before serving.
Conclusion:
And there you have it! These no-bake cheesecake balls are truly a must-try recipe for anyone craving a sweet treat without the fuss of baking. From the creamy, tangy filling to the customizable coating, every bite is an explosion of flavor and texture. I promise, once you make these, they’ll become a staple in your dessert repertoire. But why are these little bites of heaven so irresistible? First, the simplicity is unmatched. No oven required! That means no preheating, no worrying about burning, and minimal cleanup. Perfect for those hot summer days when you don’t want to turn on the oven, or for those moments when you need a quick and easy dessert for a last-minute gathering. Second, the flavor profile is universally appealing. The creamy cheesecake filling, with its subtle tang, is balanced perfectly by the sweetness of the coating. It’s a crowd-pleaser that even the pickiest eaters will enjoy. Finally, the versatility is incredible. You can customize the coating to your heart’s content, making each batch unique and tailored to your preferences. Speaking of customization, let’s talk about some serving suggestions and variations. For a classic touch, stick with the graham cracker crumbs. But don’t be afraid to experiment! Try rolling them in crushed Oreos for a chocolatey twist, finely chopped nuts for added crunch, or shredded coconut for a tropical vibe. You could even drizzle them with melted chocolate or caramel for an extra layer of indulgence. For serving, these cheesecake balls are perfect as a standalone dessert, a sweet addition to a party platter, or even a delightful snack to satisfy your sweet tooth. Consider arranging them on a tiered dessert stand for an elegant presentation, or packaging them in small gift boxes for a thoughtful homemade gift. They’re also fantastic served alongside fresh berries or a scoop of ice cream. If you’re feeling adventurous, you can even experiment with different flavorings in the cheesecake filling itself. A few drops of lemon extract will enhance the tanginess, while a dash of vanilla extract will add a touch of warmth. You could also incorporate a swirl of fruit preserves, such as raspberry or strawberry, for a burst of fruity flavor. I truly believe that these cheesecake balls no bake are a game-changer. They’re easy to make, incredibly delicious, and endlessly customizable. What more could you ask for in a dessert? So, what are you waiting for? Gather your ingredients, put on your apron, and get ready to whip up a batch of these irresistible treats. I’m confident that you’ll love them as much as I do. And when you do, I’d love to hear about your experience! Share your photos and stories on social media using [Your Hashtag Here], and let me know what variations you tried. I’m always looking for new and exciting ways to enjoy these little bites of heaven. Happy baking (or rather, no-baking)! I can’t wait to see what delicious creations you come up with. Don’t forget to rate the recipe and leave a comment below to let me know how it turned out! Your feedback is invaluable and helps me continue to create recipes that you’ll love. Enjoy! Print
Cheesecake Balls No Bake: Easy Recipe & Delicious Variations
- Total Time: 155 minutes
- Yield: 24–30 cheesecake balls 1x
Description
Easy no-bake cheesecake balls with a graham cracker crust and chocolate coating. Perfect for parties or a sweet treat!
Ingredients
- 8 ounces cream cheese, softened to room temperature
- 1/2 cup (1 stick) unsalted butter, softened to room temperature
- 1 1/2 cups powdered sugar, sifted
- 1 teaspoon vanilla extract
- 1/4 teaspoon salt
- 12 ounces chocolate chips (milk, dark, or white your choice!)
- 1 tablespoon coconut oil (or vegetable shortening)
- Optional: Sprinkles, chopped nuts, crushed cookies, or other toppings for decoration
- 1 1/2 cups graham cracker crumbs (about 12 graham crackers)
- 1/4 cup granulated sugar
- 6 tablespoons unsalted butter, melted
Instructions
- Crush graham crackers into fine crumbs using a food processor or rolling pin.
- In a medium bowl, combine graham cracker crumbs and granulated sugar. Mix well.
- Pour melted butter over the crumb mixture. Toss until evenly moistened (resembling wet sand). Add a teaspoon or two more of melted butter if too dry.
- Press the crumb mixture firmly into the bottom of a 9-inch pie plate or similar-sized dish. Create a smooth, even layer.
- Place the pie plate in the refrigerator to chill while you prepare the cheesecake filling.
- In a large bowl, beat softened cream cheese and butter together with an electric mixer until smooth and creamy.
- Gradually add the sifted powdered sugar to the cream cheese mixture, beating on low speed until fully incorporated.
- Stir in the vanilla extract and salt.
- Remove the chilled cookie crumb base from the refrigerator.
- Using a small ice cream scoop or a spoon, scoop out small balls of the cheesecake filling and place them on top of the prepared cookie crumb base.
- Gently press the balls into the cookie crumb base.
- Cover the pie plate with plastic wrap and place it in the freezer for at least 2 hours, or until the cheesecake balls are firm enough to handle.
- While the cheesecake balls are freezing, prepare your chocolate coating. In a heat-safe bowl, combine the chocolate chips and coconut oil (or vegetable shortening).
- Melt the chocolate in the microwave in 30-second intervals, stirring in between each interval, until smooth and completely melted. Be careful not to overheat the chocolate, as it can burn easily. Alternatively, you can melt the chocolate in a double boiler over simmering water.
- Remove the cheesecake balls from the freezer.
- Using a fork or dipping tools, carefully dip each cheesecake ball into the melted chocolate, ensuring it’s fully coated. Gently tap off any excess chocolate.
- Place the dipped cheesecake balls on a parchment-lined baking sheet.
- While the chocolate is still wet, sprinkle the cheesecake balls with your desired toppings, such as sprinkles, chopped nuts, or crushed cookies.
- Return the baking sheet to the refrigerator for at least 30 minutes, or until the chocolate has set completely.
- Once the chocolate has set, the cheesecake balls are ready to be served! You can arrange them on a platter for a party or simply enjoy them straight from the refrigerator.
- Store any leftover cheesecake balls in an airtight container in the refrigerator for up to 3 days. They can also be frozen for longer storage. Just be sure to thaw them in the refrigerator before serving.
Notes
- Ensure cream cheese and butter are at room temperature for a smooth filling.
- Sifting powdered sugar prevents lumps.
- Freezing the cheesecake balls is essential for easy dipping.
- Coconut oil (or vegetable shortening) thins the chocolate and gives it a glossy finish.
- Get creative with your toppings!
- Prep Time: 30 minutes
- Cook Time: 5 minutes

Leave a Comment