
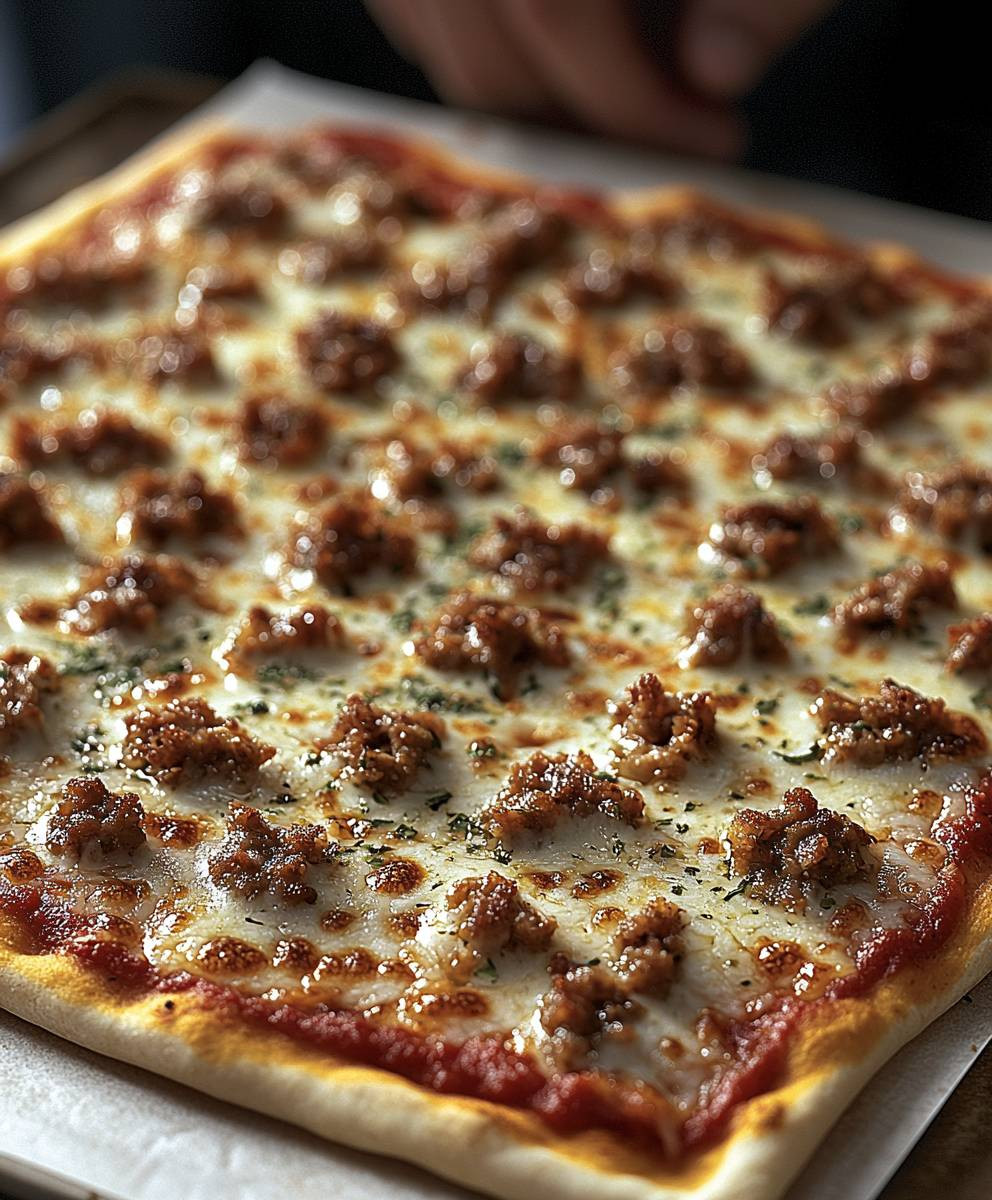
Cafeteria style pizza: remember that rectangular slice of cheesy, tomatoey goodness from your school days? It’s a taste of nostalgia that many of us crave, and I’m here to tell you that you can recreate that iconic pizza right in your own kitchen! Forget fancy Neapolitan pies; we’re talking about the comforting, slightly chewy, and undeniably satisfying pizza that fueled countless afternoons of homework and after-school activities.
While its exact origins are debated, the cafeteria pizza as we know it likely emerged in the mid-20th century as schools sought affordable and easy-to-serve meal options. It quickly became a staple, a symbol of school lunches across America. But beyond its institutional roots, this pizza holds a special place in our hearts because it’s simply delicious. The slightly sweet tomato sauce, the generous layer of melted mozzarella, and the soft, almost bread-like crust create a symphony of flavors and textures that’s hard to resist.
What makes cafeteria style pizza so appealing? It’s the perfect combination of simplicity and comfort. It’s not trying to be gourmet; it’s just honest, satisfying food. Plus, it’s incredibly easy to make at home, making it a fantastic option for a quick weeknight dinner or a fun weekend project with the kids. So, let’s ditch the delivery apps and embark on a culinary journey back to the lunchroom with this easy-to-follow recipe!

Ingredients:
- For the Dough:
- 4 cups all-purpose flour, plus more for dusting
- 1 teaspoon sugar
- 2 teaspoons salt
- 1 package (2 1/4 teaspoons) active dry yeast
- 1 1/2 cups warm water (105-115°F)
- 2 tablespoons olive oil, plus more for greasing
- For the Sauce:
- 1 (28 ounce) can crushed tomatoes
- 1 (15 ounce) can tomato sauce
- 1 tablespoon olive oil
- 2 cloves garlic, minced
- 1 teaspoon dried oregano
- 1/2 teaspoon dried basil
- 1/4 teaspoon red pepper flakes (optional)
- 1/2 teaspoon salt
- 1/4 teaspoon black pepper
- 1 teaspoon sugar (to balance acidity)
- For the Toppings:
- 8 ounces mozzarella cheese, shredded
- 4 ounces provolone cheese, shredded (optional, for extra flavor)
- Your favorite pizza toppings (pepperoni, sausage, mushrooms, onions, green peppers, etc.) – I’m using pepperoni for this recipe!
Preparing the Dough:
- Activate the Yeast: In a large bowl, dissolve the sugar and yeast in the warm water. Let it stand for 5-10 minutes, or until foamy. This means the yeast is alive and ready to go! If it doesn’t foam, your yeast might be old, and you’ll need to start over with fresh yeast.
- Combine Dry Ingredients: In a separate large bowl, whisk together the flour and salt.
- Combine Wet and Dry Ingredients: Pour the yeast mixture and olive oil into the bowl with the flour. Use a wooden spoon or your hands to mix until a shaggy dough forms.
- Knead the Dough: Turn the dough out onto a lightly floured surface. Knead for 8-10 minutes, or until the dough is smooth and elastic. If the dough is too sticky, add a little more flour, a tablespoon at a time. If it’s too dry, add a little more water, a teaspoon at a time. Kneading is crucial for developing the gluten, which gives the pizza its chewy texture.
- First Rise: Lightly grease a large bowl with olive oil. Place the dough in the bowl, turning to coat. Cover the bowl with plastic wrap or a clean kitchen towel. Let the dough rise in a warm place for 1-1.5 hours, or until doubled in size. This allows the yeast to do its work and create air pockets in the dough.
- Punch Down the Dough: Gently punch down the dough to release the air. This helps to redistribute the yeast and create a more even texture.
Making the Sauce:
- Sauté the Garlic: Heat the olive oil in a medium saucepan over medium heat. Add the minced garlic and cook for 1-2 minutes, or until fragrant. Be careful not to burn the garlic, as it will become bitter.
- Add Remaining Ingredients: Stir in the crushed tomatoes, tomato sauce, oregano, basil, red pepper flakes (if using), salt, pepper, and sugar.
- Simmer the Sauce: Bring the sauce to a simmer, then reduce the heat to low and simmer for 15-20 minutes, stirring occasionally. This allows the flavors to meld together and the sauce to thicken slightly.
- Taste and Adjust: Taste the sauce and adjust the seasonings as needed. You might want to add more salt, pepper, or sugar to your liking.
- Cool the Sauce: Let the sauce cool slightly before using. This will prevent it from making the dough soggy.
Assembling and Baking the Pizza:
- Preheat the Oven: Preheat your oven to 450°F (232°C). If you have a pizza stone, place it in the oven while it preheats. This will help to create a crispy crust.
- Prepare the Baking Sheet: Grease a large baking sheet with olive oil or line it with parchment paper. Parchment paper makes cleanup a breeze!
- Shape the Dough: Divide the dough in half. On a lightly floured surface, roll out one half of the dough into a large rectangle, about 12×18 inches. Transfer the dough to the prepared baking sheet. Repeat with the remaining dough. For a more authentic cafeteria style pizza, aim for a thicker crust.
- Dock the Dough: Use a fork to dock the dough all over. This will prevent it from puffing up too much during baking.
- Add the Sauce: Spread a generous layer of the tomato sauce over the dough, leaving a small border for the crust.
- Add the Cheese: Sprinkle the mozzarella and provolone cheese (if using) evenly over the sauce.
- Add the Toppings: Arrange your favorite pizza toppings over the cheese. I’m adding pepperoni slices!
- Bake the Pizza: Bake for 15-20 minutes, or until the crust is golden brown and the cheese is melted and bubbly. If the crust is browning too quickly, you can tent it with foil.
- Cool Slightly and Serve: Let the pizza cool for a few minutes before slicing and serving. Enjoy!
Tips for the Best Cafeteria-Style Pizza:
- Use Good Quality Ingredients: The better the ingredients, the better the pizza will taste.
- Don’t Overload the Pizza: Too many toppings can make the crust soggy.
- Let the Dough Rise Properly: This is crucial for a light and airy crust.
- Preheat the Oven Thoroughly: A hot oven is essential for a crispy crust.
- Experiment with Toppings: Don’t be afraid to try different combinations of toppings to find your favorite.
Variations:
- Vegetarian Pizza: Add your favorite vegetables, such as mushrooms, onions, green peppers, olives, and spinach.
- Meat Lover’s Pizza: Add your favorite meats, such as sausage, pepperoni, bacon, and ham.
- Hawaiian Pizza: Add ham and pineapple.
- White Pizza: Omit the tomato sauce and use a garlic and olive oil base.
Storing Leftovers:
- Store leftover pizza in an airtight container in the refrigerator for up to 3 days.
- Reheat in the oven, microwave, or skillet.
Freezing Instructions:
- Let the pizza cool completely.
- Wrap tightly in plastic wrap and then in aluminum foil.
- Freeze for up to 2 months.
- To reheat, bake from frozen at 350°F (175°C) for 20-25 minutes, or until heated through.
Troubleshooting:
- Dough is too sticky: Add more flour, a tablespoon at a time, until the dough is no longer sticky.
- Dough is too dry: Add more water, a teaspoon at a time, until the dough is smooth and elastic.
- Crust is not crispy: Make sure the oven is hot enough and that you are using a pizza stone or baking sheet. You can also try brushing the crust with olive oil before baking.
- Pizza is soggy: Don’t overload the pizza with toppings and make sure the sauce is not too watery. You can also try pre-baking the crust for a few minutes before adding the toppings.
Conclusion:
And there you have it! This cafeteria style pizza recipe is more than just a trip down memory lane; it’s a delicious, satisfying, and surprisingly easy way to enjoy a classic comfort food. I truly believe this recipe is a must-try for anyone who loves pizza, especially those who remember the simple joy of a square slice from their school days. The crispy, slightly chewy crust, the tangy sauce, and the generous blanket of cheese it all comes together to create a pizza experience that’s both nostalgic and incredibly satisfying. But why is this recipe a must-try? Beyond the nostalgia factor, it’s the sheer simplicity and adaptability. You don’t need fancy equipment or hard-to-find ingredients. The recipe uses readily available items, and the steps are straightforward, making it perfect for a weeknight dinner or a fun weekend project with the kids. Plus, the recipe is incredibly forgiving. Don’t have quite enough mozzarella? Throw in some cheddar! Want a little extra flavor? Add a pinch of Italian seasoning to the sauce. The possibilities are endless! Speaking of possibilities, let’s talk about serving suggestions and variations. While this pizza is fantastic on its own, a simple side salad with a light vinaigrette provides a refreshing contrast to the richness of the pizza. For a heartier meal, consider serving it with a bowl of warm tomato soup. And if you’re feeling adventurous, why not experiment with different toppings? Pepperoni is always a classic, but you could also try adding cooked sausage, mushrooms, onions, or even some roasted vegetables. Here are a few more ideas to get your creative juices flowing:Serving Suggestions:
- Classic Combo: Serve with a side of garlic bread and a crisp green salad.
- Pizza Party: Make a few different variations and let everyone choose their favorite.
- Lunchbox Treat: Cut the pizza into smaller squares and pack them in lunchboxes for a fun and satisfying midday meal.
Variations to Explore:
- Spicy Kick: Add a pinch of red pepper flakes to the sauce for a little heat.
- Veggie Delight: Top with your favorite vegetables, such as bell peppers, onions, and mushrooms.
- Meat Lover’s: Add cooked sausage, pepperoni, and bacon for a truly indulgent pizza.
- Hawaiian Style: Add ham and pineapple for a sweet and savory twist.
Cafeteria Style Pizza: A Nostalgic Guide to School Lunch Pizza
- Total Time: 155 minutes
- Yield: 2 large rectangular pizzas (12x18 inches each) 1x
Description
Classic cafeteria-style pizza, made from scratch with a simple dough, flavorful tomato sauce, and your favorite toppings. A nostalgic and delicious homemade version of a childhood favorite!
Ingredients
- 4 cups all-purpose flour, plus more for dusting
- 1 teaspoon sugar
- 2 teaspoons salt
- 1 package (2 1/4 teaspoons) active dry yeast
- 1 1/2 cups warm water (105-115°F)
- 2 tablespoons olive oil, plus more for greasing
- 1 (28 ounce) can crushed tomatoes
- 1 (15 ounce) can tomato sauce
- 1 tablespoon olive oil
- 2 cloves garlic, minced
- 1 teaspoon dried oregano
- 1/2 teaspoon dried basil
- 1/4 teaspoon red pepper flakes (optional)
- 1/2 teaspoon salt
- 1/4 teaspoon black pepper
- 1 teaspoon sugar (to balance acidity)
- 8 ounces mozzarella cheese, shredded
- 4 ounces provolone cheese, shredded (optional, for extra flavor)
- Your favorite pizza toppings (pepperoni, sausage, mushrooms, onions, green peppers, etc.) – I’m using pepperoni for this recipe!
Instructions
- Activate the Yeast: In a large bowl, dissolve the sugar and yeast in the warm water. Let it stand for 5-10 minutes, or until foamy. This means the yeast is alive and ready to go! If it doesn’t foam, your yeast might be old, and you’ll need to start over with fresh yeast.
- Combine Dry Ingredients: In a separate large bowl, whisk together the flour and salt.
- Combine Wet and Dry Ingredients: Pour the yeast mixture and olive oil into the bowl with the flour. Use a wooden spoon or your hands to mix until a shaggy dough forms.
- Knead the Dough: Turn the dough out onto a lightly floured surface. Knead for 8-10 minutes, or until the dough is smooth and elastic. If the dough is too sticky, add a little more flour, a tablespoon at a time. If it’s too dry, add a little more water, a teaspoon at a time. Kneading is crucial for developing the gluten, which gives the pizza its chewy texture.
- First Rise: Lightly grease a large bowl with olive oil. Place the dough in the bowl, turning to coat. Cover the bowl with plastic wrap or a clean kitchen towel. Let the dough rise in a warm place for 1-1.5 hours, or until doubled in size. This allows the yeast to do its work and create air pockets in the dough.
- Punch Down the Dough: Gently punch down the dough to release the air. This helps to redistribute the yeast and create a more even texture.
- Sauté the Garlic: Heat the olive oil in a medium saucepan over medium heat. Add the minced garlic and cook for 1-2 minutes, or until fragrant. Be careful not to burn the garlic, as it will become bitter.
- Add Remaining Ingredients: Stir in the crushed tomatoes, tomato sauce, oregano, basil, red pepper flakes (if using), salt, pepper, and sugar.
- Simmer the Sauce: Bring the sauce to a simmer, then reduce the heat to low and simmer for 15-20 minutes, stirring occasionally. This allows the flavors to meld together and the sauce to thicken slightly.
- Taste and Adjust: Taste the sauce and adjust the seasonings as needed. You might want to add more salt, pepper, or sugar to your liking.
- Cool the Sauce: Let the sauce cool slightly before using. This will prevent it from making the dough soggy.
- Preheat the Oven: Preheat your oven to 450°F (232°C). If you have a pizza stone, place it in the oven while it preheats. This will help to create a crispy crust.
- Prepare the Baking Sheet: Grease a large baking sheet with olive oil or line it with parchment paper. Parchment paper makes cleanup a breeze!
- Shape the Dough: Divide the dough in half. On a lightly floured surface, roll out one half of the dough into a large rectangle, about 12×18 inches. Transfer the dough to the prepared baking sheet. Repeat with the remaining dough. For a more authentic cafeteria style pizza, aim for a thicker crust.
- Dock the Dough: Use a fork to dock the dough all over. This will prevent it from puffing up too much during baking.
- Add the Sauce: Spread a generous layer of the tomato sauce over the dough, leaving a small border for the crust.
- Add the Cheese: Sprinkle the mozzarella and provolone cheese (if using) evenly over the sauce.
- Add the Toppings: Arrange your favorite pizza toppings over the cheese. I’m adding pepperoni slices!
- Bake the Pizza: Bake for 15-20 minutes, or until the crust is golden brown and the cheese is melted and bubbly. If the crust is browning too quickly, you can tent it with foil.
- Cool Slightly and Serve: Let the pizza cool for a few minutes before slicing and serving. Enjoy!
Notes
- Use Good Quality Ingredients: The better the ingredients, the better the pizza will taste.
- Don’t Overload the Pizza: Too many toppings can make the crust soggy.
- Let the Dough Rise Properly: This is crucial for a light and airy crust.
- Preheat the Oven Thoroughly: A hot oven is essential for a crispy crust.
- Experiment with Toppings: Don’t be afraid to try different combinations of toppings to find your favorite.
- Prep Time: 45 minutes
- Cook Time: 20 minutes

Leave a Comment