
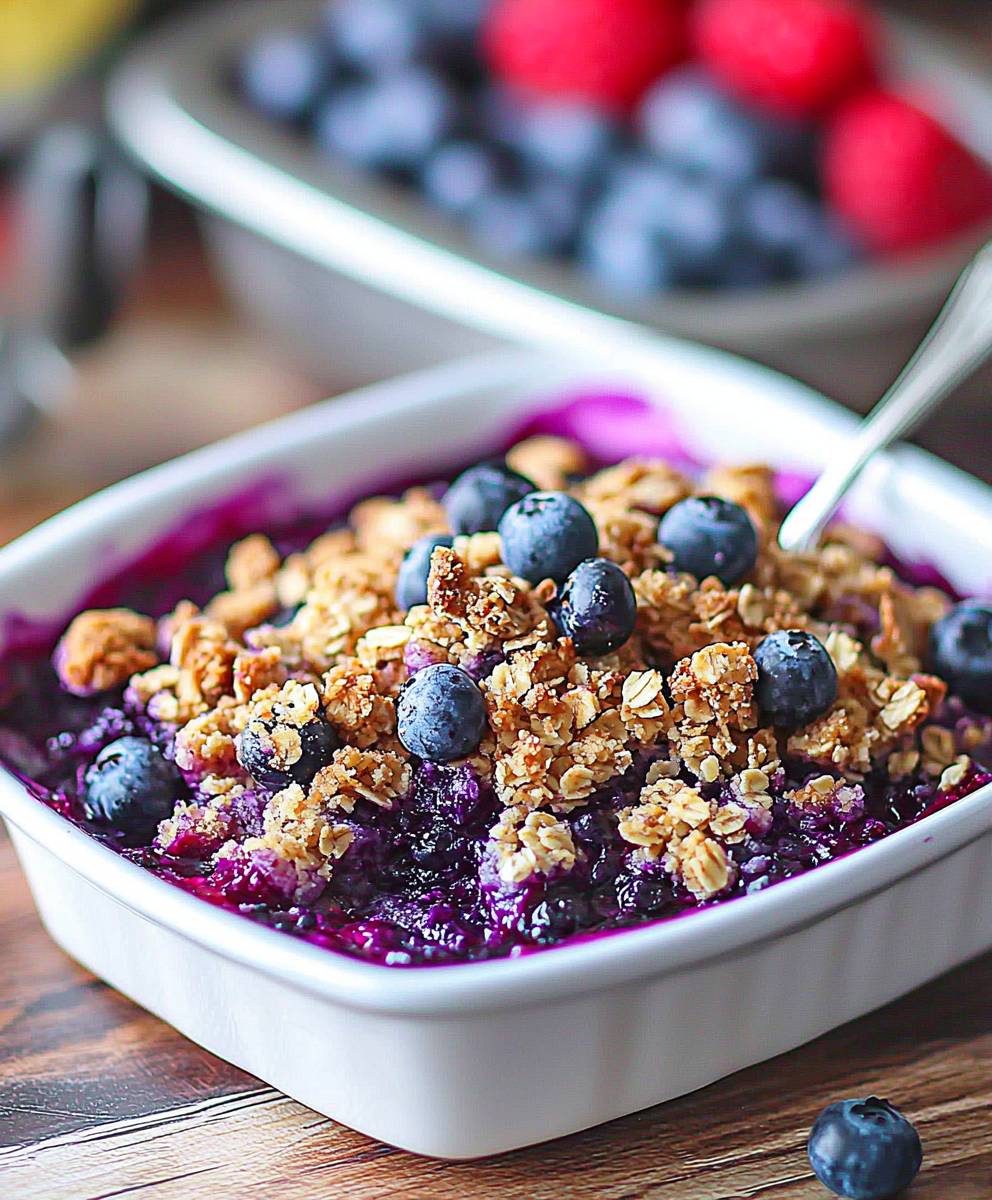
Blueberry Crisp: the very words conjure up images of warm, sun-drenched afternoons and the comforting aroma of baked fruit mingling with buttery crumble. Have you ever experienced that moment when the first spoonful of a warm dessert hits your tongue, and all your worries simply melt away? That’s the magic of a truly great crisp, and this recipe is designed to deliver that experience every single time.
While the exact origins of fruit crisps are debated, they rose to prominence in American kitchens during the mid-20th century, offering a simpler, quicker alternative to traditional pies. They became a symbol of home-style baking, a way to use seasonal fruits in a fuss-free and utterly delicious manner. The beauty of a blueberry crisp lies in its simplicity. It’s a dish that celebrates the natural sweetness of blueberries, enhanced by a perfectly balanced, crumbly topping.
People adore this dessert for so many reasons. The combination of juicy, slightly tart blueberries with the sweet, buttery, and often slightly crunchy topping is simply irresistible. It’s a textural masterpiece! Plus, it’s incredibly easy to make, requiring minimal effort and readily available ingredients. Whether you’re serving it warm with a scoop of vanilla ice cream or enjoying it on its own, this blueberry crisp is guaranteed to be a crowd-pleaser. So, let’s get baking!

Ingredients:
- For the Filling:
- 6 cups fresh blueberries, rinsed and picked over
- 1/4 cup granulated sugar
- 2 tablespoons all-purpose flour
- 1 tablespoon lemon juice
- 1/2 teaspoon lemon zest
- 1/4 teaspoon ground cinnamon
- For the Crisp Topping:
- 1 cup all-purpose flour
- 1 cup rolled oats (not instant)
- 1 cup packed light brown sugar
- 1/2 teaspoon baking powder
- 1/4 teaspoon salt
- 1/2 cup (1 stick) cold unsalted butter, cut into small cubes
- 1/4 cup chopped pecans or walnuts (optional)
- Optional, for Serving:
- Vanilla ice cream
- Whipped cream
Preparing the Blueberry Filling
Okay, let’s get started with the heart of our blueberry crisp the filling! This is where all that juicy blueberry goodness comes to life. Trust me, a little bit of prep here makes a HUGE difference in the final result.
- Rinse and Sort the Blueberries: First things first, give those blueberries a good rinse under cool water. Gently pick through them, removing any stems, leaves, or mushy berries. Nobody wants a surprise stem in their crisp!
- Combine Filling Ingredients: In a large bowl, gently toss the rinsed blueberries with the granulated sugar, all-purpose flour, lemon juice, lemon zest, and ground cinnamon. Make sure everything is evenly distributed. The flour will help thicken the juices as it bakes, and the lemon juice and zest will brighten the flavor of the blueberries. The cinnamon adds a warm, comforting touch.
- Transfer to Baking Dish: Pour the blueberry mixture into a 9-inch square baking dish or a similar-sized oven-safe dish. Make sure the blueberries are spread evenly across the bottom of the dish. This will ensure even baking and prevent any soggy spots.
Making the Crisp Topping
Now for the star of the show the crisp topping! This is what gives our blueberry crisp that delightful crunchy texture that everyone loves. Don’t be intimidated; it’s super easy to make!
- Combine Dry Ingredients: In a separate large bowl, whisk together the all-purpose flour, rolled oats, packed light brown sugar, baking powder, and salt. Make sure everything is well combined. The baking powder will give the topping a little lift, making it extra crispy.
- Cut in the Butter: Add the cold, cubed butter to the dry ingredients. Using a pastry blender or your fingertips, cut the butter into the dry ingredients until the mixture resembles coarse crumbs. The key here is to keep the butter cold. Cold butter creates pockets of steam as it bakes, which results in a flaky and crispy topping. If you’re using your fingertips, work quickly to prevent the butter from melting.
- Add Nuts (Optional): If you’re using pecans or walnuts, stir them into the crisp topping mixture. They add a nice nutty flavor and extra crunch.
- Crumble Topping Over Blueberries: Sprinkle the crisp topping evenly over the blueberry filling in the baking dish. Make sure to cover the entire surface of the blueberries.
Baking the Blueberry Crisp
Almost there! Now it’s time to bake our blueberry crisp to golden-brown perfection. The aroma that fills your kitchen while it’s baking is simply divine!
- Preheat Oven: Preheat your oven to 375°F (190°C).
- Bake: Place the baking dish in the preheated oven and bake for 35-45 minutes, or until the topping is golden brown and the blueberry filling is bubbling. Keep an eye on it towards the end of the baking time to prevent the topping from burning. If the topping starts to brown too quickly, you can loosely tent the dish with aluminum foil.
- Cool Slightly: Remove the blueberry crisp from the oven and let it cool for at least 15-20 minutes before serving. This will allow the filling to thicken slightly and prevent it from being too runny.
Serving Suggestions
The best part enjoying your homemade blueberry crisp! Here are a few serving suggestions to take it to the next level:
- Vanilla Ice Cream: A scoop of vanilla ice cream on top of a warm blueberry crisp is a classic combination that’s hard to beat. The cold ice cream melts slightly into the warm filling, creating a delightful contrast of temperatures and textures.
- Whipped Cream: A dollop of freshly whipped cream is another delicious option. It adds a light and airy sweetness that complements the tartness of the blueberries.
- Plain: Of course, you can also enjoy your blueberry crisp plain! It’s delicious all on its own.
Tips for the Perfect Blueberry Crisp
Here are a few extra tips to help you make the best blueberry crisp ever:
- Use Fresh Blueberries: While you can use frozen blueberries in a pinch, fresh blueberries will give you the best flavor and texture.
- Don’t Overmix the Filling: Gently toss the blueberries with the filling ingredients to avoid crushing them.
- Keep the Butter Cold: Cold butter is essential for a crispy topping.
- Adjust Sugar to Taste: If your blueberries are particularly tart, you may want to add a little more sugar to the filling.
- Add a Pinch of Salt to the Topping: A pinch of salt in the topping will enhance the sweetness and balance the flavors.
- Let it Cool Slightly: Letting the crisp cool slightly before serving will allow the filling to thicken and prevent it from being too runny.
Variations
Want to mix things up a bit? Here are a few variations you can try:
- Add Other Berries: Feel free to add other berries to the filling, such as raspberries, strawberries, or blackberries.
- Use Different Nuts: Try using different nuts in the topping, such as almonds, walnuts, or macadamia nuts.
- Add Spices: Experiment with different spices in the filling, such as nutmeg, ginger, or cardamom.
- Make it Gluten-Free: Use gluten-free all-purpose flour and gluten-free rolled oats to make a gluten-free version of this recipe.
- Add a Streusel Topping: For a richer topping, try making a streusel topping with butter, flour, sugar, and nuts.
Storage Instructions
If you have any leftover blueberry crisp (which is unlikely!), you can store it in the refrigerator for up to 3 days. Reheat it in the oven or microwave before serving.
I hope you enjoy this recipe as much as I do! It’s a perfect dessert for any occasion, and it’s sure to be a crowd-pleaser. Happy baking!
Conclusion:
This Blueberry Crisp isn’t just another dessert; it’s a warm hug on a plate, a burst of summer sunshine even on the gloomiest of days. The combination of sweet, juicy blueberries and that perfectly golden, buttery, and slightly crumbly topping is simply irresistible. I truly believe this recipe is a must-try for anyone who appreciates simple, honest, and utterly delicious food. It’s the kind of dessert that evokes memories of childhood, of family gatherings, and of pure, unadulterated joy.
But beyond the nostalgia, this recipe is also incredibly versatile. While it’s fantastic served warm straight from the oven, don’t hesitate to experiment! A scoop of vanilla ice cream melting slowly over the warm crisp is a classic pairing for a reason. The cold creaminess perfectly complements the warm, fruity sweetness. Or, if you’re feeling a little more adventurous, try a dollop of lightly sweetened whipped cream or even a drizzle of crème fraîche for a tangy counterpoint.
For variations, consider adding a handful of chopped pecans or walnuts to the topping for extra crunch and nutty flavor. A sprinkle of cinnamon or nutmeg to the blueberry filling will add warmth and depth. You could even swap out some of the blueberries for other berries like raspberries or blackberries for a mixed berry crisp. If you’re feeling particularly decadent, a layer of cream cheese filling beneath the blueberries would add a rich and tangy twist.
Serving suggestions are endless! This Blueberry Crisp is perfect for a casual weeknight dessert, a potluck gathering, or even a special occasion. It’s easy enough to whip up on a whim, yet impressive enough to serve to guests. I’ve even been known to enjoy a small bowl of it for breakfast (don’t judge!). It pairs beautifully with a cup of coffee or tea, or even a glass of chilled white wine.
The beauty of this recipe lies in its simplicity. It requires minimal ingredients and effort, yet delivers maximum flavor and satisfaction. It’s a recipe that’s forgiving and adaptable, allowing you to customize it to your own preferences and tastes. So, don’t be afraid to get creative and make it your own!
I truly hope you’ll give this recipe a try. I’m confident that you’ll love it as much as I do. And more importantly, I’d love to hear about your experience! Did you make any variations? What did you serve it with? What did your family and friends think? Please share your photos and comments below. I’m always eager to learn from your culinary adventures and see how you’ve made this recipe your own. Happy baking, and enjoy every delicious bite of this wonderful Blueberry Crisp! Let me know what you think!
Blueberry Crisp: The Ultimate Guide to Baking the Perfect Dessert
A classic blueberry crisp with a sweet and tart filling and a buttery, crunchy oat topping. Perfect served warm with vanilla ice cream or whipped cream!
Ingredients
- 6 cups fresh blueberries, rinsed and picked over
- 1/4 cup granulated sugar
- 2 tablespoons all-purpose flour
- 1 tablespoon lemon juice
- 1/2 teaspoon lemon zest
- 1/4 teaspoon ground cinnamon
- 1 cup all-purpose flour
- 1 cup rolled oats (not instant)
- 1 cup packed light brown sugar
- 1/2 teaspoon baking powder
- 1/4 teaspoon salt
- 1/2 cup (1 stick) cold unsalted butter, cut into small cubes
- 1/4 cup chopped pecans or walnuts (optional)
- Vanilla ice cream
- Whipped cream
Instructions
- Prepare the Blueberry Filling: Rinse blueberries and remove stems/leaves. In a large bowl, gently toss blueberries with sugar, flour, lemon juice, lemon zest, and cinnamon until evenly coated. Transfer to a 9-inch square baking dish, spreading evenly.
- Make the Crisp Topping: In a separate large bowl, whisk together flour, oats, brown sugar, baking powder, and salt. Add cold, cubed butter and cut it into the dry ingredients using a pastry blender or your fingertips until the mixture resembles coarse crumbs. Stir in chopped nuts (if using).
- Assemble and Bake: Sprinkle the crisp topping evenly over the blueberry filling. Preheat oven to 375°F (190°C). Bake for 35-45 minutes, or until the topping is golden brown and the blueberry filling is bubbling. If the topping browns too quickly, tent loosely with foil.
- Cool and Serve: Remove from oven and let cool for at least 15-20 minutes before serving. Serve warm with vanilla ice cream or whipped cream, if desired.
Notes
- Use fresh blueberries for the best flavor and texture.
- Don’t overmix the filling to avoid crushing the blueberries.
- Keep the butter cold for a crispy topping.
- Adjust sugar to taste depending on the tartness of the blueberries.
- A pinch of salt in the topping enhances the sweetness.
- Let the crisp cool slightly before serving to allow the filling to thicken.
- Variations: Add other berries, use different nuts, experiment with spices, make it gluten-free, or add a streusel topping.
- Storage: Store leftovers in the refrigerator for up to 3 days. Reheat in the oven or microwave before serving.

Leave a Comment