
Banana Split Milkshake is a delightful twist on the classic dessert that brings together the rich flavors of bananas, creamy ice cream, and a hint of chocolate. This indulgent treat not only satisfies your sweet tooth but also evokes a sense of nostalgia, reminding many of warm summer days spent at the local ice cream parlor. The banana split, originally created in the early 1900s, has become a beloved staple in American dessert culture, and this milkshake version captures all the joy of that iconic dish in a convenient, sippable form.
People adore the Banana Split Milkshake for its perfect balance of taste and texture. The creamy, smooth consistency combined with the sweetness of ripe bananas and the crunch of nuts creates a delightful experience with every sip. Plus, its incredibly easy to whip up at home, making it a go-to recipe for both casual gatherings and special occasions. Whether youre treating yourself after a long day or impressing friends at a summer barbecue, this Banana Split Milkshake is sure to be a hit!

Ingredients:
- 2 ripe bananas
- 2 cups vanilla ice cream
- 1 cup milk (whole or 2% for creaminess)
- 1/4 cup chocolate syrup
- 1/4 cup strawberry syrup
- 1/4 cup whipped cream
- 1/4 cup crushed nuts (optional, for topping)
- Maraschino cherries (for garnish)
- 1 teaspoon vanilla extract (optional, for extra flavor)
Preparing the Ingredients
1. **Select the Bananas**: Start by choosing two ripe bananas. They should be slightly speckled for the best flavor. Peel them and slice them into smaller pieces to make blending easier. 2. **Gather the Ice Cream**: Take out your vanilla ice cream and let it sit at room temperature for about 5-10 minutes. This will soften it slightly, making it easier to blend into the milkshake. 3. **Measure the Milk**: Pour 1 cup of milk into a measuring cup. You can use whole milk for a richer shake or 2% if you prefer something lighter. 4. **Prepare the Syrups**: Get your chocolate and strawberry syrups ready. You can use store-bought or make your own if youre feeling adventurous. 5. **Whipped Cream and Toppings**: If youre using store-bought whipped cream, have it ready in a can or bowl. If you want to make your own, youll need heavy cream and sugar. Also, gather your crushed nuts and maraschino cherries for garnishing.Making the Milkshake
6. **Blend the Base**: In a blender, combine the sliced bananas, softened vanilla ice cream, and milk. If youre using vanilla extract, add it now. Blend on medium speed until smooth and creamy. You may need to stop and scrape down the sides of the blender to ensure everything is well mixed. 7. **Add the Syrups**: Once the base is smooth, add the chocolate syrup and strawberry syrup. Blend again for a few seconds until the syrups are fully incorporated. You can adjust the amount of syrup based on your sweetness preference. 8. **Check the Consistency**: If the milkshake is too thick for your liking, add a little more milk and blend again. If its too thin, add a bit more ice cream. The perfect milkshake should be thick but pourable.Assembling the Banana Split Milkshake
9. **Prepare the Glasses**: Grab your favorite tall glasses or milkshake cups. Drizzle some chocolate syrup along the inside of each glass for a decorative touch. This not only looks great but adds extra flavor. 10. **Pour the Milkshake**: Carefully pour the milkshake mixture into the prepared glasses. Fill them about three-quarters full to leave room for toppings. 11. **Add Whipped Cream**: Generously top each milkshake with whipped cream. You can use a piping bag for a fancy look or simply spoon it on top. 12. **Garnish**: Sprinkle crushed nuts over the whipped cream for added crunch. Then, place a maraschino cherry on top of each milkshake for that classic banana split look.Serving Suggestions
13. **Serve Immediately**: These milkshakes are best enjoyed fresh. Serve them with a straw and a long spoon for scooping up the deliciousness. 14. **Pair with Snacks**: If you want to make it a fun dessert experience, consider serving your banana split milkshake with some chocolate chip cookies or a slice of banana bread on the side. 15. **Experiment with Flavors**: Feel free to get creative! You can add a scoop of peanut butter or a sprinkle of cinnamon for a unique twist. You can also swap out the syrups for other flavors like caramel or butterscotch.Tips for the Perfect Milkshake
16. **Use Frozen Bananas**: For an even creamier texture, consider using frozen bananas. Just peel and slice them before freezing. This will give your milkshake a thicker consistency. 17. **Chill Your Glasses**: For an extra frosty treat, chill your glasses in the freezer for about 10-15 minutes before serving. This keeps your milkshake cold longer. 18. **Adjust Sweetness**: If you prefer a less sweet milkshake, reduce the amount of syrups or use unsweetened versions. You can also add a pinch of salt to balance the sweetness. 19. **Make it a Meal**: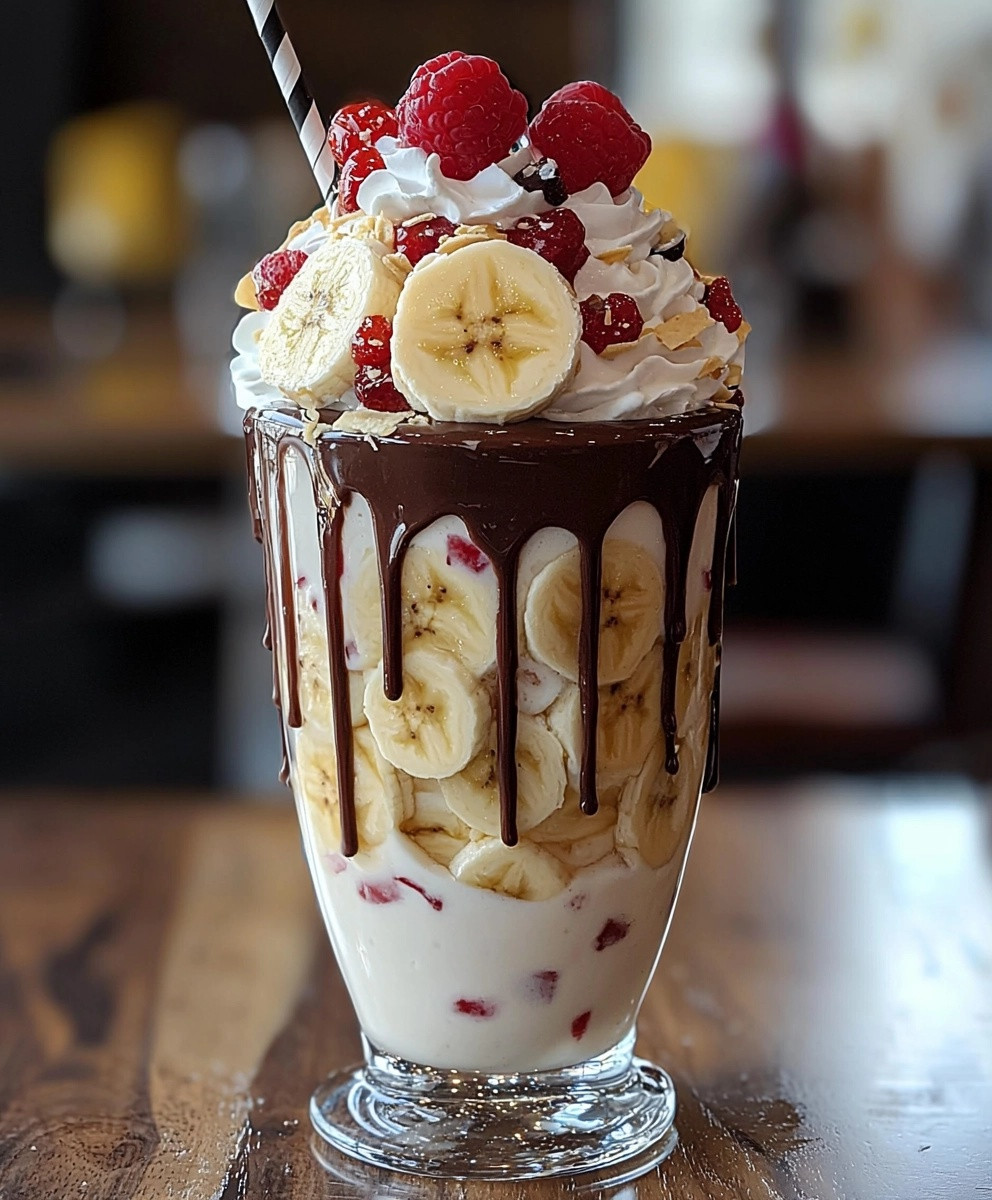
Conclusion:
In summary, this Banana Split Milkshake is an absolute must-try for anyone looking to indulge in a deliciously creamy treat that perfectly captures the essence of a classic dessert. With its delightful combination of ripe bananas, rich chocolate syrup, and velvety vanilla ice cream, this milkshake is not only a nostalgic nod to the beloved banana split but also a refreshing way to cool down on a warm day. For serving suggestions, consider topping your milkshake with a generous dollop of whipped cream, a sprinkle of crushed nuts, or even a cherry on top for that authentic banana split experience. You can also experiment with variations by adding a scoop of peanut butter or swapping out the chocolate syrup for caramel to create your own unique twist. I wholeheartedly encourage you to give this Banana Split Milkshake a try! Its a fun and easy recipe thats perfect for sharing with friends and family. Once youve whipped up your own version, Id love to hear about your experience. Share your thoughts, any variations you tried, or even a photo of your creation! Lets celebrate the joy of this delightful treat together! Print
Banana Split Milkshake: A Delicious Twist on a Classic Treat
- Total Time: 10 minutes
- Yield: 2 servings 1x
Description
Enjoy a creamy Banana Split Milkshake that blends the classic flavors of banana, chocolate, and strawberry. Perfect for warm days or as a sweet dessert, this treat is topped with whipped cream and a cherry for a delightful finish!
Ingredients
- 2 ripe bananas
- 2 cups vanilla ice cream
- 1 cup milk (whole or 2% for creaminess)
- 1/4 cup chocolate syrup
- 1/4 cup strawberry syrup
- 1/4 cup whipped cream
- 1/4 cup crushed nuts (optional, for topping)
- Maraschino cherries (for garnish)
- 1 teaspoon vanilla extract (optional, for extra flavor)
Instructions
- Choose two ripe bananas, peel them, and slice them into smaller pieces.
- Let the vanilla ice cream sit at room temperature for 5-10 minutes to soften.
- Pour 1 cup of milk into a measuring cup.
- Get your chocolate and strawberry syrups ready.
- Have whipped cream, crushed nuts, and maraschino cherries ready for garnishing.
- In a blender, combine the sliced bananas, softened vanilla ice cream, and milk. Add vanilla extract if using. Blend until smooth and creamy.
- Add chocolate and strawberry syrups to the blender and blend for a few seconds until incorporated.
- Adjust the thickness by adding more milk if too thick or more ice cream if too thin.
- Drizzle chocolate syrup along the inside of tall glasses.
- Pour the milkshake mixture into the prepared glasses, filling them about three-quarters full.
- Top each milkshake generously with whipped cream.
- Sprinkle crushed nuts over the whipped cream and place a maraschino cherry on top.
- Enjoy fresh with a straw and a long spoon.
- Serve with chocolate chip cookies or banana bread for a fun dessert experience.
- Get creative by adding peanut butter or swapping syrups for other flavors.
Notes
- For a creamier texture, consider using frozen bananas.
- Chill your glasses in the freezer for 10-15 minutes before serving for an extra frosty treat.
- Adjust sweetness by reducing syrup amounts or using unsweetened versions.
- Prep Time: 10 minutes
- Cook Time: 0 minutes

Leave a Comment