
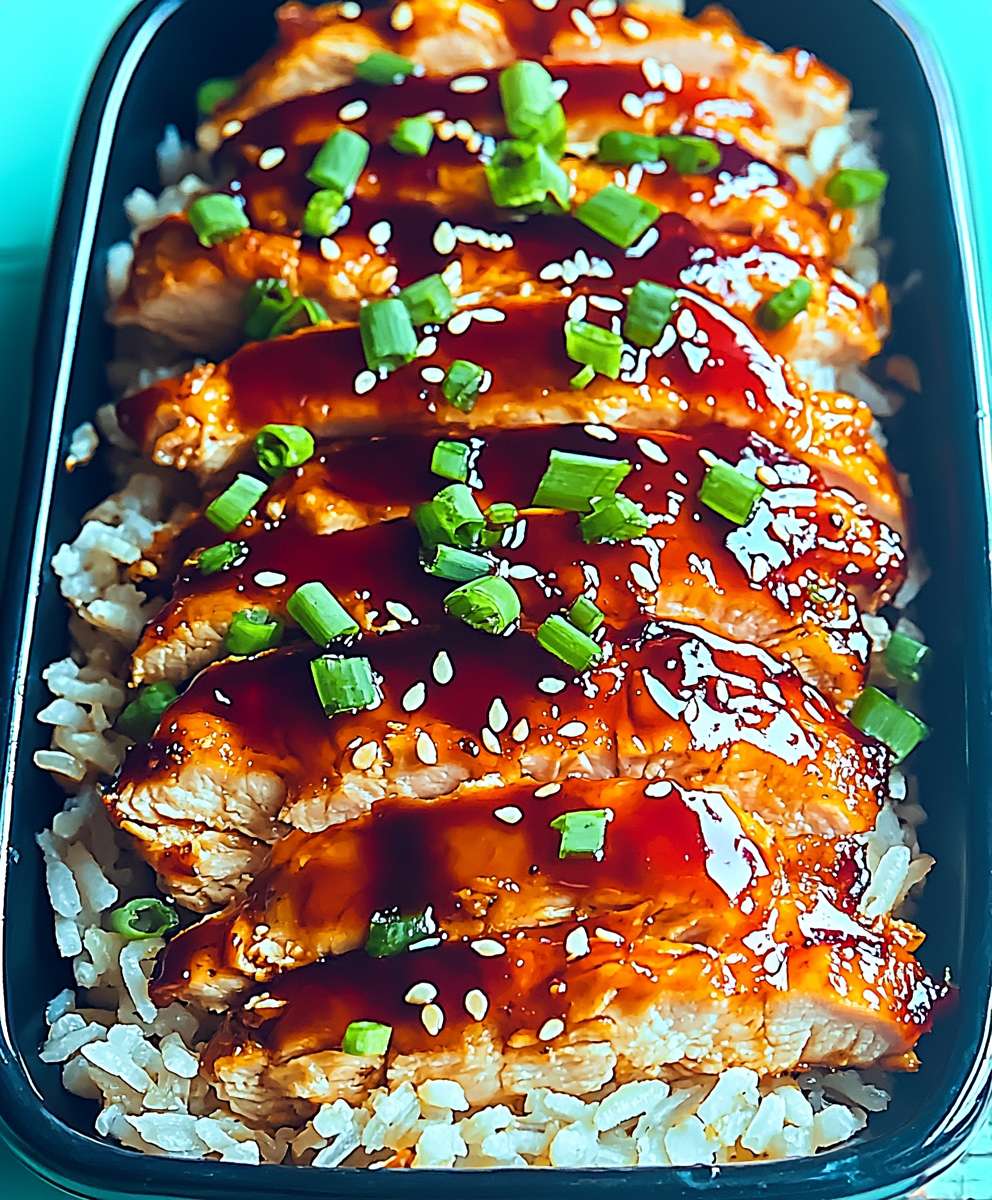
Baked Teriyaki Chicken Rice: Prepare to embark on a culinary adventure that will tantalize your taste buds and leave you craving more! Imagine succulent, juicy chicken, glazed with a sweet and savory teriyaki sauce, nestled atop a bed of fluffy, perfectly cooked rice. This isn’t just a meal; it’s an experience.
Teriyaki, a cooking technique originating in Japan, has captivated food lovers worldwide for centuries. The word “teriyaki” itself describes the glossy sheen (“teri”) imparted by the sauce and the grilling or broiling (“yaki”) method. While traditionally grilled, baking brings a unique tenderness to the chicken, making it incredibly moist and flavorful. Our baked teriyaki chicken rice recipe takes this classic dish and makes it even easier to prepare, perfect for busy weeknights or a relaxed weekend dinner.
What makes this dish so irresistible? It’s the harmonious blend of flavors and textures. The sweet and salty teriyaki sauce perfectly complements the savory chicken, while the rice provides a comforting and satisfying base. People adore this dish because it’s incredibly versatile, easily customizable to your liking, and a guaranteed crowd-pleaser. Plus, the convenience of baking everything together in one dish makes cleanup a breeze. Get ready to discover your new favorite comfort food!

Ingredients:
- For the Chicken:
- 2 lbs boneless, skinless chicken thighs, cut into 1-inch pieces
- 1/2 cup soy sauce
- 1/4 cup mirin (sweet rice wine)
- 2 tablespoons sake (rice wine)
- 2 tablespoons brown sugar, packed
- 1 tablespoon grated fresh ginger
- 2 cloves garlic, minced
- 1 teaspoon sesame oil
- 1/4 teaspoon ground black pepper
- 1 tablespoon cornstarch
- 1 tablespoon water
- For the Rice:
- 2 cups uncooked short-grain rice (sushi rice)
- 2 1/2 cups water
- 1 tablespoon butter (optional, for added richness)
- For the Toppings (Optional):
- 2 green onions, thinly sliced
- 1/4 cup sesame seeds, toasted
- Shredded nori seaweed (optional)
- Japanese mayonnaise (optional)
- Sriracha (optional, for spice)
Preparing the Teriyaki Chicken:
- Marinate the Chicken: In a large bowl, combine the soy sauce, mirin, sake, brown sugar, grated ginger, minced garlic, sesame oil, and black pepper. Whisk together until the brown sugar is dissolved. Add the chicken pieces to the marinade, ensuring they are well coated. Cover the bowl with plastic wrap and refrigerate for at least 30 minutes, or preferably for 2-4 hours. The longer the chicken marinates, the more flavorful it will be! I usually aim for at least an hour if I have the time.
- Prepare the Cornstarch Slurry: In a small bowl, whisk together the cornstarch and water until smooth. This slurry will help thicken the teriyaki sauce during cooking. Make sure there are no lumps!
- Cook the Chicken: Heat a large skillet or wok over medium-high heat. Add the marinated chicken to the skillet, reserving the marinade. Cook the chicken, stirring occasionally, until it is browned on all sides. Don’t overcrowd the pan; you may need to cook the chicken in batches to ensure even browning.
- Simmer in Teriyaki Sauce: Pour the reserved marinade into the skillet with the chicken. Bring the mixture to a simmer, then add the cornstarch slurry. Stir constantly until the sauce thickens and becomes glossy, about 1-2 minutes. Be careful not to burn the sauce! Reduce the heat to low and continue to simmer for another 5-10 minutes, or until the chicken is cooked through and the sauce has reduced to your desired consistency. The sauce should be thick enough to coat the chicken nicely.
Cooking the Rice:
- Rinse the Rice: Place the uncooked rice in a fine-mesh sieve and rinse under cold running water until the water runs clear. This removes excess starch and helps prevent the rice from becoming sticky. Rinse thoroughly!
- Combine Rice and Water: In a medium saucepan, combine the rinsed rice and water. Add the butter (if using) for extra flavor.
- Bring to a Boil: Bring the mixture to a boil over medium-high heat. Once boiling, reduce the heat to low, cover the saucepan tightly with a lid, and simmer for 15 minutes. It’s crucial to keep the lid on during this time to allow the rice to steam properly.
- Rest the Rice: After 15 minutes, remove the saucepan from the heat and let it stand, covered, for another 10 minutes. This allows the rice to finish steaming and become perfectly fluffy. Do not lift the lid during this resting period!
- Fluff the Rice: After the resting period, gently fluff the rice with a fork to separate the grains. Be careful not to mash the rice.
Assembling the Baked Teriyaki Chicken Rice:
- Preheat the Oven: Preheat your oven to 350°F (175°C).
- Prepare the Baking Dish: Lightly grease a 9×13 inch baking dish. This will prevent the rice from sticking to the bottom.
- Layer the Rice: Spread the cooked rice evenly over the bottom of the prepared baking dish.
- Top with Chicken: Arrange the cooked teriyaki chicken evenly over the rice. Make sure the chicken is distributed nicely so every bite has a good balance of rice and chicken.
- Bake: Cover the baking dish with aluminum foil and bake for 20 minutes. This will heat the rice and chicken through and allow the flavors to meld together.
- Broil (Optional): For a slightly crispy top, remove the foil and broil for 2-3 minutes, watching carefully to prevent burning. This step is optional, but I find it adds a nice texture.
- Garnish and Serve: Remove the baking dish from the oven and let it cool slightly before serving. Garnish with sliced green onions, toasted sesame seeds, shredded nori seaweed (if using), Japanese mayonnaise, and sriracha (if using). Serve hot and enjoy!
Tips and Variations:
Vegetable Additions:
Feel free to add vegetables to your baked teriyaki chicken rice! Some great options include broccoli florets, sliced carrots, bell peppers, or edamame. You can either stir-fry the vegetables separately and add them to the baking dish before baking, or you can add them directly to the skillet with the chicken during the last few minutes of cooking.
Chicken Alternatives:
If you’re not a fan of chicken thighs, you can use chicken breasts instead. Just be sure to cut them into smaller pieces and adjust the cooking time accordingly. You can also use other proteins like tofu, shrimp, or salmon.
Rice Variations:
While short-grain rice is traditionally used for this dish, you can also use medium-grain rice or even brown rice. Keep in mind that brown rice will require a longer cooking time.
Spice Level:
Adjust the amount of sriracha to your liking to control the spice level of the dish. You can also add a pinch of red pepper flakes to the marinade for an extra kick.
Make-Ahead Instructions:
You can prepare the teriyaki chicken and cook the rice ahead of time. Store them separately in the refrigerator. When you’re ready to bake, simply assemble the dish and bake as directed. This is a great option for busy weeknights!
Storage Instructions:
Store any leftover baked teriyaki chicken rice in an airtight container in the refrigerator for up to 3 days. Reheat in the microwave or oven until heated through.
Serving Suggestions:
This baked teriyaki chicken rice is a complete meal on its own, but you can also serve it with a side of miso soup or a simple salad.
Gluten-Free Option:
To make this dish gluten-free, use tamari instead of soy sauce. Tamari is a gluten-free soy sauce alternative.
Sweetness Adjustment:
If you prefer a less sweet teriyaki sauce, reduce the amount of brown sugar. You can also use honey or maple syrup as a substitute for brown sugar.
Conclusion:
This Baked Teriyaki Chicken Rice is more than just a meal; it’s a flavor explosion waiting to happen in your kitchen! I truly believe this recipe is a must-try for anyone looking for a simple, satisfying, and incredibly delicious dinner option. The combination of tender, juicy chicken infused with that sweet and savory teriyaki glaze, nestled amongst perfectly cooked rice, is simply irresistible. It’s the kind of dish that will have everyone asking for seconds, and trust me, you’ll be happy to oblige.
What makes this recipe so special is its versatility. It’s perfect for a busy weeknight when you need a quick and easy meal, but it’s also impressive enough to serve to guests. The beauty of baking everything together in one dish is that it minimizes cleanup and maximizes flavor. The rice absorbs all those delicious teriyaki juices, creating a symphony of taste and texture in every bite.
But don’t just take my word for it! I highly encourage you to give this Baked Teriyaki Chicken Rice a try. I’m confident that you’ll be amazed at how easy it is to prepare and how incredibly flavorful it turns out.
Now, let’s talk about serving suggestions and variations. While this dish is fantastic on its own, there are plenty of ways to customize it to your liking. For a complete meal, consider serving it with a side of steamed broccoli, edamame, or a crisp cucumber salad. A sprinkle of sesame seeds and chopped green onions adds a touch of elegance and freshness.
If you’re feeling adventurous, you can easily adapt this recipe to suit your dietary needs or preferences. For a vegetarian option, substitute the chicken with tofu or tempeh. Simply press the tofu to remove excess water, cube it, and marinate it in the teriyaki sauce before baking. You can also add other vegetables like bell peppers, carrots, or mushrooms to the rice for extra nutrients and flavor.
For a spicier kick, add a pinch of red pepper flakes to the teriyaki sauce or drizzle some sriracha over the finished dish. If you prefer a sweeter flavor, you can add a tablespoon of honey or maple syrup to the sauce. The possibilities are endless!
Another great variation is to use different types of rice. While I typically use long-grain white rice, you can also use brown rice, jasmine rice, or even quinoa. Just be sure to adjust the cooking time and liquid accordingly. Brown rice, for example, will require more liquid and a longer cooking time than white rice.
I’m so excited for you to try this recipe and experience the magic of Baked Teriyaki Chicken Rice for yourself. It’s a dish that I make regularly in my own kitchen, and it’s always a crowd-pleaser.
Once you’ve made it, I would absolutely love to hear about your experience! Did you make any modifications? What did you serve it with? What did your family and friends think? Please feel free to share your thoughts and photos in the comments below. Your feedback is invaluable and helps me to continue creating recipes that you’ll love.
So, what are you waiting for? Gather your ingredients, preheat your oven, and get ready to embark on a culinary adventure. I promise you won’t be disappointed. Happy cooking! And remember, the best meals are those shared with loved ones. Enjoy!
Baked Teriyaki Chicken Rice: The Ultimate One-Pan Recipe
Delicious and easy baked teriyaki chicken rice! Tender chicken thighs in a sweet and savory teriyaki sauce, baked with fluffy rice and your favorite toppings. A complete and satisfying meal.
Ingredients
- 2 lbs boneless, skinless chicken thighs, cut into 1-inch pieces
- 1/2 cup soy sauce
- 1/4 cup mirin (sweet rice wine)
- 2 tablespoons sake (rice wine)
- 2 tablespoons brown sugar, packed
- 1 tablespoon grated fresh ginger
- 2 cloves garlic, minced
- 1 teaspoon sesame oil
- 1/4 teaspoon ground black pepper
- 1 tablespoon cornstarch
- 1 tablespoon water
- 2 cups uncooked short-grain rice (sushi rice)
- 2 1/2 cups water
- 1 tablespoon butter (optional, for added richness)
- 2 green onions, thinly sliced
- 1/4 cup sesame seeds, toasted
- Shredded nori seaweed (optional)
- Japanese mayonnaise (optional)
- Sriracha (optional, for spice)
Instructions
- Marinate the Chicken: In a large bowl, combine the soy sauce, mirin, sake, brown sugar, grated ginger, minced garlic, sesame oil, and black pepper. Whisk together until the brown sugar is dissolved. Add the chicken pieces to the marinade, ensuring they are well coated. Cover the bowl with plastic wrap and refrigerate for at least 30 minutes, or preferably for 2-4 hours.
- Prepare the Cornstarch Slurry: In a small bowl, whisk together the cornstarch and water until smooth.
- Cook the Chicken: Heat a large skillet or wok over medium-high heat. Add the marinated chicken to the skillet, reserving the marinade. Cook the chicken, stirring occasionally, until it is browned on all sides. Don’t overcrowd the pan; you may need to cook the chicken in batches to ensure even browning.
- Simmer in Teriyaki Sauce: Pour the reserved marinade into the skillet with the chicken. Bring the mixture to a simmer, then add the cornstarch slurry. Stir constantly until the sauce thickens and becomes glossy, about 1-2 minutes. Reduce the heat to low and continue to simmer for another 5-10 minutes, or until the chicken is cooked through and the sauce has reduced to your desired consistency.
- Rinse the Rice: Place the uncooked rice in a fine-mesh sieve and rinse under cold running water until the water runs clear.
- Combine Rice and Water: In a medium saucepan, combine the rinsed rice and water. Add the butter (if using) for extra flavor.
- Bring to a Boil: Bring the mixture to a boil over medium-high heat. Once boiling, reduce the heat to low, cover the saucepan tightly with a lid, and simmer for 15 minutes.
- Rest the Rice: After 15 minutes, remove the saucepan from the heat and let it stand, covered, for another 10 minutes.
- Fluff the Rice: After the resting period, gently fluff the rice with a fork to separate the grains.
- Preheat the Oven: Preheat your oven to 350°F (175°C).
- Prepare the Baking Dish: Lightly grease a 9×13 inch baking dish.
- Layer the Rice: Spread the cooked rice evenly over the bottom of the prepared baking dish.
- Top with Chicken: Arrange the cooked teriyaki chicken evenly over the rice.
- Bake: Cover the baking dish with aluminum foil and bake for 20 minutes.
- Broil (Optional): For a slightly crispy top, remove the foil and broil for 2-3 minutes, watching carefully to prevent burning.
- Garnish and Serve: Remove the baking dish from the oven and let it cool slightly before serving. Garnish with sliced green onions, toasted sesame seeds, shredded nori seaweed (if using), Japanese mayonnaise, and sriracha (if using). Serve hot.
Notes
- Vegetable Additions: Feel free to add vegetables like broccoli, carrots, bell peppers, or edamame.
- Chicken Alternatives: Use chicken breasts (cut into smaller pieces), tofu, shrimp, or salmon instead of chicken thighs.
- Rice Variations: Use medium-grain rice or brown rice (adjust cooking time for brown rice).
- Spice Level: Adjust the amount of sriracha or add red pepper flakes to the marinade.
- Make-Ahead Instructions: Prepare the teriyaki chicken and cook the rice ahead of time. Store separately and assemble before baking.
- Storage Instructions: Store leftovers in an airtight container in the refrigerator for up to 3 days. Reheat in the microwave or oven.
- Serving Suggestions: Serve with miso soup or a simple salad.
- Gluten-Free Option: Use tamari instead of soy sauce.
- Sweetness Adjustment: Reduce the amount of brown sugar or use honey or maple syrup.

Leave a Comment