
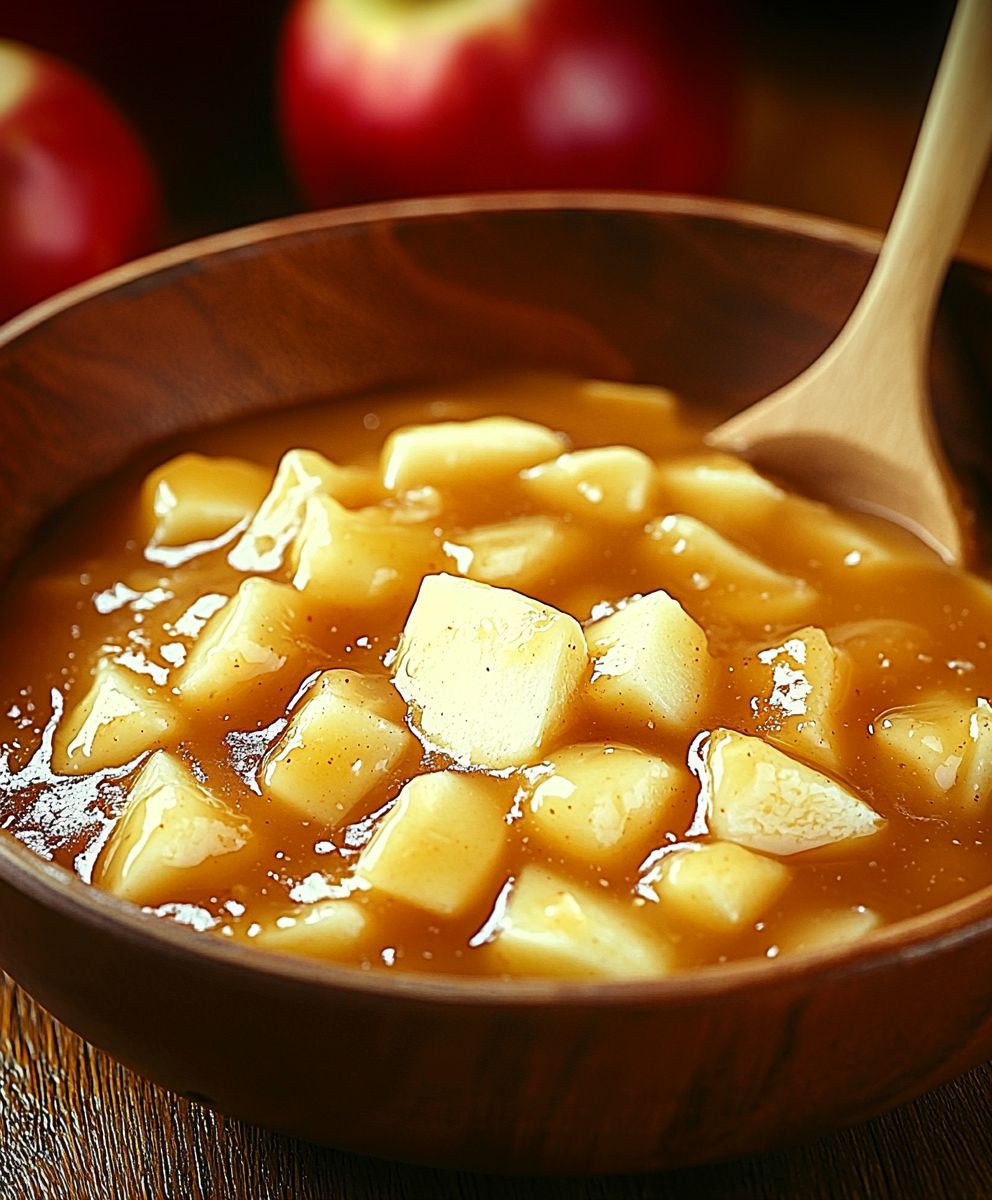
Apple pie filling, the heart and soul of a classic American dessert, is surprisingly easy to make from scratch! Forget the canned stuff once you taste the vibrant, fresh flavor of homemade, you’ll never go back. Imagine biting into a warm slice of apple pie, the sweet and tart filling bursting with cinnamon-spiced goodness. That’s the magic we’re about to create together.
Apple pie itself has a rich history, evolving from early European pies filled with meats and savory ingredients. Over time, as apples became more readily available in America, the sweet version we know and love today took root. It’s become a symbol of home, comfort, and tradition, often gracing holiday tables and family gatherings.
But what makes apple pie filling so irresistible? It’s the perfect balance of textures tender, slightly softened apples nestled in a luscious, subtly thickened sauce. The combination of sweet and tart apples, warmed by cinnamon, nutmeg, and a hint of lemon, is simply divine. Plus, making your own allows you to control the sweetness and spice levels, tailoring it perfectly to your taste. And let’s be honest, the aroma of apples and cinnamon simmering on the stove is pure bliss! So, let’s get started and create the perfect apple pie filling for your next baking adventure.

Ingredients:
- 6-8 medium apples (Granny Smith, Honeycrisp, or a mix), peeled, cored, and sliced
- 1/2 cup granulated sugar
- 1/4 cup packed light brown sugar
- 1/4 cup all-purpose flour
- 2 tablespoons lemon juice
- 1 teaspoon ground cinnamon
- 1/4 teaspoon ground nutmeg
- 1/4 teaspoon ground allspice
- 2 tablespoons unsalted butter, cut into small pieces
- 1 box (14.1 ounces) refrigerated pie crusts (or homemade pie crust)
- 1 large egg, beaten (for egg wash)
- 1 tablespoon granulated sugar (for sprinkling)
Preparing the Apple Filling:
- In a large bowl, combine the sliced apples, granulated sugar, brown sugar, flour, lemon juice, cinnamon, nutmeg, and allspice. Make sure everything is evenly distributed. I like to use my hands to gently toss the apples, ensuring they’re well coated with the sugar and spice mixture. This step is crucial because the flour helps to thicken the filling as it bakes, preventing a watery pie. The lemon juice not only adds a touch of brightness but also helps to prevent the apples from browning.
- Let the apple mixture sit for about 15-20 minutes. This allows the sugars to draw out some of the apple’s natural juices, creating a delicious syrup that will further enhance the flavor and texture of the filling. You’ll notice a pool of liquid forming at the bottom of the bowl that’s exactly what we want! Don’t drain it; it’s liquid gold!
- While the apples are macerating, preheat your oven to 400°F (200°C). This high initial temperature helps to set the crust quickly, preventing it from becoming soggy. Make sure your oven rack is positioned in the center of the oven for even baking.
Assembling the Pie:
- On a lightly floured surface, unroll one of the pie crusts. Gently roll it out a bit larger, about 12 inches in diameter, to ensure it fits comfortably in your pie dish. I usually use a 9-inch pie dish, but an 8-inch dish will also work, just adjust the amount of filling accordingly.
- Carefully transfer the crust to your pie dish. Press it gently into the bottom and up the sides of the dish. Trim any excess crust hanging over the edge with a knife or kitchen shears, leaving about a 1-inch overhang.
- Crimp the edges of the crust using your fingers or a fork. This not only makes the pie look pretty but also helps to seal the edges and prevent the filling from leaking out during baking. There are many different crimping techniques you can try get creative!
- Pour the apple filling into the prepared pie crust. Distribute the apples evenly and drizzle any accumulated juices over the top. This ensures that every bite is packed with flavor.
- Dot the top of the apple filling with the small pieces of butter. This adds richness and helps to create a beautiful golden-brown crust. The butter melts during baking, creating pockets of deliciousness throughout the filling.
- Unroll the second pie crust on a lightly floured surface. You have a few options for the top crust:
- Full Crust: Roll out the crust to a 12-inch diameter and carefully place it over the apple filling. Trim any excess crust, leaving a 1-inch overhang. Crimp the edges to seal the top and bottom crusts together. Cut several slits in the top crust to allow steam to escape during baking. This prevents the crust from puffing up too much and potentially cracking.
- Lattice Crust: Cut the crust into strips using a pizza cutter or knife. Arrange the strips in a lattice pattern over the apple filling. Trim the ends of the strips and crimp the edges to seal them to the bottom crust. A lattice crust not only looks beautiful but also allows for better ventilation, resulting in a crispier crust.
- Streusel Topping: If you’re not a fan of a top crust, you can make a streusel topping instead. Combine flour, butter, sugar, and spices in a bowl and crumble it over the apple filling. This adds a delicious crunchy texture and a sweet, buttery flavor.
- In a small bowl, whisk together the beaten egg and a tablespoon of water to create an egg wash. Brush the egg wash evenly over the top crust (or lattice strips). This will give the crust a beautiful golden-brown color and a glossy sheen.
- Sprinkle the top crust with the remaining tablespoon of granulated sugar. This adds a touch of sweetness and helps to create a caramelized crust.
Baking the Pie:
- Place the pie on a baking sheet lined with parchment paper. This will catch any drips and prevent the bottom crust from burning.
- Bake in the preheated oven for 15 minutes at 400°F (200°C). This initial high temperature helps to set the crust quickly.
- Reduce the oven temperature to 375°F (190°C) and continue baking for another 45-50 minutes, or until the crust is golden brown and the filling is bubbling. If the crust starts to brown too quickly, you can tent it with aluminum foil to prevent it from burning.
- To check if the pie is done, insert a knife into the center of the filling. The apples should be tender and the juices should be thick and bubbly.
- Remove the pie from the oven and let it cool completely on a wire rack before slicing and serving. This is crucial because the filling will continue to thicken as it cools. If you cut into the pie while it’s still hot, the filling will be runny. I know it’s tempting, but trust me, it’s worth the wait!
Tips and Variations:
- Apple Variety: Experiment with different apple varieties to find your favorite combination. Granny Smith apples are tart and hold their shape well during baking, while Honeycrisp apples are sweet and crisp. A mix of both provides a perfect balance of flavor and texture.
- Spice it Up: Add a pinch of ground cloves or cardamom to the apple filling for a more complex flavor profile.
- Nuts: Sprinkle chopped walnuts or pecans over the apple filling for added crunch and flavor.
- Caramel Sauce: Drizzle caramel sauce over the baked pie for an extra decadent treat.
- Ice Cream: Serve the pie warm with a scoop of vanilla ice cream for the ultimate comfort food experience.
- Homemade Crust: While store-bought pie crusts are convenient, homemade pie crust is always the best. There are tons of recipes online, so find one that you like and give it a try!
- Blind Baking: If you’re concerned about the bottom crust becoming soggy, you can blind bake it before adding the filling. To do this, line the pie crust with parchment paper and fill it with pie weights or dried beans. Bake for 15 minutes at 375°F (190°C), then remove the parchment paper and weights and bake for another 5-10 minutes, or until the crust is lightly golden brown.
- Freezing: Apple pie can be frozen before or after baking. To freeze before baking, assemble the pie as directed, but don’t brush it with egg wash or sprinkle it with sugar. Wrap the pie tightly in plastic wrap and then in aluminum foil. Freeze for up to 3 months. When ready to bake, thaw the pie overnight in the refrigerator, then brush it with egg wash, sprinkle it with sugar, and bake as directed. To freeze after baking, let the pie cool completely, then wrap it tightly in plastic wrap and then in aluminum foil. Freeze for up to 3 months. When ready to serve, thaw the pie overnight in the refrigerator, then reheat it in a 350°F (175°C) oven for 15-20 minutes, or until warmed through.
Enjoy your delicious homemade apple pie!
Conclusion:
And there you have it! This homemade apple pie filling recipe is truly a game-changer, and I genuinely believe it’s a must-try for anyone who loves the comforting taste of apple pie. Forget the canned stuff once you experience the vibrant, fresh flavor of this filling, you’ll never go back. The combination of perfectly spiced apples, the subtle sweetness, and that hint of lemon zest creates a symphony of flavors that will tantalize your taste buds. It’s the kind of recipe that makes your kitchen smell amazing and fills your home with warmth and happiness. But the beauty of this recipe doesn’t stop at its incredible taste. It’s also incredibly versatile! While it’s obviously perfect for a classic apple pie, don’t limit yourself. Imagine using it to make delicious apple turnovers, hand pies, or even apple crumble bars. You could even spoon it over pancakes or waffles for a decadent breakfast treat. For a delightful twist, try adding a handful of cranberries or chopped walnuts to the filling for extra texture and flavor. Or, if you’re feeling adventurous, a splash of bourbon or rum can add a sophisticated touch. Here are a few serving suggestions to get you started:Serving Suggestions:
* Classic Apple Pie: Bake it in your favorite pie crust for the ultimate comfort dessert. Serve warm with a scoop of vanilla ice cream or a dollop of whipped cream. * Apple Turnovers: Wrap the filling in puff pastry and bake until golden brown for a quick and easy treat. * Apple Crumble Bars: Spread the filling over a shortbread crust and top with a buttery crumble topping. * Apple Pancakes or Waffles: Spoon warm filling over your favorite breakfast staples for a special occasion breakfast. * Individual Apple Crisps: Divide the filling into ramekins, top with a crumble topping, and bake for individual desserts. I’ve poured my heart into perfecting this recipe, and I’m confident that you’ll love it as much as I do. It’s a simple recipe, but the results are truly extraordinary. The aroma alone is enough to make your mouth water, and the taste is simply divine. It’s the perfect way to celebrate the flavors of fall, or to bring a little bit of sunshine into your kitchen any time of year. So, what are you waiting for? Gather your ingredients, put on your apron, and get ready to create some magic in the kitchen. I promise you won’t be disappointed. And most importantly, don’t be afraid to experiment and make it your own! Add your favorite spices, adjust the sweetness to your liking, and have fun with it. I’m so excited for you to try this recipe and experience the joy of homemade apple pie filling. Once you do, please come back and share your experience in the comments below! I’d love to hear how it turned out, what variations you tried, and any tips or tricks you discovered along the way. Your feedback is invaluable, and it helps me to continue creating and sharing recipes that you’ll love. Happy baking! I can’t wait to hear all about your delicious creations. Let me know if you have any questions, and I’ll be happy to help. Enjoy! Print
Apple Pie Filling: The Ultimate Guide to Homemade Perfection
- Total Time: 90 minutes
- Yield: 8 servings 1x
Description
Classic homemade apple pie featuring a flaky crust and a sweet, spiced apple filling. Perfect for any occasion!
Ingredients
- 6–8 medium apples (Granny Smith, Honeycrisp, or a mix), peeled, cored, and sliced
- 1/2 cup granulated sugar
- 1/4 cup packed light brown sugar
- 1/4 cup all-purpose flour
- 2 tablespoons lemon juice
- 1 teaspoon ground cinnamon
- 1/4 teaspoon ground nutmeg
- 1/4 teaspoon ground allspice
- 2 tablespoons unsalted butter, cut into small pieces
- 1 box (14.1 ounces) refrigerated pie crusts (or homemade pie crust)
- 1 large egg, beaten (for egg wash)
- 1 tablespoon granulated sugar (for sprinkling)
Instructions
- Prepare the Apple Filling: In a large bowl, combine the sliced apples, granulated sugar, brown sugar, flour, lemon juice, cinnamon, nutmeg, and allspice. Toss gently to coat. Let the mixture sit for 15-20 minutes.
- Preheat Oven: Preheat your oven to 400°F (200°C).
- Assemble the Pie: On a lightly floured surface, unroll one pie crust and roll it out to about 12 inches in diameter. Transfer the crust to a 9-inch pie dish, pressing it into the bottom and up the sides. Trim any excess crust, leaving a 1-inch overhang. Crimp the edges.
- Fill the Pie: Pour the apple filling into the prepared crust, distributing the apples evenly and drizzling any accumulated juices over the top. Dot the top of the filling with the small pieces of butter.
- Add Top Crust (or Topping):
- Full Crust: Roll out the second crust, place it over the filling, trim, and crimp. Cut slits to vent.
- Lattice Crust: Cut the crust into strips and arrange in a lattice pattern. Trim and crimp.
- Streusel Topping: (Not detailed in the original input, but if you use this, you’ll need to provide the streusel recipe).
- Egg Wash and Sugar: In a small bowl, whisk together the beaten egg and a tablespoon of water. Brush the egg wash evenly over the top crust (or lattice strips). Sprinkle with the remaining tablespoon of granulated sugar.
- Bake: Place the pie on a baking sheet lined with parchment paper. Bake for 15 minutes at 400°F (200°C). Reduce the oven temperature to 375°F (190°C) and continue baking for another 45-50 minutes, or until the crust is golden brown and the filling is bubbling. Tent with foil if the crust browns too quickly.
- Cool: Remove the pie from the oven and let it cool completely on a wire rack before slicing and serving.
Notes
- Apple Variety: Use a mix of Granny Smith and Honeycrisp for a balance of tartness and sweetness.
- Spice it Up: Add a pinch of ground cloves or cardamom to the apple filling.
- Nuts: Sprinkle chopped walnuts or pecans over the apple filling.
- Caramel Sauce: Drizzle caramel sauce over the baked pie.
- Ice Cream: Serve warm with vanilla ice cream.
- Homemade Crust: Homemade pie crust is always best!
- Blind Baking: Blind bake the bottom crust if concerned about sogginess.
- Freezing: Can be frozen before or after baking. See detailed instructions in the original text.
- Prep Time: 30 minutes
- Cook Time: 60 minutes


Leave a Comment