
Almond Joy Bars, those iconic candy bars with their perfect blend of coconut, almonds, and chocolate, have always held a special place in our hearts. But what if I told you that you could recreate that nostalgic flavor in your own kitchen, and even make it better? Forget the store-bought version we’re diving headfirst into a homemade adventure that will tantalize your taste buds and leave you craving more!
The original Almond Joy, first introduced in 1946 by the Peter Paul Candy Manufacturing Company, quickly became a beloved treat. Its unique combination of textures and flavors was a hit, offering a tropical escape in every bite. The contrasting sweetness of the coconut, the satisfying crunch of the almonds, and the rich, smooth chocolate created a symphony of sensations that people couldn’t resist.
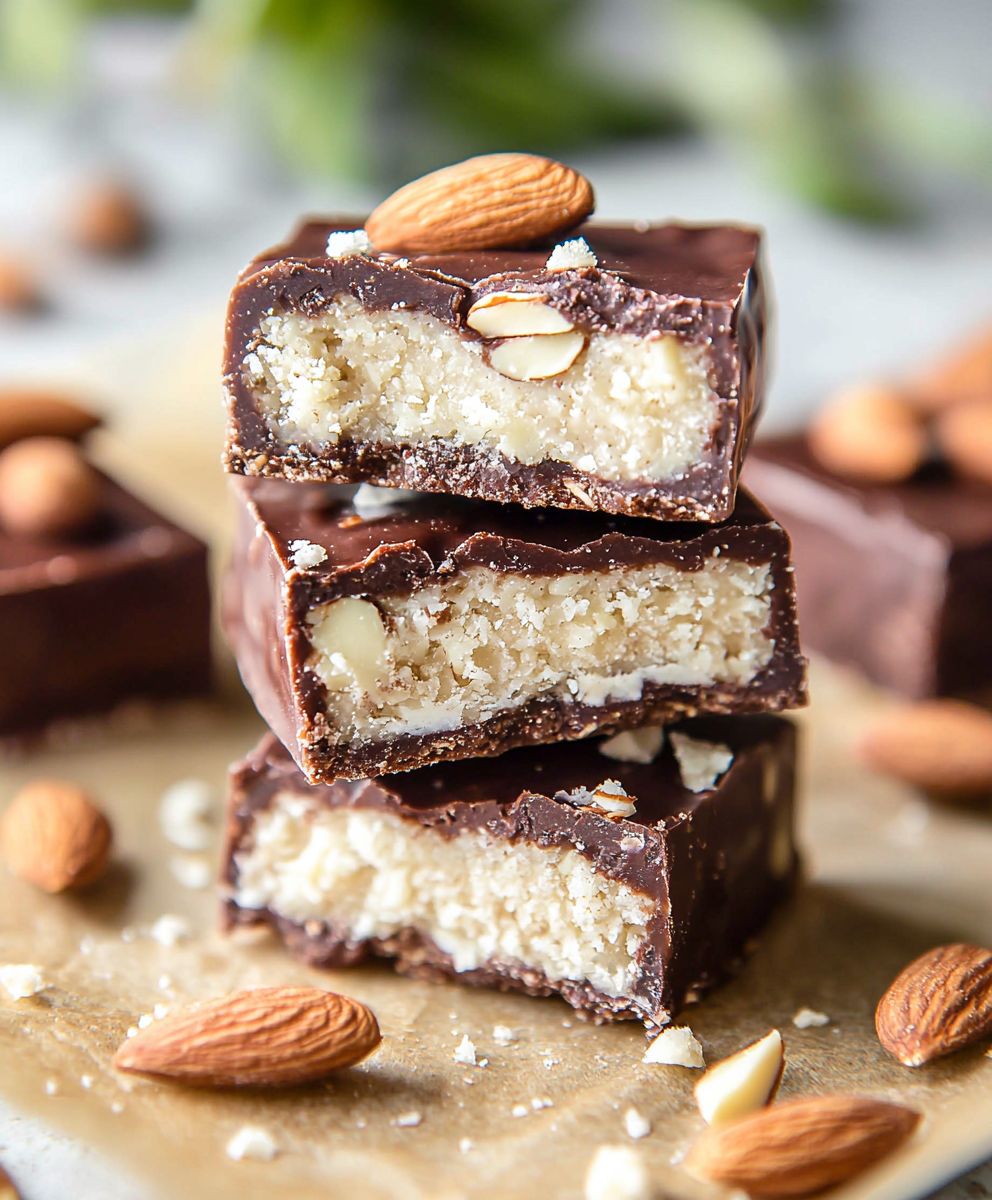
What makes Almond Joy Bars so irresistible? It’s the delightful interplay of textures and tastes. The chewy, moist coconut filling provides a soft and sweet base, while the crunchy almonds add a satisfying bite. And, of course, the decadent chocolate coating brings it all together in perfect harmony. Plus, this homemade version allows you to control the ingredients, ensuring a fresh and flavorful experience. Get ready to embark on a sweet journey as we unveil the secrets to creating the ultimate homemade Almond Joy Bars!

Ingredients:
- For the Coconut Filling:
- 4 cups sweetened shredded coconut
- 1 (14 ounce) can sweetened condensed milk
- 1/4 cup (1/2 stick) unsalted butter, melted
- 1 teaspoon vanilla extract
- 1/4 teaspoon almond extract
- Pinch of salt
- For the Almonds:
- 1 1/2 cups whole almonds, blanched
- For the Chocolate Coating:
- 12 ounces semi-sweet chocolate chips
- 1 tablespoon coconut oil (or vegetable shortening)
Preparing the Coconut Filling:
Alright, let’s get started with the heart of our Almond Joy bars the coconut filling! This is where the magic happens, and it’s surprisingly easy to whip up.
- Combine the Ingredients: In a large bowl, grab your 4 cups of sweetened shredded coconut. Make sure it’s the sweetened kind it adds just the right amount of moisture and sweetness. Add in the entire can of sweetened condensed milk. Don’t skimp! This is what binds everything together and gives it that creamy texture. Next, pour in the melted butter. The butter adds richness and helps keep the filling moist. Finally, stir in the vanilla extract, almond extract, and a pinch of salt. The vanilla enhances the overall flavor, while the almond extract gives it that signature Almond Joy taste. The salt balances out the sweetness.
- Mix Well: Now, using a sturdy spoon or spatula, mix all the ingredients together until they are thoroughly combined. You want to make sure the coconut is evenly coated with the sweetened condensed milk and butter mixture. Don’t overmix, but ensure there are no dry pockets of coconut.
- Chill the Mixture: Cover the bowl with plastic wrap and pop it into the refrigerator for at least 30 minutes, or even better, an hour. This chilling time is crucial! It allows the coconut mixture to firm up, making it easier to shape into bars later on. Trust me, you’ll thank me for this step.
Preparing the Almonds:
While the coconut filling is chilling, let’s get the almonds ready. We want them to be perfectly placed on top of our bars, adding that satisfying crunch and nutty flavor.
- Blanch the Almonds (if needed): If your almonds aren’t already blanched (skin removed), you can easily do it yourself. Bring a pot of water to a boil. Add the almonds and let them boil for about 1 minute. Drain the almonds and immediately rinse them with cold water. The skins should now easily slip off. Just pinch the almonds, and the skins will pop right off. Pat them dry with a paper towel.
- Toast the Almonds (optional): For an even deeper, nuttier flavor, you can toast the almonds. Spread them in a single layer on a baking sheet and bake in a preheated oven at 350°F (175°C) for about 5-7 minutes, or until they are lightly golden and fragrant. Keep a close eye on them, as they can burn quickly. Let them cool completely before using.
- Set Aside: Once your almonds are blanched and toasted (if you choose to toast them), set them aside. We’ll be using them later to top our bars.
Shaping the Bars:
Now comes the fun part shaping our chilled coconut filling into bars! This is where we start to see our Almond Joy bars taking form.
- Prepare Your Workspace: Line a 9×13 inch baking pan with parchment paper. This will prevent the bars from sticking and make it easy to lift them out later. Make sure the parchment paper overhangs the sides of the pan this will act as handles.
- Scoop and Shape: Take the chilled coconut mixture out of the refrigerator. Using a spoon or ice cream scoop, scoop out portions of the mixture and place them in the prepared baking pan. You can make them any size you like, but I usually aim for bars that are about 2-3 inches long and 1 inch wide.
- Press and Form: Gently press the coconut mixture into the pan, shaping it into rectangular bars. You can use your fingers or the back of a spoon to smooth out the tops and sides. Try to make them as uniform as possible for a professional look.
- Add the Almonds: Now, take your prepared almonds and press 2-3 almonds into the top of each bar. Make sure they are firmly embedded in the coconut filling.
- Chill Again: Once all the bars are shaped and topped with almonds, place the pan back into the refrigerator for another 30 minutes. This will help them firm up even more before we dip them in chocolate.
Melting the Chocolate:
Time for the grand finale the chocolate coating! This is what gives our Almond Joy bars that irresistible, decadent finish.
- Combine Chocolate and Coconut Oil: In a heat-safe bowl, combine the semi-sweet chocolate chips and coconut oil (or vegetable shortening). The coconut oil helps to thin out the chocolate, making it easier to dip the bars and giving it a nice, glossy finish.
- Melt the Chocolate: There are two ways to melt the chocolate:
- Microwave Method: Microwave the chocolate and coconut oil in 30-second intervals, stirring in between each interval, until the chocolate is completely melted and smooth. Be careful not to overheat the chocolate, as it can burn.
- Double Boiler Method: Place the bowl over a saucepan of simmering water, making sure the bottom of the bowl doesn’t touch the water. Stir constantly until the chocolate is completely melted and smooth.
- Stir Until Smooth: Once the chocolate is melted, stir it until it is completely smooth and glossy. If it seems too thick, you can add a little more coconut oil, a teaspoon at a time, until it reaches the desired consistency.
Dipping and Setting:
Almost there! Now we’re going to dip our chilled coconut bars into the melted chocolate and let them set. This is the final step before we can finally enjoy our homemade Almond Joy bars.
- Prepare for Dipping: Line a baking sheet with parchment paper or wax paper. This is where we’ll place the dipped bars to set.
- Dip the Bars: Take the chilled coconut bars out of the refrigerator. One at a time, carefully dip each bar into the melted chocolate, making sure it is completely coated. You can use a fork or dipping tools to help you.
- Remove Excess Chocolate: After dipping, gently lift the bar out of the chocolate and tap it lightly to remove any excess chocolate. You can also use a fork to scrape off any excess chocolate from the bottom of the bar.
- Place on Baking Sheet: Place the dipped bar on the prepared baking sheet.
- Repeat: Repeat the dipping process with the remaining bars.
- Chill to Set: Once all the bars are dipped, place the baking sheet into the refrigerator for at least 30 minutes, or until the chocolate is completely set. This will help the chocolate harden and prevent it from melting when you handle the bars.
Cutting and Serving:
Congratulations! You’ve made your own homemade Almond Joy bars. Now it’s time to cut them and enjoy the fruits of your labor.
- Remove from Refrigerator: Take the baking sheet out of the refrigerator.
- Cut into Bars: Using a sharp knife, cut the bars into individual pieces. You can cut them into the same size you shaped them earlier, or you can cut them into smaller pieces if you prefer.
- Serve and Enjoy: Serve the Almond Joy bars immediately, or store them in an airtight container in the refrigerator for up to a week. They’re perfect for a sweet treat, a party snack, or a homemade gift. Enjoy!
Conclusion:
And there you have it! These homemade Almond Joy Bars are truly a must-try for anyone who loves that classic coconut and chocolate combination. Forget the store-bought version; this recipe delivers a fresher, more intense flavor that will absolutely blow you away. The chewy coconut filling, the satisfying crunch of the almonds, and the rich, decadent chocolate coating all come together in perfect harmony. Trust me, once you make these, you’ll never go back to the pre-packaged kind. But why are these bars so special? It’s the quality of the ingredients, of course! Using real coconut flakes, high-quality chocolate, and fresh almonds makes all the difference. Plus, you have complete control over the sweetness level, so you can tailor them to your exact preferences. And let’s be honest, there’s something incredibly satisfying about creating something delicious from scratch. Beyond the incredible taste, these Almond Joy Bars are surprisingly easy to make. The recipe is straightforward and doesn’t require any fancy equipment or complicated techniques. Even if you’re a beginner baker, you can definitely pull these off. And the best part? They’re perfect for any occasion! Bring them to a potluck, pack them in a lunchbox, or simply enjoy them as an afternoon treat. They’re guaranteed to be a crowd-pleaser. Looking for serving suggestions or variations? I’ve got you covered! For a truly decadent experience, try drizzling the finished bars with melted white chocolate. The contrast of the dark and white chocolate is not only visually appealing but also adds another layer of flavor. You could also experiment with different types of nuts. Pecans or macadamia nuts would be delicious substitutes for the almonds. Or, if you’re feeling adventurous, try adding a pinch of sea salt to the chocolate coating for a sweet and salty twist. Another fun variation is to make mini Almond Joy Bars. Simply cut the bars into smaller squares for bite-sized treats. These are perfect for parties or for portion control (although, let’s be real, it’s hard to stop at just one!). You could also dip the bars in melted chocolate and then roll them in shredded coconut for an extra coconutty experience. The possibilities are endless! I truly believe that this recipe is a winner. It’s simple, delicious, and customizable. So, what are you waiting for? Gather your ingredients, preheat your oven, and get ready to make the best Almond Joy Bars you’ve ever tasted. I’m confident that you’ll love them as much as I do. Now, it’s your turn! I’m so excited for you to try this recipe and experience the joy of homemade Almond Joy Bars. Once you’ve made them, please come back and share your experience in the comments below. I’d love to hear what you think, what variations you tried, and any tips or tricks you discovered along the way. Happy baking! Print
Almond Joy Bars: The Ultimate Homemade Recipe
- Total Time: 100 minutes
- Yield: 24 bars 1x
Description
Homemade Almond Joy bars with sweet coconut filling, crunchy almonds, and rich chocolate coating.
Ingredients
- 4 cups sweetened shredded coconut
- 1 (14 ounce) can sweetened condensed milk
- 1/4 cup (1/2 stick) unsalted butter, melted
- 1 teaspoon vanilla extract
- 1/4 teaspoon almond extract
- Pinch of salt
- 1 1/2 cups whole almonds, blanched
- 12 ounces semi-sweet chocolate chips
- 1 tablespoon coconut oil (or vegetable shortening)
Instructions
- Prepare the Coconut Filling: In a large bowl, combine shredded coconut, sweetened condensed milk, melted butter, vanilla extract, almond extract, and salt. Mix well until thoroughly combined. Cover and chill in the refrigerator for at least 30 minutes (or up to an hour).
- Prepare the Almonds: If almonds are not blanched, blanch them by boiling for 1 minute, then rinsing with cold water and removing skins. Toast almonds (optional) at 350°F (175°C) for 5-7 minutes until lightly golden and fragrant. Let cool.
- Shape the Bars: Line a 9×13 inch baking pan with parchment paper. Scoop chilled coconut mixture into the pan and shape into rectangular bars. Press 2-3 almonds into the top of each bar. Chill again for 30 minutes.
- Melt the Chocolate: In a heat-safe bowl, combine chocolate chips and coconut oil. Melt in the microwave in 30-second intervals, stirring in between, or melt using a double boiler method. Stir until smooth.
- Dip and Set: Line a baking sheet with parchment paper. Dip each chilled coconut bar into the melted chocolate, ensuring it’s fully coated. Remove excess chocolate and place on the prepared baking sheet. Chill in the refrigerator for at least 30 minutes, or until the chocolate is completely set.
- Cut and Serve: Remove from refrigerator. Cut into individual bars. Serve immediately or store in an airtight container in the refrigerator for up to a week.
Notes
- Chilling the coconut filling is crucial for easy shaping.
- Toasting the almonds enhances their flavor.
- Coconut oil in the chocolate coating helps to thin the chocolate and gives it a glossy finish.
- Store in the refrigerator to prevent melting.
- Prep Time: 30 minutes
- Cook Time: 10 minutes


Leave a Comment