
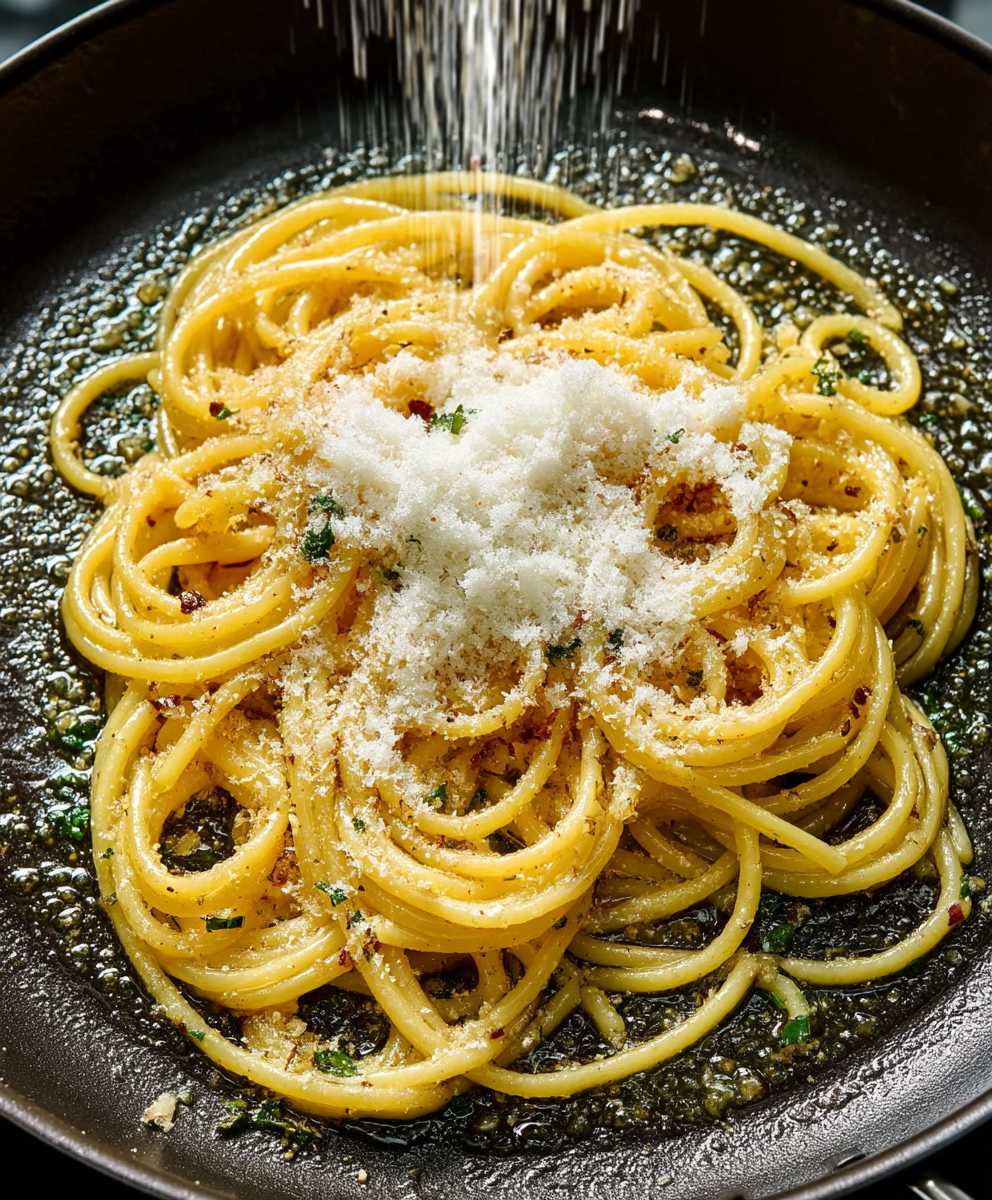
Aglio e Olio Pasta: Simple, satisfying, and ready in under 20 minutes need I say more? This isn’t just a recipe; it’s a culinary lifeline for busy weeknights and a testament to the magic of Italian minimalism. Imagine twirling perfectly cooked spaghetti, glistening with olive oil, infused with the pungent bite of garlic, and a subtle kick of red pepper flakes. That, my friends, is the essence of Aglio e Olio Pasta.
This dish, whose name literally translates to “garlic and oil,” hails from Naples, Italy, and represents the heart of cucina povera “poor cooking.” It was born out of necessity, utilizing readily available and inexpensive ingredients to create a flavorful and nourishing meal. But don’t let its humble origins fool you; Aglio e Olio is a dish that transcends social classes and continues to be enjoyed worldwide.
So, why do people adore this seemingly simple pasta? It’s the perfect balance of flavors and textures. The garlic, when cooked properly, becomes sweet and nutty, complementing the richness of the olive oil. The red pepper flakes add a delightful warmth, while the parsley provides a fresh, herbaceous note. And let’s not forget the al dente pasta, providing the perfect canvas for all these flavors to meld together. Plus, its quick preparation time makes it a winner for anyone craving a delicious and effortless meal. Let’s get cooking!

Ingredients:
- 1 pound spaghetti
- ½ cup extra virgin olive oil, plus more for drizzling
- 6-8 cloves garlic, thinly sliced
- ½ teaspoon red pepper flakes, or more to taste
- ½ teaspoon salt, plus more to taste
- ¼ teaspoon black pepper, plus more to taste
- ½ cup reserved pasta water
- ¼ cup chopped fresh parsley, plus more for garnish
- Grated Parmesan cheese, for serving (optional)
Preparing the Garlic and Oil
Okay, let’s get started! The key to amazing Aglio e Olio is all in the garlic and oil. We want to infuse the oil with that garlicky goodness without burning the garlic. Trust me, burnt garlic is NOT what we’re going for.
- Thinly slice the garlic: This is crucial! We want the garlic to release its flavor into the oil, and thin slices are the way to go. Aim for slices that are about 1/8 inch thick. If they’re too thick, they won’t cook evenly, and if they’re too thin, they’ll burn easily.
- Heat the olive oil: In a large skillet (large enough to eventually hold the cooked pasta), pour in the ½ cup of extra virgin olive oil. Place the skillet over medium-low heat. This is important! We want a gentle heat to slowly infuse the oil.
- Add the garlic and red pepper flakes: Once the oil is warm (but not smoking!), add the sliced garlic and red pepper flakes. Stir frequently with a wooden spoon or spatula. The goal is to gently cook the garlic until it’s fragrant and lightly golden. This should take about 5-7 minutes. Watch it like a hawk! If the garlic starts to brown too quickly, reduce the heat even further. We want it to be a beautiful golden color, not brown or burnt.
- Season with salt and pepper: Add the ½ teaspoon of salt and ¼ teaspoon of black pepper to the garlic and oil mixture. Stir to combine. This will help to season the oil and bring out the flavors.
- Remove from heat (temporarily): Once the garlic is golden and fragrant, remove the skillet from the heat. This will prevent the garlic from continuing to cook and potentially burning while we prepare the pasta. We’ll bring it back to the heat later.
Cooking the Pasta
Now, let’s get that pasta cooking! Remember to salt your pasta water it’s the only chance you have to season the pasta itself!
- Bring water to a boil: Fill a large pot with water (at least 4 quarts). Add a generous pinch of salt about 1 tablespoon. Bring the water to a rolling boil over high heat.
- Cook the pasta: Add the spaghetti to the boiling water and cook according to the package directions for al dente. Al dente means “to the tooth” in Italian, and it refers to pasta that is firm and slightly chewy. Usually, this is about 8-10 minutes.
- Reserve pasta water: Before draining the pasta, reserve about ½ cup of the pasta water. This starchy water is liquid gold! It will help to create a creamy sauce and bind the pasta and oil together. Use a measuring cup to scoop out the water and set it aside.
- Drain the pasta: Drain the pasta in a colander. Don’t rinse it! We want that starchy coating to help the sauce cling to the pasta.
Bringing it All Together
This is where the magic happens! We’re going to combine the pasta, garlic-infused oil, and pasta water to create a delicious and simple sauce.
- Return the skillet to the heat: Place the skillet with the garlic and oil back over medium heat.
- Add the pasta: Add the drained pasta to the skillet with the garlic and oil. Toss to coat the pasta evenly with the oil.
- Add pasta water: Pour in about ¼ cup of the reserved pasta water. Toss continuously to emulsify the sauce. The pasta water will help to create a creamy, emulsified sauce that coats the pasta beautifully. If the sauce seems too dry, add more pasta water, a tablespoon at a time, until you reach your desired consistency.
- Toss and cook: Continue to toss the pasta and cook for about 1-2 minutes, allowing the sauce to thicken slightly and cling to the pasta.
- Add parsley: Remove the skillet from the heat and stir in the chopped fresh parsley. The parsley adds a bright, fresh flavor to the dish.
- Adjust seasoning: Taste the pasta and adjust the seasoning as needed. Add more salt, pepper, or red pepper flakes to your liking.
Serving
Time to enjoy your delicious Aglio e Olio! This dish is best served immediately.
- Serve immediately: Divide the pasta among plates or bowls.
- Garnish: Garnish with extra chopped fresh parsley and a drizzle of extra virgin olive oil.
- Add Parmesan cheese (optional): If desired, sprinkle with grated Parmesan cheese. While some purists argue that Parmesan doesn’t belong on Aglio e Olio, I say it’s your pasta, your rules!
Tips and Tricks for Perfect Aglio e Olio
Here are a few extra tips to help you make the best Aglio e Olio ever:
- Use high-quality olive oil: Since olive oil is a key ingredient in this dish, it’s important to use a good quality extra virgin olive oil. The flavor of the olive oil will really shine through, so choose one that you enjoy.
- Don’t burn the garlic: I can’t stress this enough! Burnt garlic is bitter and will ruin the flavor of the dish. Keep a close eye on the garlic while it’s cooking and adjust the heat as needed.
- Use enough salt: Salt is essential for bringing out the flavors of the pasta and sauce. Don’t be afraid to salt your pasta water generously and season the sauce to taste.
- Reserve enough pasta water: The starchy pasta water is what makes the sauce creamy and emulsified. Be sure to reserve enough before draining the pasta.
- Work quickly: Aglio e Olio is best served immediately, so work quickly to combine the pasta, sauce, and parsley.
- Experiment with flavors: Feel free to experiment with different flavors and ingredients. You can add other vegetables, such as broccoli or spinach, or use different types of pasta.
Variations
Want to mix things up a bit? Here are a few variations you can try:
- Aglio e Olio with Shrimp: Add cooked shrimp to the skillet along with the pasta.
- Aglio e Olio with Broccoli: Add steamed or roasted broccoli to the skillet along with the pasta.
- Spicy Aglio e Olio: Add more red pepper flakes for a spicier kick. You can also add a pinch of cayenne pepper.
- Lemon Aglio e Olio: Add a squeeze of fresh lemon juice to the skillet along with the parsley. The lemon juice will add a bright, zesty flavor to the dish.
Enjoy your homemade Aglio e Olio! I hope you love it as much as I do. It’s a simple, yet incredibly satisfying dish that’s perfect for a quick and easy weeknight meal.
Conclusion:
This isn’t just another pasta recipe; it’s a culinary experience waiting to happen! The simplicity of Aglio e Olio Pasta belies its incredible depth of flavor. From the satisfying sizzle of the garlic in olive oil to the perfectly al dente pasta, every bite is a testament to the power of fresh, quality ingredients. It’s quick, it’s easy, and it’s guaranteed to impress, even on the busiest weeknights. Seriously, what’s not to love?
But the real magic lies in its versatility. While the classic recipe is divine on its own, feel free to get creative! Craving a little extra protein? Toss in some grilled shrimp or chicken for a heartier meal. Want to kick up the heat? Add a pinch of red pepper flakes (or more, if you’re feeling brave!). For a vegetarian twist, consider adding some roasted vegetables like zucchini, bell peppers, or mushrooms. A sprinkle of toasted breadcrumbs adds a delightful crunch, and a squeeze of lemon juice brightens the flavors beautifully.
Serving suggestions are endless. This Aglio e Olio Pasta makes a fantastic main course, especially when paired with a simple side salad and some crusty bread for soaking up all that delicious garlic-infused oil. It’s also a wonderful side dish to accompany grilled meats or fish. And if you happen to have leftovers (though I doubt you will!), it’s just as delicious cold the next day, perfect for a quick and easy lunch.
I truly believe that everyone should have this recipe in their repertoire. It’s a lifesaver on those nights when you’re short on time and energy, but still want a satisfying and flavorful meal. It’s also a great way to impress your friends and family without spending hours in the kitchen. Plus, it’s a fantastic base for experimenting with different flavors and ingredients, allowing you to create your own signature version.
So, what are you waiting for? Gather your ingredients, put on some music, and get ready to experience the joy of cooking (and eating!) this incredible Aglio e Olio Pasta. I promise you won’t be disappointed.
And now for the fun part! I’m dying to know what you think. Did you try the recipe? What variations did you make? Did you add shrimp, vegetables, or extra chili flakes? What did your family and friends think? Share your experiences, photos, and tips in the comments below. Let’s create a community of Aglio e Olio Pasta enthusiasts and inspire each other with our culinary creations! I can’t wait to hear from you! Happy cooking!
Aglio e Olio Pasta: The Authentic Italian Recipe You Need
Simple yet flavorful Italian pasta with garlic, olive oil, red pepper flakes, and parsley. Ready in under 30 minutes!
Ingredients
- 1 pound spaghetti
- ½ cup extra virgin olive oil, plus more for drizzling
- 6-8 cloves garlic, thinly sliced
- ½ teaspoon red pepper flakes, or more to taste
- ½ teaspoon salt, plus more to taste
- ¼ teaspoon black pepper, plus more to taste
- ½ cup reserved pasta water
- ¼ cup chopped fresh parsley, plus more for garnish
- Grated Parmesan cheese, for serving (optional)
Instructions
- Prepare Garlic and Oil: Thinly slice the garlic. In a large skillet, heat olive oil over medium-low heat. Add garlic and red pepper flakes. Stir frequently until garlic is fragrant and lightly golden (5-7 minutes). Season with salt and pepper. Remove from heat.
- Cook Pasta: Bring a large pot of salted water to a boil. Cook spaghetti according to package directions for al dente (8-10 minutes).
- Reserve Pasta Water: Before draining, reserve ½ cup of pasta water.
- Drain Pasta: Drain the pasta in a colander (do not rinse).
- Combine: Return the skillet with garlic and oil to medium heat. Add the drained pasta and toss to coat.
- Add Pasta Water: Pour in ¼ cup of reserved pasta water. Toss continuously to emulsify the sauce. Add more pasta water, a tablespoon at a time, if needed, until desired consistency is reached.
- Toss and Cook: Continue to toss and cook for 1-2 minutes, allowing the sauce to thicken slightly.
- Add Parsley: Remove from heat and stir in chopped fresh parsley.
- Adjust Seasoning: Taste and adjust seasoning as needed.
- Serve: Serve immediately, garnished with extra parsley and a drizzle of olive oil. Sprinkle with Parmesan cheese, if desired.
Notes
- Use high-quality extra virgin olive oil for the best flavor.
- Watch the garlic carefully to prevent burning. Burnt garlic will make the dish bitter.
- Don’t be afraid to salt your pasta water generously.
- The pasta water is key to creating a creamy, emulsified sauce.
- Serve immediately for the best taste and texture.
- Variations: Add cooked shrimp, steamed broccoli, lemon juice, or extra red pepper flakes for a spicier dish.
Leave a Comment