
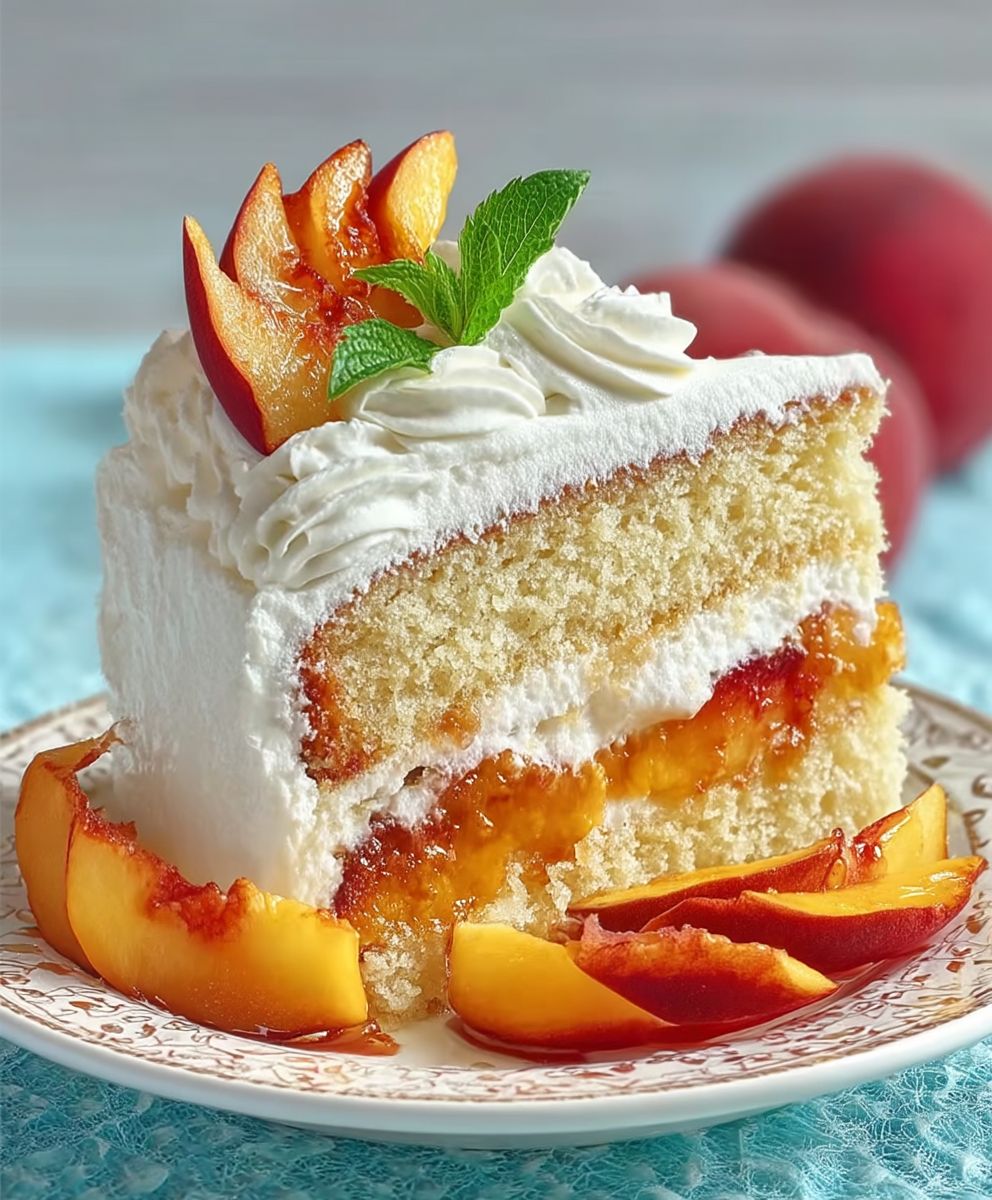
Peaches and Cream Cake: just the name conjures up images of sun-drenched afternoons and the sweet, juicy taste of summer, doesn’t it? Imagine sinking your fork into a slice of this heavenly dessert, the delicate crumb of the cake yielding to the luscious combination of ripe peaches and rich, creamy frosting. It’s a taste of pure bliss, and I’m so excited to share my version of this classic recipe with you!
While the exact origins of Peaches and Cream Cake are a bit hazy, the combination of peaches and cream has been a beloved pairing for centuries. Peaches, originally from China, made their way to Europe and eventually to the Americas, where they flourished. The simple elegance of pairing them with fresh cream quickly became a staple in desserts across the South, evolving into the comforting cake we know and love today.
But what is it about this cake that makes it so irresistible? For me, it’s the perfect balance of flavors and textures. The slight tanginess of the peaches cuts through the sweetness of the cake and frosting, creating a symphony of taste in every bite. The moist, tender crumb of the cake, combined with the soft, juicy peaches and the smooth, velvety cream, is a textural delight. Plus, its surprisingly easy to make, making it the perfect dessert for both casual gatherings and special occasions. Get ready to bake a Peaches and Cream Cake that will have everyone asking for seconds!

Ingredients:
- For the Cake:
- 2 1/2 cups all-purpose flour
- 1 teaspoon baking powder
- 1/2 teaspoon baking soda
- 1/4 teaspoon salt
- 1 cup (2 sticks) unsalted butter, softened
- 1 3/4 cups granulated sugar
- 2 large eggs
- 1 teaspoon vanilla extract
- 1 cup buttermilk
- For the Peach Filling:
- 4 cups fresh peaches, peeled and sliced (about 6 medium peaches)
- 1/4 cup granulated sugar
- 2 tablespoons cornstarch
- 1 tablespoon lemon juice
- 1/4 teaspoon ground cinnamon
- For the Cream Cheese Frosting:
- 8 ounces cream cheese, softened
- 1/2 cup (1 stick) unsalted butter, softened
- 3 cups powdered sugar
- 1 teaspoon vanilla extract
- 2-3 tablespoons milk or heavy cream (for desired consistency)
Preparing the Peach Filling:
- Combine the peaches, sugar, cornstarch, lemon juice, and cinnamon in a saucepan. In a medium saucepan, gently mix the sliced peaches with the 1/4 cup of granulated sugar, cornstarch, lemon juice, and ground cinnamon. Make sure the peaches are evenly coated with the sugar and cornstarch mixture. This will help thicken the filling as it cooks.
- Cook over medium heat until thickened. Place the saucepan over medium heat. Stir the peach mixture constantly to prevent sticking and burning. Cook for about 8-10 minutes, or until the peaches have softened and the sauce has thickened into a glossy, jam-like consistency. The cornstarch will activate as it heats, creating a lovely, thick sauce.
- Remove from heat and let cool completely. Once the peach filling has thickened, remove the saucepan from the heat. Transfer the filling to a bowl and let it cool completely to room temperature. This is important because you don’t want to add warm filling to the cake layers, as it could make the frosting melt. You can speed up the cooling process by placing the bowl in the refrigerator for a short time.
Making the Cake Batter:
- Preheat oven and prepare cake pans. Preheat your oven to 350°F (175°C). Grease and flour two 9-inch round cake pans. You can also line the bottoms of the pans with parchment paper rounds for easy removal. This will prevent the cakes from sticking to the pans.
- Whisk together dry ingredients. In a medium bowl, whisk together the flour, baking powder, baking soda, and salt. Whisking ensures that the baking powder and baking soda are evenly distributed throughout the flour, which will help the cake rise properly.
- Cream butter and sugar. In a large bowl, using an electric mixer, cream together the softened butter and granulated sugar until light and fluffy. This usually takes about 3-5 minutes. Creaming the butter and sugar incorporates air into the mixture, which contributes to the cake’s light and airy texture.
- Beat in eggs and vanilla. Beat in the eggs one at a time, then stir in the vanilla extract. Make sure each egg is fully incorporated before adding the next. The vanilla extract enhances the flavor of the cake.
- Alternate adding dry ingredients and buttermilk. Gradually add the dry ingredients to the wet ingredients, alternating with the buttermilk, beginning and ending with the dry ingredients. Mix until just combined. Be careful not to overmix the batter, as this can result in a tough cake. Start by adding about one-third of the dry ingredients, then half of the buttermilk, then another third of the dry ingredients, the remaining buttermilk, and finally the last of the dry ingredients.
- Divide batter evenly between cake pans. Divide the cake batter evenly between the prepared cake pans. Use a kitchen scale to ensure that each pan has the same amount of batter, which will help the cakes bake evenly.
- Bake until golden brown and a toothpick inserted into the center comes out clean. Bake for 30-35 minutes, or until the cakes are golden brown and a toothpick inserted into the center comes out clean. The baking time may vary depending on your oven, so start checking the cakes after 30 minutes.
- Let cool in pans for 10 minutes, then invert onto a wire rack to cool completely. Once the cakes are done, let them cool in the pans for 10 minutes before inverting them onto a wire rack to cool completely. This will prevent the cakes from breaking apart. Make sure the cakes are completely cool before frosting.
Making the Cream Cheese Frosting:
- Beat cream cheese and butter until smooth. In a large bowl, using an electric mixer, beat the softened cream cheese and butter until smooth and creamy. Make sure the cream cheese and butter are at room temperature for the best results.
- Gradually add powdered sugar. Gradually add the powdered sugar, one cup at a time, beating well after each addition. This will prevent the powdered sugar from flying all over the place.
- Stir in vanilla extract and milk. Stir in the vanilla extract and milk (or heavy cream). Add the milk or heavy cream a tablespoon at a time until you reach your desired consistency. The frosting should be smooth and spreadable.
- Beat until light and fluffy. Beat the frosting for another minute or two until it is light and fluffy.
Assembling the Cake:
- Level the cake layers (if needed). If the cake layers are uneven, use a serrated knife to level them. This will ensure that the cake is stable and looks professional.
- Place one cake layer on a serving plate or cake stand. Place one cake layer on a serving plate or cake stand.
- Spread half of the peach filling over the cake layer. Spread half of the cooled peach filling evenly over the cake layer.
- Top with the second cake layer. Carefully place the second cake layer on top of the peach filling.
- Frost the entire cake with the cream cheese frosting. Frost the entire cake with the cream cheese frosting. You can use an offset spatula to create a smooth and even finish.
- Optional: Garnish with extra peach slices. If desired, garnish the cake with extra peach slices. This will add a beautiful finishing touch.
- Chill for at least 30 minutes before serving. Chill the cake in the refrigerator for at least 30 minutes before serving. This will allow the frosting to set and the flavors to meld together.
Conclusion:
This Peaches and Cream Cake isn’t just a dessert; it’s a slice of summer sunshine on a plate, and I truly believe you absolutely *must* try it. The combination of the moist, tender cake, the juicy, sweet peaches, and the luscious cream topping is simply irresistible. It’s a symphony of flavors and textures that will have everyone begging for seconds. Trust me, this cake is a guaranteed crowd-pleaser, perfect for any occasion, from a casual backyard barbecue to a more formal dinner party.
But what makes this recipe a must-try? It’s the simplicity! You don’t need to be a master baker to create this masterpiece. The instructions are straightforward, the ingredients are readily available, and the results are consistently delicious. It’s the kind of recipe that you’ll find yourself making again and again, not just during peach season, but any time you crave a comforting and flavorful treat. It’s also incredibly versatile.
Looking for serving suggestions? A simple dusting of powdered sugar is always a classic and elegant touch. For a more decadent experience, try serving it with a scoop of vanilla ice cream or a dollop of freshly whipped cream. A drizzle of honey or maple syrup would also complement the flavors beautifully. And if you’re feeling adventurous, a sprinkle of toasted almonds or pecans adds a delightful crunch.
Now, let’s talk variations! While I adore this cake with peaches, you can easily adapt it to use other fruits. Nectarines, plums, or even berries would work wonderfully. If you’re not a fan of cream cheese in the frosting, you can substitute it with mascarpone for a lighter, tangier flavor. You could also add a hint of almond extract to the cake batter for a more complex flavor profile. For a gluten-free version, simply substitute the all-purpose flour with a gluten-free blend. The possibilities are endless!
I’ve poured my heart into perfecting this Peaches and Cream Cake recipe, and I’m confident that you’ll love it as much as I do. It’s more than just a recipe; it’s an experience, a celebration of simple pleasures, and a reminder of the joy that comes from sharing good food with loved ones.
So, what are you waiting for? Gather your ingredients, preheat your oven, and get ready to bake! I promise you won’t regret it. And once you’ve tried it, I’d absolutely love to hear about your experience. Did you make any variations? What did your family and friends think? Share your photos and stories in the comments below! I’m always eager to learn from your culinary adventures and see how you’ve made this recipe your own. Happy baking, and enjoy every delicious bite! I am sure that you will find that this cake is a delightful addition to your recipe collection. Don’t be afraid to experiment with different toppings and fruit combinations to create your own signature version. Remember, the best recipes are the ones that are made with love and shared with joy.
Peaches and Cream Cake: The Ultimate Summer Dessert Recipe
A moist peach cake with layers of tender cake, sweet peach filling, and creamy cream cheese frosting. Perfect for summer!
Ingredients
- 2 1/2 cups all-purpose flour
- 1 teaspoon baking powder
- 1/2 teaspoon baking soda
- 1/4 teaspoon salt
- 1 cup (2 sticks) unsalted butter, softened
- 1 3/4 cups granulated sugar
- 2 large eggs
- 1 teaspoon vanilla extract
- 1 cup buttermilk
- 4 cups fresh peaches, peeled and sliced (about 6 medium peaches)
- 1/4 cup granulated sugar
- 2 tablespoons cornstarch
- 1 tablespoon lemon juice
- 1/4 teaspoon ground cinnamon
- 8 ounces cream cheese, softened
- 1/2 cup (1 stick) unsalted butter, softened
- 3 cups powdered sugar
- 1 teaspoon vanilla extract
- 2-3 tablespoons milk or heavy cream (for desired consistency)
Instructions
- Combine the peaches, sugar, cornstarch, lemon juice, and cinnamon in a saucepan. In a medium saucepan, gently mix the sliced peaches with the 1/4 cup of granulated sugar, cornstarch, lemon juice, and ground cinnamon. Make sure the peaches are evenly coated with the sugar and cornstarch mixture. This will help thicken the filling as it cooks.
- Cook over medium heat until thickened. Place the saucepan over medium heat. Stir the peach mixture constantly to prevent sticking and burning. Cook for about 8-10 minutes, or until the peaches have softened and the sauce has thickened into a glossy, jam-like consistency. The cornstarch will activate as it heats, creating a lovely, thick sauce.
- Remove from heat and let cool completely. Once the peach filling has thickened, remove the saucepan from the heat. Transfer the filling to a bowl and let it cool completely to room temperature. This is important because you don’t want to add warm filling to the cake layers, as it could make the frosting melt. You can speed up the cooling process by placing the bowl in the refrigerator for a short time.
- Preheat oven and prepare cake pans. Preheat your oven to 350°F (175°C). Grease and flour two 9-inch round cake pans. You can also line the bottoms of the pans with parchment paper rounds for easy removal. This will prevent the cakes from sticking to the pans.
- Whisk together dry ingredients. In a medium bowl, whisk together the flour, baking powder, baking soda, and salt. Whisking ensures that the baking powder and baking soda are evenly distributed throughout the flour, which will help the cake rise properly.
- Cream butter and sugar. In a large bowl, using an electric mixer, cream together the softened butter and granulated sugar until light and fluffy. This usually takes about 3-5 minutes. Creaming the butter and sugar incorporates air into the mixture, which contributes to the cake’s light and airy texture.
- Beat in eggs and vanilla. Beat in the eggs one at a time, then stir in the vanilla extract. Make sure each egg is fully incorporated before adding the next. The vanilla extract enhances the flavor of the cake.
- Alternate adding dry ingredients and buttermilk. Gradually add the dry ingredients to the wet ingredients, alternating with the buttermilk, beginning and ending with the dry ingredients. Mix until just combined. Be careful not to overmix the batter, as this can result in a tough cake. Start by adding about one-third of the dry ingredients, then half of the buttermilk, then another third of the dry ingredients, the remaining buttermilk, and finally the last of the dry ingredients.
- Divide batter evenly between cake pans. Divide the cake batter evenly between the prepared cake pans. Use a kitchen scale to ensure that each pan has the same amount of batter, which will help the cakes bake evenly.
- Bake until golden brown and a toothpick inserted into the center comes out clean. Bake for 30-35 minutes, or until the cakes are golden brown and a toothpick inserted into the center comes out clean. The baking time may vary depending on your oven, so start checking the cakes after 30 minutes.
- Let cool in pans for 10 minutes, then invert onto a wire rack to cool completely. Once the cakes are done, let them cool in the pans for 10 minutes before inverting them onto a wire rack to cool completely. This will prevent the cakes from breaking apart. Make sure the cakes are completely cool before frosting.
- Beat cream cheese and butter until smooth. In a large bowl, using an electric mixer, beat the softened cream cheese and butter until smooth and creamy. Make sure the cream cheese and butter are at room temperature for the best results.
- Gradually add powdered sugar. Gradually add the powdered sugar, one cup at a time, beating well after each addition. This will prevent the powdered sugar from flying all over the place.
- Stir in vanilla extract and milk. Stir in the vanilla extract and milk (or heavy cream). Add the milk or heavy cream a tablespoon at a time until you reach your desired consistency. The frosting should be smooth and spreadable.
- Beat until light and fluffy. Beat the frosting for another minute or two until it is light and fluffy.
- Level the cake layers (if needed). If the cake layers are uneven, use a serrated knife to level them. This will ensure that the cake is stable and looks professional.
- Place one cake layer on a serving plate or cake stand. Place one cake layer on a serving plate or cake stand.
- Spread half of the peach filling over the cake layer. Spread half of the cooled peach filling evenly over the cake layer.
- Top with the second cake layer. Carefully place the second cake layer on top of the peach filling.
- Frost the entire cake with the cream cheese frosting. Frost the entire cake with the cream cheese frosting. You can use an offset spatula to create a smooth and even finish.
- Optional: Garnish with extra peach slices. If desired, garnish the cake with extra peach slices. This will add a beautiful finishing touch.
- Chill for at least 30 minutes before serving. Chill the cake in the refrigerator for at least 30 minutes before serving. This will allow the frosting to set and the flavors to meld together.
Notes
- Make sure all ingredients are at room temperature for best results, especially the butter, cream cheese, and eggs.
- Don’t overmix the cake batter, as this can result in a tough cake.
- Let the peach filling cool completely before assembling the cake to prevent the frosting from melting.
- For a more intense peach flavor, you can add a teaspoon of peach extract to the cake batter.
- Store leftover cake in the refrigerator for up to 3 days.


Leave a Comment