
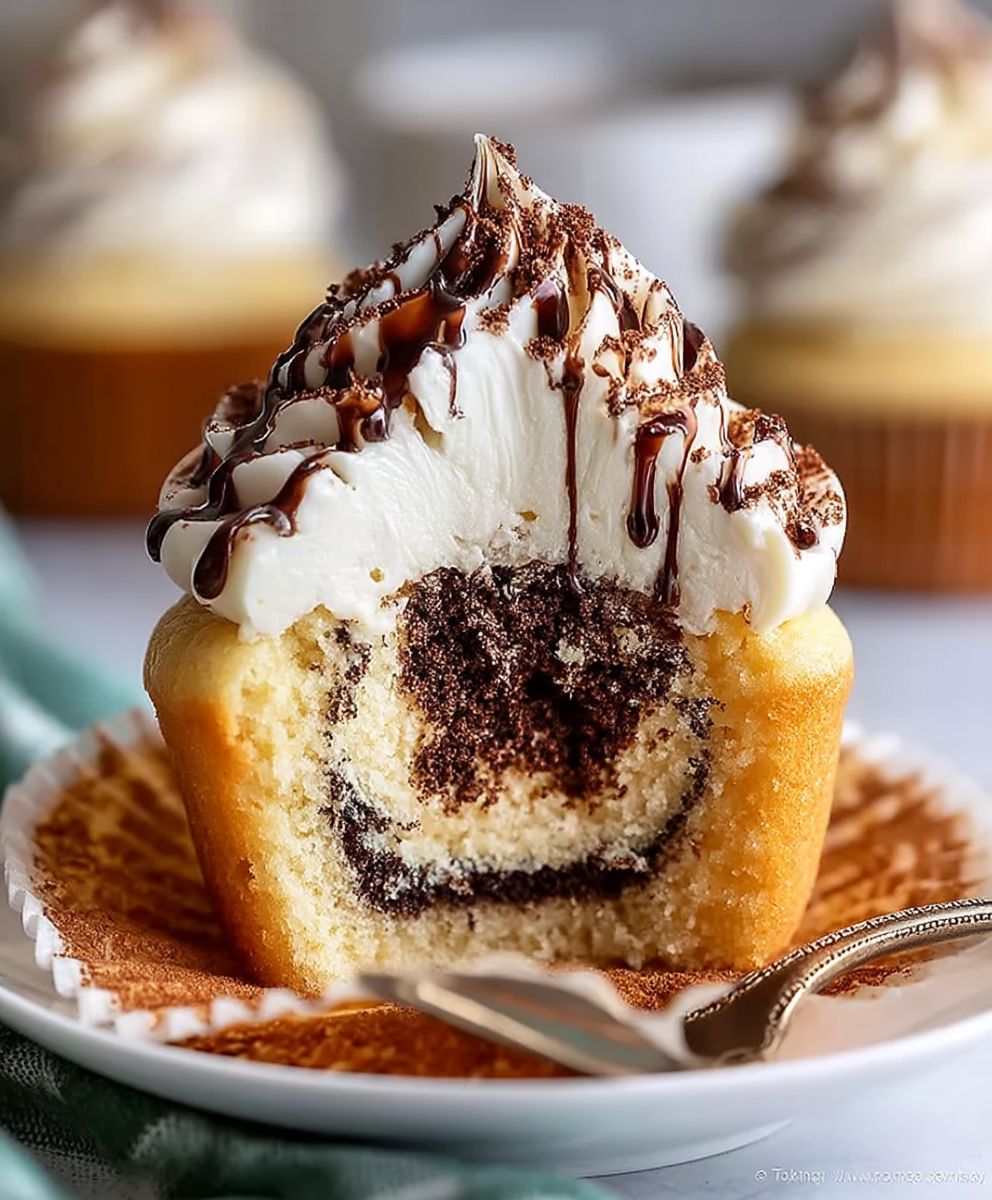
Tiramisu Cupcakes: Prepare to be transported to a charming Italian café with every single bite! Imagine the rich, coffee-soaked flavors of classic tiramisu, now perfectly portioned and adorably presented in cupcake form. These aren’t just cupcakes; they’re a mini masterpiece of Italian dessert tradition, reimagined for modern indulgence.
Tiramisu, meaning “pick me up” or “cheer me up,” has a relatively recent history, believed to have originated in the Veneto region of Italy in the latter half of the 20th century. While its exact origins are debated, its popularity quickly spread worldwide, becoming a beloved symbol of Italian culinary artistry. The combination of espresso, mascarpone, and cocoa creates an irresistible symphony of flavors that has captivated dessert lovers for decades.
What makes Tiramisu Cupcakes so irresistible? It’s the perfect marriage of convenience and decadence. You get all the delightful flavors of tiramisu the creamy mascarpone, the bold coffee notes, and the dusting of cocoa in an easy-to-eat, portable treat. They’re perfect for parties, potlucks, or simply satisfying your sweet tooth after a long day. Plus, who can resist the charm of a beautifully decorated cupcake? Get ready to impress your friends and family with these delightful little bites of Italian heaven!

Ingredients:
- For the Espresso-Soaked Ladyfingers:
- 12 Ladyfingers (Savoiardi biscuits)
- 1 cup strong brewed espresso, cooled
- 2 tablespoons coffee liqueur (such as Kahlua or Tia Maria), optional
- For the Mascarpone Cream:
- 8 ounces (226g) mascarpone cheese, softened
- 1 cup heavy cream, cold
- 1/2 cup powdered sugar, sifted
- 1 teaspoon vanilla extract
- Pinch of salt
- For the Chocolate Ganache:
- 4 ounces (113g) semi-sweet chocolate, finely chopped
- 1/4 cup heavy cream
- For Dusting:
- Cocoa powder, for dusting
Preparing the Espresso-Soaked Ladyfingers:
- Brew the Espresso: Start by brewing a cup of strong espresso. I like to use a dark roast for a richer flavor, but any good quality espresso will work. Let it cool completely before moving on to the next step. This is important because hot espresso will make the ladyfingers too soggy.
- Prepare the Coffee Liqueur (Optional): If you’re using coffee liqueur, now’s the time to add it to the cooled espresso. This will enhance the coffee flavor and add a little extra kick. If you prefer a non-alcoholic version, simply skip this step.
- Soak the Ladyfingers: Lightly dip each ladyfinger into the cooled espresso mixture. Don’t soak them for too long, just a quick dip on each side, about 2-3 seconds per side. You want them to be moist but not falling apart. I usually work in batches of 2-3 ladyfingers at a time to prevent them from becoming overly saturated.
- Cut and Arrange: Cut the soaked ladyfingers into smaller pieces that will fit nicely into the bottom of your cupcake liners. I usually cut each ladyfinger into about 4-6 pieces, depending on the size of my liners. Place the ladyfinger pieces evenly into the bottom of each cupcake liner, creating a base layer.
Making the Mascarpone Cream:
- Soften the Mascarpone: Make sure your mascarpone cheese is softened to room temperature before you start. This will help it blend smoothly with the other ingredients and prevent lumps from forming. If you forget to take it out of the fridge ahead of time, you can microwave it for a few seconds, but be careful not to melt it.
- Whip the Heavy Cream: In a large bowl, using an electric mixer (either a stand mixer or a hand mixer), whip the heavy cream until stiff peaks form. This usually takes about 3-5 minutes. Be careful not to overwhip the cream, or it will turn into butter. You want it to be thick and fluffy.
- Combine Mascarpone and Powdered Sugar: In a separate bowl, combine the softened mascarpone cheese, sifted powdered sugar, vanilla extract, and a pinch of salt. Beat with the electric mixer until smooth and creamy. Sifting the powdered sugar is crucial to avoid any lumps in your mascarpone cream.
- Gently Fold in Whipped Cream: Gently fold the whipped cream into the mascarpone mixture in two additions. Be careful not to deflate the whipped cream. This step is important for maintaining the light and airy texture of the mascarpone cream. Use a spatula and fold from the bottom up until just combined.
- Pipe or Spoon the Cream: Transfer the mascarpone cream to a piping bag fitted with a large round tip (or any tip you prefer). If you don’t have a piping bag, you can simply spoon the cream over the ladyfinger base. I prefer piping because it gives the cupcakes a more professional look.
Preparing the Chocolate Ganache:
- Chop the Chocolate: Finely chop the semi-sweet chocolate and place it in a heatproof bowl. The finer the chocolate is chopped, the easier it will melt evenly.
- Heat the Heavy Cream: In a small saucepan, heat the heavy cream over medium heat until it just begins to simmer. Do not let it boil.
- Pour Cream over Chocolate: Pour the hot heavy cream over the chopped chocolate. Let it sit for about a minute to allow the heat to melt the chocolate.
- Stir Until Smooth: Gently stir the mixture until the chocolate is completely melted and the ganache is smooth and glossy. If there are any stubborn pieces of chocolate, you can microwave the mixture for a few seconds at a time, stirring in between, until it’s completely melted.
- Cool Slightly: Let the ganache cool slightly before drizzling it over the mascarpone cream. This will prevent the ganache from melting the cream. You want it to be thick enough to hold its shape but still pourable.
Assembling the Tiramisu Cupcakes:
- Drizzle with Ganache: Once the mascarpone cream has been piped or spooned onto the ladyfinger base, drizzle the cooled chocolate ganache over the top of each cupcake. You can use a spoon or a piping bag to drizzle the ganache. Get creative with your designs!
- Dust with Cocoa Powder: Generously dust the tops of the cupcakes with cocoa powder. This adds a beautiful finishing touch and enhances the tiramisu flavor. I like to use a fine-mesh sieve to ensure an even dusting.
- Chill Before Serving: Refrigerate the tiramisu cupcakes for at least 2 hours before serving. This will allow the flavors to meld together and the mascarpone cream to set. Chilling them also makes them easier to handle and eat.
- Serve and Enjoy: Once chilled, the tiramisu cupcakes are ready to be served. These are best enjoyed cold. You can garnish them with a chocolate shaving or a coffee bean for an extra touch of elegance.
Tips for Success:
- Don’t Over-Soak the Ladyfingers: This is the most important tip! Over-soaked ladyfingers will result in soggy cupcakes. A quick dip on each side is all you need.
- Use High-Quality Ingredients: The quality of your ingredients will directly impact the flavor of your tiramisu cupcakes. Use good quality espresso, mascarpone cheese, and chocolate for the best results.
- Sift the Powdered Sugar: Sifting the powdered sugar is essential for a smooth and lump-free mascarpone cream.
- Chill Thoroughly: Chilling the cupcakes for at least 2 hours is crucial for allowing the flavors to meld and the mascarpone cream to set.
- Get Creative with Garnishes: Feel free to get creative with your garnishes. Chocolate shavings, coffee beans, or even a dusting of cinnamon can add a special touch.
Variations:
- Alcohol-Free Version: If you prefer a non-alcoholic version, simply omit the coffee liqueur from the espresso mixture. You can substitute it with a teaspoon of vanilla extract or a splash of coffee extract.
- Different Liqueurs: Experiment with different liqueurs to add a unique twist to your tiramisu cupcakes. Amaretto, Frangelico, or even a splash of rum would all be delicious.
- Chocolate Ladyfingers: Use chocolate ladyfingers instead of regular ladyfingers for an extra chocolatey treat.
- Different Chocolate: Use dark chocolate or milk chocolate for the ganache, depending on your preference.
- Add Berries: Add a layer of fresh berries, such as raspberries or strawberries, between the ladyfinger base and the mascarpone cream for a fruity twist.
Storage Instructions:
- Store the tiramisu cupcakes in an airtight container in the refrigerator for up to 3 days. They are best enjoyed within the first 24 hours, as the ladyfingers may become slightly softer over time.
- I do not recommend freezing these cupcakes, as the mascarpone cream may change texture upon thawing.
Conclusion:
So, there you have it! These Tiramisu Cupcakes are truly a must-try for any dessert lover, and I’m confident they’ll become a new favorite in your baking repertoire. The combination of coffee-soaked sponge, creamy mascarpone filling, and cocoa dusting creates a symphony of flavors and textures that perfectly captures the essence of classic tiramisu, but in a fun, portable, and utterly irresistible cupcake form.
Why are these cupcakes so special? Well, beyond the incredible taste, they’re surprisingly easy to make. You don’t need any fancy equipment or advanced baking skills. The recipe is straightforward, and I’ve included plenty of tips and tricks to ensure your success. Plus, they’re a fantastic make-ahead dessert, perfect for parties, potlucks, or simply satisfying your sweet tooth throughout the week.
But the best part? The sheer joy these cupcakes bring! The aroma of coffee and cocoa filling your kitchen, the anticipation as you frost each cupcake, and the look on people’s faces when they take their first bite it’s all pure magic.
Serving Suggestions and Variations:
These Tiramisu Cupcakes are delicious on their own, but here are a few ideas to elevate them even further:
* Espresso Drizzle: For an extra kick of coffee flavor, drizzle a small amount of strong espresso over the frosted cupcakes just before serving.
* Chocolate Shavings: Add a touch of elegance by sprinkling dark chocolate shavings on top of the cocoa powder.
* Kahlua Infusion: For an adult twist, brush the sponge cupcakes with a mixture of coffee and Kahlua before adding the filling. Be mindful of serving these to children!
* Seasonal Berries: Garnish with fresh raspberries or strawberries for a burst of color and a touch of tartness that complements the richness of the tiramisu.
* Mini Chocolate Chips: Fold mini chocolate chips into the mascarpone filling for added texture and chocolatey goodness.
* Different Extracts: Experiment with different extracts in the mascarpone filling. Vanilla extract is classic, but almond or even a hint of orange extract can add a unique twist.
Don’t be afraid to get creative and personalize these cupcakes to your liking! Baking is all about experimentation and having fun.
I truly believe that this Tiramisu Cupcakes recipe is a winner. It’s a crowd-pleaser, a conversation starter, and a guaranteed way to impress your friends and family. I’ve poured my heart into perfecting this recipe, and I’m so excited for you to try it.
So, what are you waiting for? Gather your ingredients, preheat your oven, and get ready to embark on a delicious baking adventure. I promise you won’t regret it!
And most importantly, I’d love to hear about your experience! Once you’ve made these Tiramisu Cupcakes, please come back and leave a comment below. Let me know how they turned out, what variations you tried, and any tips or tricks you discovered along the way. Your feedback is invaluable, and it helps me continue to improve my recipes and share the joy of baking with others. Happy baking!
Tiramisu Cupcakes: The Ultimate Recipe for Coffee-Infused Bliss
Espresso-soaked ladyfingers topped with creamy mascarpone filling and rich chocolate ganache, dusted with cocoa powder.
Ingredients
- 12 Ladyfingers (Savoiardi biscuits)
- 1 cup strong brewed espresso, cooled
- 2 tablespoons coffee liqueur (such as Kahlua or Tia Maria), optional
- 8 ounces (226g) mascarpone cheese, softened
- 1 cup heavy cream, cold
- 1/2 cup powdered sugar, sifted
- 1 teaspoon vanilla extract
- Pinch of salt
- 4 ounces (113g) semi-sweet chocolate, finely chopped
- 1/4 cup heavy cream
- Cocoa powder, for dusting
Instructions
- Brew the Espresso: Brew a cup of strong espresso and let it cool completely.
- Prepare Coffee Liqueur (Optional): If using, add coffee liqueur to the cooled espresso.
- Soak the Ladyfingers: Lightly dip each ladyfinger into the espresso mixture for 2-3 seconds per side.
- Cut and Arrange: Cut the soaked ladyfingers into smaller pieces and place them evenly into the bottom of cupcake liners.
- Soften the Mascarpone: Ensure mascarpone cheese is softened to room temperature.
- Whip the Heavy Cream: In a large bowl, whip the heavy cream until stiff peaks form.
- Combine Mascarpone and Powdered Sugar: In a separate bowl, combine the softened mascarpone cheese, sifted powdered sugar, vanilla extract, and a pinch of salt. Beat until smooth and creamy.
- Gently Fold in Whipped Cream: Gently fold the whipped cream into the mascarpone mixture in two additions.
- Pipe or Spoon the Cream: Transfer the mascarpone cream to a piping bag or spoon it over the ladyfinger base.
- Chop the Chocolate: Finely chop the semi-sweet chocolate and place it in a heatproof bowl.
- Heat the Heavy Cream: In a small saucepan, heat the heavy cream over medium heat until it just begins to simmer. Do not let it boil.
- Pour Cream over Chocolate: Pour the hot heavy cream over the chopped chocolate. Let it sit for about a minute to allow the heat to melt the chocolate.
- Stir Until Smooth: Gently stir the mixture until the chocolate is completely melted and the ganache is smooth and glossy.
- Cool Slightly: Let the ganache cool slightly before drizzling it over the mascarpone cream.
- Drizzle with Ganache: Drizzle the cooled chocolate ganache over the top of each cupcake.
- Dust with Cocoa Powder: Generously dust the tops of the cupcakes with cocoa powder.
- Chill Before Serving: Refrigerate the tiramisu cupcakes for at least 2 hours before serving.
- Serve and Enjoy: Once chilled, the tiramisu cupcakes are ready to be served.
Notes
- Don’t over-soak the ladyfingers.
- Use high-quality ingredients.
- Sift the powdered sugar for a smooth mascarpone cream.
- Chill thoroughly for the best flavor and texture.
- Get creative with garnishes.
Leave a Comment