
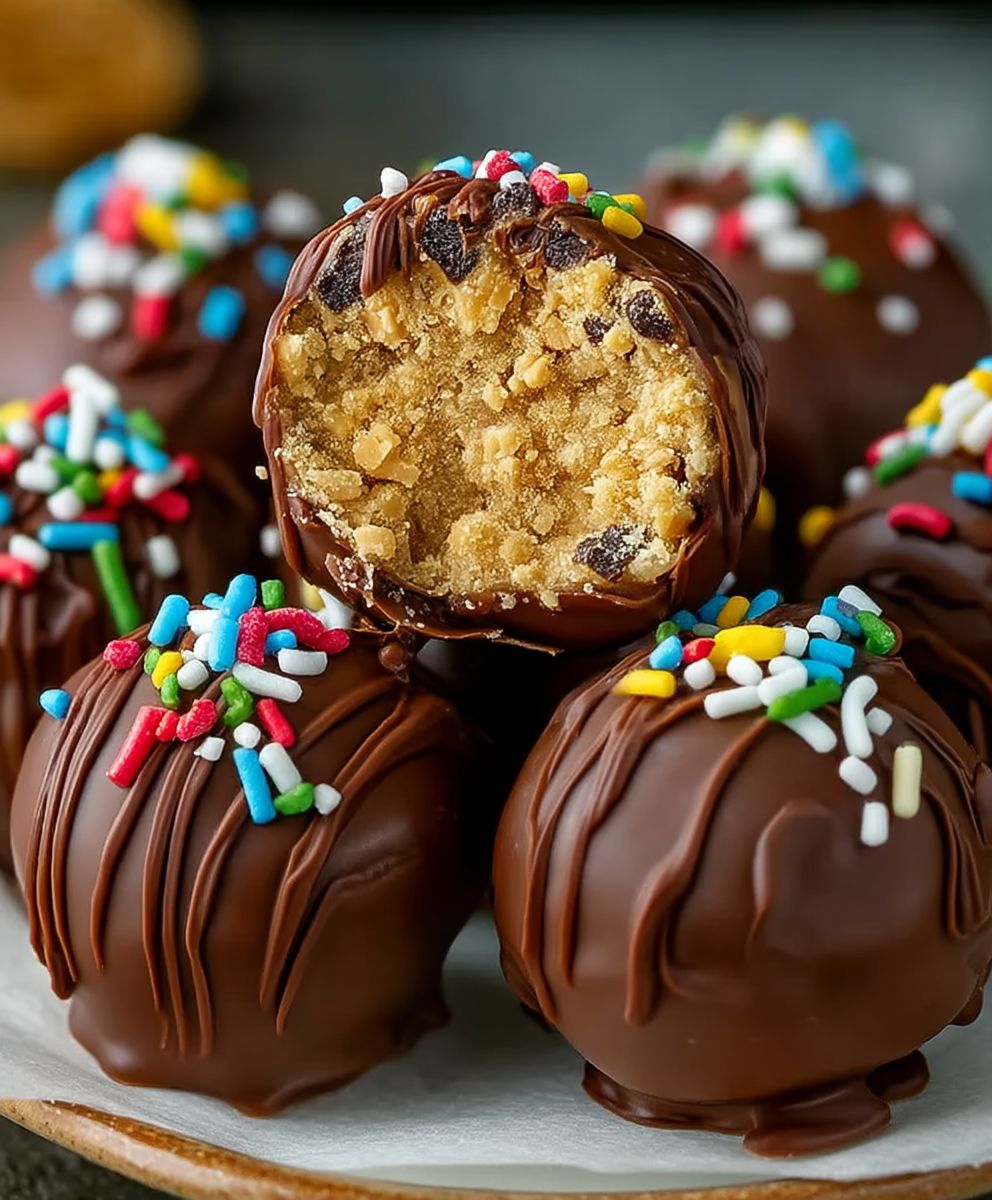
Butterfinger Happiness Balls: Just the name alone conjures up images of pure, unadulterated joy, doesn’t it? And trust me, these little bites of bliss live up to the hype! Imagine sinking your teeth into a creamy, peanut butter-infused center, studded with crunchy Butterfinger pieces, all rolled into a perfectly poppable ball. It’s a textural and flavor explosion that will have you reaching for another before you even realize it.
While the exact origins of these no-bake treats are shrouded in a bit of mystery, their popularity is undeniable. They’ve become a staple at potlucks, holiday gatherings, and bake sales across the country. Perhaps their appeal lies in their simplicity requiring minimal ingredients and absolutely no oven time. Or maybe it’s the irresistible combination of sweet, salty, and crunchy that makes them so addictive. Whatever the reason, Butterfinger Happiness Balls have earned their place as a beloved, easy-to-make dessert.
I think what makes these so special is the delightful contrast. The smooth, melt-in-your-mouth peanut butter filling is perfectly balanced by the crisp, flaky Butterfinger candy. Plus, they are incredibly convenient! You can whip up a batch in minutes, making them ideal for satisfying those sudden sweet cravings or for bringing a crowd-pleasing treat to your next event. Get ready to experience a burst of happiness with every single bite!

Ingredients:
- 1 (16 ounce) package of chocolate sandwich cookies (like Oreos), finely crushed
- 1 (16 ounce) jar of creamy peanut butter
- 1 (12 ounce) package of Butterfinger candy bars, finely crushed
- 1/2 cup (1 stick) unsalted butter, melted
- 1 (12 ounce) package of semi-sweet chocolate chips
- 2 tablespoons vegetable shortening
Preparing the Butterfinger Bliss
Okay, friends, let’s get started on these Butterfinger Happiness Balls! Trust me, they’re worth every single calorie. The combination of chocolate, peanut butter, and that signature Butterfinger crunch is just *chef’s kiss*.
- Crush the Cookies: First things first, we need to crush those chocolate sandwich cookies. You have a couple of options here. You can use a food processor for a super fine crumb, which is my preferred method. Just pulse them until they’re completely broken down. If you don’t have a food processor, no worries! Place the cookies in a large zip-top bag, seal it tightly, and use a rolling pin to crush them into fine crumbs. Make sure to get all the big chunks out we want a smooth texture for our base.
- Butterfinger Breakdown: Now, let’s tackle the Butterfinger candy bars. This is where you can really get out your aggression! Again, a food processor works wonders here, pulsing until you have a mix of fine and slightly larger pieces. The larger pieces will give you that delightful Butterfinger crunch in every bite. If you’re going the manual route, unwrap each candy bar and place them in a zip-top bag. Use a meat mallet or rolling pin to crush them. Don’t pulverize them completely; we want some texture. Aim for a mix of sizes.
- Melt the Butter: In a microwave-safe bowl, melt the butter. You can do this in the microwave in 30-second intervals, stirring in between, until it’s completely melted. Alternatively, you can melt it in a saucepan over low heat on the stovetop. Just keep a close eye on it so it doesn’t burn.
Mixing the Magic
This is where the real magic happens! We’re going to combine all those delicious ingredients into a cohesive mixture that will form the base of our happiness balls.
- Combine the Dry Ingredients: In a large mixing bowl, combine the crushed chocolate sandwich cookies and the crushed Butterfinger candy bars. Give them a good stir to ensure they’re evenly distributed. This will ensure that every ball has that perfect balance of chocolate and Butterfinger goodness.
- Add the Wet Ingredients: Now, add the creamy peanut butter and the melted butter to the bowl. Get ready to get your hands dirty (or use a sturdy spoon!).
- Mix it Up: This is the most important step! Mix everything together until it’s thoroughly combined. You might need to use your hands to really get in there and work the ingredients together. The mixture should be slightly sticky and hold its shape when you squeeze it. If it seems too dry, you can add a tablespoon or two of melted butter. If it seems too wet, add a little more crushed cookie crumbs.
Rolling and Chilling
Time to shape our happiness! This part is a little messy, but totally worth it. Chilling the mixture helps the balls hold their shape and makes them easier to dip in chocolate.
- Roll into Balls: Using a tablespoon or a small cookie scoop, scoop out portions of the mixture and roll them into balls. I usually aim for about 1-inch balls, but you can make them bigger or smaller depending on your preference. Place the rolled balls on a baking sheet lined with parchment paper or wax paper. This will prevent them from sticking.
- Chill Out: Once all the balls are rolled, place the baking sheet in the refrigerator and chill for at least 30 minutes. This will help them firm up and make them easier to dip in the chocolate. You can even chill them for longer, up to a couple of hours, if you want.
Chocolate Coating Extravaganza
The final touch! The chocolate coating is what really elevates these Butterfinger Happiness Balls to the next level. A smooth, glossy chocolate shell encasing that peanut butter and Butterfinger center? Yes, please!
- Melt the Chocolate: In a double boiler or a microwave-safe bowl, combine the semi-sweet chocolate chips and the vegetable shortening. If using a double boiler, heat water in the bottom pot until simmering. Place the bowl with the chocolate and shortening on top, making sure the bottom of the bowl doesn’t touch the water. Stir frequently until the chocolate is completely melted and smooth. If using the microwave, heat in 30-second intervals, stirring in between, until melted and smooth. The vegetable shortening helps to thin the chocolate and gives it a nice shine.
- Dipping Time: Remove the chilled balls from the refrigerator. Using a fork or dipping tools, dip each ball into the melted chocolate, making sure it’s completely coated. Gently tap off any excess chocolate.
- Set and Decorate (Optional): Place the dipped balls back on the parchment-lined baking sheet. At this point, you can add some decorations if you like. Some ideas include:
- Sprinkling with extra crushed Butterfinger candy bars
- Drizzling with melted white chocolate
- Adding a sprinkle of sea salt
- Final Chill: Place the baking sheet back in the refrigerator and chill for another 15-20 minutes, or until the chocolate is completely set.
Storage and Serving
These Butterfinger Happiness Balls are best stored in an airtight container in the refrigerator. They’ll keep for up to a week (if they last that long!). You can also freeze them for longer storage. Just thaw them in the refrigerator before serving.
Serve these little bites of heaven at parties, potlucks, or just as a special treat for yourself. They’re guaranteed to be a crowd-pleaser!
Conclusion:
So, there you have it! These Butterfinger Happiness Balls are truly a must-try for anyone who loves a sweet treat with a satisfying crunch. They’re incredibly easy to make, require minimal ingredients, and deliver maximum flavor. I promise, once you pop one of these little guys in your mouth, you won’t be able to stop! The combination of the creamy peanut butter, the sweet powdered sugar, and that unmistakable Butterfinger crunch is simply irresistible.
But what makes these even better is their versatility. Think of this recipe as a starting point for your own confectionery creations! Want to add a little extra something? Consider dipping them in melted chocolate milk chocolate, dark chocolate, or even white chocolate would be divine. A sprinkle of sea salt on top of the chocolate would add a delightful salty-sweet contrast. Or, if you’re feeling adventurous, try rolling them in chopped nuts like peanuts, pecans, or walnuts for an extra layer of texture and flavor.
For serving suggestions, these Butterfinger Happiness Balls are perfect for just about any occasion. They make a wonderful addition to a holiday dessert platter, a delightful treat to bring to a potluck, or simply a sweet indulgence to enjoy on a cozy night in. They’re also fantastic for gifting! Package them up in a cute little box or bag, and you’ve got a homemade present that’s sure to be appreciated. Imagine the smiles you’ll bring!
And speaking of holidays, consider adapting the recipe for different seasons. For Halloween, you could add a touch of orange food coloring to the peanut butter mixture. For Christmas, a sprinkle of crushed candy canes would be festive and delicious. The possibilities are truly endless!
I’ve made these Butterfinger Happiness Balls countless times, and they’re always a hit. They’re the perfect balance of sweet, salty, and crunchy, and they’re so easy to customize to your own preferences. I truly believe that everyone should have this recipe in their repertoire. It’s a guaranteed crowd-pleaser that’s sure to become a family favorite.
So, what are you waiting for? Gather your ingredients, put on your apron, and get ready to experience the joy of making these incredible Butterfinger Happiness Balls. I’m confident that you’ll love them as much as I do.
Once you’ve tried them, I’d absolutely love to hear about your experience! Did you make any variations? Did you serve them at a party? What did your friends and family think? Share your photos and stories in the comments below. I’m always eager to see how others are enjoying my recipes and to learn new tips and tricks. Let’s spread the happiness, one Butterfinger Ball at a time! Don’t forget to rate the recipe too! Your feedback helps others discover this amazing treat. Happy baking!
Butterfinger Happiness Balls: The Ultimate No-Bake Recipe
Chocolate sandwich cookie and Butterfinger candy balls coated in chocolate. A sweet and crunchy treat!
Ingredients
- 1 (16 ounce) package of chocolate sandwich cookies (like Oreos), finely crushed
- 1 (16 ounce) jar of creamy peanut butter
- 1 (12 ounce) package of Butterfinger candy bars, finely crushed
- 1/2 cup (1 stick) unsalted butter, melted
- 1 (12 ounce) package of semi-sweet chocolate chips
- 2 tablespoons vegetable shortening
Instructions
- Crush chocolate sandwich cookies in a food processor or zip-top bag with a rolling pin until finely crushed.
- Crush Butterfinger candy bars in a food processor or zip-top bag with a rolling pin until a mix of fine and slightly larger pieces.
- Melt butter in a microwave-safe bowl in 30-second intervals or in a saucepan over low heat.
- In a large mixing bowl, combine the crushed chocolate sandwich cookies and the crushed Butterfinger candy bars. Stir to combine.
- Add the creamy peanut butter and the melted butter to the bowl.
- Mix everything together until thoroughly combined. The mixture should be slightly sticky and hold its shape. Adjust with melted butter or crushed cookie crumbs if needed.
- Scoop out portions of the mixture and roll them into 1-inch balls. Place on a baking sheet lined with parchment paper.
- Place the baking sheet in the refrigerator and chill for at least 30 minutes.
- In a double boiler or microwave-safe bowl, combine the semi-sweet chocolate chips and the vegetable shortening. Heat until melted and smooth, stirring frequently.
- Remove the chilled balls from the refrigerator. Dip each ball into the melted chocolate, ensuring it’s completely coated. Tap off excess chocolate.
- Place the dipped balls back on the parchment-lined baking sheet. Decorate with extra crushed Butterfinger candy bars, melted white chocolate, or sea salt, if desired.
- Place the baking sheet back in the refrigerator and chill for another 15-20 minutes, or until the chocolate is completely set.
Notes
- For best results, use a food processor to crush the cookies and Butterfinger bars.
- If the mixture is too dry, add a tablespoon or two of melted butter. If it’s too wet, add a little more crushed cookie crumbs.
- Store in an airtight container in the refrigerator for up to a week, or freeze for longer storage. Thaw in the refrigerator before serving.


Leave a Comment