
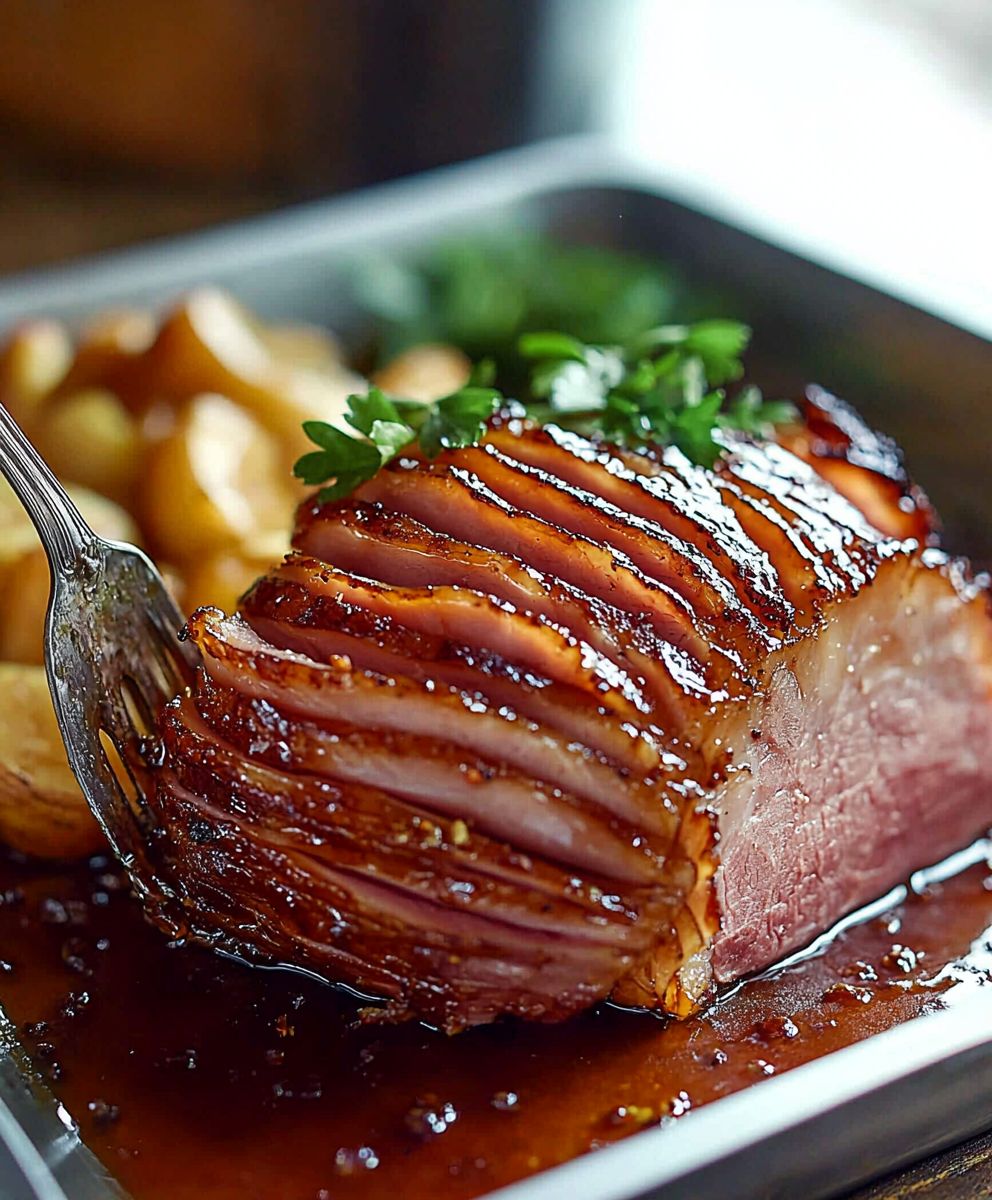
Ham glaze: the secret weapon to transforming an ordinary baked ham into a show-stopping centerpiece that will have your guests begging for seconds! I’m thrilled to share my family’s cherished recipe, a tradition passed down through generations, that guarantees a perfectly caramelized, flavorful crust every single time.
The practice of glazing hams dates back centuries, with roots in European culinary traditions where preserving and enhancing the flavor of meats was paramount. Honey, spices, and fruit preserves were common ingredients, each region adding its unique touch. Today, a beautifully glazed ham remains a symbol of celebration, gracing holiday tables and special occasions with its impressive presence.
But what makes a ham glaze so irresistible? It’s the symphony of sweet and savory notes, the delightful contrast between the tender, smoky ham and the sticky, flavorful glaze. The glaze not only adds a burst of flavor but also creates a stunning visual appeal, making it a feast for both the eyes and the palate. People adore this dish because it’s relatively easy to prepare, yet delivers an impressive result. The combination of convenience and exceptional taste makes it a winner in my book, and I know it will be in yours too!

Ingredients:
- 1 cup packed brown sugar
- 1/2 cup Dijon mustard
- 1/4 cup honey
- 1/4 cup apple cider vinegar
- 2 tablespoons Worcestershire sauce
- 1 tablespoon orange juice
- 1 teaspoon smoked paprika
- 1/2 teaspoon ground cloves
- 1/4 teaspoon ground cinnamon
- Pinch of cayenne pepper (optional, for a little kick!)
Preparing the Ham Glaze:
Okay, let’s get started on this amazing ham glaze! It’s super easy and will transform your holiday ham into something truly special. Trust me, the combination of sweet, tangy, and smoky flavors is irresistible.
- Combine the Ingredients: In a medium saucepan, whisk together the brown sugar, Dijon mustard, honey, apple cider vinegar, Worcestershire sauce, orange juice, smoked paprika, ground cloves, cinnamon, and cayenne pepper (if using). Make sure everything is well combined. There shouldn’t be any lumps of brown sugar. If you find some stubborn lumps, you can use the back of a spoon to crush them against the side of the saucepan.
- Simmer the Glaze: Place the saucepan over medium heat. Bring the mixture to a gentle simmer, stirring constantly. You want the brown sugar to completely dissolve and the glaze to thicken slightly. This usually takes about 5-7 minutes. Be careful not to let it boil rapidly, as it can burn.
- Check the Consistency: The glaze is ready when it coats the back of a spoon. To test this, dip a spoon into the glaze and then run your finger across the back of the spoon. If the glaze doesn’t run back together, it’s thick enough. If it’s still too thin, continue simmering for another minute or two, stirring constantly, and then test again.
- Cool Slightly: Remove the saucepan from the heat and let the glaze cool slightly before using. This will help it to thicken a bit more and make it easier to apply to the ham. While it’s cooling, you can prepare your ham for glazing.
Preparing the Ham for Glazing:
Now that our glaze is ready (or almost ready), let’s talk about preparing the ham. This step is crucial for ensuring that the glaze adheres properly and that the ham is heated through evenly.
- Preheat the Oven: Preheat your oven to 325°F (160°C). This lower temperature will allow the ham to heat gently without drying out.
- Score the Ham (Optional but Recommended): Scoring the ham helps the glaze penetrate the meat and creates a beautiful presentation. Use a sharp knife to score the ham in a diamond pattern, making shallow cuts about 1/4 inch deep. Be careful not to cut too deep, as you don’t want to separate the ham from the bone. The diamond pattern should be about 1-inch apart.
- Place the Ham in a Roasting Pan: Place the ham in a large roasting pan. If you have a roasting rack, use it to elevate the ham slightly. This will allow for better air circulation and prevent the ham from sticking to the bottom of the pan.
- Add Water to the Pan (Optional): Adding about 1 cup of water to the bottom of the roasting pan can help to keep the ham moist during cooking. This is especially helpful if you’re using a leaner ham.
- Cover the Ham (Optional): Covering the ham with foil during the first part of the cooking process can also help to prevent it from drying out. If you choose to cover the ham, remove the foil during the last 30-45 minutes of cooking to allow the glaze to caramelize.
Glazing and Baking the Ham:
This is where the magic happens! We’ll apply the glaze and bake the ham to perfection. The aroma that fills your kitchen will be absolutely divine!
- First Glaze Application: Using a pastry brush or a spoon, generously brush the ham with about half of the prepared glaze. Make sure to get the glaze into all the crevices created by the scoring.
- Bake the Ham: Bake the ham in the preheated oven for the recommended time, according to the ham’s weight and type. A general rule of thumb is about 15-20 minutes per pound for a fully cooked ham. Use a meat thermometer to ensure that the ham reaches an internal temperature of 140°F (60°C).
- Basting with Glaze: During the last 30-45 minutes of cooking, remove the ham from the oven and brush it with the remaining glaze. Return the ham to the oven and continue baking, basting with the glaze every 10-15 minutes. This will create a beautiful, glossy, and flavorful crust.
- Check the Internal Temperature: Use a meat thermometer to check the internal temperature of the ham. Insert the thermometer into the thickest part of the ham, being careful not to touch the bone. The ham is ready when it reaches an internal temperature of 140°F (60°C).
- Rest the Ham: Once the ham is cooked through, remove it from the oven and let it rest for at least 15-20 minutes before carving. This allows the juices to redistribute throughout the ham, resulting in a more tender and flavorful final product. Tent the ham loosely with foil while it rests to keep it warm.
Carving and Serving:
Almost there! Now it’s time to carve and serve your masterpiece. The presentation is just as important as the taste, so take your time and make it look beautiful.
- Carving the Ham: Place the ham on a large cutting board. Use a sharp carving knife to slice the ham against the grain. Start by making a few slices to create a flat surface, then continue slicing until you reach the bone. You can also carve the ham in a spiral fashion, following the bone.
- Arranging the Slices: Arrange the ham slices on a serving platter. You can garnish the platter with fresh herbs, such as rosemary or thyme, or with slices of orange or pineapple.
- Serving the Ham: Serve the ham warm with your favorite side dishes. Some popular choices include mashed potatoes, roasted vegetables, green bean casserole, and dinner rolls. You can also serve the ham with a side of extra glaze, if desired.
Tips for Success:
- Choose the Right Ham: The type of ham you choose will affect the final result. A bone-in ham will generally be more flavorful and moist than a boneless ham. A spiral-cut ham is easy to carve, but it can also dry out more quickly.
- Don’t Overcook the Ham: Overcooking the ham will result in a dry and tough product. Use a meat thermometer to ensure that the ham reaches an internal temperature of 140°F (60°C).
- Baste Frequently: Basting the ham with the glaze during the last 30-45 minutes of cooking will create a beautiful, glossy, and flavorful crust.
- Let the Ham Rest: Letting the ham rest for at least 15-20 minutes before carving allows the juices to redistribute throughout the ham, resulting in a more tender and flavorful final product.
- Get Creative with the Glaze: Feel free to experiment with different ingredients to create your own unique ham glaze. You can add other spices, such as ginger or allspice, or you can use different types of vinegar or fruit juice.
Variations:
- Spicy Ham Glaze: Add more cayenne pepper or a pinch of red pepper flakes to the glaze for a spicier kick.
- Maple Ham Glaze: Substitute maple syrup for the honey in the glaze for a richer, more complex flavor.
- Pineapple Ham Glaze: Add 1/2 cup of crushed pineapple to the glaze for a tropical twist.
- Bourbon Ham Glaze: Add 1/4 cup of bourbon to the glaze for a boozy and flavorful glaze.
Storage:
Leftover ham can be stored in the refrigerator for up to 3-4 days. Store the ham in an airtight container or wrapped tightly in plastic wrap. You can also freeze leftover ham for up to 2-3 months. Thaw the ham in the refrigerator before reheating.
Reheating:
To reheat leftover ham, preheat your oven to 325°F (160°C). Place the ham in a baking dish and add a little water or broth to the bottom of the dish to keep the ham moist. Cover the dish with foil and bake for
Conclusion:
And there you have it! This isn’t just another ham glaze recipe; it’s a gateway to a truly unforgettable holiday meal, a Sunday supper that sings, or even a surprisingly delightful weeknight treat. I genuinely believe this ham glaze will elevate your ham from ordinary to extraordinary, and I’m so excited for you to experience the difference.
Why is this a must-try? Because it’s more than just sweet and sticky. The carefully balanced blend of sweet, savory, and tangy notes creates a complex flavor profile that complements the inherent saltiness of the ham perfectly. It’s the kind of glaze that has everyone asking for seconds (and the recipe!). It’s also incredibly versatile and forgiving. Whether you’re a seasoned chef or a kitchen novice, you’ll find this recipe easy to follow and hard to mess up. Plus, the aroma that fills your kitchen as it bakes is simply divine a promise of deliciousness to come.
But the best part? It’s adaptable to your own tastes and preferences!
Serving Suggestions and Variations:
Don’t be afraid to experiment! For a spicier kick, add a pinch of red pepper flakes or a dash of your favorite hot sauce to the glaze. If you prefer a more pronounced citrus flavor, increase the amount of orange juice or add a teaspoon of orange zest. For a deeper, richer flavor, try using brown sugar instead of granulated sugar.
Beyond the ham itself, this glaze is surprisingly versatile. Drizzle it over roasted vegetables like Brussels sprouts or carrots for a sweet and savory side dish. Use it as a dipping sauce for grilled chicken or pork chops. Or, get really creative and brush it onto a brie wheel before baking for a show-stopping appetizer.
When it comes to serving your glazed ham, the possibilities are endless. Classic sides like mashed potatoes, green bean casserole, and dinner rolls are always a hit. But don’t be afraid to think outside the box! A fresh salad with a bright vinaigrette provides a welcome contrast to the richness of the ham. Roasted asparagus or grilled pineapple also make excellent accompaniments. And for dessert? A simple fruit tart or a scoop of vanilla ice cream is the perfect ending to a memorable meal.
I personally love serving this glazed ham with scalloped potatoes and a side of honey-glazed carrots. The sweetness of the carrots complements the ham beautifully, and the scalloped potatoes add a creamy, comforting element to the meal.
Ready to Get Glazing?
I truly hope you’ll give this recipe a try. I’ve poured my heart and soul into perfecting it, and I’m confident that you’ll love it as much as I do. Remember, cooking should be fun and enjoyable, so don’t be afraid to get creative and put your own spin on things.
And most importantly, please share your experience! I’d love to hear how your ham glaze turned out, what variations you tried, and what sides you served it with. Leave a comment below, tag me in your photos on social media, or send me an email. I’m always eager to learn from my readers and see how they’re making this recipe their own. Your feedback is invaluable, and it helps me continue to create recipes that you’ll love.
So, go ahead, grab your ingredients, preheat your oven, and get ready to create a truly unforgettable ham. I can’t wait to hear all about it! Happy cooking!
Ham Glaze: The Ultimate Guide to a Deliciously Glazed Ham
A sweet, tangy, and smoky ham glaze that will transform your holiday ham into a show-stopping centerpiece. Easy to make and bursting with flavor!
Ingredients
- 1 cup packed brown sugar
- 1/2 cup Dijon mustard
- 1/4 cup honey
- 1/4 cup apple cider vinegar
- 2 tablespoons Worcestershire sauce
- 1 tablespoon orange juice
- 1 teaspoon smoked paprika
- 1/2 teaspoon ground cloves
- 1/4 teaspoon ground cinnamon
- Pinch of cayenne pepper (optional, for a little kick!)
Instructions
- Combine the Ingredients: In a medium saucepan, whisk together the brown sugar, Dijon mustard, honey, apple cider vinegar, Worcestershire sauce, orange juice, smoked paprika, ground cloves, cinnamon, and cayenne pepper (if using). Make sure everything is well combined.
- Simmer the Glaze: Place the saucepan over medium heat. Bring the mixture to a gentle simmer, stirring constantly. You want the brown sugar to completely dissolve and the glaze to thicken slightly. This usually takes about 5-7 minutes. Be careful not to let it boil rapidly, as it can burn.
- Check the Consistency: The glaze is ready when it coats the back of a spoon. To test this, dip a spoon into the glaze and then run your finger across the back of the spoon. If the glaze doesn’t run back together, it’s thick enough. If it’s still too thin, continue simmering for another minute or two, stirring constantly, and then test again.
- Cool Slightly: Remove the saucepan from the heat and let the glaze cool slightly before using. This will help it to thicken a bit more and make it easier to apply to the ham. While it’s cooling, you can prepare your ham for glazing.
- Preheat the Oven: Preheat your oven to 325°F (160°C). This lower temperature will allow the ham to heat gently without drying out.
- Score the Ham (Optional but Recommended): Scoring the ham helps the glaze penetrate the meat and creates a beautiful presentation. Use a sharp knife to score the ham in a diamond pattern, making shallow cuts about 1/4 inch deep. Be careful not to cut too deep, as you don’t want to separate the ham from the bone. The diamond pattern should be about 1-inch apart.
- Place the Ham in a Roasting Pan: Place the ham in a large roasting pan. If you have a roasting rack, use it to elevate the ham slightly. This will allow for better air circulation and prevent the ham from sticking to the bottom of the pan.
- Add Water to the Pan (Optional): Adding about 1 cup of water to the bottom of the roasting pan can help to keep the ham moist during cooking. This is especially helpful if you’re using a leaner ham.
- Cover the Ham (Optional): Covering the ham with foil during the first part of the cooking process can also help to prevent it from drying out. If you choose to cover the ham, remove the foil during the last 30-45 minutes of cooking to allow the glaze to caramelize.
- First Glaze Application: Using a pastry brush or a spoon, generously brush the ham with about half of the prepared glaze. Make sure to get the glaze into all the crevices created by the scoring.
- Bake the Ham: Bake the ham in the preheated oven for the recommended time, according to the ham’s weight and type. A general rule of thumb is about 15-20 minutes per pound for a fully cooked ham. Use a meat thermometer to ensure that the ham reaches an internal temperature of 140°F (60°C).
- Basting with Glaze: During the last 30-45 minutes of cooking, remove the ham from the oven and brush it with the remaining glaze. Return the ham to the oven and continue baking, basting with the glaze every 10-15 minutes. This will create a beautiful, glossy, and flavorful crust.
- Check the Internal Temperature: Use a meat thermometer to check the internal temperature of the ham. Insert the thermometer into the thickest part of the ham, being careful not to touch the bone. The ham is ready when it reaches an internal temperature of 140°F (60°C).
- Rest the Ham: Once the ham is cooked through, remove it from the oven and let it rest for at least 15-20 minutes before carving. This allows the juices to redistribute throughout the ham, resulting in a more tender and flavorful final product. Tent the ham loosely with foil while it rests to keep it warm.
- Carving the Ham: Place the ham on a large cutting board. Use a sharp carving knife to slice the ham against the grain. Start by making a few slices to create a flat surface, then continue slicing until you reach the bone. You can also carve the ham in a spiral fashion, following the bone.
- Arranging the Slices: Arrange the ham slices on a serving platter. You can garnish the platter with fresh herbs, such as rosemary or thyme, or with slices of orange or pineapple.
- Serving the Ham: Serve the ham warm with your favorite side dishes. Some popular choices include mashed potatoes, roasted vegetables, green bean casserole, and dinner rolls. You can also serve the ham with a side of extra glaze, if desired.
Notes
- Choose the Right Ham: The type of ham you choose will affect the final result. A bone-in ham will generally be more flavorful and moist than a boneless ham. A spiral-cut ham is easy to carve, but it can also dry out more quickly.
- Don’t Overcook the Ham: Overcooking the ham will result in a dry and tough product. Use a meat thermometer to ensure that the ham reaches an internal temperature of 140°F (60°C).
- Baste Frequently: Basting the ham with the glaze during the last 30-45 minutes of cooking will create a beautiful, glossy, and flavorful crust.
- Let the Ham Rest: Letting the ham rest for at least 15-20 minutes before carving allows the juices to redistribute throughout the ham, resulting in a more tender and flavorful final product.
- Get Creative with the Glaze: Feel free to experiment with different ingredients to create your own unique ham glaze. You can add other spices, such as ginger or allspice, or you can use different types of vinegar or fruit juice.

Leave a Comment