
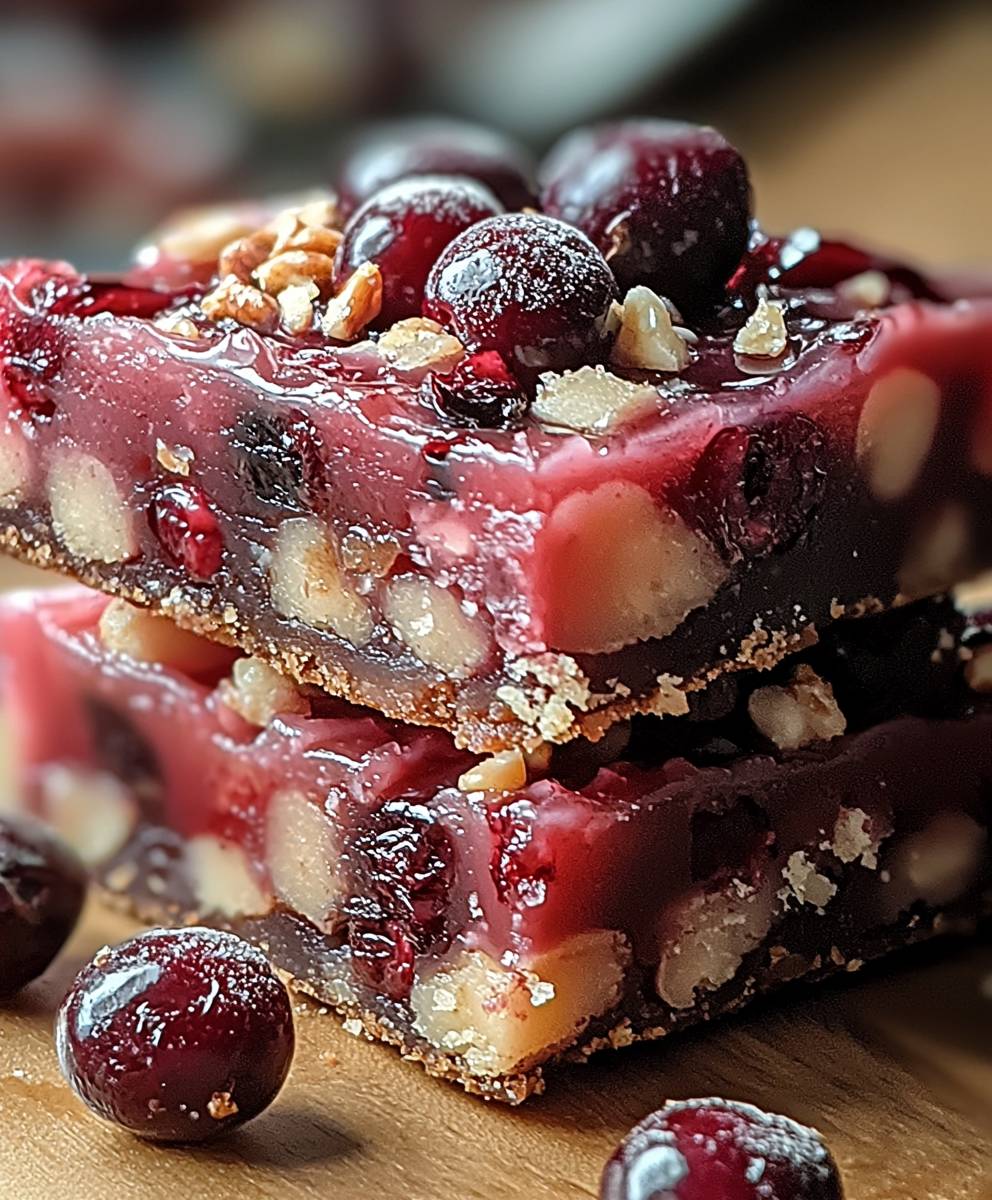
Cherry Mash Bars: Prepare to be transported back to childhood with this delightful homemade version of a classic candy! Remember those chewy, cherry-flavored bars coated in peanuts and chocolate? Well, get ready to recreate that nostalgic goodness right in your own kitchen. This recipe isn’t just about making a candy bar; it’s about capturing a memory.
While the exact origins of the commercially produced Cherry Mash Bar are shrouded in a bit of mystery, its enduring popularity speaks volumes. First introduced in 1918, it quickly became a beloved treat, particularly in the Midwest. The combination of sweet cherry, creamy fondant, and salty peanuts proved irresistible, and it remains a favorite for many even today.
What makes Cherry Mash Bars so appealing? It’s the perfect balance of textures and flavors. The soft, almost melt-in-your-mouth cherry center contrasts beautifully with the crunchy peanuts and the smooth, rich chocolate coating. Plus, making them at home allows you to customize the sweetness and nuttiness to your liking. This recipe is surprisingly simple, making it a fun project for bakers of all skill levels. So, ditch the store-bought version and let’s embark on a journey to create the ultimate homemade Cherry Mash Bar!

Ingredients:
- For the Cherry Layer:
- 1 (3 ounce) package cherry gelatin
- 1 cup boiling water
- 1 (14 ounce) can sweetened condensed milk
- 1 (20 ounce) can crushed pineapple, undrained
- 1 cup miniature marshmallows
- 1 cup chopped maraschino cherries, drained and patted dry
- For the Chocolate Peanut Butter Layer:
- 1 cup (2 sticks) unsalted butter, softened
- 3 cups powdered sugar
- 1 cup creamy peanut butter
- 1 teaspoon vanilla extract
- 6 ounces semi-sweet chocolate chips, melted and cooled slightly
Preparing the Cherry Layer:
- Dissolve the Gelatin: In a large bowl, dissolve the cherry gelatin in the boiling water. Stir until the gelatin is completely dissolved and the mixture is clear. This is a crucial step to ensure a smooth and even cherry layer.
- Combine Wet Ingredients: Add the sweetened condensed milk and undrained crushed pineapple to the dissolved gelatin. Stir well to combine. The pineapple adds a lovely tang and texture to the cherry layer, so don’t skip the juice!
- Incorporate Marshmallows and Cherries: Gently fold in the miniature marshmallows and chopped maraschino cherries. Make sure the cherries are well-drained and patted dry to prevent the cherry layer from becoming too watery. The marshmallows will add a delightful chewiness to the final product.
- Chill the Cherry Layer: Pour the cherry mixture into a 9×13 inch baking dish. I like to lightly grease the dish with cooking spray to prevent sticking, but you can also line it with parchment paper, leaving an overhang for easy removal later. Cover the dish with plastic wrap and refrigerate for at least 4 hours, or preferably overnight, until the cherry layer is firm and set. This is important for creating distinct layers in your Cherry Mash Bars.
Making the Chocolate Peanut Butter Layer:
- Cream Butter and Sugar: In a large mixing bowl, cream together the softened butter and powdered sugar until light and fluffy. This step is best done with an electric mixer (stand mixer or hand mixer). Scrape down the sides of the bowl occasionally to ensure everything is evenly incorporated. The mixture should be pale and airy.
- Add Peanut Butter and Vanilla: Add the creamy peanut butter and vanilla extract to the butter and sugar mixture. Beat until well combined. Make sure to use creamy peanut butter for the best texture. The vanilla extract enhances the overall flavor profile.
- Incorporate Melted Chocolate: Gently fold in the melted and slightly cooled semi-sweet chocolate chips. Be careful not to overmix, as this can cause the chocolate to seize up. The chocolate should be evenly distributed throughout the peanut butter mixture. I usually melt the chocolate in 30-second intervals in the microwave, stirring in between, to prevent burning.
Assembling the Cherry Mash Bars:
- Spread Chocolate Peanut Butter Layer: Once the cherry layer is firm, remove it from the refrigerator. Spread the chocolate peanut butter mixture evenly over the top of the cherry layer. Use an offset spatula or the back of a spoon to create a smooth and even surface.
- Chill Again: Cover the baking dish with plastic wrap and refrigerate for at least 2 hours, or preferably longer, until the chocolate peanut butter layer is firm. This will make it easier to cut the bars neatly.
- Cut and Serve: Once the bars are firm, remove them from the refrigerator. If you lined the baking dish with parchment paper, lift the bars out using the overhang. Cut the bars into squares using a sharp knife. For clean cuts, you can run the knife under hot water and wipe it dry between each cut.
- Storage: Store the Cherry Mash Bars in an airtight container in the refrigerator. They will keep for up to a week (if they last that long!).
Tips and Variations:
- Type of Cherries: While maraschino cherries are traditional, you can experiment with other types of cherries, such as dried cherries or fresh cherries (pitted and chopped). Just be sure to adjust the sweetness accordingly.
- Chocolate Options: Feel free to use milk chocolate, dark chocolate, or even white chocolate chips in the peanut butter layer. Each type of chocolate will impart a different flavor profile to the bars.
- Nut Alternatives: If you have a peanut allergy, you can substitute the peanut butter with almond butter, cashew butter, or sunflower seed butter.
- Marshmallow Variations: You can use flavored marshmallows, such as strawberry or vanilla, to add a unique twist to the cherry layer.
- Adding Texture: For added texture, consider adding chopped nuts (such as peanuts, pecans, or walnuts) to the chocolate peanut butter layer.
- Making it Vegan: To make these bars vegan, use vegan gelatin, vegan sweetened condensed milk, vegan butter, and vegan chocolate chips.
- Presentation: For a more elegant presentation, you can drizzle melted chocolate over the top of the bars after they have been cut.
Troubleshooting:
- Cherry Layer Not Setting: If the cherry layer is not setting properly, it could be due to using too much liquid or not chilling it for long enough. Make sure to use the correct amount of boiling water and chill the layer for at least 4 hours, or preferably overnight.
- Chocolate Peanut Butter Layer Too Soft: If the chocolate peanut butter layer is too soft, it could be due to using butter that is too warm or not chilling it for long enough. Make sure the butter is softened but not melted, and chill the layer for at least 2 hours.
- Bars Difficult to Cut: If the bars are difficult to cut, it could be due to not chilling them for long enough or using a dull knife. Make sure the bars are firm before cutting, and use a sharp knife. Running the knife under hot water and wiping it dry between each cut can also help.
Enjoy!
I hope you enjoy making and eating these delicious Cherry Mash Bars! They are a perfect treat for parties, potlucks, or any occasion. They are also a great way to use up leftover maraschino cherries. Let me know in the comments if you have any questions or if you try any variations!
Conclusion:
Well, there you have it! I truly believe this recipe for Cherry Mash Bars is a must-try for anyone who loves a sweet treat with a nostalgic twist. It’s the perfect combination of chewy, crunchy, and oh-so-cherry-licious. Forget store-bought imitations; these homemade bars are bursting with flavor and have that special touch that only comes from making something yourself.
Why is this recipe a winner? First, it’s surprisingly easy to make. You don’t need any fancy equipment or advanced baking skills. The ingredients are readily available at most grocery stores, and the steps are straightforward and simple to follow. Second, the taste is simply divine. The combination of the buttery graham cracker crust, the sweet and chewy cherry filling, and the rich chocolate topping is a symphony of flavors and textures that will leave you wanting more. Third, it’s a crowd-pleaser! Whether you’re making them for a family gathering, a potluck, or just a weekend treat, these bars are guaranteed to be a hit.
But the best part? You can easily customize these bars to your liking!
Serving Suggestions and Variations:
* For a richer flavor: Use dark chocolate for the topping. The slight bitterness of the dark chocolate will perfectly complement the sweetness of the cherry filling.
* Add some nuts: Sprinkle chopped pecans or walnuts on top of the chocolate topping before it sets for added crunch and flavor.
* Make it festive: Use red and green sprinkles for a holiday-themed treat.
* Individual servings: Cut the bars into smaller squares or use cookie cutters to create fun shapes.
* Ice Cream Companion: Crumble a Cherry Mash Bar over vanilla ice cream for an unforgettable dessert.
* Elevated Presentation: Drizzle melted white chocolate over the finished bars for an elegant touch.
* Cherry Boost: Add a teaspoon of cherry extract to the filling for an even more intense cherry flavor.
* Peanut Butter Swirl: Swirl a spoonful of peanut butter into the melted chocolate before spreading it over the bars for a delightful peanut butter and cherry combination.
I’m so excited for you to try this recipe! I know you’ll love it as much as I do. The satisfaction of creating something delicious from scratch is truly rewarding, and these Cherry Mash Bars are the perfect project for both beginner and experienced bakers.
Don’t be afraid to experiment with different variations and make it your own. Baking is all about having fun and creating something that you and your loved ones will enjoy.
So, what are you waiting for? Gather your ingredients, preheat your oven, and get ready to bake up a batch of these irresistible Cherry Mash Bars. I promise you won’t regret it!
And most importantly, I’d love to hear about your experience! Once you’ve made these bars, please come back and leave a comment below. Let me know what you thought, what variations you tried, and any tips or tricks you discovered along the way. Sharing your feedback helps me improve my recipes and inspires other bakers to try them too. Happy baking! I can’t wait to hear all about your Cherry Mash Bar adventures!
Cherry Mash Bars: A Nostalgic Treat Recipe
Layered dessert bar with cherry gelatin and a rich chocolate peanut butter topping. Easy, nostalgic, and perfect for sharing!
Ingredients
- 1 (3 ounce) package cherry gelatin
- 1 cup boiling water
- 1 (14 ounce) can sweetened condensed milk
- 1 (20 ounce) can crushed pineapple, undrained
- 1 cup miniature marshmallows
- 1 cup chopped maraschino cherries, drained and patted dry
- 1 cup (2 sticks) unsalted butter, softened
- 3 cups powdered sugar
- 1 cup creamy peanut butter
- 1 teaspoon vanilla extract
- 6 ounces semi-sweet chocolate chips, melted and cooled slightly
Instructions
- Dissolve the Gelatin: In a large bowl, dissolve the cherry gelatin in the boiling water. Stir until the gelatin is completely dissolved and the mixture is clear.
- Combine Wet Ingredients: Add the sweetened condensed milk and undrained crushed pineapple to the dissolved gelatin. Stir well to combine.
- Incorporate Marshmallows and Cherries: Gently fold in the miniature marshmallows and chopped maraschino cherries. Make sure the cherries are well-drained and patted dry.
- Chill the Cherry Layer: Pour the cherry mixture into a 9×13 inch baking dish. Lightly grease the dish with cooking spray or line with parchment paper. Cover the dish with plastic wrap and refrigerate for at least 4 hours, or preferably overnight, until the cherry layer is firm and set.
- Cream Butter and Sugar: In a large mixing bowl, cream together the softened butter and powdered sugar until light and fluffy. Scrape down the sides of the bowl occasionally.
- Add Peanut Butter and Vanilla: Add the creamy peanut butter and vanilla extract to the butter and sugar mixture. Beat until well combined.
- Incorporate Melted Chocolate: Gently fold in the melted and slightly cooled semi-sweet chocolate chips. Be careful not to overmix.
- Spread Chocolate Peanut Butter Layer: Once the cherry layer is firm, remove it from the refrigerator. Spread the chocolate peanut butter mixture evenly over the top of the cherry layer.
- Chill Again: Cover the baking dish with plastic wrap and refrigerate for at least 2 hours, or preferably longer, until the chocolate peanut butter layer is firm.
- Cut and Serve: Once the bars are firm, remove them from the refrigerator. If you lined the baking dish with parchment paper, lift the bars out using the overhang. Cut the bars into squares using a sharp knife. For clean cuts, you can run the knife under hot water and wipe it dry between each cut.
- Storage: Store the Cherry Mash Bars in an airtight container in the refrigerator. They will keep for up to a week.
Notes
- Type of Cherries: While maraschino cherries are traditional, you can experiment with other types of cherries, such as dried cherries or fresh cherries (pitted and chopped). Just be sure to adjust the sweetness accordingly.
- Chocolate Options: Feel free to use milk chocolate, dark chocolate, or even white chocolate chips in the peanut butter layer. Each type of chocolate will impart a different flavor profile to the bars.
- Nut Alternatives: If you have a peanut allergy, you can substitute the peanut butter with almond butter, cashew butter, or sunflower seed butter.
- Marshmallow Variations: You can use flavored marshmallows, such as strawberry or vanilla, to add a unique twist to the cherry layer.
- Adding Texture: For added texture, consider adding chopped nuts (such as peanuts, pecans, or walnuts) to the chocolate peanut butter layer.
- Making it Vegan: To make these bars vegan, use vegan gelatin, vegan sweetened condensed milk, vegan butter, and vegan chocolate chips.
- Presentation: For a more elegant presentation, you can drizzle melted chocolate over the top of the bars after they have been cut.
- Cherry Layer Not Setting: If the cherry layer is not setting properly, it could be due to using too much liquid or not chilling it for long enough. Make sure to use the correct amount of boiling water and chill the layer for at least 4 hours, or preferably overnight.
- Chocolate Peanut Butter Layer Too Soft: If the chocolate peanut butter layer is too soft, it could be due to using butter that is too warm or not chilling it for long enough. Make sure the butter is softened but not melted, and chill the layer for at least 2 hours.
- Bars Difficult to Cut: If the bars are difficult to cut, it could be due to not chilling them for long enough or using a dull knife. Make sure the bars are firm before cutting, and use a sharp knife. Running the knife under hot water and wiping it dry between each cut can also help.
Leave a Comment