
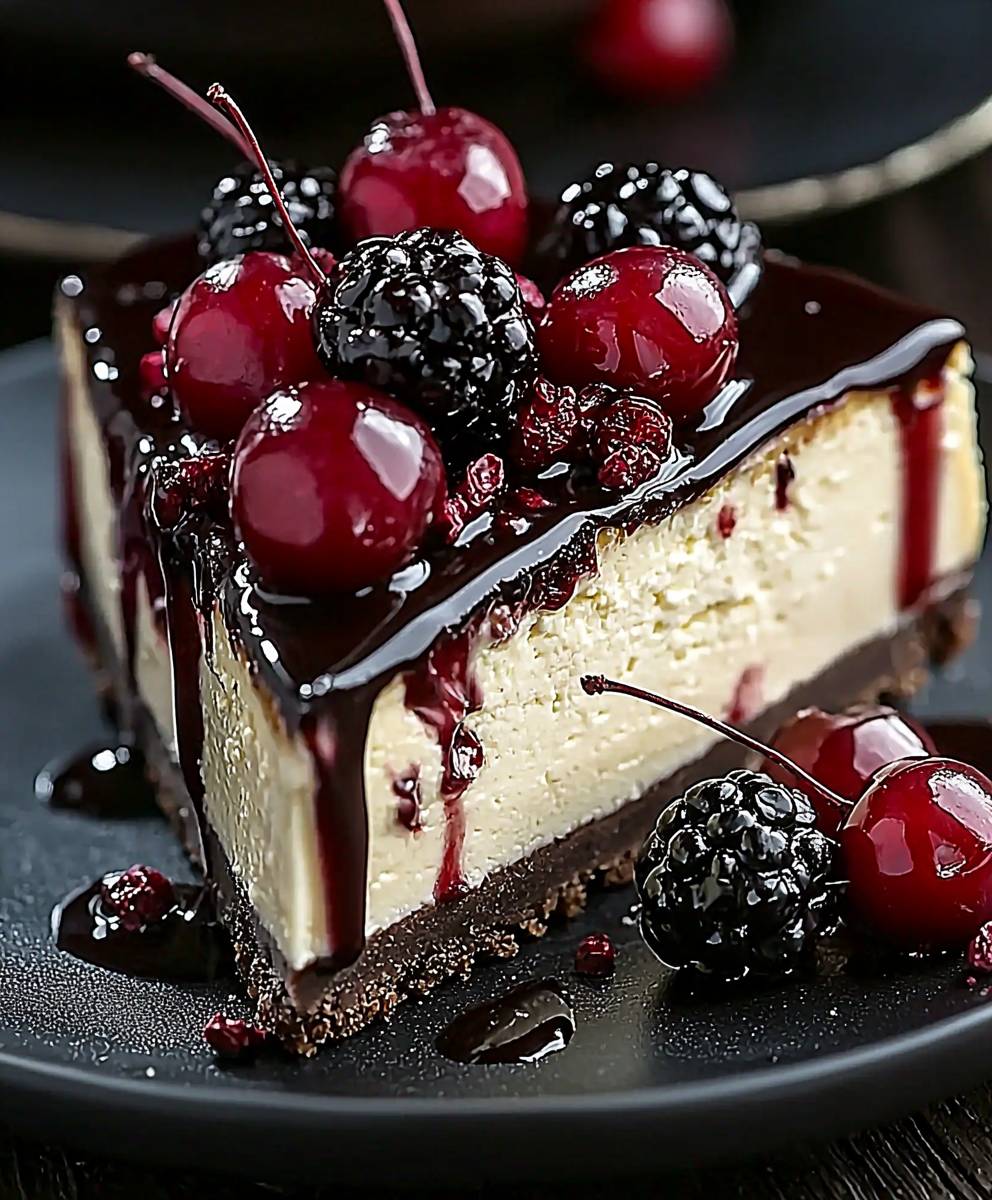
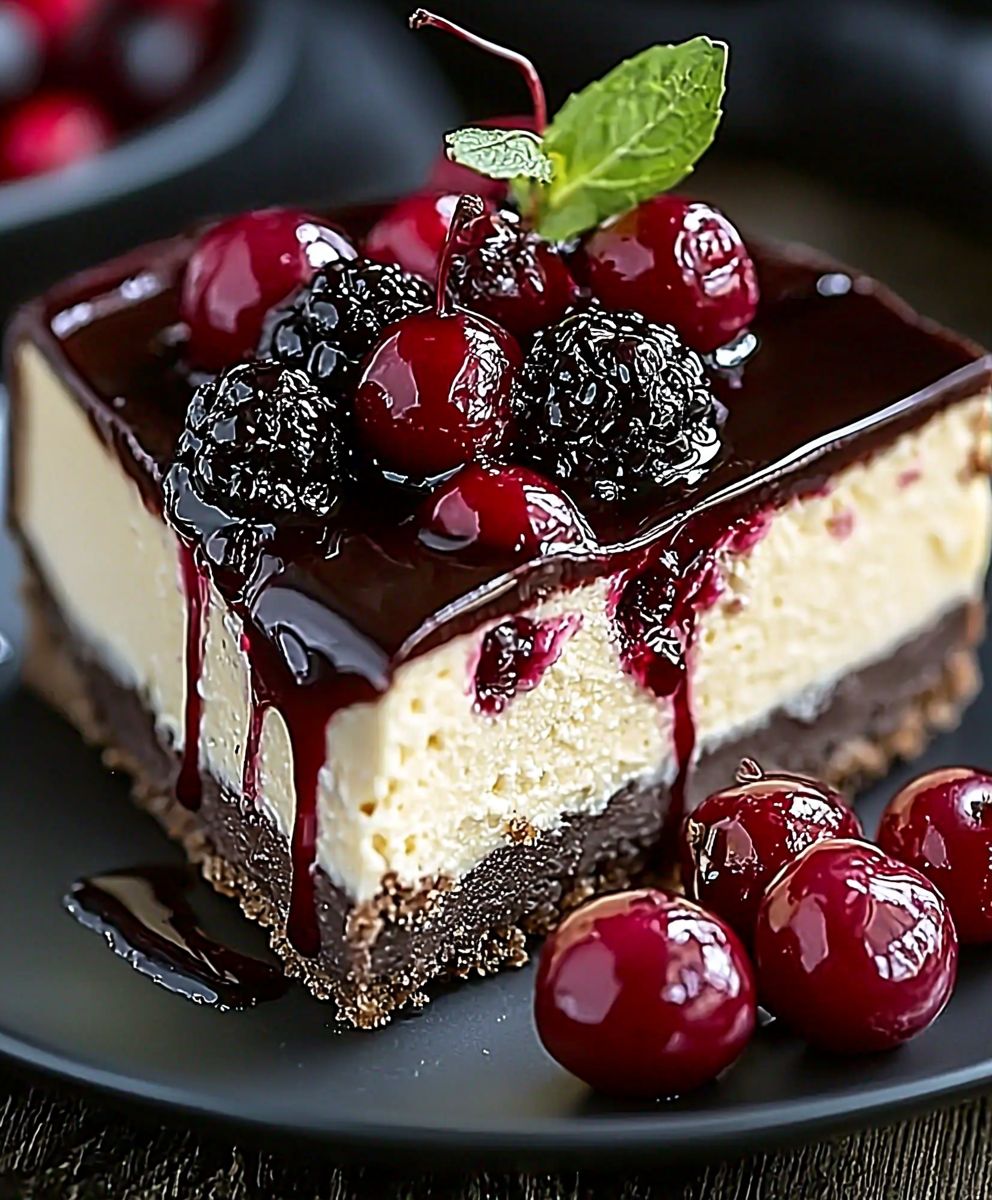
Black Forest Cheesecake: just the name conjures up images of decadent chocolate, sweet cherries, and creamy, dreamy goodness, doesn’t it? Forget choosing between cake and cheesecake with this recipe, you get the best of both worlds in one unforgettable dessert! I’m thrilled to share my take on this classic treat, a dessert that’s guaranteed to impress at any gathering.
While the Black Forest cake itself originates from the Black Forest region of Germany (known as the Schwarzwald), famed for its sour cherries and Kirsch liqueur, the cheesecake adaptation is a more modern invention. It cleverly captures the essence of the traditional cake, transforming it into a richer, creamier experience. Think of it as a delicious homage to a beloved classic!
What makes this Black Forest Cheesecake so irresistible? It’s the perfect balance of flavors and textures. The rich, chocolatey base complements the tangy cheesecake filling, while the sweet, juicy cherries provide a burst of fruity delight. The addition of Kirsch (optional, but highly recommended!) adds a subtle warmth and complexity that elevates the entire dessert. People adore this dish because it’s indulgent without being overly heavy, and it offers a sophisticated twist on familiar flavors. Plus, who can resist a slice of cheesecake that looks as stunning as it tastes? Let’s get baking!
Ingredients:
- For the Chocolate Crust:
- 1 ½ cups chocolate cookie crumbs (about 24 chocolate wafer cookies)
- 5 tablespoons unsalted butter, melted
- 2 tablespoons granulated sugar
- ¼ teaspoon salt
- For the Cheesecake Filling:
- 3 (8 ounce) packages cream cheese, softened
- 1 ½ cups granulated sugar
- ½ cup sour cream
- 2 large eggs
- 2 large egg yolks
- 1 teaspoon vanilla extract
- ¼ teaspoon almond extract
- 4 ounces bittersweet chocolate, melted and cooled slightly
- For the Cherry Topping:
- 1 (21 ounce) can cherry pie filling
- 2 tablespoons Kirsch (cherry liqueur), optional
- For the Chocolate Shavings (Optional):
- 4 ounces semi-sweet or bittersweet chocolate
Preparing the Chocolate Crust
- Preheat your oven: Preheat your oven to 350°F (175°C). This is crucial for baking the crust properly.
- Prepare the cookie crumbs: If you’re using whole chocolate wafer cookies, place them in a food processor and pulse until you have fine crumbs. Alternatively, you can place them in a resealable bag and crush them with a rolling pin. Make sure the crumbs are evenly sized for a consistent crust.
- Combine the crust ingredients: In a medium bowl, combine the chocolate cookie crumbs, melted butter, granulated sugar, and salt. Mix well until all the crumbs are evenly moistened. The mixture should resemble wet sand.
- Press the crust into the pan: Press the crumb mixture firmly and evenly into the bottom of a 9-inch springform pan. I like to use the bottom of a measuring cup to help press it down firmly and create a smooth, even surface. Make sure to press it all the way to the edges.
- Bake the crust: Bake the crust in the preheated oven for 8-10 minutes. This helps to set the crust and prevent it from becoming soggy.
- Cool the crust: Remove the crust from the oven and let it cool completely while you prepare the cheesecake filling. This is important to prevent the filling from melting the crust.
Making the Cheesecake Filling
- Beat the cream cheese: In a large bowl, beat the softened cream cheese with an electric mixer until smooth and creamy. This is a very important step. If your cream cheese is not soft enough, you will end up with lumps in your cheesecake. I recommend letting the cream cheese sit at room temperature for at least an hour before starting.
- Add the sugar: Gradually add the granulated sugar to the cream cheese, beating until well combined and smooth. Be sure to scrape down the sides of the bowl occasionally to ensure that everything is evenly mixed.
- Mix in the sour cream: Add the sour cream and beat until just combined. Sour cream adds moisture and tang to the cheesecake, creating a richer flavor.
- Add the eggs and egg yolks: Add the eggs and egg yolks one at a time, beating well after each addition. The egg yolks add richness and color to the cheesecake. Be careful not to overbeat the mixture at this stage, as this can incorporate too much air and cause the cheesecake to crack during baking.
- Incorporate the extracts: Stir in the vanilla extract and almond extract. The almond extract enhances the cherry flavor and adds a subtle complexity to the cheesecake.
- Add the melted chocolate: Gradually add the melted and cooled bittersweet chocolate to the cheesecake batter, mixing until just combined. Be careful not to overmix. Make sure the chocolate is not too hot, or it will cook the eggs in the batter.
Baking the Cheesecake
- Pour the filling into the crust: Pour the cheesecake filling over the cooled chocolate crust in the springform pan. Spread the filling evenly.
- Prepare a water bath: Wrap the bottom of the springform pan tightly with heavy-duty aluminum foil. This will prevent water from seeping into the cheesecake. Place the wrapped pan in a larger roasting pan. Pour hot water into the roasting pan until it reaches about halfway up the sides of the springform pan. The water bath helps to bake the cheesecake evenly and prevent it from cracking.
- Bake the cheesecake: Bake the cheesecake in the preheated oven for 55-70 minutes, or until the edges are set but the center still has a slight jiggle. The baking time may vary depending on your oven.
- Turn off the oven and let the cheesecake cool: Turn off the oven and let the cheesecake cool in the oven with the door slightly ajar for 1 hour. This gradual cooling process helps to prevent the cheesecake from cracking.
- Refrigerate the cheesecake: Remove the cheesecake from the oven and water bath. Let it cool completely on a wire rack. Then, cover it with plastic wrap and refrigerate for at least 6 hours, or preferably overnight. This allows the cheesecake to set completely and develop its flavor.
Assembling and Garnishing
- Remove the cheesecake from the pan: Carefully remove the cheesecake from the springform pan. Run a thin knife around the edges of the cheesecake to loosen it from the pan before releasing the sides.
- Prepare the cherry topping: In a small bowl, combine the cherry pie filling and Kirsch (if using). The Kirsch enhances the cherry flavor and adds a touch of sophistication.
- Top the cheesecake: Spoon the cherry topping evenly over the top of the cheesecake.
- Add chocolate shavings (optional): If desired, create chocolate shavings by running a vegetable peeler along the side of a block of semi-sweet or bittersweet chocolate. Sprinkle the chocolate shavings over the cherry topping.
- Serve and enjoy: Slice the cheesecake and serve chilled. This Black Forest Cheesecake is best enjoyed within a few days of making it.
Tips for Success
- Use room temperature ingredients: Make sure your cream cheese, eggs, and sour cream are at room temperature before you start. This will help them blend together smoothly and prevent lumps in your cheesecake.
- Don’t overbeat the batter: Overbeating the batter can incorporate too much air and cause the cheesecake to crack during baking. Mix the ingredients until just combined.
- Use a water bath: A water bath is essential for baking a creamy, crack-free cheesecake. The water bath helps to bake the cheesecake evenly and prevent it from drying out.
- Cool the cheesecake slowly: Cooling the cheesecake slowly in the oven helps to prevent it from cracking.
- Refrigerate the cheesecake for at least 6 hours: Refrigerating the cheesecake allows it to set completely and develop its flavor.
Variations
- Add chocolate chips to the filling: For an extra chocolatey cheesecake, add ½ cup of mini chocolate chips to the filling.
- Use a different type of cookie crust: You can use graham cracker crumbs or Oreo crumbs instead of chocolate cookie crumbs for the crust.
- Add a layer of chocolate ganache: For an even more decadent cheesecake, add a layer of chocolate ganache on top of the cherry topping.
- Use fresh cherries: If you prefer, you can use fresh cherries instead of cherry pie filling. Pit the cherries and cook them with sugar and a little cornstarch until they thicken.
Conclusion:
This Black Forest Cheesecake is more than just a dessert; it’s an experience. The rich, decadent chocolate, the bright burst of cherries, and the creamy, smooth cheesecake filling all come together in perfect harmony. It’s a showstopper that’s surprisingly easy to make, and I promise, it will impress everyone you share it with. If you’re looking for a dessert that’s both elegant and comforting, look no further. This is it.
Why is this a must-try? Because it elevates the classic cheesecake to a whole new level. The combination of flavors is simply irresistible. The chocolate crumb crust provides a delightful textural contrast to the creamy filling, while the cherry topping adds a touch of sweetness and tartness that cuts through the richness perfectly. It’s a symphony of flavors and textures that will leave you wanting more. Plus, it’s a fantastic way to showcase your baking skills without spending hours in the kitchen.
Ready to serve? This Black Forest Cheesecake is fantastic on its own, but you can also dress it up with a few simple additions. A dollop of freshly whipped cream is always a welcome accompaniment. For an extra touch of elegance, sprinkle some shaved chocolate or cocoa powder on top. You could even add a few fresh cherries for a beautiful presentation.
Looking for variations? Get creative! If you’re not a fan of chocolate crumb crust, you can use a classic graham cracker crust instead. You could also experiment with different types of cherries, such as Bing cherries or Rainier cherries. For a boozy twist, soak the cherries in Kirschwasser (cherry liqueur) before adding them to the topping. If you want to make it even more decadent, add a layer of chocolate ganache between the cheesecake filling and the cherry topping. Or, for a lighter version, use a reduced-fat cream cheese and a sugar substitute. The possibilities are endless!
I truly believe that this Black Forest Cheesecake will become a new favorite in your household. It’s perfect for special occasions, holidays, or even just a weekend treat. It’s a guaranteed crowd-pleaser that will have everyone asking for the recipe.
So, what are you waiting for? Gather your ingredients, preheat your oven, and get ready to bake! I’m confident that you’ll love this recipe as much as I do. And most importantly, don’t be afraid to experiment and make it your own. Baking is all about having fun and creating something delicious.
Once you’ve tried this recipe, I’d love to hear about your experience. Did you make any variations? What did your friends and family think? Share your photos and stories in the comments below. I can’t wait to see your creations! Happy baking! I hope you enjoy this Black Forest Cheesecake as much as I do. It’s a truly special dessert that’s perfect for any occasion.
Black Forest Cheesecake: The Ultimate Recipe and Baking Guide
Chocolate cookie crust topped with creamy cheesecake filling and a luscious cherry topping.
Ingredients
- 1 ½ cups chocolate cookie crumbs (about 24 chocolate wafer cookies)
- 5 tablespoons unsalted butter, melted
- 2 tablespoons granulated sugar
- ¼ teaspoon salt
- 3 (8 ounce) packages cream cheese, softened
- 1 ½ cups granulated sugar
- ½ cup sour cream
- 2 large eggs
- 2 large egg yolks
- 1 teaspoon vanilla extract
- ¼ teaspoon almond extract
- 4 ounces bittersweet chocolate, melted and cooled slightly
- 1 (21 ounce) can cherry pie filling
- 2 tablespoons Kirsch (cherry liqueur), optional
- 4 ounces semi-sweet or bittersweet chocolate
Instructions
- Prepare the Chocolate Crust:
- Preheat oven to 350°F (175°C).
- Combine chocolate cookie crumbs, melted butter, granulated sugar, and salt in a medium bowl. Mix well.
- Press the crumb mixture firmly and evenly into the bottom of a 9-inch springform pan.
- Bake for 8-10 minutes.
- Cool completely.
- Make the Cheesecake Filling:
- Beat softened cream cheese with an electric mixer until smooth and creamy.
- Gradually add granulated sugar, beating until well combined.
- Mix in sour cream until just combined.
- Add eggs and egg yolks one at a time, beating well after each addition.
- Stir in vanilla extract and almond extract.
- Gradually add melted and cooled bittersweet chocolate, mixing until just combined.
- Bake the Cheesecake:
- Pour the cheesecake filling over the cooled chocolate crust in the springform pan. Spread the filling evenly.
- Wrap the bottom of the springform pan tightly with heavy-duty aluminum foil. Place the wrapped pan in a larger roasting pan. Pour hot water into the roasting pan until it reaches about halfway up the sides of the springform pan.
- Bake for 55-70 minutes, or until the edges are set but the center still has a slight jiggle.
- Turn off the oven and let the cheesecake cool in the oven with the door slightly ajar for 1 hour.
- Remove the cheesecake from the oven and water bath. Let it cool completely on a wire rack. Then, cover it with plastic wrap and refrigerate for at least 6 hours, or preferably overnight.
- Assemble and Garnish:
- Carefully remove the cheesecake from the springform pan.
- In a small bowl, combine the cherry pie filling and Kirsch (if using).
- Spoon the cherry topping evenly over the top of the cheesecake.
- If desired, create chocolate shavings and sprinkle them over the cherry topping.
- Slice and serve chilled.
Notes
- Use room temperature ingredients for a smooth batter.
- Don’t overbeat the batter.
- A water bath is essential for a creamy, crack-free cheesecake.
- Cool the cheesecake slowly to prevent cracking.
- Refrigerate for at least 6 hours to allow it to set completely.
- Variations: Add chocolate chips to the filling, use a different type of cookie crust, add a layer of chocolate ganache, or use fresh cherries.
Leave a Comment