
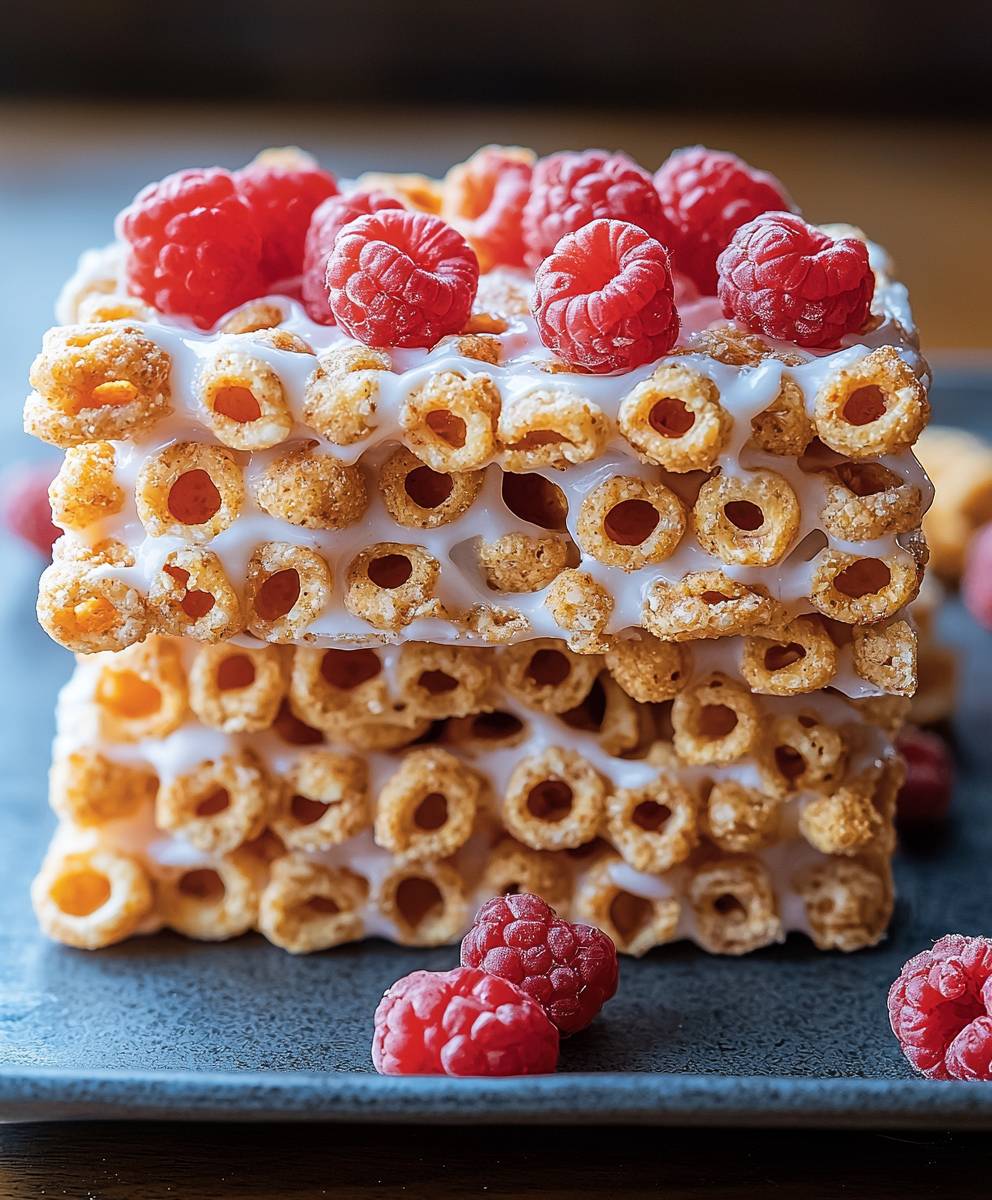
Cereal bars: who doesn’t love them? Imagine sinking your teeth into a chewy, crunchy, and perfectly sweet bar packed with your favorite grains and flavors. It’s the ultimate grab-and-go snack, a lunchbox staple, and a satisfying treat that bridges the gap between meals. But did you know that the concept of a portable grain-based snack dates back centuries? Ancient civilizations often carried rudimentary versions of energy bars made from grains, nuts, and honey for sustenance during travel and labor.
While the modern cereal bars we know and love are a relatively recent invention, their popularity is undeniable. People adore them for their convenience, portability, and the sheer variety of flavors and textures available. From classic oat and honey to decadent chocolate chip and peanut butter, there’s a cereal bar to satisfy every craving. Plus, they offer a customizable canvas for adding healthy ingredients like dried fruits, nuts, and seeds, making them a surprisingly nutritious option.
In this recipe, I’m going to share my foolproof method for creating homemade cereal bars that are even better than store-bought. Get ready to ditch the processed stuff and embrace a healthier, tastier, and more personalized snacking experience!

Ingredients:
- 3 cups rolled oats (old-fashioned, not instant)
- 1 cup mixed nuts (almonds, walnuts, pecans), roughly chopped
- 1 cup dried fruit (cranberries, raisins, chopped apricots), roughly chopped
- ½ cup shredded coconut (unsweetened)
- ½ cup sunflower seeds
- ¼ cup chia seeds
- ½ teaspoon ground cinnamon
- ¼ teaspoon salt
- ½ cup peanut butter (or almond butter, sunflower seed butter)
- ½ cup honey (or maple syrup for a vegan option)
- ¼ cup coconut oil, melted
- 1 teaspoon vanilla extract
- Optional: ½ cup chocolate chips (dark, milk, or white)
Preparing the Dry Ingredients:
- First, let’s get all our dry ingredients ready. In a large bowl, combine the 3 cups of rolled oats, 1 cup of mixed nuts, 1 cup of dried fruit, ½ cup of shredded coconut, ½ cup of sunflower seeds, and ¼ cup of chia seeds.
- Next, add ½ teaspoon of ground cinnamon and ¼ teaspoon of salt to the bowl. The cinnamon adds a lovely warmth, and the salt helps to balance the sweetness.
- Now, give everything a good stir to make sure all the dry ingredients are evenly distributed. This ensures that every bite of your cereal bar is packed with flavor and texture.
Preparing the Wet Ingredients:
- In a separate, microwave-safe bowl, combine ½ cup of peanut butter (or your preferred nut butter), ½ cup of honey (or maple syrup), and ¼ cup of melted coconut oil.
- Microwave the mixture for about 30-45 seconds, or until the peanut butter is softened and the coconut oil is fully melted. Keep a close eye on it to prevent it from burning.
- Remove the bowl from the microwave and stir the wet ingredients together until they are smooth and well combined. This will create a luscious, sticky binder for our cereal bars.
- Add 1 teaspoon of vanilla extract to the wet ingredients and stir again. The vanilla extract enhances the overall flavor profile of the bars.
Combining Wet and Dry Ingredients:
- Pour the wet ingredients over the dry ingredients in the large bowl.
- Using a sturdy spatula or wooden spoon, mix everything together thoroughly. This step requires a bit of elbow grease, so be prepared to put in some effort.
- Make sure that all the dry ingredients are coated evenly with the wet ingredients. You want every oat, nut, and piece of fruit to be nicely coated in the sticky mixture.
- If you’re using chocolate chips, now is the time to add them. Gently fold them into the mixture until they are evenly distributed.
Pressing and Setting the Bars:
- Line an 8×8 inch baking pan with parchment paper. Make sure the parchment paper overhangs the sides of the pan; this will make it easier to lift the bars out later.
- Transfer the cereal bar mixture into the prepared baking pan.
- Using your hands or the back of a spatula, firmly press the mixture into the pan. The tighter you pack the mixture, the firmer your bars will be.
- For an extra-smooth top, you can use a piece of parchment paper to cover the mixture and then press down with a flat-bottomed object, like a measuring cup.
- Once the mixture is firmly pressed, cover the pan with plastic wrap and refrigerate for at least 2 hours, or preferably overnight. This allows the bars to set completely and makes them easier to cut.
Cutting and Storing the Bars:
- After the bars have chilled and set, remove them from the refrigerator.
- Lift the bars out of the pan using the parchment paper overhang.
- Place the bars on a cutting board and use a sharp knife to cut them into your desired size and shape. I usually cut them into rectangles, but you can also make squares or even triangles.
- For clean cuts, you can run the knife under hot water and wipe it dry between each cut.
- Store the cereal bars in an airtight container in the refrigerator for up to a week. You can also freeze them for longer storage; just wrap them individually in plastic wrap before freezing.
Tips and Variations:
Nut Butter Substitutions:
Don’t have peanut butter on hand? No problem! Almond butter, cashew butter, or sunflower seed butter all work wonderfully in this recipe. Each will impart a slightly different flavor, so feel free to experiment and find your favorite.
Sweetener Options:
While honey is my go-to sweetener, maple syrup is a fantastic vegan alternative. You can also use agave nectar or brown rice syrup, but keep in mind that these sweeteners may affect the overall texture of the bars.
Dried Fruit Swaps:
Get creative with your dried fruit! Cranberries, raisins, chopped apricots, dates, and figs all add a delicious chewy texture and sweetness to the bars. Feel free to use a combination of your favorites.
Nutty Additions:
The mixed nuts in this recipe are just a suggestion. You can use any combination of nuts that you enjoy, such as almonds, walnuts, pecans, cashews, or macadamia nuts. You can also add toasted nuts for a richer flavor.
Seed Sensations:
Sunflower seeds and chia seeds add a boost of nutrients and a pleasant crunch to the bars. You can also add pumpkin seeds, flax seeds, or hemp seeds for even more nutritional benefits.
Spice It Up:
Cinnamon is a classic addition to cereal bars, but you can also experiment with other spices, such as nutmeg, ginger, or cardamom. A pinch of cayenne pepper can also add a subtle kick.
Chocolate Lover’s Delight:
If you’re a chocolate lover, don’t hesitate to add chocolate chips to your cereal bars. Dark chocolate, milk chocolate, white chocolate, or even chopped chocolate bars all work well. You can also drizzle melted chocolate over the finished bars for an extra touch of indulgence.
Texture Tweaks:
For chewier bars, use more honey or maple syrup. For crunchier bars, add more nuts and seeds. You can also adjust the amount of oats to achieve your desired texture.
Allergy Considerations:
If you have any allergies, be sure to check the labels of all your ingredients carefully. You can easily adapt this recipe to be gluten-free, dairy-free, nut-free, or vegan by making appropriate substitutions.
Baking for a Crowd:
This recipe can easily be doubled or tripled to make a larger batch of cereal bars. Just be sure to use a larger baking pan and adjust the baking time accordingly.
No-Bake Convenience:
The beauty of this recipe is that it requires no baking! Simply mix, press, and chill. This makes it a perfect option for hot summer days or when you don’t want to turn on the oven.
Perfect for On-the-Go:
These cereal bars are a great snack to take with you on the go. They’re perfect for hiking, biking, road trips, or just a quick energy boost during the day.
Kid-Friendly Fun:
Get your kids involved in making these cereal bars! They’ll love helping to measure ingredients, mix everything together, and press the mixture into the pan. It’s a fun and healthy activity that the whole family can enjoy.
Make Ahead Marvel:
These cereal bars can be made ahead of time and stored in the refrigerator or freezer. This makes them a convenient option for busy weeknights or when you need a quick and easy snack on hand.
Cost-Effective Creation:
Making your own cereal bars is much more cost-effective than buying them from the store. You can save money by buying ingredients in bulk and using what you already have on hand.
Healthier Alternative:
These homemade cereal bars are a healthier alternative to store-bought versions, which are often loaded with sugar, preservatives, and artificial ingredients. You can control the ingredients and make sure that your bars are packed with wholesome goodness.
Customizable Creations:
The possibilities are endless when it comes to customizing these cereal bars. Feel free to experiment with different ingredients and flavors to create your own signature recipe.
Conclusion:
So, there you have it! These homemade cereal bars are truly a game-changer. They’re quick, customizable, and oh-so-delicious everything you could possibly want in a snack or breakfast treat. But why are they a must-try? Well, beyond the sheer convenience of having a grab-and-go option that’s actually good for you (or at least, better than most store-bought alternatives!), it’s the sheer versatility that really seals the deal.
I know what you’re thinking: “Cereal bars? Been there, done that.” But trust me, these are different. The homemade aspect allows you to control the ingredients, ditching the processed sugars and artificial flavors that often plague commercial versions. You get to choose your favorite cereals, your favorite nuts and seeds, and your favorite dried fruits. It’s a blank canvas for your taste buds!
And speaking of versatility, let’s talk serving suggestions and variations. These bars are fantastic on their own, perfect for a quick breakfast on a busy morning or a mid-afternoon energy boost. But you can also elevate them! Try crumbling them over yogurt for a delightful parfait. Pack them in your kids’ lunchboxes for a healthy and satisfying snack. Or, for a truly decadent treat, drizzle them with melted dark chocolate and a sprinkle of sea salt.
The possibilities are endless! Feeling adventurous? Try adding a tablespoon of peanut butter or almond butter to the melted butter and honey mixture for an extra layer of flavor and richness. Or, for a vegan option, substitute the honey with maple syrup or agave nectar. You can also experiment with different spices, like cinnamon, nutmeg, or even a pinch of cardamom.
For a protein boost, consider adding a scoop of your favorite protein powder to the dry ingredients. This is a great way to make these bars even more satisfying and keep you feeling full for longer. And if you’re looking for a little extra crunch, try adding some toasted coconut flakes or chopped pretzels.
I’ve personally made these cereal bars dozens of times, and each time I tweak the recipe slightly to suit my mood and cravings. That’s the beauty of it it’s a recipe that’s meant to be played with and adapted to your own preferences.
But the best part? Sharing them! These bars make a wonderful homemade gift for friends and family. Wrap them individually in parchment paper and tie them with a ribbon for a thoughtful and delicious present. They’re also a great addition to potlucks and picnics.
So, what are you waiting for? I urge you to give this recipe a try. I promise you won’t be disappointed. Gather your ingredients, preheat your oven, and get ready to create some seriously delicious and satisfying cereal bars.
And most importantly, I want to hear about your experience! Did you try a particular variation that you loved? Did you add any unique ingredients? Share your photos and stories in the comments below. I can’t wait to see what you create! Happy baking (or, in this case, no-baking)! Let me know how your cereal bars turn out!
Cereal Bars: The Ultimate Guide to Healthy and Delicious Options
Easy no-bake cereal bars packed with oats, nuts, dried fruit, and a touch of sweetness. A customizable and healthy snack perfect for on-the-go!
Ingredients
- 3 cups rolled oats (old-fashioned, not instant)
- 1 cup mixed nuts (almonds, walnuts, pecans), roughly chopped
- 1 cup dried fruit (cranberries, raisins, chopped apricots), roughly chopped
- ½ cup shredded coconut (unsweetened)
- ½ cup sunflower seeds
- ¼ cup chia seeds
- ½ teaspoon ground cinnamon
- ¼ teaspoon salt
- ½ cup peanut butter (or almond butter, sunflower seed butter)
- ½ cup honey (or maple syrup for a vegan option)
- ¼ cup coconut oil, melted
- 1 teaspoon vanilla extract
- Optional: ½ cup chocolate chips (dark, milk, or white)
Instructions
- Prepare Dry Ingredients: In a large bowl, combine rolled oats, mixed nuts, dried fruit, shredded coconut, sunflower seeds, and chia seeds. Add cinnamon and salt. Stir well to distribute evenly.
- Prepare Wet Ingredients: In a microwave-safe bowl, combine peanut butter (or nut butter), honey (or maple syrup), and melted coconut oil. Microwave for 30-45 seconds until softened. Stir until smooth. Add vanilla extract and stir again.
- Combine Wet and Dry: Pour wet ingredients over dry ingredients. Mix thoroughly with a spatula or wooden spoon until all dry ingredients are evenly coated. Fold in chocolate chips (if using).
- Press and Set: Line an 8×8 inch baking pan with parchment paper, with overhang on the sides. Transfer mixture to the pan and firmly press down with your hands or the back of a spatula. For a smooth top, cover with parchment paper and press with a flat-bottomed object.
- Chill: Cover the pan with plastic wrap and refrigerate for at least 2 hours, or preferably overnight, to set.
- Cut and Store: Remove from refrigerator. Lift bars out of the pan using the parchment paper overhang. Cut into desired size and shape using a sharp knife (run under hot water and wipe dry between cuts for clean lines).
- Store: Store in an airtight container in the refrigerator for up to a week, or freeze for longer storage (wrap individually before freezing).
Notes
- Nut Butter Substitutions: Almond butter, cashew butter, or sunflower seed butter can be used instead of peanut butter.
- Sweetener Options: Maple syrup, agave nectar, or brown rice syrup can be used instead of honey.
- Dried Fruit Swaps: Cranberries, raisins, chopped apricots, dates, and figs can be used.
- Nutty Additions: Almonds, walnuts, pecans, cashews, or macadamia nuts can be used.
- Seed Sensations: Pumpkin seeds, flax seeds, or hemp seeds can be added.
- Spice It Up: Nutmeg, ginger, or cardamom can be added. A pinch of cayenne pepper can also add a subtle kick.
- Chocolate Lover’s Delight: Dark chocolate, milk chocolate, white chocolate, or even chopped chocolate bars all work well. You can also drizzle melted chocolate over the finished bars for an extra touch of indulgence.
- Texture Tweaks: For chewier bars, use more honey or maple syrup. For crunchier bars, add more nuts and seeds. You can also adjust the amount of oats to achieve your desired texture.
- Allergy Considerations: Adapt this recipe to be gluten-free, dairy-free, nut-free, or vegan by making appropriate substitutions.

Leave a Comment