
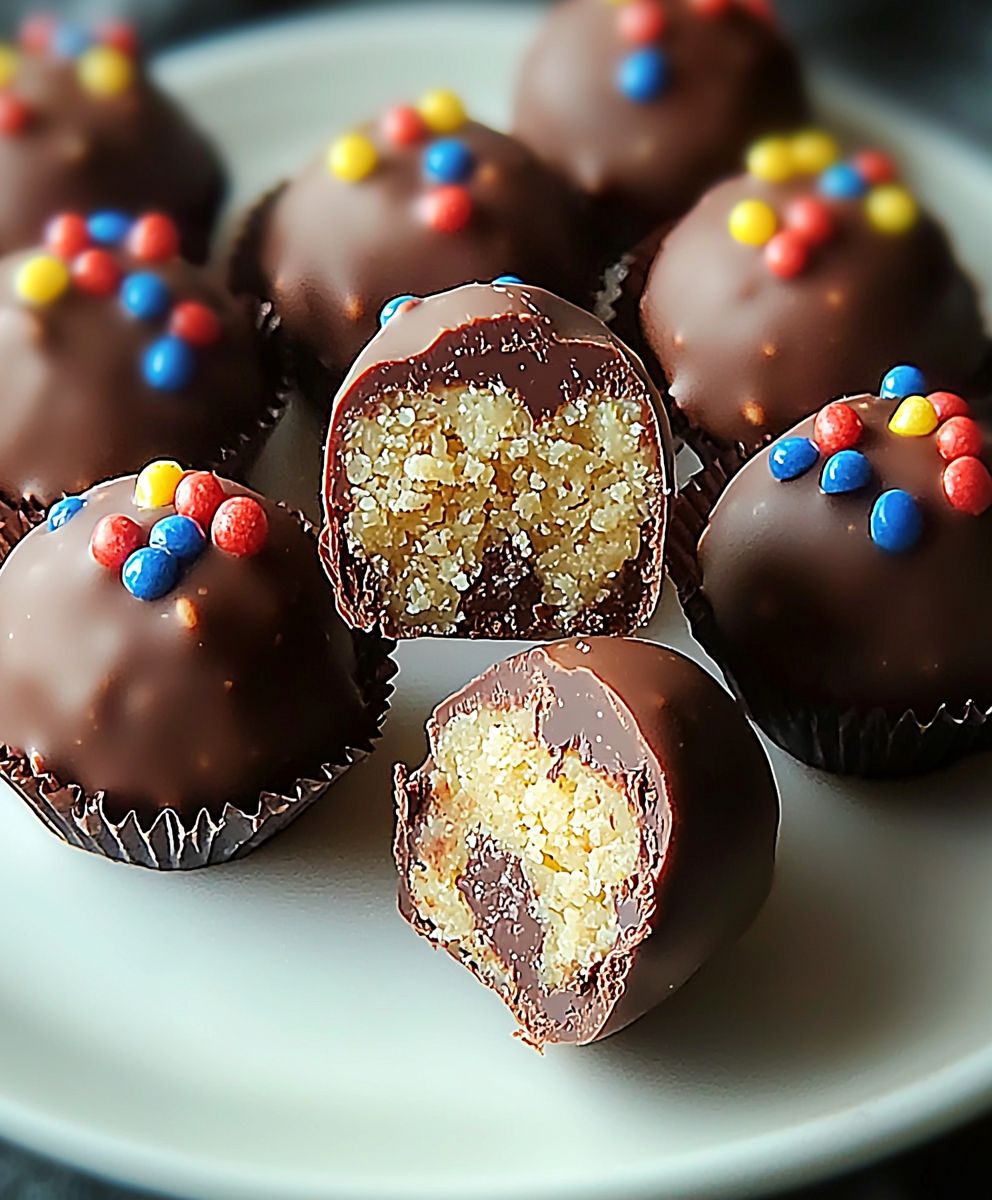
Chocolate Candy Truffles: Prepare to embark on a decadent journey into the heart of chocolate bliss! Imagine biting into a velvety smooth sphere, the rich, intense chocolate melting on your tongue, leaving you utterly captivated. That’s the magic of a truly exceptional truffle, and I’m thrilled to share my foolproof recipe with you.
These delightful confections have a history steeped in elegance and indulgence. Legend has it that the first chocolate truffle was accidentally created in France in the late 19th century, when a pastry chef, in a moment of inspiration (or perhaps a happy accident!), poured hot cream over chocolate. The result? A luscious ganache that, when rolled in cocoa powder, resembled the prized fungus, hence the name “truffle.”
But why are chocolate candy truffles so universally adored? It’s a symphony of textures and flavors. The initial firmness gives way to an unbelievably creamy center, delivering an intense chocolate experience that’s both comforting and sophisticated. Plus, they’re surprisingly easy to make at home! Forget complicated techniques and fancy equipment; with just a few simple ingredients and my easy-to-follow instructions, you can create these exquisite treats in your own kitchen. Whether you’re looking for a show-stopping dessert for a special occasion, a thoughtful homemade gift, or simply a little something to satisfy your chocolate cravings, these truffles are guaranteed to impress.

Ingredients:
- 16 ounces (450g) high-quality dark chocolate, finely chopped (at least 70% cacao)
- 1 cup (240ml) heavy cream
- 4 tablespoons (57g) unsalted butter, softened
- 2 tablespoons (30ml) liqueur (such as Grand Marnier, Frangelico, or rum – optional)
- 1 teaspoon vanilla extract
- Pinch of sea salt
- For Coating (choose one or a combination):
- Unsweetened cocoa powder
- Chopped nuts (almonds, pecans, hazelnuts)
- Sprinkles
- Melted chocolate (milk, dark, or white)
- Powdered sugar
Preparing the Ganache:
- Chop the Chocolate: The most crucial step for a smooth ganache is finely chopping your chocolate. Uniformly sized pieces will melt evenly. I like to use a serrated knife for this. Place the chopped chocolate in a heatproof bowl.
- Heat the Cream: In a saucepan, heat the heavy cream over medium heat. Watch it carefully! You want it to just come to a simmer small bubbles will form around the edges. Do not let it boil. Boiling the cream can change its texture and affect the final truffle.
- Pour Over Chocolate: Immediately pour the hot cream over the chopped chocolate in the bowl. Let it sit undisturbed for about a minute. This allows the heat from the cream to begin melting the chocolate.
- Whisk Until Smooth: After a minute, gently whisk the cream and chocolate together, starting from the center and working your way outwards. Continue whisking until the chocolate is completely melted and the mixture is smooth and glossy. Be patient; it might take a few minutes. If you have stubborn bits of chocolate that refuse to melt, you can gently warm the bowl over a double boiler (a saucepan with simmering water, making sure the bottom of the bowl doesn’t touch the water) or in the microwave in 10-second intervals, stirring in between, until melted. But be careful not to overheat the chocolate!
- Add Butter, Liqueur, Vanilla, and Salt: Add the softened butter, liqueur (if using), vanilla extract, and a pinch of sea salt to the ganache. Whisk until everything is fully incorporated and the ganache is silky smooth. The butter adds richness and shine, while the liqueur and vanilla enhance the flavor. The salt balances the sweetness.
- Chill the Ganache: Cover the bowl with plastic wrap, pressing it directly onto the surface of the ganache. This prevents a skin from forming. Refrigerate the ganache for at least 4 hours, or preferably overnight. This allows the ganache to firm up enough to be easily rolled into truffles. The longer it chills, the firmer it will become.
Forming the Truffles:
- Prepare Your Coating: While the ganache is chilling, prepare your chosen coatings. If using cocoa powder, place it in a shallow dish. If using chopped nuts, chop them finely and place them in a shallow dish. If using melted chocolate, melt it according to the package instructions and keep it warm. If using sprinkles or powdered sugar, have them ready in shallow dishes.
- Scoop the Ganache: Once the ganache is firm, use a small cookie scoop or a spoon to scoop out portions of the ganache. I find that a small cookie scoop (about 1 tablespoon) works best for creating uniform truffles.
- Roll into Balls: Gently roll each scoop of ganache between your palms to form a smooth ball. Don’t worry if they’re not perfectly round; they’ll still taste delicious! If the ganache is too soft and sticky to roll easily, return it to the refrigerator for another 30 minutes to firm up further. You can also lightly dust your hands with cocoa powder or powdered sugar to prevent sticking.
- Place on Baking Sheet: Place the rolled truffles on a baking sheet lined with parchment paper or a silicone mat. This prevents them from sticking to the sheet.
- Chill Again (Optional): For easier coating, you can chill the rolled truffles in the refrigerator for another 30 minutes before coating. This will help them hold their shape better.
Coating the Truffles:
- Roll in Coating: One at a time, roll each truffle in your chosen coating, ensuring it’s evenly coated. For cocoa powder, simply drop the truffle into the dish and roll it around until it’s completely covered. For chopped nuts, gently press the truffle into the nuts to help them adhere. For melted chocolate, use a fork or dipping tools to dip the truffle into the melted chocolate, then tap off any excess.
- Set on Baking Sheet: Place the coated truffles back on the prepared baking sheet.
- Decorate (Optional): If you’re using melted chocolate, you can drizzle a contrasting color of melted chocolate over the truffles for a decorative touch. You can also sprinkle them with extra nuts, sprinkles, or sea salt.
- Chill to Set: Refrigerate the coated truffles for at least 30 minutes, or until the coating is set. This will help them hold their shape and prevent them from melting at room temperature.
Storage:
Store your chocolate truffles in an airtight container in the refrigerator for up to 2 weeks. They can also be frozen for up to 2 months. To freeze, place the truffles in a single layer on a baking sheet and freeze until solid. Then, transfer them to an airtight container or freezer bag. Thaw in the refrigerator before serving.
Tips for Success:
- Use High-Quality Chocolate: The quality of your chocolate will directly impact the flavor of your truffles. Choose a high-quality dark chocolate with at least 70% cacao for the best results.
- Don’t Overheat the Cream: Overheating the cream can cause it to separate and affect the texture of the ganache. Heat it gently until it just comes to a simmer.
- Be Patient When Melting the Chocolate: Don’t rush the melting process. Gently whisk the cream and chocolate together until the chocolate is completely melted and the mixture is smooth.
- Chill the Ganache Properly: Chilling the ganache for at least 4 hours, or preferably overnight, is essential for it to firm up enough to be easily rolled into truffles.
- Keep Your Hands Cool: If the ganache starts to melt in your hands while rolling the truffles, wash your hands with cold water and dry them thoroughly before continuing.
- Experiment with Flavors: Don’t be afraid to experiment with different flavors! You can add different liqueurs, extracts, spices, or even citrus zest to the ganache to create your own unique truffle flavors.
- Get Creative with Coatings: The possibilities for coatings are endless! Try using different types of nuts, sprinkles, cocoa powders, or even edible glitter to create visually stunning truffles.
Troubleshooting:
- Ganache is too soft: If your ganache is too soft to roll, it hasn’t chilled long enough. Return it to the refrigerator for another hour or two.
- Ganache is too hard: If your ganache is too hard to scoop, let it sit at room temperature for a few minutes to soften slightly.
- Truffles are melting: If your truffles are melting, make sure they are properly chilled. You can also work in a cool environment and keep your hands cool.
- Coatings aren’t sticking: If your coatings aren’t sticking to the truffles, try chilling the truffles for a few minutes before coating them. You can also lightly dampen the truffles with a little bit of water or melted chocolate to help the coatings adhere.
Conclusion:
So there you have it! These Chocolate Candy Truffles are truly a must-try for any chocolate lover, and I’m confident they’ll become a new favorite in your household. The rich, decadent flavor combined with the surprisingly simple preparation makes them perfect for any occasion, from a cozy night in to an elegant dinner party. Forget store-bought chocolates; once you taste these homemade delights, you’ll never go back! But what makes these truffles so special? It’s the perfect balance of creamy texture and intense chocolate flavor. The high-quality chocolate we use really shines through, creating a melt-in-your-mouth experience that’s simply irresistible. Plus, the versatility of this recipe allows you to customize them to your own preferences. Looking for serving suggestions? These Chocolate Candy Truffles are fantastic on their own, served chilled straight from the refrigerator. They also make a stunning addition to a dessert platter, alongside fresh berries, whipped cream, or a scoop of vanilla ice cream. For a truly decadent experience, pair them with a glass of dessert wine or a rich coffee. And don’t be afraid to get creative with variations! Consider rolling your truffles in different toppings to add texture and flavor. Finely chopped nuts, shredded coconut, cocoa powder, or even crushed pretzels are all excellent choices. You could also experiment with different extracts, such as peppermint or orange, to create unique flavor combinations. For a spicy kick, try adding a pinch of cayenne pepper to the chocolate mixture. Another fun idea is to dip the finished truffles in melted white chocolate or milk chocolate for a beautiful and delicious contrast. If you’re feeling adventurous, you could even try making these truffles with different types of chocolate. Dark chocolate will give you a more intense and bitter flavor, while milk chocolate will result in a sweeter and creamier truffle. White chocolate, although not technically “chocolate” in the purest sense, can also be used to create a unique and delicate truffle. Just remember to adjust the amount of cream accordingly, as different types of chocolate have different fat contents. These Chocolate Candy Truffles also make a wonderful homemade gift. Package them in a pretty box or tin, and they’re sure to be appreciated by anyone who receives them. They’re perfect for birthdays, holidays, or just as a thoughtful gesture to show someone you care. I truly believe that anyone can make these truffles, regardless of their baking experience. The recipe is straightforward and easy to follow, and the results are always impressive. So, what are you waiting for? Gather your ingredients, put on your apron, and get ready to create some chocolate magic! I’m so excited for you to try this recipe and experience the joy of making your own Chocolate Candy Truffles. Once you’ve made them, please come back and share your experience in the comments below! I’d love to hear about your variations, your serving suggestions, and any tips or tricks you discovered along the way. Happy truffle-making! Let me know how yours turn out! I can’t wait to hear all about your delicious creations. Print
Chocolate Candy Truffles: Your Ultimate Guide to Delicious Homemade Treats
- Total Time: 265 minutes
- Yield: 30–40 truffles 1x
Description
Decadent dark chocolate truffles made with a rich ganache, perfect for gifting or indulging. Customize with your favorite coatings!
Ingredients
- 16 ounces (450g) high-quality dark chocolate, finely chopped (at least 70% cacao)
- 1 cup (240ml) heavy cream
- 4 tablespoons (57g) unsalted butter, softened
- 2 tablespoons (30ml) liqueur (such as Grand Marnier, Frangelico, or rum – optional)
- 1 teaspoon vanilla extract
- Pinch of sea salt
- Unsweetened cocoa powder
- Chopped nuts (almonds, pecans, hazelnuts)
- Sprinkles
- Melted chocolate (milk, dark, or white)
- Powdered sugar
Instructions
- Finely chop the chocolate and place it in a heatproof bowl.
- In a saucepan, heat the heavy cream over medium heat until it just comes to a simmer (small bubbles form around the edges). Do not boil.
- Immediately pour the hot cream over the chopped chocolate. Let it sit undisturbed for about a minute.
- Gently whisk the cream and chocolate together until the chocolate is completely melted and the mixture is smooth and glossy. If needed, gently warm the bowl over a double boiler or in the microwave in 10-second intervals, stirring in between, until melted. Be careful not to overheat the chocolate!
- Add the softened butter, liqueur (if using), vanilla extract, and a pinch of sea salt to the ganache. Whisk until everything is fully incorporated and the ganache is silky smooth.
- Cover the bowl with plastic wrap, pressing it directly onto the surface of the ganache. Refrigerate the ganache for at least 4 hours, or preferably overnight.
- Prepare your chosen coatings in shallow dishes.
- Once the ganache is firm, use a small cookie scoop or a spoon to scoop out portions of the ganache.
- Gently roll each scoop of ganache between your palms to form a smooth ball. If the ganache is too soft and sticky to roll easily, return it to the refrigerator for another 30 minutes to firm up further. You can also lightly dust your hands with cocoa powder or powdered sugar to prevent sticking.
- Place the rolled truffles on a baking sheet lined with parchment paper or a silicone mat.
- For easier coating, you can chill the rolled truffles in the refrigerator for another 30 minutes before coating.
- One at a time, roll each truffle in your chosen coating, ensuring it’s evenly coated.
- Place the coated truffles back on the prepared baking sheet.
- If you’re using melted chocolate, you can drizzle a contrasting color of melted chocolate over the truffles for a decorative touch. You can also sprinkle them with extra nuts, sprinkles, or sea salt.
- Refrigerate the coated truffles for at least 30 minutes, or until the coating is set.
Notes
- Storage: Store your chocolate truffles in an airtight container in the refrigerator for up to 2 weeks. They can also be frozen for up to 2 months. To freeze, place the truffles in a single layer on a baking sheet and freeze until solid. Then, transfer them to an airtight container or freezer bag. Thaw in the refrigerator before serving.
- Tips for Success:
Use High-Quality Chocolate: The quality of your chocolate will directly impact the flavor of your truffles. Choose a high-quality dark chocolate with at least 70% cacao for the best results.
Don’t Overheat the Cream: Overheating the cream can cause it to separate and affect the texture of the ganache. Heat it gently until it just comes to a simmer.
Be Patient When Melting the Chocolate: Don’t rush the melting process. Gently whisk the cream and chocolate together until the chocolate is completely melted and the mixture is smooth.
Chill the Ganache Properly: Chilling the ganache for at least 4 hours, or preferably overnight, is essential for it to firm up enough to be easily rolled into truffles.
Keep Your Hands Cool: If the ganache starts to melt in your hands while rolling the truffles, wash your hands with cold water and dry them thoroughly before continuing.
Experiment with Flavors: Don’t be afraid to experiment with different flavors! You can add different liqueurs, extracts, spices, or even citrus zest to the ganache to create your own unique truffle flavors.
Get Creative with Coatings: The possibilities for coatings are endless! Try using different types of nuts, sprinkles, cocoa powders, or even edible glitter to create visually stunning truffles. - Troubleshooting:
Ganache is too soft: If your ganache is too soft to roll, it hasn’t chilled long enough. Return it to the refrigerator for another hour or two.
Ganache is too hard: If your ganache is too hard to scoop, let it sit at room temperature for a few minutes to soften slightly.
Truffles are melting: If your truffles are melting, make sure they are properly chilled. You can also work in a cool environment and keep your hands cool.
Coatings aren’t sticking: If your coatings aren’t sticking to the truffles, try chilling the truffles for a few minutes before coating them. You can also lightly dampen the truffles with a little bit of water or melted chocolate to help the coatings adhere.
- Prep Time: 20 minutes
- Cook Time: 5 minutes

Leave a Comment