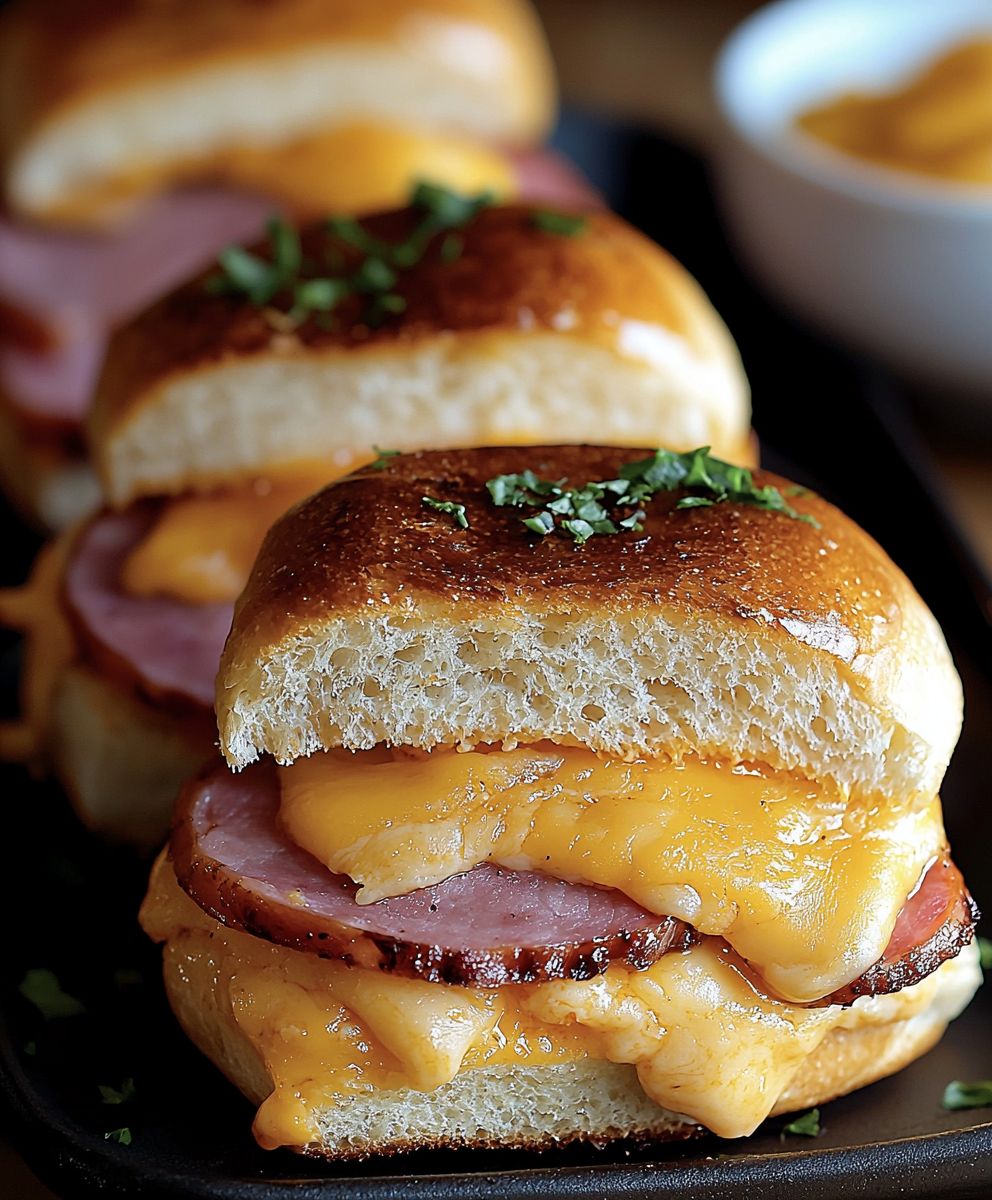
Ham and Cheese Sliders: Prepare to meet your new favorite party appetizer, quick lunch, or even a surprisingly satisfying weeknight dinner! These aren’t just any mini sandwiches; they’re a symphony of savory ham, melted cheese, and a hint of sweetness, all nestled in soft, buttery rolls. Trust me, once you try them, you’ll understand why they disappear in minutes.
While the exact origins of sliders are debated, their popularity exploded in the mid-20th century, becoming a staple at diners and family gatherings across America. Their bite-sized nature makes them perfect for sharing, and their customizable fillings mean there’s a version for everyone. The beauty of ham and cheese sliders lies in their simplicity. They require minimal ingredients and effort, yet deliver maximum flavor and satisfaction.
What’s not to love? The warm, gooey cheese perfectly complements the salty ham, while the soft, slightly sweet rolls provide the perfect textural contrast. They’re incredibly convenient to make ahead of time, making them ideal for potlucks or busy weeknights. Plus, they’re a guaranteed crowd-pleaser, appealing to both kids and adults alike. So, gather your ingredients, preheat your oven, and get ready to experience the magic of these irresistible little sandwiches!
Ingredients:
- 12 Hawaiian sweet rolls
- 1 pound sliced ham (I prefer Black Forest ham for its smoky flavor)
- 1 pound sliced Swiss cheese (or your favorite cheese, like cheddar or provolone)
- 1/2 cup (1 stick) unsalted butter, melted
- 2 tablespoons Dijon mustard
- 1 tablespoon Worcestershire sauce
- 1 tablespoon poppy seeds
- 1 tablespoon dried minced onion
- 1 teaspoon garlic powder
- 1/2 teaspoon onion powder
- Optional: Everything bagel seasoning for topping
Preparing the Glaze:
Before we even think about assembling the sliders, let’s get that delicious glaze ready. This glaze is what really elevates these ham and cheese sliders from simple sandwiches to something truly special. It’s sweet, savory, and adds a beautiful shine to the finished product.
- Melt the Butter: In a small bowl, melt the butter completely. You can do this in the microwave in 30-second intervals, stirring in between, or in a small saucepan over low heat. Just be careful not to burn it!
- Add the Dijon Mustard: To the melted butter, add the Dijon mustard. The Dijon adds a tangy kick that balances the sweetness of the rolls and the richness of the ham and cheese.
- Incorporate the Worcestershire Sauce: Next, stir in the Worcestershire sauce. This adds a depth of umami flavor that you won’t want to skip. It really ties all the flavors together.
- Add the Spices: Now for the good stuff! Add the poppy seeds, dried minced onion, garlic powder, and onion powder to the bowl. The poppy seeds add a nice visual appeal and a subtle nutty flavor, while the dried minced onion, garlic powder, and onion powder provide that classic savory flavor that we all love.
- Whisk it All Together: Whisk all of the ingredients together until they are well combined and the glaze is smooth. Make sure there are no clumps of dried onion or garlic powder.
- Taste and Adjust (Optional): Give the glaze a taste and adjust the seasonings to your liking. If you want it a little sweeter, you can add a touch of honey or maple syrup. If you want it a little spicier, you can add a pinch of red pepper flakes.
Assembling the Sliders:
Now that the glaze is ready, it’s time to assemble the sliders. This is the fun part! I like to think of it as a mini sandwich-making assembly line.
- Preheat the Oven: Preheat your oven to 350°F (175°C). This will ensure that the sliders are cooked evenly and the cheese is melted perfectly.
- Prepare the Rolls: Using a large serrated knife, carefully slice the entire slab of Hawaiian sweet rolls horizontally, keeping the top and bottom halves intact. You want to create one large top piece and one large bottom piece.
- Layer the Ham: Place the bottom half of the rolls on a baking sheet lined with parchment paper. This will make cleanup a breeze. Layer the sliced ham evenly over the bottom half of the rolls. Make sure to cover the entire surface so that every slider has a good amount of ham.
- Layer the Cheese: Next, layer the sliced Swiss cheese (or your cheese of choice) evenly over the ham. Again, make sure to cover the entire surface. I like to overlap the cheese slices slightly to ensure that they melt together nicely.
- Replace the Top Half of the Rolls: Carefully place the top half of the rolls back on top of the cheese.
Glazing and Baking:
This is where the magic happens! The glaze not only adds flavor but also helps to keep the rolls soft and prevents them from drying out in the oven.
- Brush with Glaze: Using a pastry brush, generously brush the prepared glaze evenly over the top of the rolls. Make sure to get into all the nooks and crannies. You may not use all of the glaze, but don’t be shy!
- Optional: Add Everything Bagel Seasoning: If you’re feeling fancy, sprinkle some everything bagel seasoning over the glazed rolls. This adds a nice textural element and even more flavor.
- Cover with Foil: Cover the baking sheet with aluminum foil. This will help to prevent the rolls from browning too quickly and ensure that the cheese melts completely.
- Bake: Bake in the preheated oven for 20 minutes.
- Remove Foil and Bake Longer: Remove the foil and bake for an additional 5-10 minutes, or until the rolls are golden brown and the cheese is melted and bubbly. Keep a close eye on them to prevent them from burning.
- Let Rest: Remove the sliders from the oven and let them rest for a few minutes before slicing. This will allow the cheese to set up slightly and make them easier to handle.
Serving:
Now for the best part serving and enjoying these delicious ham and cheese sliders! They’re perfect for parties, potlucks, game day, or just a quick and easy weeknight meal.
- Slice and Serve: Using a serrated knife, carefully slice the sliders along the pre-cut lines of the Hawaiian sweet rolls.
- Serve Warm: Serve the sliders warm. The cheese will be gooey and delicious, and the rolls will be soft and flavorful.
- Optional: Serve with Sides: Serve the sliders with your favorite sides, such as potato chips, coleslaw, or a simple salad.
Tips and Variations:
Cheese Variations:
While Swiss cheese is a classic choice for ham and cheese sliders, feel free to experiment with other cheeses. Cheddar, provolone, mozzarella, and Gruyere are all great options. You can even use a combination of cheeses for a more complex flavor.
Ham Variations:
Black Forest ham is my personal favorite, but you can use any type of ham that you like. Honey ham, smoked ham, and Virginia ham are all delicious choices.
Spice it Up:
If you like a little heat, add a pinch of red pepper flakes to the glaze or use a spicy mustard instead of Dijon.
Add Some Veggies:
For a little extra flavor and nutrition, add some thinly sliced onions or pickles to the sliders before baking.
Make it a Meal:
Serve the sliders with a side of soup or salad for a complete and satisfying meal.
Make-Ahead Instructions:
You can assemble the sliders ahead of time and store them in the refrigerator until you’re ready to bake them. Just be sure to cover them tightly with plastic wrap to prevent the rolls from drying out. Add the glaze just before baking.
Storage Instructions:
Leftover sliders can be stored in the refrigerator for up to 3 days. Reheat them in the oven or microwave before serving.
Why These Sliders Are the Best:
These aren’t just any ham and cheese sliders. The combination of the sweet Hawaiian rolls, savory ham and cheese, and that incredible glaze is what sets them apart. The glaze is the real secret weapon here. It adds so much flavor and moisture, and it really takes these sliders to the next level. Plus, they’re so easy to make, which is always a bonus!
Perfect for Any Occasion:
Whether you’re hosting a party, watching the game, or just need a quick and easy weeknight meal, these ham and cheese sliders are always a crowd-pleaser. They’re perfect for feeding a crowd, and they’re always a hit with kids and adults alike.
Enjoy!
I hope you enjoy these ham and cheese sliders as much as I do! They’re a family favorite in my house, and I’m sure they’ll become a favorite in yours too. Happy baking!
Conclusion:
So, there you have it! These Ham and Cheese Sliders are more than just a quick snack; they’re a guaranteed crowd-pleaser, a comforting weeknight dinner solution, and honestly, just plain delicious. I truly believe this recipe is a must-try for anyone looking for something easy, satisfying, and endlessly customizable. The combination of savory ham, melted cheese, and that slightly sweet, buttery glaze is simply irresistible. Why are these sliders a must-try? Well, beyond the incredible flavor, they’re incredibly versatile. Need a quick appetizer for a party? These sliders are perfect. Looking for a simple dinner that even the pickiest eaters will enjoy? Look no further. Want something you can easily pack for a picnic or road trip? These sliders travel like a dream. Plus, the recipe is so straightforward that even beginner cooks can master it with ease. You really can’t go wrong! But the best part? You can totally make these your own!Serving Suggestions and Variations:
Think of this recipe as a blank canvas for your culinary creativity. Here are a few ideas to get you started: * Cheese, Please! Experiment with different cheeses. Gruyere, Swiss, provolone, or even a sharp cheddar would all be fantastic alternatives to the classic cheddar. A blend of cheeses can also add a complex flavor profile. * Spice it Up: Add a pinch of red pepper flakes to the glaze for a little kick. Or, spread a thin layer of Dijon mustard on the slider buns before adding the ham and cheese. * Veggie Power: Sneak in some thinly sliced onions, bell peppers, or even spinach for added nutrients and flavor. Just be sure to sauté them lightly before adding them to the sliders. * Hawaiian Twist: Use Hawaiian rolls for an extra touch of sweetness. The pineapple juice in the glaze complements the sweetness of the rolls perfectly. * Deluxe Ham: Upgrade your ham! Use Black Forest ham, honey ham, or even prosciutto for a more sophisticated flavor. * Garlic Lovers: Add a clove or two of minced garlic to the melted butter for the glaze. The garlic will infuse the sliders with a delicious aroma and flavor. * Herby Goodness: Sprinkle some dried herbs, such as thyme, rosemary, or oregano, over the sliders before baking. This will add a touch of freshness and complexity. * Make it a Meal: Serve these sliders with a side of coleslaw, potato salad, or a simple green salad for a complete and satisfying meal. A bowl of tomato soup is also a great accompaniment, especially on a chilly day. I’m so excited for you to try this recipe and discover your own favorite variations. I know you’ll love how easy and delicious these Ham and Cheese Sliders are. Now, it’s your turn! Head to the kitchen, gather your ingredients, and get ready to bake up a batch of these irresistible sliders. I promise you won’t be disappointed. And most importantly, don’t forget to share your experience! I’d love to hear what you think of the recipe and what variations you tried. Leave a comment below, tag me on social media, or simply tell a friend. Sharing is caring, especially when it comes to delicious food! I can’t wait to see your creations and hear your feedback. Happy baking! Print
Ham and Cheese Sliders: The Ultimate Party Appetizer Recipe
- Total Time: 45 minutes
- Yield: 12 sliders 1x
Description
Sweet and savory ham and Swiss sliders baked to golden perfection with a buttery, flavorful glaze. Perfect for parties, game day, or a quick weeknight meal!
Ingredients
- 12 Hawaiian sweet rolls
- 1 pound sliced ham (Black Forest ham recommended)
- 1 pound sliced Swiss cheese
- 1/2 cup (1 stick) unsalted butter, melted
- 2 tablespoons Dijon mustard
- 1 tablespoon Worcestershire sauce
- 1 tablespoon poppy seeds
- 1 tablespoon dried minced onion
- 1 teaspoon garlic powder
- 1/2 teaspoon onion powder
- Optional: Everything bagel seasoning for topping
Instructions
- Prepare the Glaze: In a small bowl, melt the butter. Add the Dijon mustard and Worcestershire sauce. Stir in the poppy seeds, dried minced onion, garlic powder, and onion powder. Whisk until smooth. Taste and adjust seasonings as desired.
- Preheat Oven: Preheat oven to 350°F (175°C).
- Prepare Rolls: Slice the slab of Hawaiian sweet rolls horizontally, keeping the top and bottom halves intact.
- Layer Ham: Place the bottom half of the rolls on a parchment-lined baking sheet. Layer the sliced ham evenly over the bottom half.
- Layer Cheese: Layer the sliced Swiss cheese evenly over the ham.
- Replace Top: Carefully place the top half of the rolls back on top of the cheese.
- Brush with Glaze: Generously brush the prepared glaze evenly over the top of the rolls.
- Optional: Add Everything Bagel Seasoning: Sprinkle everything bagel seasoning over the glazed rolls.
- Cover and Bake: Cover the baking sheet with aluminum foil. Bake for 20 minutes.
- Remove Foil and Bake Longer: Remove the foil and bake for an additional 5-10 minutes, or until the rolls are golden brown and the cheese is melted and bubbly.
- Let Rest: Remove the sliders from the oven and let them rest for a few minutes before slicing.
- Slice and Serve: Using a serrated knife, carefully slice the sliders along the pre-cut lines of the Hawaiian sweet rolls. Serve warm.
Notes
- Cheese Variations: Cheddar, provolone, mozzarella, and Gruyere are great alternatives to Swiss.
- Ham Variations: Honey ham, smoked ham, and Virginia ham are all delicious choices.
- Spice it Up: Add a pinch of red pepper flakes to the glaze or use a spicy mustard instead of Dijon.
- Add Some Veggies: Add thinly sliced onions or pickles to the sliders before baking.
- Make it a Meal: Serve the sliders with a side of soup or salad for a complete and satisfying meal.
- Make-Ahead Instructions: Assemble the sliders ahead of time and store them in the refrigerator until you’re ready to bake them. Just be sure to cover them tightly with plastic wrap to prevent the rolls from drying out. Add the glaze just before baking.
- Storage Instructions: Leftover sliders can be stored in the refrigerator for up to 3 days. Reheat them in the oven or microwave before serving.
- Prep Time: 15 minutes
- Cook Time: 25 minutes


Leave a Comment